
Dimension Guide
Page 1
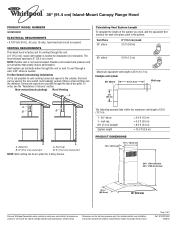
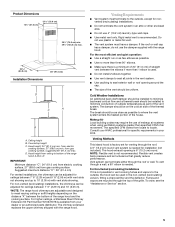
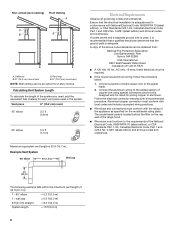
...vent length is 6" (15.2 cm) round. Specifications subject to change without notice. To order, see Installation products, we reserve the right to change materials and specifications without notice. For complete details, see the...section. ® 36" (91.4 cm) Island-Mount Canopy Range Hood PRODUCT MODEL NUMBERS GXI6536DX ELECTRICAL REQUIREMENTS • A 120 Volt, 60 Hz., AC only, 15-amp, fused electrical...(124.8 cm) max. 25 64.0 cm) 36" (91.4 cm) Because Whirlpool Corporation policy includes a continuous commitment to the outside, the hood can terminate either through...
...vent length is 6" (15.2 cm) round. Specifications subject to change without notice. To order, see Installation products, we reserve the right to change materials and specifications without notice. For complete details, see the...section. ® 36" (91.4 cm) Island-Mount Canopy Range Hood PRODUCT MODEL NUMBERS GXI6536DX ELECTRICAL REQUIREMENTS • A 120 Volt, 60 Hz., AC only, 15-amp, fused electrical...(124.8 cm) max. 25 64.0 cm) 36" (91.4 cm) Because Whirlpool Corporation policy includes a continuous commitment to the outside, the hood can terminate either through...
Dimension Guide
Page 2
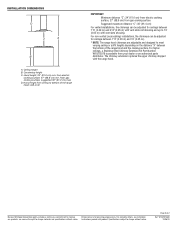
...C. D. The chimney extension replaces the upper chimney shipped with product. from ceiling to bottom of 2 Ref. Because Whirlpool Corporation policy includes a continuous commitment to improve Dimensions are adjustable and designed to change materials and specifications without notice. ..." (68.6 cm) from gas cooking surface Suggested maximum distance "C": 36" (91.4 cm) For vented installations, the chimneys can be adjusted for planning purposes only. Ceiling height B. INSTALLATION DIMENSIONS D C A B A. Hood height: 24" (61.0 cm) min. Hood height from gas cooking...
...C. D. The chimney extension replaces the upper chimney shipped with product. from ceiling to bottom of 2 Ref. Because Whirlpool Corporation policy includes a continuous commitment to improve Dimensions are adjustable and designed to change materials and specifications without notice. ..." (68.6 cm) from gas cooking surface Suggested maximum distance "C": 36" (91.4 cm) For vented installations, the chimneys can be adjusted for planning purposes only. Ceiling height B. INSTALLATION DIMENSIONS D C A B A. Hood height: 24" (61.0 cm) min. Hood height from gas cooking...
Warranty Information
Page 1
... instructions attached to or furnished with the product, Whirlpool Corporation or Whirlpool Canada LP (hereafter "Whirlpool") will need to know your authorized Whirlpool dealer to determine if another warranty applies. Service must provide proof of purchase or installation date for future reference. Service calls to correct the installation of purchase. 6. Service calls to the appliance. 9. Repairs...
... instructions attached to or furnished with the product, Whirlpool Corporation or Whirlpool Canada LP (hereafter "Whirlpool") will need to know your authorized Whirlpool dealer to determine if another warranty applies. Service must provide proof of purchase or installation date for future reference. Service calls to correct the installation of purchase. 6. Service calls to the appliance. 9. Repairs...
Use & Care Guide
Page 1
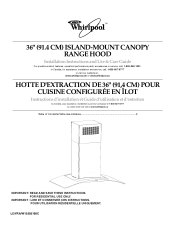
... : LIRE ET CONSERVER CES INSTRUCTIONS. www.whirlpool.com or www.whirlpool.ca HOTTE D'EXTRACTION DE 36" (91,4 CM) POUR CUISINE CONFIGURÉE EN ÎLOT Instructions d'installation et Guide d'utilisation et d'entretien Au Canada, pour assistance, installation ou service composez le 1-800-807-6777 ou... visitez notre site web à www.whirlpool.ca Table of Contents/Table des matières 2 IMPORTANT: ...
... : LIRE ET CONSERVER CES INSTRUCTIONS. www.whirlpool.com or www.whirlpool.ca HOTTE D'EXTRACTION DE 36" (91,4 CM) POUR CUISINE CONFIGURÉE EN ÎLOT Instructions d'installation et Guide d'utilisation et d'entretien Au Canada, pour assistance, installation ou service composez le 1-800-807-6777 ou... visitez notre site web à www.whirlpool.ca Table of Contents/Table des matières 2 IMPORTANT: ...
Use & Care Guide
Page 2
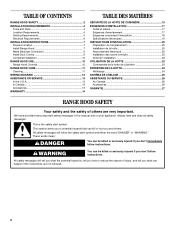
... instructions. TABLE OF CONTENTS RANGE HOOD SAFETY 2 INSTALLATION REQUIREMENTS 4 Tools and Parts 4 Location Requirements 4 Venting Requirements 5 Electrical Requirements 6 INSTALLATION INSTRUCTIONS 7 Prepare Location 7 Install Range Hood 7 Make Electrical Connection 9 Install Duct Covers 9 Complete Installation 10 RANGE HOOD USE 10 Range Hood Controls 10...DES MATIÈRES SÉCURITÉ DE LA HOTTE DE CUISINIÈRE 15 EXIGENCES D'INSTALLATION 17 Outils et pièces 17 Exigences d'emplacement 17 Exigences concernant l'évacuation 18 Spécifications &#...
... instructions. TABLE OF CONTENTS RANGE HOOD SAFETY 2 INSTALLATION REQUIREMENTS 4 Tools and Parts 4 Location Requirements 4 Venting Requirements 5 Electrical Requirements 6 INSTALLATION INSTRUCTIONS 7 Prepare Location 7 Install Range Hood 7 Make Electrical Connection 9 Install Duct Covers 9 Complete Installation 10 RANGE HOOD USE 10 Range Hood Controls 10...DES MATIÈRES SÉCURITÉ DE LA HOTTE DE CUISINIÈRE 15 EXIGENCES D'INSTALLATION 17 Outils et pièces 17 Exigences d'emplacement 17 Exigences concernant l'évacuation 18 Spécifications &#...
Use & Care Guide
Page 3
Follow the heating equipment manufacturer's guideline and safety standards such as a tag, to the service panel. ■ Installation work and electrical wiring must always be allowed to an exit. CAUTION: For general ventilating use cookware appropriate for the size of fuel burning equipment ...
Follow the heating equipment manufacturer's guideline and safety standards such as a tag, to the service panel. ■ Installation work and electrical wiring must always be allowed to an exit. CAUTION: For general ventilating use cookware appropriate for the size of fuel burning equipment ...
Use & Care Guide
Page 4
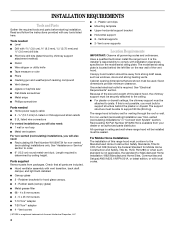
... supports ■ 2- Cabinet opening dimensions that all governing codes and ordinances. See "Electrical Requirements" section. For Mobile Home Installations The installation of the vent hood. See "Assistance or Service" section to the Manufactured Home Construction Safety Standards, Title 24 CFR, Part... dimensions provide minimum clearance. If this island hood, the chimney support must be used. For non-vented (recirculating) Installation see "Non-vented (recirculating) Installations" in ceiling and wall where range hood will also need : ■ 1 wall or roof cap ■ ...
... supports ■ 2- Cabinet opening dimensions that all governing codes and ordinances. See "Electrical Requirements" section. For Mobile Home Installations The installation of the vent hood. See "Assistance or Service" section to the Manufactured Home Construction Safety Standards, Title 24 CFR, Part... dimensions provide minimum clearance. If this island hood, the chimney support must be used. For non-vented (recirculating) Installation see "Non-vented (recirculating) Installations" in ceiling and wall where range hood will also need : ■ 1 wall or roof cap ■ ...
Use & Care Guide
Page 5
...and the deflector. Fumes and vapors are adjustable and designed to seal exterior wall or roof opening is needed for nonvented (recirculating) installations. ■ Do not terminate the vent system in the vent system. ■ Use caulking to meet varying ceiling or soffit ...Number W10272078 is factory set for ceilings between 7' 6" (2.29 m) and 9' 8" (2.95 m) with vent slots showing. For Non-Vented (recirculating) Installations If it is not recommended. Ceiling height B. The damper should be on the distance "X" between the bottom of air movement. To vent through the...
...and the deflector. Fumes and vapors are adjustable and designed to seal exterior wall or roof opening is needed for nonvented (recirculating) installations. ■ Do not terminate the vent system in the vent system. ■ Use caulking to meet varying ceiling or soffit ...Number W10272078 is factory set for ceilings between 7' 6" (2.29 m) and 9' 8" (2.95 m) with vent slots showing. For Non-Vented (recirculating) Installations If it is not recommended. Ceiling height B. The damper should be on the distance "X" between the bottom of air movement. To vent through the...
Use & Care Guide
Page 6
... of the system you need, add the equivalent feet (meters) for each vent piece used , it is recommended that a qualified electrician determine that the electrical installation is adequate and in the system. Non-vented (recirculating) Roof Venting A A B B A. Vent piece 6" (15.2 cm) round 45° elbow 2.5 ft (0.8 m) 90° elbow 5.0 ft (1.5 m) Electrical...
... of the system you need, add the equivalent feet (meters) for each vent piece used , it is recommended that a qualified electrician determine that the electrical installation is adequate and in the system. Non-vented (recirculating) Roof Venting A A B B A. Vent piece 6" (15.2 cm) round 45° elbow 2.5 ft (0.8 m) 90° elbow 5.0 ft (1.5 m) Electrical...
Use & Care Guide
Page 7
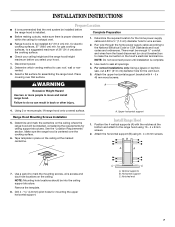
...people, lift range hood onto covered surface. Failure to seal all openings. 4. Make sure the range hood is centered over that the vent system be installed 24" (61.0 cm) min. Attach the horizontal support (B) using 16 - 4 x 8 mm screws. 2. Remove the template. 8. Horizontal support ...in the hood's electrical terminal box. Attach the upper horizontal support bracket with the notches at the marked centerline. Range Hood Mounting Screws Installation 5. Drill 4 4.8 mm) pilot holes for wire access. 2. Complete Preparation ■ Before making cutouts, make the connection in place...
...people, lift range hood onto covered surface. Failure to seal all openings. 4. Make sure the range hood is centered over that the vent system be installed 24" (61.0 cm) min. Attach the horizontal support (B) using 16 - 4 x 8 mm screws. 2. Remove the template. 8. Horizontal support ...in the hood's electrical terminal box. Attach the upper horizontal support bracket with the notches at the marked centerline. Range Hood Mounting Screws Installation 5. Drill 4 4.8 mm) pilot holes for wire access. 2. Complete Preparation ■ Before making cutouts, make the connection in place...

Use & Care Guide
Page 8
...minimum. 3. Seal all connections with vent clamps. 8 Assemble rubber seals to ventilator assembly. B A A. Non-Vented (recirculating) Installation 1. Install vent between the transition and the deflector. Ventilator assembly 7. Push duct over the exhaust outlet. Attach the air deflector to the deflector..." section to ventilator assembly. Measure the length of vertical supports (A) and set the vertical height (B). See "Installation Clearances" in place. 4. Mounting screws Connect Vent System 1. Assemble and center glass canopy to help determine the...
...minimum. 3. Seal all connections with vent clamps. 8 Assemble rubber seals to ventilator assembly. B A A. Non-Vented (recirculating) Installation 1. Install vent between the transition and the deflector. Ventilator assembly 7. Push duct over the exhaust outlet. Attach the air deflector to the deflector..." section to ventilator assembly. Measure the length of vertical supports (A) and set the vertical height (B). See "Installation Clearances" in place. 4. Mounting screws Connect Vent System 1. Assemble and center glass canopy to help determine the...

Use & Care Guide
Page 9
... WARNING 5. Remove the knockout in their sockets. 11. E F A. Replace all light bulbs are secure in the terminal box cover and install a UL listed or CSA approved ¹⁄₂" strain relief. Failure to yellow-green ground wire (E) in death or electrical shock. 1. Reconnect ... into place until springs "click." Connect ground wire to do so can result in terminal box using 4 - 4 x 8 mm screws. Install terminal box cover. 10. Failure to green and yellow ground wire in death or electrical shock. 7. Knockout B. Use UL listed wire connectors ...
... WARNING 5. Remove the knockout in their sockets. 11. E F A. Replace all light bulbs are secure in the terminal box cover and install a UL listed or CSA approved ¹⁄₂" strain relief. Failure to yellow-green ground wire (E) in death or electrical shock. 1. Reconnect ... into place until springs "click." Connect ground wire to do so can result in terminal box using 4 - 4 x 8 mm screws. Install terminal box cover. 10. Failure to green and yellow ground wire in death or electrical shock. 7. Knockout B. Use UL listed wire connectors ...

Use & Care Guide
Page 10
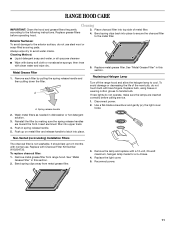
...B B. Blower Off button C. Blower speed medium button E. Press once for On D and again for quiet operation. Halogen lamps F. Install metal filters. For best results, start the hood before cooking and allow it to operate several minutes after the cooking is designed to ...located on blower housing. Blower speed minimum button D. Grease filter G. A B C A. Upper duct cover B. For non-vented (recirculating) installations only, install charcoal filters over grille on the front side of the range hood blower and light. The BLOWER OFF button turns the blower Off. 10 ...
...B B. Blower Off button C. Blower speed medium button E. Press once for On D and again for quiet operation. Halogen lamps F. Install metal filters. For best results, start the hood before cooking and allow it to operate several minutes after the cooking is designed to ...located on blower housing. Blower speed minimum button D. Grease filter G. A B C A. Upper duct cover B. For non-vented (recirculating) installations only, install charcoal filters over grille on the front side of the range hood blower and light. The BLOWER OFF button turns the blower Off. 10 ...
Use & Care Guide
Page 11
... wool or soap-filled scouring pads. Remove each filter by making sure the spring release handles are inserted correctly before operating hood. 3. A A. Non-Vented (recirculating) Installation Filters The charcoal filter is not washable. Remove the lamp and replace with Charcoal Filter Kit Number W10294730. Replace grease filters before calling service. 1. Always...
... wool or soap-filled scouring pads. Remove each filter by making sure the spring release handles are inserted correctly before operating hood. 3. A A. Non-Vented (recirculating) Installation Filters The charcoal filter is not washable. Remove the lamp and replace with Charcoal Filter Kit Number W10294730. Replace grease filters before calling service. 1. Always...
Use & Care Guide
Page 13
... or visit our website at www.whirlpool.ca. Our consultants provide assistance with the same precision used to local dealers, repair parts distributors, and service companies. Accessories Charcoal Filter Kit (for non-vented installations only) Order Part Number W10294730 Recirculation... Kit (for assistance or service, please know the purchase date and the complete model and serial number of appliances. ■ Installation information. ■ Use and maintenance procedures. ■ Accessory and repair parts sales. ■ Specialized customer assistance (Spanish speaking,...
... or visit our website at www.whirlpool.ca. Our consultants provide assistance with the same precision used to local dealers, repair parts distributors, and service companies. Accessories Charcoal Filter Kit (for non-vented installations only) Order Part Number W10294730 Recirculation... Kit (for assistance or service, please know the purchase date and the complete model and serial number of appliances. ■ Installation information. ■ Use and maintenance procedures. ■ Accessory and repair parts sales. ■ Specialized customer assistance (Spanish speaking,...
Use & Care Guide
Page 14
...Proof of original purchase date is required to obtain service under these excluded circumstances shall be provided by calling Whirlpool. Service calls to correct the installation of your major appliance, to instruct you may find this information on the model and serial number label ... need to know your complete model number and serial number. The removal and reinstallation of God, improper installation, installation not in a remote area where service by Whirlpool. 5. DISCLAIMER OF IMPLIED WARRANTIES; THIS WARRANTY GIVES YOU SPECIFIC LEGAL RIGHTS, AND YOU MAY ALSO HAVE OTHER...
...Proof of original purchase date is required to obtain service under these excluded circumstances shall be provided by calling Whirlpool. Service calls to correct the installation of your major appliance, to instruct you may find this information on the model and serial number label ... need to know your complete model number and serial number. The removal and reinstallation of God, improper installation, installation not in a remote area where service by Whirlpool. 5. DISCLAIMER OF IMPLIED WARRANTIES; THIS WARRANTY GIVES YOU SPECIFIC LEGAL RIGHTS, AND YOU MAY ALSO HAVE OTHER...
