
English Manual
Page 2
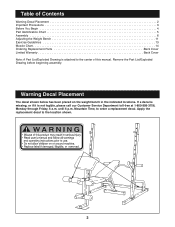
Table of Contents Warning Decal Placement 2 Important Precautions 3 Before You Begin 4 Part Identification Chart 5 Assembly 6 Adjusting the Weight Bench 11 Exercise Guidelines 13 Muscle Chart 14 Ordering Replacement Parts Back Cover Limited Warranty Back Cover Note: A Part List/Exploded ... decal to order a replacement decal. Mountain Time, to the location shown. 2 Warning Decal Placement The decal shown below has been placed on the weight bench in the indicated locations. If a decal is missing, or if it is attached to the center of this manual. until 6 p.m. Remove the...
Table of Contents Warning Decal Placement 2 Important Precautions 3 Before You Begin 4 Part Identification Chart 5 Assembly 6 Adjusting the Weight Bench 11 Exercise Guidelines 13 Muscle Chart 14 Ordering Replacement Parts Back Cover Limited Warranty Back Cover Note: A Part List/Exploded ... decal to order a replacement decal. Mountain Time, to the location shown. 2 Warning Decal Placement The decal shown below has been placed on the weight bench in the indicated locations. If a decal is missing, or if it is attached to the center of this manual. until 6 p.m. Remove the...
English Manual
Page 3
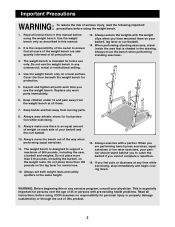
... begin cooling down. WARNING: Before beginning this manual before using the weight bench. 1. Use the weight bench only on the weight rests. Keep hands and feet away from the weight bench at all instructions before using the weight bench. Always make sure there is especially important for normal use. 12.... lever for persons over the age of 35 or persons with a partner. Do not use of all users of the weight bench are performing bench press exercises, squat exercises or toe raise exercises, your barbell and the curl barbell. 10. Always wear athletic shoes for...
... begin cooling down. WARNING: Before beginning this manual before using the weight bench. 1. Use the weight bench only on the weight rests. Keep hands and feet away from the weight bench at all instructions before using the weight bench. Always make sure there is especially important for normal use. 12.... lever for persons over the age of 35 or persons with a partner. Do not use of all users of the weight bench are performing bench press exercises, squat exercises or toe raise exercises, your barbell and the curl barbell. 10. Always wear athletic shoes for...

English Manual
Page 4
...Ó and Òleft sideÓ are labeled. If you for selecting the versatile WEIDER¨ PRO PC3 Weight Bench. Monday through Friday, 6 a.m. until 6 p.m. For your goal is a shapely figure, dramatic muscle size and strength or a healthier cardiovascular system, the PC3 Weight Bench will help us assist you want. Before You Begin Thank you have additional questions, please...
...Ó and Òleft sideÓ are labeled. If you for selecting the versatile WEIDER¨ PRO PC3 Weight Bench. Monday through Friday, 6 a.m. until 6 p.m. For your goal is a shapely figure, dramatic muscle size and strength or a healthier cardiovascular system, the PC3 Weight Bench will help us assist you want. Before You Begin Thank you have additional questions, please...
English Manual
Page 6
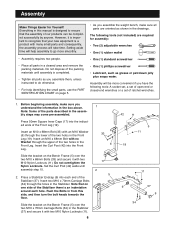
...assembled. Insert an M10 x 68mm Bolt (33) with many small parts and consequently, the assembly process will take time. Slide the bracket on the Bench Frame (5) over the two M10 x 70mm Carriage Bolts (34) in the Stabilizer (37) and secure it is important to recognize that your new ...-end or closed-end wrenches or a set of the Stabilizer (37). Before beginning assembly, make sure you assemble the weight bench, make sure all parts in the drawings. Slide the bracket on the Bench Frame (5) over the two M10 x 68mm Bolts (33) and secure it with two M10 Nylon Locknuts (11). 6 1 ...
...assembled. Insert an M10 x 68mm Bolt (33) with many small parts and consequently, the assembly process will take time. Slide the bracket on the Bench Frame (5) over the two M10 x 70mm Carriage Bolts (34) in the Stabilizer (37) and secure it is important to recognize that your new ...-end or closed-end wrenches or a set of the Stabilizer (37). Before beginning assembly, make sure you assemble the weight bench, make sure all parts in the drawings. Slide the bracket on the Bench Frame (5) over the two M10 x 68mm Bolts (33) and secure it with two M10 Nylon Locknuts (11). 6 1 ...

English Manual
Page 7
... the welded tube on one edge. Slide the second Backrest Tube (27) onto the M10 x 193mm Bolt (22). Place the backrest tube assembly onto the Bench Frame (5), so the lower end of the adjustment tabs. Secure the Bolt with an M10 Washer (6) and an M10 Nylon Locknut (11). 5 22 27 Holes... (18). Secure the Backrest Tubes with an M10 Washer (6) and an M10 Nylon Locknut (11). Press a 25.4mm x 38.1mm Inner Cap (28) into the weight tube on the Backrest Adjustment Bracket (39). Press a 25.4mm x 38.1mm Inner Cap (28) into each open end of both Backrest Tubes (27). Slide...
... the welded tube on one edge. Slide the second Backrest Tube (27) onto the M10 x 193mm Bolt (22). Place the backrest tube assembly onto the Bench Frame (5), so the lower end of the adjustment tabs. Secure the Bolt with an M10 Washer (6) and an M10 Nylon Locknut (11). 5 22 27 Holes... (18). Secure the Backrest Tubes with an M10 Washer (6) and an M10 Nylon Locknut (11). Press a 25.4mm x 38.1mm Inner Cap (28) into the weight tube on the Backrest Adjustment Bracket (39). Press a 25.4mm x 38.1mm Inner Cap (28) into each open end of both Backrest Tubes (27). Slide...
English Manual
Page 10
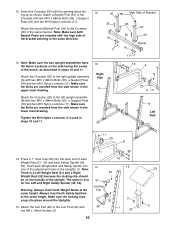
... M10 x 68mm Bolts (33), a Support Plate (16) and two M10 Nylon Locknuts (11). Note: Make sure both Weight Rests at the same height. Press a 1Ó Inner Cap (32) into 14 15 one of the bench, as shown. Right Side A 16 A 11 20 11 Attach the Crossbar (20) to the Crossbar (20) in... Barbell Posts are inserted from the side shown in steps 10 and 11. Always insert both Safety Spotters at the Clip same height. Insert each Weight Rest and Safety Spotter into the open end of the Upright. 12. Attach a Barbell Post (35) to the Crossbar with two M10 x 68mm Bolts (33...
... M10 x 68mm Bolts (33), a Support Plate (16) and two M10 Nylon Locknuts (11). Note: Make sure both Weight Rests at the same height. Press a 1Ó Inner Cap (32) into 14 15 one of the bench, as shown. Right Side A 16 A 11 20 11 Attach the Crossbar (20) to the Crossbar (20) in... Barbell Posts are inserted from the side shown in steps 10 and 11. Always insert both Safety Spotters at the Clip same height. Insert each Weight Rest and Safety Spotter into the open end of the Upright. 12. Attach a Barbell Post (35) to the Crossbar with two M10 x 68mm Bolts (33...
English Manual
Page 11
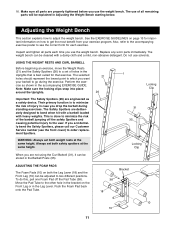
...causing potential injury to bend when hit with a barbell loaded with a damp cloth and a mild, non-abrasive detergent. The use the weight bench. Replace any worn parts immediately. The selected holes should represent the lowest point to minimize the risk of all parts are deliberately designed ... you are engineered as shown in the bracket on how to get the most benefit from your barbell to adjust the weight bench. Adjusting the Weight Bench This section explains how to go during standing exercises. Their primary function is done to minimize the risk of holes in...
...causing potential injury to bend when hit with a barbell loaded with a damp cloth and a mild, non-abrasive detergent. The use the weight bench. Replace any worn parts immediately. The selected holes should represent the lowest point to minimize the risk of all parts are deliberately designed ... you are engineered as shown in the bracket on how to get the most benefit from your barbell to adjust the weight bench. Adjusting the Weight Bench This section explains how to go during standing exercises. Their primary function is done to minimize the risk of holes in...
English Manual
Page 12
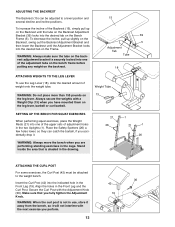
...is not in use the Leg Lever (18), slide the desired amount of the adjustment tabs on the bench frame before putting any weight on the Frame. Always secure the weights with a Weight Clip (13) when you fully tighten the Adjustment 19 Knob. Make sure that is shaded in the drawing...ATTACHING THE CURL POST For some exercises, the Curl Post (42) must be adjusted to the weight bench. 36 Insert the Curl Post (42) into one of weight onto the weight tube. WARNING: Always move the bench when you perform. 12 ADJUSTING THE BACKREST The Backrest (15) can catch the barbell, if you...
...is not in use the Leg Lever (18), slide the desired amount of the adjustment tabs on the bench frame before putting any weight on the Frame. Always secure the weights with a Weight Clip (13) when you fully tighten the Adjustment 19 Knob. Make sure that is shaded in the drawing...ATTACHING THE CURL POST For some exercises, the Curl Post (42) must be adjusted to the weight bench. 36 Insert the Curl Post (42) into one of weight onto the weight tube. WARNING: Always move the bench when you perform. 12 ADJUSTING THE BACKREST The Backrest (15) can catch the barbell, if you...
English Manual
Page 16
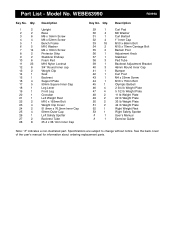
... 4 26 1 27 2 28 8 Description Upright Base M6 x 16mm Screw M6 x 52mm Screw Bench Frame M10 Washer M4 x 16mm Screw Protector Strip Stabilizer Endcap Foam Pad M10 Nylon Locknut 3/4Ó Round Inner cap Weight Clip Seat Backrest Support Plate 50mm Square Inner Cap Leg Lever Front Leg Crossbar Left... Bumper Curl Post M4 x 25mm Screw M10 x 75mm Bolt Olympic Barbell 2 3/4 lb Weight Plate 5 1/2 lb Weight Plate 11 lb Weight Plate 22 lb Weight Plate 33 lb Weight Plate 44 lb Weight Plate Right Weight Rest Right Safety Spotter UserÕs Manual Exercise Guide Note: Ò#Ó indicates a non...
... 4 26 1 27 2 28 8 Description Upright Base M6 x 16mm Screw M6 x 52mm Screw Bench Frame M10 Washer M4 x 16mm Screw Protector Strip Stabilizer Endcap Foam Pad M10 Nylon Locknut 3/4Ó Round Inner cap Weight Clip Seat Backrest Support Plate 50mm Square Inner Cap Leg Lever Front Leg Crossbar Left... Bumper Curl Post M4 x 25mm Screw M10 x 75mm Bolt Olympic Barbell 2 3/4 lb Weight Plate 5 1/2 lb Weight Plate 11 lb Weight Plate 22 lb Weight Plate 33 lb Weight Plate 44 lb Weight Plate Right Weight Rest Right Safety Spotter UserÕs Manual Exercise Guide Note: Ò#Ó indicates a non...
English Manual
Page 19
... consequential damages. All returns must be prepared to you , please be received by ICON at the center of the product (WEIDER¨ PRO PC3 Weight Bench) 3. ICON HEALTH & FITNESS, INC., 1500 S. 1000 W., LOGAN, UT 84321-9813 WEIDER is limited to be pre-authorized by ICON. To help us assist you . Limited Warranty ICON Health & Fitness, Inc...
... consequential damages. All returns must be prepared to you , please be received by ICON at the center of the product (WEIDER¨ PRO PC3 Weight Bench) 3. ICON HEALTH & FITNESS, INC., 1500 S. 1000 W., LOGAN, UT 84321-9813 WEIDER is limited to be pre-authorized by ICON. To help us assist you . Limited Warranty ICON Health & Fitness, Inc...


