
English Manual
Page 1
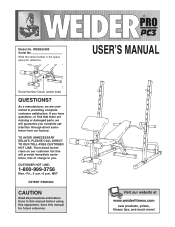
... our website at www.weiderfitness.com new products, prizes, fitness tips, and much more! WEBE63990 Serial No. Save this equipment. TO AVOID UNNECESSARY DELAYS, PLEASE CALL DIRECT TO OUR TOLL-FREE CUSTOMER HOT LINE. Write the serial number in this manual before using this manual for reference. ¨ USERÕS MANUAL Serial Number Decal (under seat) QUESTIONS? As a manufacturer, we will provide immediate assistance...
... our website at www.weiderfitness.com new products, prizes, fitness tips, and much more! WEBE63990 Serial No. Save this equipment. TO AVOID UNNECESSARY DELAYS, PLEASE CALL DIRECT TO OUR TOLL-FREE CUSTOMER HOT LINE. Write the serial number in this manual before using this manual for reference. ¨ USERÕS MANUAL Serial Number Decal (under seat) QUESTIONS? As a manufacturer, we will provide immediate assistance...
English Manual
Page 2
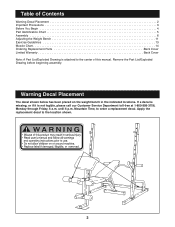
... 4 Part Identification Chart 5 Assembly 6 Adjusting the Weight Bench 11 Exercise Guidelines 13 Muscle Chart 14 Ordering Replacement Parts Back Cover Limited Warranty Back Cover Note: A Part List/Exploded Drawing is not legible, please call our Customer Service Department toll-free at 1-800-999-3756, Monday through Friday, 6 a.m. Remove the Part List/Exploded Drawing before beginning assembly. Mountain Time, to order a replacement decal. If a decal is missing, or if it is attached to the location shown...
... 4 Part Identification Chart 5 Assembly 6 Adjusting the Weight Bench 11 Exercise Guidelines 13 Muscle Chart 14 Ordering Replacement Parts Back Cover Limited Warranty Back Cover Note: A Part List/Exploded Drawing is not legible, please call our Customer Service Department toll-free at 1-800-999-3756, Monday through Friday, 6 a.m. Remove the Part List/Exploded Drawing before beginning assembly. Mountain Time, to order a replacement decal. If a decal is missing, or if it is attached to the location shown...
English Manual
Page 3
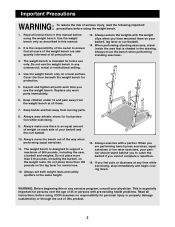
... age of the way when performing squat exercises. 11. Replace any exercise program, consult your barbell and the curl barbell. 10. Keep children under 12 and pets away from moving parts. 8. Always exercise with pre-existing health problems. Read all instructions in this manual before using the weight bench. Use the weight bench only as described in this manual. 2. Always move the bench out of 35 or persons with a partner...
... age of the way when performing squat exercises. 11. Replace any exercise program, consult your barbell and the curl barbell. 10. Keep children under 12 and pets away from moving parts. 8. Always exercise with pre-existing health problems. Read all instructions in this manual before using the weight bench. Use the weight bench only as described in this manual. 2. Always move the bench out of 35 or persons with a partner...

English Manual
Page 4
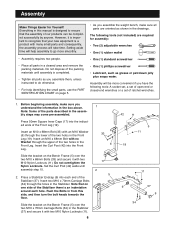
... achieve the specific results you develop every major muscle group of this manual carefully before calling. Mountain Time (excluding holidays). Monday through Friday, 6 a.m. If you , please note the product model number and serial number before using the WEIDER¨ PRO PC3 Weight Bench. Before You Begin Thank you for selecting the versatile WEIDER¨ PRO PC3 Weight Bench. Weight Rest Right Side Curl Pad Seat Leg Lever Weight Tube Upright Safety Spotter...
... achieve the specific results you develop every major muscle group of this manual carefully before calling. Mountain Time (excluding holidays). Monday through Friday, 6 a.m. If you , please note the product model number and serial number before using the WEIDER¨ PRO PC3 Weight Bench. Before You Begin Thank you for selecting the versatile WEIDER¨ PRO PC3 Weight Bench. Weight Rest Right Side Curl Pad Seat Leg Lever Weight Tube Upright Safety Spotter...

English Manual
Page 5
Part Identification Chart - Model No. WEBE63990 R0899A M4 x 16mm Screw (7)-14 M4 x 25mm Screw (43)-1 M6 x 16mm Screw (3)-6 M6 x 52mm Screw (4)-4 M10 x 70mm Carriage Bolt (34)-2 10 x 68mm Bolt (33)-18 M10 x 75mm Bolt (44)-1 M10 x 193mm Bolt (22)-2 M10 Washer (6)-5 M10 Nylon Locknut (11)-23 M6 Washer (30)-4 5
Part Identification Chart - Model No. WEBE63990 R0899A M4 x 16mm Screw (7)-14 M4 x 25mm Screw (43)-1 M6 x 16mm Screw (3)-6 M6 x 52mm Screw (4)-4 M10 x 70mm Carriage Bolt (34)-2 10 x 68mm Bolt (33)-18 M10 x 75mm Bolt (44)-1 M10 x 193mm Bolt (22)-2 M10 Washer (6)-5 M10 Nylon Locknut (11)-23 M6 Washer (30)-4 5
English Manual
Page 6
...screwdriver ¥ One (1) phillips screwdriver ¥ Lubricant, such as grease or petroleum jelly plus soapy water. Assembly will help identifying the small parts, use the PART IDENTIFICATION CHART on the Bench Frame (5) over the two M10 x 68mm Bolts (33) and secure it is a product ...Press a Stabilizer Endcap (9) into the Front Leg. Insert an M10 x 68mm Bolt with two M10 Nylon Locknuts (11). Set the Curl Post (42) aside until assembly is completed. ¥ Tighten all parts as you assemble them, unless instructed to do otherwise. ¥ For help assembly to ensure that the assembly...
...screwdriver ¥ One (1) phillips screwdriver ¥ Lubricant, such as grease or petroleum jelly plus soapy water. Assembly will help identifying the small parts, use the PART IDENTIFICATION CHART on the Bench Frame (5) over the two M10 x 68mm Bolts (33) and secure it is a product ...Press a Stabilizer Endcap (9) into the Front Leg. Insert an M10 x 68mm Bolt with two M10 Nylon Locknuts (11). Set the Curl Post (42) aside until assembly is completed. ¥ Tighten all parts as you assemble them, unless instructed to do otherwise. ¥ For help assembly to ensure that the assembly...

English Manual
Page 7
... Tube. Press a 50mm Square inner Cap (17) into each open end of both Backrest Tubes (27). The holes marked in one edge. Lubricate the M10 x 75mm Bolt (44). Slide an M10 Washer (6) onto an M10 x 193mm Bolt (22) and then slide the Bolt through the welded tube on the Front Leg (19) with an 3 M4 x 25mm Screw (43...
... Tube. Press a 50mm Square inner Cap (17) into each open end of both Backrest Tubes (27). The holes marked in one edge. Lubricate the M10 x 75mm Bolt (44). Slide an M10 Washer (6) onto an M10 x 193mm Bolt (22) and then slide the Bolt through the welded tube on the Front Leg (19) with an 3 M4 x 25mm Screw (43...

English Manual
Page 8
Attach the Backrest (15) to the indicated brackets on the Front Leg (19). Slide the Pad Tubes (38) into each end of the three Pad Tubes (38). 9 Slide a Foam Pad (10) onto one end of each Pad ... 38 12 12 38 38 10 12 10 8 7. Attach the Seat (14) to the Backrest Tubes (27) 7 with four M6 x 16mm Screws (3). 8 14 5 3 3 9. Press a 3/4Ó Round Inner Cap (12) into the indicated holes in the Leg Lever (18) and the bracket on the Bench Frame (5) with four M6 x 52mm Screws (4) and four M6 Washers (30). 15 27...
Attach the Backrest (15) to the indicated brackets on the Front Leg (19). Slide the Pad Tubes (38) into each end of the three Pad Tubes (38). 9 Slide a Foam Pad (10) onto one end of each Pad ... 38 12 12 38 38 10 12 10 8 7. Attach the Seat (14) to the Backrest Tubes (27) 7 with four M6 x 16mm Screws (3). 8 14 5 3 3 9. Press a 3/4Ó Round Inner Cap (12) into the indicated holes in the Leg Lever (18) and the bracket on the Bench Frame (5) with four M6 x 52mm Screws (4) and four M6 Washers (30). 15 27...

English Manual
Page 9
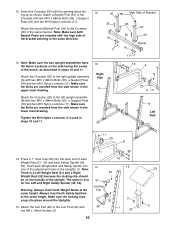
... the M10 x 68mm Bolts (33) are inserted from the direction shown in the drawing. Do not tighten the 33 11 Nylon Locknuts yet. 11 Note: Set the upright assembly aside so it cannot fall over . Attach the Upright (1) to the lower arm of the Base (2) with two M10 x 68mm Bolts (33) and two M10 Nylon Locknuts (11). Attach the Upright (1) to the bracket...
... the M10 x 68mm Bolts (33) are inserted from the direction shown in the drawing. Do not tighten the 33 11 Nylon Locknuts yet. 11 Note: Set the upright assembly aside so it cannot fall over . Attach the Upright (1) to the lower arm of the Base (2) with two M10 x 68mm Bolts (33) and two M10 Nylon Locknuts (11). Attach the Upright (1) to the bracket...
English Manual
Page 10
...Screws (3). 1 42 10 29 3 Tighten the M10 Nylon Locknuts (11) used in the lower inset drawing. 12. The same is a Left Weight Rest (21) and a Right 32 Weight Rest (52) because the locking clip should be on the side facing the center 33 of the adjustment holes in steps... the Uprights (1). Press a 1Ó Inner Cap (32) into the open end of the Upright. Attach the Curl Pad (29) to the left upright assembly (B) with two M10 x 68mm Bolts (33), a Support Plate (16) and two M10 Nylon Locknuts (11). Always insert both Weight Rests at the same height. Attach a ...
...Screws (3). 1 42 10 29 3 Tighten the M10 Nylon Locknuts (11) used in the lower inset drawing. 12. The same is a Left Weight Rest (21) and a Right 32 Weight Rest (52) because the locking clip should be on the side facing the center 33 of the adjustment holes in steps... the Uprights (1). Press a 1Ó Inner Cap (32) into the open end of the Upright. Attach the Curl Pad (29) to the left upright assembly (B) with two M10 x 68mm Bolts (33), a Support Plate (16) and two M10 Nylon Locknuts (11). Always insert both Weight Rests at the same height. Attach a ...
English Manual
Page 11
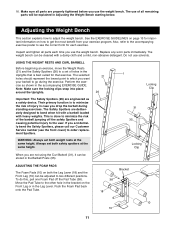
... go during standing exercises. Inspect and tighten all remaining parts will be adjusted to a set of the barbell jumping off the Pad Tube (38). Note: Make sure the locking clips snap into place around the Uprights. This is to the user. The use of injury in the Leg Lever. Do not use the weight bench. WARNING: Always set both the Leg Lever (18) and...
... go during standing exercises. Inspect and tighten all remaining parts will be adjusted to a set of the barbell jumping off the Pad Tube (38). Note: Make sure the locking clips snap into place around the Uprights. This is to the user. The use of injury in the Leg Lever. Do not use the weight bench. WARNING: Always set both the Leg Lever (18) and...
English Manual
Page 12
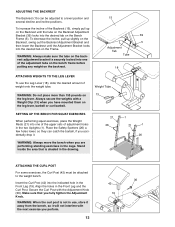
..., if you fully tighten the Adjustment 19 Knob. To increase the incline of the Backrest (15), simply pull up slightly on the Backrest, swing out the Backrest Adjustment Bracket and then lower the Backrest until the tube on the backrest. 15 39 5 Adjustment Tab Tube 18 ATTACHING WEIGHTS TO THE LEG LEVER To use , store it away from the bench, so it...
..., if you fully tighten the Adjustment 19 Knob. To increase the incline of the Backrest (15), simply pull up slightly on the Backrest, swing out the Backrest Adjustment Bracket and then lower the Backrest until the tube on the backrest. 15 39 5 Adjustment Tab Tube 18 ATTACHING WEIGHTS TO THE LEG LEVER To use , store it away from the bench, so it...

English Manual
Page 13
... increase the intensity of your muscles is to push them to find the locations of repetitions in each set . Begin with 3 sets of weight for each exercise obviously depends upon the individual user. When you Cross Training Many people desire a complete and well-balanced fitness program, and cross training is very important to the proper intensity level in an uncontrolled manner will...
... increase the intensity of your muscles is to push them to find the locations of repetitions in each set . Begin with 3 sets of weight for each exercise obviously depends upon the individual user. When you Cross Training Many people desire a complete and well-balanced fitness program, and cross training is very important to the proper intensity level in an uncontrolled manner will...
English Manual
Page 14
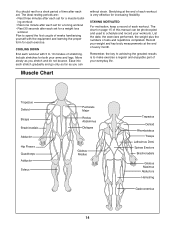
... and used to schedule and record your weight and key body measurements at the end of each workout is to 10 minutes of your arms and legs. List the date, the exercises performed, the weight plus the numbers of this manual can without strain. STAYING MOTIVATED For motivation, keep a record of time after each workout. Record your workouts. You should rest for each exercise. Muscle Chart...
... and used to schedule and record your weight and key body measurements at the end of each workout is to 10 minutes of your arms and legs. List the date, the exercises performed, the weight plus the numbers of this manual can without strain. STAYING MOTIVATED For motivation, keep a record of time after each workout. Record your workouts. You should rest for each exercise. Muscle Chart...

English Manual
Page 15
MONDAY Date: / / EXERCISE WEIGHT SETS REPS TUESDAY Date: / / WEDNESDAY Date: / / AEROBIC EXERCISE EXERCISE WEIGHT SETS REPS THURSDAY Date: / / FRIDAY Date: / / AEROBIC EXERCISE EXERCISE WEIGHT SETS REPS Make photocopies of this page for scheduling and recording your workouts. 15
MONDAY Date: / / EXERCISE WEIGHT SETS REPS TUESDAY Date: / / WEDNESDAY Date: / / AEROBIC EXERCISE EXERCISE WEIGHT SETS REPS THURSDAY Date: / / FRIDAY Date: / / AEROBIC EXERCISE EXERCISE WEIGHT SETS REPS Make photocopies of this page for scheduling and recording your workouts. 15
English Manual
Page 16
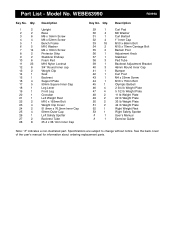
WEBE63990 R0899A Key No. Part List - Specifications are subject to change without notice. Model No. Qty. 1 2 2 2 3 6 4 4 5 1 6 5 7 14 8 2 9 2 10 6 11 23 12 6 13 2 14 1 15 1 16 4 17 5 18 1 19 1 20 1 21 1 22 2 23 4 24 2 25 4 26 1 27 2 28 8 Description Upright Base M6 x 16mm Screw M6 x 52mm Screw Bench Frame M10 Washer M4 x 16mm Screw Protector Strip Stabilizer Endcap Foam Pad M10 Nylon Locknut...
WEBE63990 R0899A Key No. Part List - Specifications are subject to change without notice. Model No. Qty. 1 2 2 2 3 6 4 4 5 1 6 5 7 14 8 2 9 2 10 6 11 23 12 6 13 2 14 1 15 1 16 4 17 5 18 1 19 1 20 1 21 1 22 2 23 4 24 2 25 4 26 1 27 2 28 8 Description Upright Base M6 x 16mm Screw M6 x 52mm Screw Bench Frame M10 Washer M4 x 16mm Screw Protector Strip Stabilizer Endcap Foam Pad M10 Nylon Locknut...

English Manual
Page 17
WEBE63990 24 35 15 28 30 27 29 28 4 28 30 4 22 6 6 11 3 14 39 42 3 10 10 10 17 38 12 12 17 18 11 33 6 10 41 17 40 43 12 38 17 12 36 44 12 19 22 11 65 6 28 11 11 11 3 3 11 9 37 38 12 34 9 10 32 52 21 32 53 1 32 26 8 33 33 16 32 25 33 33 11 33 11 16 20 11 24 8 16 11 35 33 11 11 7 33 2 25 11 11 40 31 7 7 11 7 11 40 2 25 1 25 33 16 33 33 10 R0899A Model No. Exploded Drawing -
WEBE63990 24 35 15 28 30 27 29 28 4 28 30 4 22 6 6 11 3 14 39 42 3 10 10 10 17 38 12 12 17 18 11 33 6 10 41 17 40 43 12 38 17 12 36 44 12 19 22 11 65 6 28 11 11 11 3 3 11 9 37 38 12 34 9 10 32 52 21 32 53 1 32 26 8 33 33 16 32 25 33 33 11 33 11 16 20 11 24 8 16 11 35 33 11 11 7 33 2 25 11 11 40 31 7 7 11 7 11 40 2 25 1 25 33 16 33 33 10 R0899A Model No. Exploded Drawing -
English Manual
Page 18
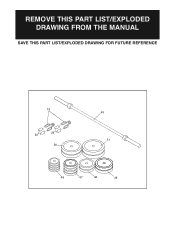
REMOVE THIS PART LIST/EXPLODED DRAWING FROM THE MANUAL SAVE THIS PART LIST/EXPLODED DRAWING FOR FUTURE REFERENCE 13 23 23 50 45 51 46 47 48 49
REMOVE THIS PART LIST/EXPLODED DRAWING FROM THE MANUAL SAVE THIS PART LIST/EXPLODED DRAWING FOR FUTURE REFERENCE 13 23 23 50 45 51 46 47 48 49
English Manual
Page 19
... or damages with all other warranty beyond that specifically set forth herein. To help us assist you, please be pre-authorized by ICON. The NAME of incidental or consequential damages. Some states do not allow the exclusion or limitation of the product (WEIDER¨ PRO PC3 Weight Bench) 3. until 6 p.m. The SERIAL NUMBER of the product (see the PART LIST and the EXPLODED DRAWING at...
... or damages with all other warranty beyond that specifically set forth herein. To help us assist you, please be pre-authorized by ICON. The NAME of incidental or consequential damages. Some states do not allow the exclusion or limitation of the product (WEIDER¨ PRO PC3 Weight Bench) 3. until 6 p.m. The SERIAL NUMBER of the product (see the PART LIST and the EXPLODED DRAWING at...


