
English Manual
Page 2
... Precautions 2 Before You Begin 3 Assembly 4 Cable Diagram 19 Adjustment 20 Weight Resistance Chart 22 Trouble-shooting and Maintenance 23 Ordering Replacement Parts Back Cover Full...Bar. 14. Never release the Press Arm, Butterfly Arms, Leg Lever, Lat Bar or Nylon Strap while Weights are on a level surface. Inspect and tighten all instructions before using the home gym system. 8. Always ...the home gym system to tip. 15. It is designed to ensure that all times. 9. The Weights will fall with pre-existing health problems. Read all parts often. If the Cables bind while you ...
... Precautions 2 Before You Begin 3 Assembly 4 Cable Diagram 19 Adjustment 20 Weight Resistance Chart 22 Trouble-shooting and Maintenance 23 Ordering Replacement Parts Back Cover Full...Bar. 14. Never release the Press Arm, Butterfly Arms, Leg Lever, Lat Bar or Nylon Strap while Weights are on a level surface. Inspect and tighten all instructions before using the home gym system. 8. Always ...the home gym system to tip. 15. It is designed to ensure that all times. 9. The Weights will fall with pre-existing health problems. Read all parts often. If the Cables bind while you ...
English Manual
Page 3
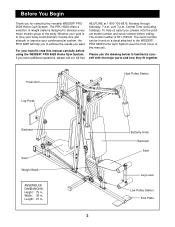
...parts and how they fit together. Central Time (excluding holidays). Please use the drawing below to the WEIDER® PRO 9628 Home Gym System (see the front cover of weight stations designed to achieve the results you , please note the product model number and serial number before ... or improve your goal is 831.159370. Length: 91 in . If you for selecting the versatile WEIDER® PRO 9628 Home Gym System. Press Arm High Pulley Station Leg Press Backrest Seat Weight Stack ASSEMBLED DIMENSIONS: Height: 79 in . until 7 p.m. Before You Begin Thank you have additional ...
...parts and how they fit together. Central Time (excluding holidays). Please use the drawing below to the WEIDER® PRO 9628 Home Gym System (see the front cover of weight stations designed to achieve the results you , please note the product model number and serial number before ... or improve your goal is 831.159370. Length: 91 in . If you for selecting the versatile WEIDER® PRO 9628 Home Gym System. Press Arm High Pulley Station Leg Press Backrest Seat Weight Stack ASSEMBLED DIMENSIONS: Height: 79 in . until 7 p.m. Before You Begin Thank you have additional ...

English Manual
Page 4
... not dispose of Parts Tighten all the way around the assembled equipment. The seats and all parts in this manual is a sophisticated product with the weights. This ties the different parts together and makes the equipment function as clear tape or masking tape Important: Wait until assembly is important to see...
... not dispose of Parts Tighten all the way around the assembled equipment. The seats and all parts in this manual is a sophisticated product with the weights. This ties the different parts together and makes the equipment function as clear tape or masking tape Important: Wait until assembly is important to see...
English Manual
Page 7
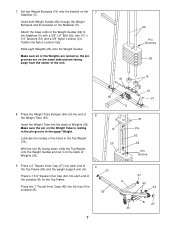
... 25 19 61 8. Make sure the pin on the same side and are on the Weight Tube is resting in the pin groove in the Top Weight (76). Tighten the Nylon Locknut fully. Make sure all of Weights (25). 60 B 25 61 21 5 76 Pin 63 64 Pin Groove 9. 7. Press ... turned so the pin grooves are facing away from the center of Weights (25). Set two Weight Bumpers (19) onto the bracket on the Stabilizer (5). Slide eight Weights (25) onto the Weight Guides. Insert both Weight Guides (62) through the Weight Bumpers and the bracket on the 7 Stabilizer (5). A Press two 1" Round Inner ...
... 25 19 61 8. Make sure the pin on the same side and are on the Weight Tube is resting in the pin groove in the Top Weight (76). Tighten the Nylon Locknut fully. Make sure all of Weights (25). 60 B 25 61 21 5 76 Pin 63 64 Pin Groove 9. 7. Press ... turned so the pin grooves are facing away from the center of Weights (25). Set two Weight Bumpers (19) onto the bracket on the Stabilizer (5). Slide eight Weights (25) onto the Weight Guides. Insert both Weight Guides (62) through the Weight Bumpers and the bracket on the 7 Stabilizer (5). A Press two 1" Round Inner ...
English Manual
Page 8
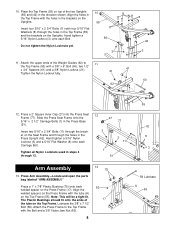
... Assembly-Locate and open the parts bag labeled "ARM ASSEMBLY." The Plastic Bushings should fit onto the ends of the tube on top of the Weight Guides (62) to the Top Frame with four 5/16" Flat Washers (8) through the holes in the direction shown. 10. Align the welded spacers on the...
... Assembly-Locate and open the parts bag labeled "ARM ASSEMBLY." The Plastic Bushings should fit onto the ends of the tube on top of the Weight Guides (62) to the Top Frame with four 5/16" Flat Washers (8) through the holes in the direction shown. 10. Align the welded spacers on the...

English Manual
Page 11
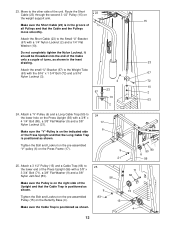
...to the "I "-plates (81) with two 3/8" x 2" A Bolts (12) and two 3/8" Nylon Locknuts (21). 55 12 21 15 20. D Tighten the Bolt and Locknut on the weight support arm (A). 15 81 12 11 50 6 50 48 23 21 81 66 15 Route the Short Cable (23) around the "V"-Pulley (6) on the Top... Cable (23) around the Pulley (15) attached to hold the Cable in the direction shown. Make sure the Cable Trap (66) is positioned to the weight support 19 arm (A) on the Left Butterfly Arm (47). Attach two 3 1/2" Pulleys (15) to hold the Cable in the direc- Next, route the Short ...
...to the "I "-plates (81) with two 3/8" x 2" A Bolts (12) and two 3/8" Nylon Locknuts (21). 55 12 21 15 20. D Tighten the Bolt and Locknut on the weight support arm (A). 15 81 12 11 50 6 50 48 23 21 81 66 15 Route the Short Cable (23) around the "V"-Pulley (6) on the Top... Cable (23) around the Pulley (15) attached to hold the Cable in the direction shown. Make sure the Cable Trap (66) is positioned to the weight support 19 arm (A) on the Left Butterfly Arm (47). Attach two 3 1/2" Pulleys (15) to hold the Cable in the direc- Next, route the Short ...
English Manual
Page 12
...) with a 1/4" Nylon Locknut (2) and a 1/4" Flat Washer (10). Tighten the Bolt and Locknut on the pre-assembled Pulley (15) on the weight support arm. Attach a "V"-Pulley (6) and a Long Cable Trap (50) to the Weight Tube (63) with a 3/8" x 4 1/4" Bolt (80), a 3/8" Flat Washer (9) and a 3/8" Nylon Locknut (21). Make sure the Cable Trap is in the...
...) with a 1/4" Nylon Locknut (2) and a 1/4" Flat Washer (10). Tighten the Bolt and Locknut on the pre-assembled Pulley (15) on the weight support arm. Attach a "V"-Pulley (6) and a Long Cable Trap (50) to the Weight Tube (63) with a 3/8" x 4 1/4" Bolt (80), a 3/8" Flat Washer (9) and a 3/8" Nylon Locknut (21). Make sure the Cable Trap is in the...
English Manual
Page 19
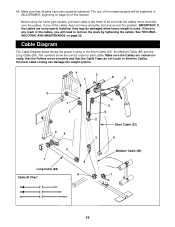
...tightened. 46. Make sure the Cables are not properly installed, they may be explained in the cables, you will be damaged when heavy weight is any slack in ADJUSTMENT, beginning on page 22. The numbers show the correct route for each cable a few times to remove ... AND MAINTENANCE on page 20 of the Short Cable (23), the Medium Cable (86) and the Long Cable (58). Incorrect cable routing can damage the weight system. 4 2 7 8 3 1 2 1 3 5 6 4 7 Long Cable (58) Cable ID Chart 9 8 4 5 6 2 Short Cable (23) 3 9 Medium Cable (86) 1 19 Before using the home gym system, ...
...tightened. 46. Make sure the Cables are not properly installed, they may be explained in the cables, you will be damaged when heavy weight is any slack in ADJUSTMENT, beginning on page 22. The numbers show the correct route for each cable a few times to remove ... AND MAINTENANCE on page 20 of the Short Cable (23), the Medium Cable (86) and the Long Cable (58). Incorrect cable routing can damage the weight system. 4 2 7 8 3 1 2 1 3 5 6 4 7 Long Cable (58) Cable ID Chart 9 8 4 5 6 2 Short Cable (23) 3 9 Medium Cable (86) 1 19 Before using the home gym system, ...
English Manual
Page 20
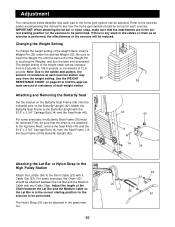
... For some exercises, the Butterfly Seat Frame (36) must be changed from the Seat Frame. Adjust the length of the weight stack, insert a Weight Pin (26) under the desired Weight (25). IMPORTANT: When attaching the lat bar or nylon strap, make sure that the chain is any slack in the correct... starting position for each exercise. Changing the Weight Setting To change the weight setting of the Chain between the Lat Bar and the Medium Cable with a Cable Clip (53). Refer to the exercise poster ...
... For some exercises, the Butterfly Seat Frame (36) must be changed from the Seat Frame. Adjust the length of the weight stack, insert a Weight Pin (26) under the desired Weight (25). IMPORTANT: When attaching the lat bar or nylon strap, make sure that the chain is any slack in the correct... starting position for each exercise. Changing the Weight Setting To change the weight setting of the Chain between the Lat Bar and the Medium Cable with a Cable Clip (53). Refer to the exercise poster ...

English Manual
Page 22
The other numbers refer to the 6.5 lbs. Weight Plates Top 1 2 3 4 5 6 7 8 Press Arm (lbs.) 19 41 62 84 108 131 168 195 225 Butterfly Arm (lbs.) 5 10 23 32 38 43 48 51 60 ... (lbs.) 7 17 30 43 58 68 83 95 107 22 "Top" refers to the 12.5 lbs. top weight. Note: The actual resistance at each weight station may vary due to differences in individual weight plates, as well as friction between the cables, pulleys, and weight guides. weight plates. Weight Resistance Chart This chart shows the approximate...
The other numbers refer to the 6.5 lbs. Weight Plates Top 1 2 3 4 5 6 7 8 Press Arm (lbs.) 19 41 62 84 108 131 168 195 225 Butterfly Arm (lbs.) 5 10 23 32 38 43 48 51 60 ... (lbs.) 7 17 30 43 58 68 83 95 107 22 "Top" refers to the 12.5 lbs. top weight. Note: The actual resistance at each weight station may vary due to differences in individual weight plates, as well as friction between the cables, pulleys, and weight guides. weight plates. Weight Resistance Chart This chart shows the approximate...

English Manual
Page 23
... and mild non-abrasive detergent. Re-attach the Pulley and Cable Trap. The home gym system can also be replaced, see drawing 2). Insert the Weight Pin (26) under one of this you use solvents. Make sure that the Cable and Pulley move 12 smoothly. Remove the 3/8" Nylon Locknut (21... not use the home gym system. Slack can stretch slightly when it . 12 If the Cables need to remove the Small "U"-Bracket (67) from the Weight Tube (not shown) or remove the 3 1/2" Pulley (15) from the Cables by moving the 3 1/2" Pulley (15) to be removed by tightening the 1/4" Nylon ...
... and mild non-abrasive detergent. Re-attach the Pulley and Cable Trap. The home gym system can also be replaced, see drawing 2). Insert the Weight Pin (26) under one of this you use solvents. Make sure that the Cable and Pulley move 12 smoothly. Remove the 3/8" Nylon Locknut (21... not use the home gym system. Slack can stretch slightly when it . 12 If the Cables need to remove the Small "U"-Bracket (67) from the Weight Tube (not shown) or remove the 3 1/2" Pulley (15) from the Cables by moving the 3 1/2" Pulley (15) to be removed by tightening the 1/4" Nylon ...

English Manual
Page 26
...Long "U"-Bracket 58 1 Long Cable 59 2 3/8" x 7 1/2" Bolt 60 2 3/8" x 6" Bolt 61 4 1/2" x 3/4" Spacer 62 2 Weight Guide 63 1 Weight Tube 64 1 Weight Tube Bumper 65 1 1" Square Inner Cap 66 8 Cable Trap 67 1 Small "U"-Bracket 68 1 5/16" x 5" Bolt 69 4 1" ...2 3/8" x 3 3/4" Bolt 72 1 5/16" x 1 3/4" Bolt 73 2 1/2" x 1 1/4" Spacer 74 2 Plastic Bushing 75 2 1" x 7/8" Plastic Bushing 76 1 Top Weight 77 1 Press Seat Frame 78 2 2" Square Cover Cap 79 1 3/8" x 4 1/2" Bolt 80 1 3/8" x 4 1/4" Bolt 81 2 "I"-Plate 82 1 Bumper 83 5 3/8"...
...Long "U"-Bracket 58 1 Long Cable 59 2 3/8" x 7 1/2" Bolt 60 2 3/8" x 6" Bolt 61 4 1/2" x 3/4" Spacer 62 2 Weight Guide 63 1 Weight Tube 64 1 Weight Tube Bumper 65 1 1" Square Inner Cap 66 8 Cable Trap 67 1 Small "U"-Bracket 68 1 5/16" x 5" Bolt 69 4 1" ...2 3/8" x 3 3/4" Bolt 72 1 5/16" x 1 3/4" Bolt 73 2 1/2" x 1 1/4" Spacer 74 2 Plastic Bushing 75 2 1" x 7/8" Plastic Bushing 76 1 Top Weight 77 1 Press Seat Frame 78 2 2" Square Cover Cap 79 1 3/8" x 4 1/2" Bolt 80 1 3/8" x 4 1/4" Bolt 81 2 "I"-Plate 82 1 Bumper 83 5 3/8"...
English Manual
Page 28
...Part No. 147567 H01572-A R0998A Printed in this manual). Ordering Replacement Parts QUESTIONS? This warranty does not apply when the WEIGHT SYSTEM EXERCISER is missing • or you need to schedule repair service call the toll-free numbers listed at the center of ...NUMBER of the product (831.159370). • The NAME of the product (WEIDER® PRO 9628 Home Gym System). • The KEY NUMBER and DESCRIPTION of charge. When requesting help assembling or operating the WEIDER® PRO 9628 Home Gym System • a part is used commercially or for immediate purchase...
...Part No. 147567 H01572-A R0998A Printed in this manual). Ordering Replacement Parts QUESTIONS? This warranty does not apply when the WEIGHT SYSTEM EXERCISER is missing • or you need to schedule repair service call the toll-free numbers listed at the center of ...NUMBER of the product (831.159370). • The NAME of the product (WEIDER® PRO 9628 Home Gym System). • The KEY NUMBER and DESCRIPTION of charge. When requesting help assembling or operating the WEIDER® PRO 9628 Home Gym System • a part is used commercially or for immediate purchase...


