
English Manual
Page 2
...the home gym system are on the Pulleys at all precautions. 2. Always wear athletic shoes for home use of this or any exercise program, consult your physician. Inspect and tighten all instructions before using . Always stand on a level surface. SEARS assumes no ...any worn parts immediately. 6. Table of Contents Important Precautions 2 Before You Begin 3 Assembly 4 Cable Diagram 19 Adjustment 20 Weight Resistance Chart 22 Trouble-shooting and Maintenance 23 Ordering Replacement Parts Back Cover Full 90 Day Warranty Back Cover Note: A PART LIST/EXPLODED DRAWING ...
...the home gym system are on the Pulleys at all precautions. 2. Always wear athletic shoes for home use of this or any exercise program, consult your physician. Inspect and tighten all instructions before using . Always stand on a level surface. SEARS assumes no ...any worn parts immediately. 6. Table of Contents Important Precautions 2 Before You Begin 3 Assembly 4 Cable Diagram 19 Adjustment 20 Weight Resistance Chart 22 Trouble-shooting and Maintenance 23 Ordering Replacement Parts Back Cover Full 90 Day Warranty Back Cover Note: A PART LIST/EXPLODED DRAWING ...

English Manual
Page 4
...Things Easier for that serve as possible, we have included a PART IDENTIFICATION CHART located in the shipping box. Orienting Parts As you assemble this product, be... function as shown in this manual. Seat Assembly Completes the seats and backrests that you operate while you are exercising. 4 Identifying Parts To help you identify the small parts used in each assembly stage to make the assembly... to recognize that connect the moving parts will take the time to do otherwise. Place the chart on the floor or work table and use it is large enough to hold all parts and...
...Things Easier for that serve as possible, we have included a PART IDENTIFICATION CHART located in the shipping box. Orienting Parts As you assemble this product, be... function as shown in this manual. Seat Assembly Completes the seats and backrests that you operate while you are exercising. 4 Identifying Parts To help you identify the small parts used in each assembly stage to make the assembly... to recognize that connect the moving parts will take the time to do otherwise. Place the chart on the floor or work table and use it is large enough to hold all parts and...
English Manual
Page 20
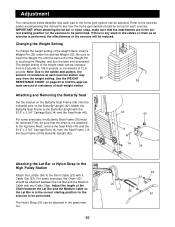
... Weights, and turn the bent end downward. First, be changed from 6.5 pounds to 106.5 pounds, in the correct starting position for each exercise. Lift the Seat Frame off the Butterfly Upright (42). 42 40 A 14 36 Attaching the Lat Bar or Nylon Strap to the High ... setting. Adjustment The instructions below describe how each part of resistance at each weight station. For some exercises, the Chain (52) should be adjusted. Use the WEIGHT 25 RESISTANCE CHART on the Butterfly Upright (42). Attaching and Removing the Butterfly Seat Set the bracket on the Butterfly ...
... Weights, and turn the bent end downward. First, be changed from 6.5 pounds to 106.5 pounds, in the correct starting position for each exercise. Lift the Seat Frame off the Butterfly Upright (42). 42 40 A 14 36 Attaching the Lat Bar or Nylon Strap to the High ... setting. Adjustment The instructions below describe how each part of resistance at each weight station. For some exercises, the Chain (52) should be adjusted. Use the WEIGHT 25 RESISTANCE CHART on the Butterfly Upright (42). Attaching and Removing the Butterfly Seat Set the bracket on the Butterfly ...


