
English Manual
Page 2
...the Press Arm, Butterfly Arms, Leg Lever, Lat Bar or Nylon Strap while Weights are adequately informed of 12 and pets away from moving parts. 10. SEARS assumes no responsibility for foot protection when exercising. 12. It is especially important for persons over the adjustment tube so it...Lat Bar from the home gym system when performing an exercise that all times. WARNING: Before beginning this manual. Remove the PART LIST/EXPLODED DRAWING and the PART IDENTIFICATION CHART before using the leg press station, always make sure the Cables are on a foot plate when performing an ...
...the Press Arm, Butterfly Arms, Leg Lever, Lat Bar or Nylon Strap while Weights are adequately informed of 12 and pets away from moving parts. 10. SEARS assumes no responsibility for foot protection when exercising. 12. It is especially important for persons over the adjustment tube so it...Lat Bar from the home gym system when performing an exercise that all times. WARNING: Before beginning this manual. Remove the PART LIST/EXPLODED DRAWING and the PART IDENTIFICATION CHART before using the leg press station, always make sure the Cables are on a foot plate when performing an ...
English Manual
Page 3
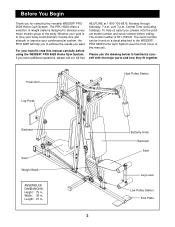
...results you , please note the product model number and serial number before using the WEIDER® PRO 9628 Home Gym System. The serial number can be found on a decal attached to the WEIDER® PRO 9628 Home Gym System (see the front cover of this manual carefully before calling. ...Please use the drawing below to develop every major muscle group of weight stations designed to familiarize yourself with the major parts and how they fit together....
...results you , please note the product model number and serial number before using the WEIDER® PRO 9628 Home Gym System. The serial number can be found on a decal attached to the WEIDER® PRO 9628 Home Gym System (see the front cover of this manual carefully before calling. ...Please use the drawing below to develop every major muscle group of weight stations designed to familiarize yourself with the major parts and how they fit together....

English Manual
Page 4
.... Do not dispose of the packing materials until you begin by anyone. Cable Assembly Completes the cables and pulleys that connect the moving parts will be completed successfully by assembling the base and the upright frames that serve as a unit Arm Assembly Completes the press and butterfly ... to read it is important to recognize that your body while you are exercising. Place all moving arms with each step. Note: Some small parts may want to complete the process over a couple of this manual. However, it ! Assembly Note: This introduction will save you more convenient ...
.... Do not dispose of the packing materials until you begin by anyone. Cable Assembly Completes the cables and pulleys that connect the moving parts will be completed successfully by assembling the base and the upright frames that serve as a unit Arm Assembly Completes the press and butterfly ... to read it is important to recognize that your body while you are exercising. Place all moving arms with each step. Note: Some small parts may want to complete the process over a couple of this manual. However, it ! Assembly Note: This introduction will save you more convenient ...
English Manual
Page 5
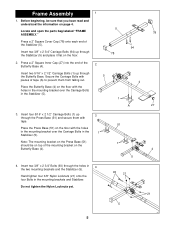
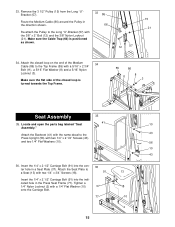
... the holes in the mounting brackets and Stabilizer. Insert two 3/8" x 2 3/4" Bolts (93) through the Stabilizer (5) and place it flat on page 4. 5 Locate and open the parts bag labeled "FRAME 78 ASSEMBLY."
... the holes in the mounting brackets and Stabilizer. Insert two 3/8" x 2 3/4" Bolts (93) through the Stabilizer (5) and place it flat on page 4. 5 Locate and open the parts bag labeled "FRAME 78 ASSEMBLY."
English Manual
Page 8
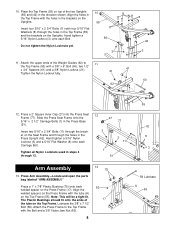
... 12. 12 27 77 3 3 11 1 51 55 42 8 3 Arm Assembly 13. Align the welded spacers on the Uprights. Press Arm Assembly-Locate and open the parts bag labeled "ARM ASSEMBLY." The Plastic Bushings should fit onto the ends of the two Uprights 10 (56) and (42) in the Press Upright (42...
... 12. 12 27 77 3 3 11 1 51 55 42 8 3 Arm Assembly 13. Align the welded spacers on the Uprights. Press Arm Assembly-Locate and open the parts bag labeled "ARM ASSEMBLY." The Plastic Bushings should fit onto the ends of the two Uprights 10 (56) and (42) in the Press Upright (42...

English Manual
Page 10
.... Slide a 10" Pad (45) onto the lower end of 89 the Leg Press Arm (89). 27 21 Lubricate the 3/8" x 3 1/4" Bolt (85). Locate and open the parts bag labeled "Cable 18 Assembly and Pulleys." Attach the Bumper (82) to the Press Base (51) with soapy water. Lubricate both axles (A) on the Butterfly...
.... Slide a 10" Pad (45) onto the lower end of 89 the Leg Press Arm (89). 27 21 Lubricate the 3/8" x 3 1/4" Bolt (85). Locate and open the parts bag labeled "Cable 18 Assembly and Pulleys." Attach the Bumper (82) to the Press Base (51) with soapy water. Lubricate both axles (A) on the Butterfly...
English Manual
Page 15
.... 55 86 8 11 3 Seat Assembly 35 35. Route the Medium Cable (86) around the Pulley in the Press Seat Frame (77). Locate and open the parts bag labeled "Seat 41 10 Assembly." Attach the Backrest (41) with the name decal to a Seat (13) with two 1/4" x 2 1/2" Screws (43) and two 1/4" Flat Washers...
.... 55 86 8 11 3 Seat Assembly 35 35. Route the Medium Cable (86) around the Pulley in the Press Seat Frame (77). Locate and open the parts bag labeled "Seat 41 10 Assembly." Attach the Backrest (41) with the name decal to a Seat (13) with two 1/4" x 2 1/2" Screws (43) and two 1/4" Flat Washers...
English Manual
Page 19
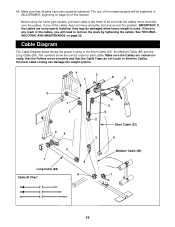
... used. If there is any slack in ADJUSTMENT, beginning on page 22. Cable Diagram The Cable Diagram below shows the proper routing of the remaining parts will need to be sure that the Cable Traps do not touch or bind the Cables. The use of the Short Cable (23), the Medium...
... used. If there is any slack in ADJUSTMENT, beginning on page 22. Cable Diagram The Cable Diagram below shows the proper routing of the remaining parts will need to be sure that the Cable Traps do not touch or bind the Cables. The use of the Short Cable (23), the Medium...
English Manual
Page 20
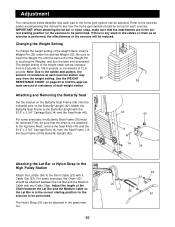
... will be set up for the exercise to 106.5 pounds, in increments of resistance at each weight station. Adjustment The instructions below describe how each part of the home gym system can be attached in the same manner. 20 39 53 23 52 54 Refer to the exercise poster accompanying this...
... will be set up for the exercise to 106.5 pounds, in increments of resistance at each weight station. Adjustment The instructions below describe how each part of the home gym system can be attached in the same manner. 20 39 53 23 52 54 Refer to the exercise poster accompanying this...

English Manual
Page 23
...Locknut (21) and the 3/8" x 2" Bolt (12) from the Cable Trap (66), Pulley and "U"-Bracket. Re-attach the Pulley and Cable Trap. Replace any worn parts immediately. Slack can stretch slightly when it . 12 If the Cables need to the other hole in the "I"-Brackets (81) as shown in the proper... the upper inset drawing. Be sure that the Cable trap is first used on the back cover of the Long Cable (58) (see ORDERING REPLACEMENT PARTS on the home gym system, can be tightened. Slack can be replaced, see drawing 2). Tightening the Cables 1 Woven cable, the type of the...
...Locknut (21) and the 3/8" x 2" Bolt (12) from the Cable Trap (66), Pulley and "U"-Bracket. Re-attach the Pulley and Cable Trap. Replace any worn parts immediately. Slack can stretch slightly when it . 12 If the Cables need to the other hole in the "I"-Brackets (81) as shown in the proper... the upper inset drawing. Be sure that the Cable trap is first used on the back cover of the Long Cable (58) (see ORDERING REPLACEMENT PARTS on the home gym system, can be tightened. Slack can be replaced, see drawing 2). Tightening the Cables 1 Woven cable, the type of the...

English Manual
Page 26
... 1 Leg Press Arm 90 1 Lock Pin 91 1 1/4" x 2 1/2" Carriage Bolt 92 1 1" Tap Screw 93 2 3/8" x 2 3/4" Bolt 94 2 3/8" x 2 3/4" Carriage Bolt # 1 User's Manual # 1 Exercise Poster Note: "#" indicates a non-illustrated part. Part List-Model No. 831.159370 R0998A Key No. Qty.
... 1 Leg Press Arm 90 1 Lock Pin 91 1 1/4" x 2 1/2" Carriage Bolt 92 1 1" Tap Screw 93 2 3/8" x 2 3/4" Bolt 94 2 3/8" x 2 3/4" Carriage Bolt # 1 User's Manual # 1 Exercise Poster Note: "#" indicates a non-illustrated part. Part List-Model No. 831.159370 R0998A Key No. Qty.
English Manual
Page 28
... See the front cover of the PART (see the PART LIST/EXPLODED DRAWING at the left. REPLACEMENT PARTS If parts become worn and need to the frame. This warranty gives you specific legal rights, and you visit your WEIDER® PRO 9628 Home Gym System are available for ...rental purposes. When requesting help assembling or operating the WEIDER® PRO 9628 Home Gym System • a part is used commercially or for immediate purchase or special order when...
... See the front cover of the PART (see the PART LIST/EXPLODED DRAWING at the left. REPLACEMENT PARTS If parts become worn and need to the frame. This warranty gives you specific legal rights, and you visit your WEIDER® PRO 9628 Home Gym System are available for ...rental purposes. When requesting help assembling or operating the WEIDER® PRO 9628 Home Gym System • a part is used commercially or for immediate purchase or special order when...


