
Uk Manual
Page 1
Model No. WEEVBE33030 Serial No Write the serial number in this manual before using this manual for reference. As a manufacturer, we are missing or damaged parts, please call: 08457 089 009 Or write: ICON Health & Fitness, Ltd. Save this equipment. Serial Number Decal QUESTIONS? USER'S MANUAL Class HC Fitness Product Visit our website at www.iconeurope.com Customer Service Department Unit 4 Revie Road Industrial Estate Revie Road Beeston...
Model No. WEEVBE33030 Serial No Write the serial number in this manual before using this manual for reference. As a manufacturer, we are missing or damaged parts, please call: 08457 089 009 Or write: ICON Health & Fitness, Ltd. Save this equipment. Serial Number Decal QUESTIONS? USER'S MANUAL Class HC Fitness Product Visit our website at www.iconeurope.com Customer Service Department Unit 4 Revie Road Industrial Estate Revie Road Beeston...
Uk Manual
Page 2
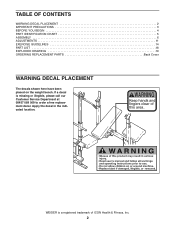
... fingers clear of ICON Health & Fitness, Inc. 2 Apply the decal in the indicated location. WEIDER is missing or illegible, please call our Customer Service Department at 08457 089 009 to order a free replacement decal. TABLE OF CONTENTS WARNING DECAL PLACEMENT 2 IMPORTANT PRECAUTIONS 3 BEFORE YOU BEGIN 4 PART IDENTIFICATION CHART 5 ASSEMBLY 6 ADJUSTMENTS 11 EXERCISE GUIDELINES 14 PART LIST 18 EXPLODED DRAWING 19 ORDERING REPLACEMENT PARTS Back Cover WARNING DECAL PLACEMENT...
... fingers clear of ICON Health & Fitness, Inc. 2 Apply the decal in the indicated location. WEIDER is missing or illegible, please call our Customer Service Department at 08457 089 009 to order a free replacement decal. TABLE OF CONTENTS WARNING DECAL PLACEMENT 2 IMPORTANT PRECAUTIONS 3 BEFORE YOU BEGIN 4 PART IDENTIFICATION CHART 5 ASSEMBLY 6 ADJUSTMENTS 11 EXERCISE GUIDELINES 14 PART LIST 18 EXPLODED DRAWING 19 ORDERING REPLACEMENT PARTS Back Cover WARNING DECAL PLACEMENT...

Uk Manual
Page 3
... users of the weight bench are properly tightened each side of the owner to the lat tower, make sure that all instructions before performing leg curl or leg extension exercises. 18. Use the weight bench only as described in an inclined position, make sure there is inserted completely through the use the weight bench. Use the weight bench only on the leg lever. Always wear athletic shoes for home use a barbell that all parts...
... users of the weight bench are properly tightened each side of the owner to the lat tower, make sure that all instructions before performing leg curl or leg extension exercises. 18. Use the weight bench only as described in an inclined position, make sure there is inserted completely through the use the weight bench. Use the weight bench only on the leg lever. Always wear athletic shoes for home use a barbell that all parts...

Uk Manual
Page 4
... for selecting the WEIDER® PRO 435 weight bench. Lat Bar Lat Tower Weight Carriage Leg Lever Weight Tube Seat Barbell Hook Backrest Weight Rest Upright Curl Pad Folding Bracket Storage Tube Anchor Hole* *Use the anchor holes to achieve the specific results you to secure the weight bench in a fixed position, if desired. 4 BEFORE YOU BEGIN Thank you , please mention the product model number and serial number when calling. Whether your benefit, read this manual).
... for selecting the WEIDER® PRO 435 weight bench. Lat Bar Lat Tower Weight Carriage Leg Lever Weight Tube Seat Barbell Hook Backrest Weight Rest Upright Curl Pad Folding Bracket Storage Tube Anchor Hole* *Use the anchor holes to achieve the specific results you to secure the weight bench in a fixed position, if desired. 4 BEFORE YOU BEGIN Thank you , please mention the product model number and serial number when calling. Whether your benefit, read this manual).

Uk Manual
Page 5
... you identify the small parts used in assembly. Important: Some parts may have been pre-assembled. PART IDENTIFICATION CHART This chart is provided to the key number of the part, from the PART LIST on page 18 of this manual. M10 x 175mm Bolt (17) M10 x 80mm Bolt (35) M6 Washer (25) M10 x 75mm Bolt (51) M8 x 70mm Bolt (67) M10 x 70mm Bolt (18) M10 x 65mm Bolt (40) M8 Washer (38...
... you identify the small parts used in assembly. Important: Some parts may have been pre-assembled. PART IDENTIFICATION CHART This chart is provided to the key number of the part, from the PART LIST on page 18 of this manual. M10 x 175mm Bolt (17) M10 x 80mm Bolt (35) M6 Washer (25) M10 x 75mm Bolt (51) M8 x 70mm Bolt (67) M10 x 70mm Bolt (18) M10 x 65mm Bolt (40) M8 Washer (38...

Uk Manual
Page 6
... following information and instructions: • Assembly requires two persons. • For help identifying small parts, use the PART IDENTIFICATION CHART on page 5. • Tighten all parts as you assemble them, unless instructed to ensure that the weight bench can be assembled successfully by setting aside plenty of the Right and Left Stabiliser (45, 46). Attach an Upright Base (7) to the Right Stabiliser (45) with four M10 x 80mm Bolts...
... following information and instructions: • Assembly requires two persons. • For help identifying small parts, use the PART IDENTIFICATION CHART on page 5. • Tighten all parts as you assemble them, unless instructed to ensure that the weight bench can be assembled successfully by setting aside plenty of the Right and Left Stabiliser (45, 46). Attach an Upright Base (7) to the Right Stabiliser (45) with four M10 x 80mm Bolts...
Uk Manual
Page 7
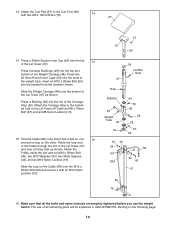
... Locknut; Tighten the M10 x 57mm Adjustment Knob (33) into the Leg Lever (4). Tighten all of holes in the bracket on the Crossbar (3) with two M10 x 70mm Bolts (18), the Support Plate (14), and two M10 Nylon Locknuts (19). Slide the Weight Tube (41) through the Upright Base. Press the 25...Bolts (35), two Joint Plates (20), and four M10 Nylon Locknuts (19). Press two 40mm x 50mm Inner Caps (68) into the lower set of the M10 Nylon Locknuts (19) used in the same manner. 2 3 35 20 19 7 20 19 3. the Bench Frame must be able to the upper set of the Front Leg. Insert the Ring Pin...
... Locknut; Tighten the M10 x 57mm Adjustment Knob (33) into the Leg Lever (4). Tighten all of holes in the bracket on the Crossbar (3) with two M10 x 70mm Bolts (18), the Support Plate (14), and two M10 Nylon Locknuts (19). Slide the Weight Tube (41) through the Upright Base. Press the 25...Bolts (35), two Joint Plates (20), and four M10 Nylon Locknuts (19). Press two 40mm x 50mm Inner Caps (68) into the lower set of the M10 Nylon Locknuts (19) used in the same manner. 2 3 35 20 19 7 20 19 3. the Bench Frame must be able to the upper set of the Front Leg. Insert the Ring Pin...

Uk Manual
Page 8
... Nylon Locknut; Attach the Backrest to the Bench Frame (2) with the wide end on the side shown. Do not overtighten the Nylon Locknut; Do not tighten the Bolts yet. 8. Secure the Backrest (6) to pivot easily. Make sure that the Adjustment Pin is completely inserted through the tube in the Bench Frame and a set of each adjustment tube. Lubricate an M10...
... Nylon Locknut; Attach the Backrest to the Bench Frame (2) with the wide end on the side shown. Do not overtighten the Nylon Locknut; Do not tighten the Bolts yet. 8. Secure the Backrest (6) to pivot easily. Make sure that the Adjustment Pin is completely inserted through the tube in the Bench Frame and a set of each adjustment tube. Lubricate an M10...

Uk Manual
Page 9
...Screws (34). Press the tabs on the Bushing (28) into the slots in the Upright Base. Attach the right Upright (1) to pinch your fingers Align one of the three Pad Tubes (10). Note: Always set both ends of the adjustment holes in the Upright (1) with the hole in the left Upright (1). Attach the Seat... slots in the Upright Base (7). Slide a Bushing (28) onto the bottom of the other Upright in the Leg Lever (4) and the Front Leg (8). Slide the Pad Tubes 10 22 into the holes. Slide two Foam Pads (22) onto each Upright (1). Tighten an M10 x 62mm Adjustment Knob (30) into ...
...Screws (34). Press the tabs on the Bushing (28) into the slots in the Upright Base. Attach the right Upright (1) to pinch your fingers Align one of the three Pad Tubes (10). Note: Always set both ends of the adjustment holes in the Upright (1) with the hole in the left Upright (1). Attach the Seat... slots in the Upright Base (7). Slide a Bushing (28) onto the bottom of the other Upright in the Leg Lever (4) and the Front Leg (8). Slide the Pad Tubes 10 22 into the holes. Slide two Foam Pads (22) onto each Upright (1). Tighten an M10 x 62mm Adjustment Knob (30) into ...
Uk Manual
Page 10
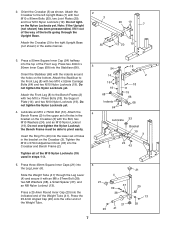
...Pulley (55) as shown. The use the weight bench. 13. Route the loop end of the Lat Tower (47) as shown. Press two 25.4mm Round Inner Caps (23) into the bracket from the direction shown. Make sure that it has a ball on one 15 end and a loop on the Cable (58) onto the M10 x 20mm Bolt... Nylon Locknut (13). 15. Press Carriage Bushings (49) into the top and bottom of all the bolts and nylon locknuts are properly tightened before you use of the Weight Carriage (48). Attach the Carriage Stop to the Curl Post (26) 13 with an M10 x 65mm Bolt (40), two M10 Washers (24...
...Pulley (55) as shown. The use the weight bench. 13. Route the loop end of the Lat Tower (47) as shown. Press two 25.4mm Round Inner Caps (23) into the bracket from the direction shown. Make sure that it has a ball on one 15 end and a loop on the Cable (58) onto the M10 x 20mm Bolt... Nylon Locknut (13). 15. Press Carriage Bushings (49) into the top and bottom of all the bolts and nylon locknuts are properly tightened before you use of the Weight Carriage (48). Attach the Carriage Stop to the Curl Post (26) 13 with an M10 x 65mm Bolt (40), two M10 Washers (24...

Uk Manual
Page 11
... Replace any worn parts immediately. Tighten the M10 x 57mm Adjustment Knob (33) into the Front Leg. WARNING: When the Lat Tower (47) or Curl Pad (27) is not in use, replace the 50mm Square Inner Cap (54). ADJUSTMENTS The weight bench is designed to be used in a decline position, a flat position, or two incline positions. Refer also to the exercise information accompanying your own weight set for important exercise information...
... Replace any worn parts immediately. Tighten the M10 x 57mm Adjustment Knob (33) into the Front Leg. WARNING: When the Lat Tower (47) or Curl Pad (27) is not in use, replace the 50mm Square Inner Cap (54). ADJUSTMENTS The weight bench is designed to be used in a decline position, a flat position, or two incline positions. Refer also to the exercise information accompanying your own weight set for important exercise information...
Uk Manual
Page 12
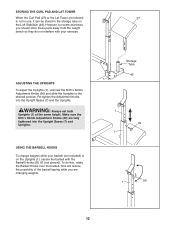
...]). Make sure the M10 x 62mm Adjustment Knobs (30) are changing weights. 27 Storage Tube 46 1 30 7 1 56 12 However, for some exercises, you are fully tightened into the Upright Bases (7) and the Uprights. ADJUSTING THE UPRIGHTS To adjust the Uprights (1), unscrew the M10 x 62mm Adjustment Knobs (30) and slide the Uprights to the desired position. USING THE BARBELL HOOKS To change weights while your exercise. This will reduce the possibility...
...]). Make sure the M10 x 62mm Adjustment Knobs (30) are changing weights. 27 Storage Tube 46 1 30 7 1 56 12 However, for some exercises, you are fully tightened into the Upright Bases (7) and the Uprights. ADJUSTING THE UPRIGHTS To adjust the Uprights (1), unscrew the M10 x 62mm Adjustment Knobs (30) and slide the Uprights to the desired position. USING THE BARBELL HOOKS To change weights while your exercise. This will reduce the possibility...
Uk Manual
Page 13
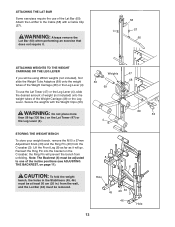
... Leg Lever (4). 4 69 53 STORING THE WEIGHT BENCH To store your weight bench, remove the M10 x 57mm Adjustment Knob (33) and the Ring Pin (43) from the wall, and the Lat Bar (60) must be at least 50 cm (20 in.) from the Crossbar (3). CAUTION: To fold the weight bench, the holes in the Stabilisers (45, 46) must be adjusted to the Cable (58) with the Weight...
... Leg Lever (4). 4 69 53 STORING THE WEIGHT BENCH To store your weight bench, remove the M10 x 57mm Adjustment Knob (33) and the Ring Pin (43) from the wall, and the Lat Bar (60) must be at least 50 cm (20 in.) from the Crossbar (3). CAUTION: To fold the weight bench, the holes in the Stabilisers (45, 46) must be adjusted to the Cable (58) with the Weight...

Uk Manual
Page 14
... set . This requires moving only the appropriate parts of time for each set . Rest for more oxygen to 10 different exercises. PERSONALIZING YOUR EXERCISE PROGRAM Determining the exact length of the body. Weight Loss To lose weight, use a low amount of weight and increase the number of repetitions in any time while exercising, stop immediately and begin cooling down. To give your body's signals. EXERCISE FORM Maintaining proper form...
... set . This requires moving only the appropriate parts of time for each set . Rest for more oxygen to 10 different exercises. PERSONALIZING YOUR EXERCISE PROGRAM Determining the exact length of the body. Weight Loss To lose weight, use a low amount of weight and increase the number of repetitions in any time while exercising, stop immediately and begin cooling down. To give your body's signals. EXERCISE FORM Maintaining proper form...

Uk Manual
Page 15
... and used , and the numbers of every month. Sartorius (front of stretching. List the date, the exercises performed, the weight used to 10 minutes of thigh) EE J. MUSCLE CHART A. Rectus Abdominus (stomach) GG N N N. The ideal resting periods are: • Rest for three minutes after each set for a muscle building workout. • Rest for one minute after each set for a toning work...
... and used , and the numbers of every month. Sartorius (front of stretching. List the date, the exercises performed, the weight used to 10 minutes of thigh) EE J. MUSCLE CHART A. Rectus Abdominus (stomach) GG N N N. The ideal resting periods are: • Rest for three minutes after each set for a muscle building workout. • Rest for one minute after each set for a toning work...

Uk Manual
Page 16
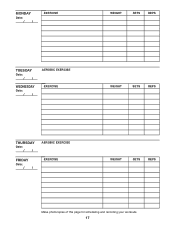
MONDAY Date: / / EXERCISE WEIGHT SETS REPS TUESDAY Date: / / AEROBIC EXERCISE WEDNESDAY Date: / / EXERCISE WEIGHT SETS REPS THURSDAY Date: / / AEROBIC EXERCISE FRIDAY Date: / / EXERCISE WEIGHT SETS REPS Make photocopies of this page for scheduling and recording your workouts. 16
MONDAY Date: / / EXERCISE WEIGHT SETS REPS TUESDAY Date: / / AEROBIC EXERCISE WEDNESDAY Date: / / EXERCISE WEIGHT SETS REPS THURSDAY Date: / / AEROBIC EXERCISE FRIDAY Date: / / EXERCISE WEIGHT SETS REPS Make photocopies of this page for scheduling and recording your workouts. 16
Uk Manual
Page 17
MONDAY Date: / / EXERCISE WEIGHT SETS REPS TUESDAY Date: / / WEDNESDAY Date: / / AEROBIC EXERCISE EXERCISE WEIGHT SETS REPS THURSDAY Date: / / FRIDAY Date: / / AEROBIC EXERCISE EXERCISE WEIGHT SETS REPS Make photocopies of this page for scheduling and recording your workouts. 17
MONDAY Date: / / EXERCISE WEIGHT SETS REPS TUESDAY Date: / / WEDNESDAY Date: / / AEROBIC EXERCISE EXERCISE WEIGHT SETS REPS THURSDAY Date: / / FRIDAY Date: / / AEROBIC EXERCISE EXERCISE WEIGHT SETS REPS Make photocopies of this page for scheduling and recording your workouts. 17

Uk Manual
Page 18
... 1 Pulley 56 1 Right Barbell Hook 57 1 Cable Clip 58 1 Cable 59 2 Handgrips 60 1 Lat Bar 61 1 Left Barbell Hook 62 2 Bright M8 Nylon Locknut 63 2 Bright M8 Washer 64 2 M10 x 52mm Carraige Bolt 65 4 60mm Square Inner Cap 66 1 Stabiliser 67 1 M8 x 70mm Bolt 68 2 40mm x 50mm Inner Cap 69 2 Weight Tube Adaptor # 1 User's Manual # 1 Exercise Guide # 1 Grease Note: "#" indicates a non-illustrated part. WEEVBE33030...
... 1 Pulley 56 1 Right Barbell Hook 57 1 Cable Clip 58 1 Cable 59 2 Handgrips 60 1 Lat Bar 61 1 Left Barbell Hook 62 2 Bright M8 Nylon Locknut 63 2 Bright M8 Washer 64 2 M10 x 52mm Carraige Bolt 65 4 60mm Square Inner Cap 66 1 Stabiliser 67 1 M8 x 70mm Bolt 68 2 40mm x 50mm Inner Cap 69 2 Weight Tube Adaptor # 1 User's Manual # 1 Exercise Guide # 1 Grease Note: "#" indicates a non-illustrated part. WEEVBE33030...

Uk Manual
Page 19
EXPLODED DRAWING-Model No. WEEVBE33030 R0803A 62 63 54 19 24 44 44 24 59 56 27 60 53 53 6 55 40 1 59 12 58 28 57 47 34 30 31 34 15 26 20 19 5 25 42 16 7 35 25 12 16 61 33 25 36 16 58 49 19 35 19 20 3 65 43 1 19 28 23 28 13 22 21 22 50 19 48 23 49 65 67 20 45 52 21 4 39 38 37 19 14 19 68 19 29 54 20 33 18 8 19 35 17 18 15 35 31 34 34 11 20 51 32 24 30 7 24 24 19 19 2 19 24 19 35 23 41 21 38 13 9 69 9 10 10 9 9 22 66 9 68 64 22 35 18 15 35 10 22 20 65 9 46 20 65 19 19
EXPLODED DRAWING-Model No. WEEVBE33030 R0803A 62 63 54 19 24 44 44 24 59 56 27 60 53 53 6 55 40 1 59 12 58 28 57 47 34 30 31 34 15 26 20 19 5 25 42 16 7 35 25 12 16 61 33 25 36 16 58 49 19 35 19 20 3 65 43 1 19 28 23 28 13 22 21 22 50 19 48 23 49 65 67 20 45 52 21 4 39 38 37 19 14 19 68 19 29 54 20 33 18 8 19 35 17 18 15 35 31 34 34 11 20 51 32 24 30 7 24 24 19 19 2 19 24 19 35 23 41 21 38 13 9 69 9 10 10 9 9 22 66 9 68 64 22 35 18 15 35 10 22 20 65 9 46 20 65 19 19

Uk Manual
Page 20
...; 2003 ICON Health & Fitness, Inc. ORDERING REPLACEMENT PARTS If you encounter any difficulties with this manual) • The KEY NUMBER and DESCRIPTION of the part(s) (see the front cover of this product, or if you need to give the following information: • The MODEL NUMBER of the product (WEEVBE33030) • The NAME of the product (WEIDER® PRO 435 weight bench) • The SERIAL NUMBER of the product (see the PART LIST and...
...; 2003 ICON Health & Fitness, Inc. ORDERING REPLACEMENT PARTS If you encounter any difficulties with this manual) • The KEY NUMBER and DESCRIPTION of the part(s) (see the front cover of this product, or if you need to give the following information: • The MODEL NUMBER of the product (WEEVBE33030) • The NAME of the product (WEIDER® PRO 435 weight bench) • The SERIAL NUMBER of the product (see the PART LIST and...


