
English Manual
Page 1
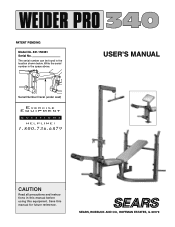
Write the serial number in the location shown below. Serial Number Decal (under seat) USER'S MANUAL CAUTION Read all precautions and instructions in this manual before using this manual for future reference. Save this equipment. PATENT PENDING Model No. 831.150381 Serial No. SEARS, ROEBUCK AND CO., HOFFMAN ESTATES, IL 60179 The serial number can be found in the space above.
Write the serial number in the location shown below. Serial Number Decal (under seat) USER'S MANUAL CAUTION Read all precautions and instructions in this manual before using this manual for future reference. Save this equipment. PATENT PENDING Model No. 831.150381 Serial No. SEARS, ROEBUCK AND CO., HOFFMAN ESTATES, IL 60179 The serial number can be found in the space above.
English Manual
Page 2
TABLE OF CONTENTS FULL 90 DAY WARRANTY 3 IMPORTANT PRECAUTIONS 4 CAUTION DECAL PLACEMENT 5 BEFORE YOU BEGIN 6 ASSEMBLY 7 ADJUSTING THE WEIDER PRO 340 13 EXERCISE GUIDELINES 17 ORDERING REPLACEMENT PARTS Back Cover Note: A PART IDENTIFICATION CHART and a PART LIST/EXPLODED DRAWING are attached to the center of this manual. Remove the PART IDENTIFICATION CHART and the PART LIST/EXPLODED DRAWING before beginning assembly. 2
TABLE OF CONTENTS FULL 90 DAY WARRANTY 3 IMPORTANT PRECAUTIONS 4 CAUTION DECAL PLACEMENT 5 BEFORE YOU BEGIN 6 ASSEMBLY 7 ADJUSTING THE WEIDER PRO 340 13 EXERCISE GUIDELINES 17 ORDERING REPLACEMENT PARTS Back Cover Note: A PART IDENTIFICATION CHART and a PART LIST/EXPLODED DRAWING are attached to the center of this manual. Remove the PART IDENTIFICATION CHART and the PART LIST/EXPLODED DRAWING before beginning assembly. 2
English Manual
Page 3
This warranty gives you specific legal rights, and you may also have other rights which vary from the date of purchase, if failure occurs due to state. FULL 90 DAY WARRANTY For 90 days from state to defect in material or workmanship in this SEARS WEIGHT BENCH EXERCISER, contact the nearest SEARS Service Center throughout the United States and SEARS will repair or replace the WEIGHT BENCH EXERCISER, free of charge. SEARS, ROEBUCK AND CO., DEPT. 817WA, HOFFMAN ESTATES, IL 60179 3 This warranty does not apply when the WEIGHT BENCH EXERCISER is used commercially or for rental purposes.
This warranty gives you specific legal rights, and you may also have other rights which vary from the date of purchase, if failure occurs due to state. FULL 90 DAY WARRANTY For 90 days from state to defect in material or workmanship in this SEARS WEIGHT BENCH EXERCISER, contact the nearest SEARS Service Center throughout the United States and SEARS will repair or replace the WEIGHT BENCH EXERCISER, free of charge. SEARS, ROEBUCK AND CO., DEPT. 817WA, HOFFMAN ESTATES, IL 60179 3 This warranty does not apply when the WEIGHT BENCH EXERCISER is used commercially or for rental purposes.
English Manual
Page 4
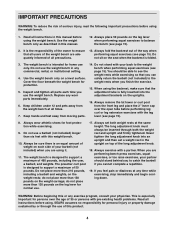
... weight rests while exercising so that the adjustment tube is an equal amount of weight on the uprights. 16. do not place more than six feet with the leg lever (see page 15). Always exercise with pre-existing health problems. Read all precautions. 13. SEARS assumes no responsibility for home use the weight bench in this manual. 12. Inspect and tighten all users of the weight bench are performing bench press exercises...
... weight rests while exercising so that the adjustment tube is an equal amount of weight on the uprights. 16. do not place more than six feet with the leg lever (see page 15). Always exercise with pre-existing health problems. Read all precautions. 13. SEARS assumes no responsibility for home use the weight bench in this manual. 12. Inspect and tighten all users of the weight bench are performing bench press exercises...
English Manual
Page 6
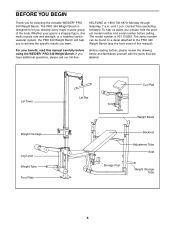
... PRO 340 Weight Bench (see the front cover of the body. Central Time (excluding holidays). To help you to let you develop every major muscle group of this manual carefully before calling. until 7 p.m. Whether your benefit, read this manual). The model number is designed to achieve the specific results you have additional questions, please call our toll-free Before reading further, please review...
... PRO 340 Weight Bench (see the front cover of the body. Central Time (excluding holidays). To help you to let you develop every major muscle group of this manual carefully before calling. until 7 p.m. Whether your benefit, read this manual). The model number is designed to achieve the specific results you have additional questions, please call our toll-free Before reading further, please review...
English Manual
Page 7
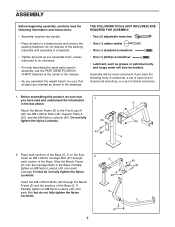
... identifying the small parts used in assembly, use the PART IDENTIFICATION CHART attached at the center of the manual. • As you assemble the weight bench, be sure that you have read the following tools: A socket set, a set of open-end or closed-end wrenches, or a set of ratchet wrenches. 1. Insert two M8 x 65mm Bolts (42) through each Carriage Bolt but do not fully tighten the Nylon Locknuts...
... identifying the small parts used in assembly, use the PART IDENTIFICATION CHART attached at the center of the manual. • As you assemble the weight bench, be sure that you have read the following tools: A socket set, a set of open-end or closed-end wrenches, or a set of ratchet wrenches. 1. Insert two M8 x 65mm Bolts (42) through each Carriage Bolt but do not fully tighten the Nylon Locknuts...
English Manual
Page 8
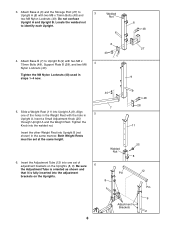
... a Weight Rest (11) into one of adjustment brackets on the Uprights. 40 7 Welded Nut Pin 8 48 28 11 25 8 12 Pin 9 Adjustment Brackets 8 Insert the Adjustment Tube (12) into Upright A (8). Welded Nut 8 48 4. Attach Base A (6) and the Storage Post (27) to 3 Upright A (8) with two M8 x 75mm Bolts (48), Support Plate B (28), and two M8 4 Nylon Locknuts (40). Tighten the Knob into the adjustment brackets on the Uprights (8, 9). Tighten...
... a Weight Rest (11) into one of adjustment brackets on the Uprights. 40 7 Welded Nut Pin 8 48 28 11 25 8 12 Pin 9 Adjustment Brackets 8 Insert the Adjustment Tube (12) into Upright A (8). Welded Nut 8 48 4. Attach Base A (6) and the Storage Post (27) to 3 Upright A (8) with two M8 x 75mm Bolts (48), Support Plate B (28), and two M8 4 Nylon Locknuts (40). Tighten the Knob into the adjustment brackets on the Uprights (8, 9). Tighten...

English Manual
Page 9
...Attach the Weight Tube (19) to the Leg Lever (3) with four M6 x 40mm Bolts (44) and four M6 23 Washers (54). Lower the Backrest (23) onto the Adjustment Tube (12). 9. Attach the Backrest (23) to the Bench Frame (5) with the M6 x 65mm Bolt (46), two M6 x 16mm Screws (45), and three M6 Washers (54). 44 8 Lubricate... Bolt (42), two M8 Washers (55), a 13mm Spacer (56), and an M8 Nylon Locknut (40). the Backrest Brackets must be ori- Attach the Seat (22) to move freely. Press the 1" Round Angle Cap (57) onto the Weight Tube (19). 7. Slide the Weight Stop (21) onto the Weight ...
...Attach the Weight Tube (19) to the Leg Lever (3) with four M6 x 40mm Bolts (44) and four M6 23 Washers (54). Lower the Backrest (23) onto the Adjustment Tube (12). 9. Attach the Backrest (23) to the Bench Frame (5) with the M6 x 65mm Bolt (46), two M6 x 16mm Screws (45), and three M6 Washers (54). 44 8 Lubricate... Bolt (42), two M8 Washers (55), a 13mm Spacer (56), and an M8 Nylon Locknut (40). the Backrest Brackets must be ori- Attach the Seat (22) to move freely. Press the 1" Round Angle Cap (57) onto the Weight Tube (19). 7. Slide the Weight Stop (21) onto the Weight ...

English Manual
Page 10
... (17). 18 13. Tighten an M8 Nylon Locknut (40) onto the Eyebolt. Insert a Pad Tube (17) through the other 12 hole in the 14 Weight Carriage (2) from the direction shown. Attach the Leg 11 Lever (3) to the Curl Post (10) with the Bolt and an 49 M10 Nylon Locknut (49). 3 41 Lubricate 4 12. Be sure ... one hole in the top and bottom of the Weight Carriage. (2) 18 17 4 17 3 18 24 45 10 27 39 59 58 2 40 58 10 11. Attach the Curl Pad (24) to the Front Leg (4) with two M6 x 16mm Screws (45). 13 Slide the Curl Post (10) into the Storage Post (27). 14.
... (17). 18 13. Tighten an M8 Nylon Locknut (40) onto the Eyebolt. Insert a Pad Tube (17) through the other 12 hole in the 14 Weight Carriage (2) from the direction shown. Attach the Leg 11 Lever (3) to the Curl Post (10) with the Bolt and an 49 M10 Nylon Locknut (49). 3 41 Lubricate 4 12. Be sure ... one hole in the top and bottom of the Weight Carriage. (2) 18 17 4 17 3 18 24 45 10 27 39 59 58 2 40 58 10 11. Attach the Curl Pad (24) to the Front Leg (4) with two M6 x 16mm Screws (45). 13 Slide the Curl Post (10) into the Storage Post (27). 14.

English Manual
Page 11
... be facing the Weight Carriage (2). Attach the Pulley to the Lat Tower with a 10mm x 75mm Bolt (50), two 10mm Washers (51), two 16mm Spacers (52), and a 10mm Nylon Locknut (49). Attach the other Pulley (35). The Cable must run smoothly over both Pulleys. Feed the Cable (36) through the indicated slot in the Lat Tower. Rest the Cable in the groove of...
... be facing the Weight Carriage (2). Attach the Pulley to the Lat Tower with a 10mm x 75mm Bolt (50), two 10mm Washers (51), two 16mm Spacers (52), and a 10mm Nylon Locknut (49). Attach the other Pulley (35). The Cable must run smoothly over both Pulleys. Feed the Cable (36) through the indicated slot in the Lat Tower. Rest the Cable in the groove of...
English Manual
Page 12
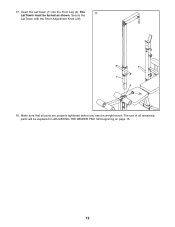
17. Secure the Lat Tower with the Short Adjustment Knob (26). 1 4 26 18. The 17 Lat Tower must be explained in ADJUSTING THE WEIDER PRO 340 beginning on page 13. 12 The use of all parts are properly tightened before you use the weight bench. Make sure that all remaining parts will be turned as shown. Insert the Lat Tower (1) into the Front Leg (4).
17. Secure the Lat Tower with the Short Adjustment Knob (26). 1 4 26 18. The 17 Lat Tower must be explained in ADJUSTING THE WEIDER PRO 340 beginning on page 13. 12 The use of all parts are properly tightened before you use the weight bench. Make sure that all remaining parts will be turned as shown. Insert the Lat Tower (1) into the Front Leg (4).
English Manual
Page 13
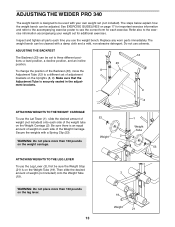
... time you use the Lat Tower (1), slide the desired amount of weight on the leg lever. 19 Weight 21 13 Replace any worn parts immediately. Refer also to the exercise information accompanying your own weight set to three different positions: a level position, a decline position, and an incline position. ADJUSTING THE WEIDER PRO 340 The weight bench is designed to be adjusted. The steps below explain how the weight bench can be set (not...
... time you use the Lat Tower (1), slide the desired amount of weight on the leg lever. 19 Weight 21 13 Replace any worn parts immediately. Refer also to the exercise information accompanying your own weight set to three different positions: a level position, a decline position, and an incline position. ADJUSTING THE WEIDER PRO 340 The weight bench is designed to be adjusted. The steps below explain how the weight bench can be set (not...
English Manual
Page 14
... fully tighten the Long Adjustment Knob. Position the other exercises, the Lat Tower (1) must always be stored in the Storage Post (27). Never tighten the long adjustment knob into the indicated hole in the Front Leg (4). Align the holes in the Front Leg (4). ADJUSTING THE WEIGHT RESTS To change the height of the Weight Rests (11), first remove your barbell from the Weight Rest in Upright A (8). Position the Weight...
... fully tighten the Long Adjustment Knob. Position the other exercises, the Lat Tower (1) must always be stored in the Storage Post (27). Never tighten the long adjustment knob into the indicated hole in the Front Leg (4). Align the holes in the Front Leg (4). ADJUSTING THE WEIGHT RESTS To change the height of the Weight Rests (11), first remove your barbell from the Weight Rest in Upright A (8). Position the Weight...

English Manual
Page 15
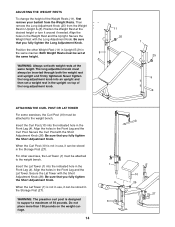
...When you will need to use either the curl post or the lat tower (not shown) are attached to cover the open tube. ADJUSTING THE WEIGHT BENCH FOR SQUAT EXERCISES To perform squat or toe raise exercises, you want to lock the backrest in a safe location. To lock ...Leg (4) and store the 2" Square Inner Cap in the upright position (see LOCKING THE BACKREST above). When you will then need to lock the Backrest (23) in the Bench Frame (5). LOCKING THE BACKREST To perform squat exercises, you use the Storage Post (27) when performing squat or toe raise exercises. WARNING: Always fold...
...When you will need to use either the curl post or the lat tower (not shown) are attached to cover the open tube. ADJUSTING THE WEIGHT BENCH FOR SQUAT EXERCISES To perform squat or toe raise exercises, you want to lock the backrest in a safe location. To lock ...Leg (4) and store the 2" Square Inner Cap in the upright position (see LOCKING THE BACKREST above). When you will then need to lock the Backrest (23) in the Bench Frame (5). LOCKING THE BACKREST To perform squat exercises, you use the Storage Post (27) when performing squat or toe raise exercises. WARNING: Always fold...
English Manual
Page 16
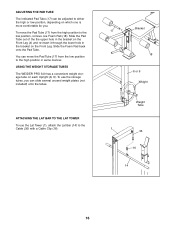
... Front Leg. ATTACHING THE LAT BAR TO THE LAT TOWER To use the storage tubes, you . Slide the Foam Pad back onto the Pad Tube. Bracket 17 18 8 or 9 Weight Weight Tube 1 36 16 14 16 To move the Pad Tube (17) from the high position to the low position, remove one is more comfortable for you can be adjusted to the Cable...
... Front Leg. ATTACHING THE LAT BAR TO THE LAT TOWER To use the storage tubes, you . Slide the Foam Pad back onto the Pad Tube. Bracket 17 18 8 or 9 Weight Weight Tube 1 36 16 14 16 To move the Pad Tube (17) from the high position to the low position, remove one is more comfortable for you can be adjusted to the Cable...
English Manual
Page 17
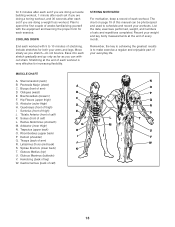
... showing the correct form for a maximum of 30 seconds between sets. • Cross Training In the pursuit of a complete and well-balanced fitness program, many sets of repetitions in an uncontrolled manner will find the locations of the muscles. By combining weight training with a list of each workout with it. Exercising in each set . A description of the muscles affected. Refer to the muscle chart on Monday...
... showing the correct form for a maximum of 30 seconds between sets. • Cross Training In the pursuit of a complete and well-balanced fitness program, many sets of repetitions in an uncontrolled manner will find the locations of the muscles. By combining weight training with a list of each workout with it. Exercising in each set . A description of the muscles affected. Refer to the muscle chart on Monday...
English Manual
Page 18
... Erectors (lower back) K T. Obliques (waist) B E. Quadriceps (front of calf) K. Triceps (back of calf) N O P Q R S T U V W 18 Ease into each workout is to achieving the greatest results is very effective for both your workouts. MUSCLE CHART A. Brachioradials (forearm) F. Rectus Abdominus (stomach) M. Deltoid (shoulder) I . Gastrocnemius (back of arm) J R. Move slowly as you are doing a weight loss workout. List the date, exercises performed, weight, and numbers of...
... Erectors (lower back) K T. Obliques (waist) B E. Quadriceps (front of calf) K. Triceps (back of calf) N O P Q R S T U V W 18 Ease into each workout is to achieving the greatest results is very effective for both your workouts. MUSCLE CHART A. Brachioradials (forearm) F. Rectus Abdominus (stomach) M. Deltoid (shoulder) I . Gastrocnemius (back of arm) J R. Move slowly as you are doing a weight loss workout. List the date, exercises performed, weight, and numbers of...
English Manual
Page 19
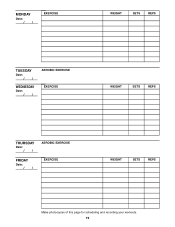
MONDAY Date: / / EXERCISE WEIGHT SETS REPS TUESDAY Date: / / WEDNESDAY Date: / / AEROBIC EXERCISE EXERCISE WEIGHT SETS REPS THURSDAY Date: / / FRIDAY Date: / / AEROBIC EXERCISE EXERCISE WEIGHT SETS REPS Make photocopies of this page for scheduling and recording your workouts. 19
MONDAY Date: / / EXERCISE WEIGHT SETS REPS TUESDAY Date: / / WEDNESDAY Date: / / AEROBIC EXERCISE EXERCISE WEIGHT SETS REPS THURSDAY Date: / / FRIDAY Date: / / AEROBIC EXERCISE EXERCISE WEIGHT SETS REPS Make photocopies of this page for scheduling and recording your workouts. 19
English Manual
Page 22
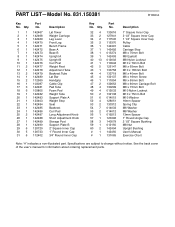
... 120720 120733 112402 Description Lat Tower Weight Carriage Leg Lever Front Leg Bench Frame Base A Base B Upright A Upright B Curl Post Weight Rest Adjustment Tube Backrest Tube Lat Bar Handgrip Cable Clip Pad Tube Foam Pad Weight Tube Support Plate A Weight Stop Seat Backrest Curl Pad Long Adjustment Knob Short Adjustment Knob Storage Post Support Plate B 2" Square Inner Cap 1" Round Inner Cap 3/4" Round Inner Cap Key No. PART LIST-Model No. 831.150381 R1099 A Key No. Qty. 32 4 33...
... 120720 120733 112402 Description Lat Tower Weight Carriage Leg Lever Front Leg Bench Frame Base A Base B Upright A Upright B Curl Post Weight Rest Adjustment Tube Backrest Tube Lat Bar Handgrip Cable Clip Pad Tube Foam Pad Weight Tube Support Plate A Weight Stop Seat Backrest Curl Pad Long Adjustment Knob Short Adjustment Knob Storage Post Support Plate B 2" Square Inner Cap 1" Round Inner Cap 3/4" Round Inner Cap Key No. PART LIST-Model No. 831.150381 R1099 A Key No. Qty. 32 4 33...
English Manual
Page 24
... immediate purchase or special order when you need help or service, or ordering parts, please be replaced, call the following information: • The MODEL NUMBER of the product (831.150381). • The NAME of the product (WEIDER® PRO 340 Weight Bench). • The PART NUMBER of the PART (see the PART LIST and the EXPLODED DRAWING at the center of this manual). • The DESCRIPTION of this...
... immediate purchase or special order when you need help or service, or ordering parts, please be replaced, call the following information: • The MODEL NUMBER of the product (831.150381). • The NAME of the product (WEIDER® PRO 340 Weight Bench). • The PART NUMBER of the PART (see the PART LIST and the EXPLODED DRAWING at the center of this manual). • The DESCRIPTION of this...


