

English Manual
Page 1
PATENT PENDING Model No. 831.150380 Serial No. The serial number can be found in the space above. Write the serial number in the location shown below. Save this equipment. Serial Number Decal (under seat) USER'S MANUAL CAUTION Read all precautions and instructions in this manual before using this manual for future reference. SEARS, ROEBUCK AND CO., HOFFMAN ESTATES, IL 60179
PATENT PENDING Model No. 831.150380 Serial No. The serial number can be found in the space above. Write the serial number in the location shown below. Save this equipment. Serial Number Decal (under seat) USER'S MANUAL CAUTION Read all precautions and instructions in this manual before using this manual for future reference. SEARS, ROEBUCK AND CO., HOFFMAN ESTATES, IL 60179

English Manual
Page 2
... 3 BEFORE YOU BEGIN 4 PART IDENTIFICATION CHART 5 ASSEMBLY 6 ADJUSTING THE WEIDER PRO 335 12 EXERCISE GUIDELINES 14 PART LIST 18 EXPLODED DRAWING 19 ORDERING REPLACEMENT PARTS Back Cover FULL 90 DAY WARRANTY For 90 days from state to defect in material or workmanship in this SEARS WEIGHT BENCH EXERCISER, contact the nearest SEARS Service Center throughout the United States and SEARS will repair or replace the WEIGHT BENCH EXERCISER, free of charge. This warranty gives you specific legal rights, and...
... 3 BEFORE YOU BEGIN 4 PART IDENTIFICATION CHART 5 ASSEMBLY 6 ADJUSTING THE WEIDER PRO 335 12 EXERCISE GUIDELINES 14 PART LIST 18 EXPLODED DRAWING 19 ORDERING REPLACEMENT PARTS Back Cover FULL 90 DAY WARRANTY For 90 days from state to defect in material or workmanship in this SEARS WEIGHT BENCH EXERCISER, contact the nearest SEARS Service Center throughout the United States and SEARS will repair or replace the WEIGHT BENCH EXERCISER, free of charge. This warranty gives you specific legal rights, and...
English Manual
Page 3
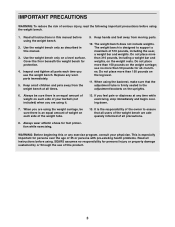
Replace any exercise program, consult your barbell (not included) when you are using the weight carriage, be sure there is designed to ensure that the adjustment tube is the responsibility of the owner to support a maximum of 35 or persons with pre-existing health problems. Read all instructions before using the weight bench. 2. Do not place more than 310 pounds, including a weight bar and weights, on each side...
Replace any exercise program, consult your barbell (not included) when you are using the weight carriage, be sure there is designed to ensure that the adjustment tube is the responsibility of the owner to support a maximum of 35 or persons with pre-existing health problems. Read all instructions before using the weight bench. 2. Do not place more than 310 pounds, including a weight bar and weights, on each side...

English Manual
Page 4
Whether your own weight set (not included) to develop every major muscle group of this manual carefully before calling. High Pulley Station Lat Bar Weight Rests Lock Pins Weight Carriage Adjustment Brackets Adjustment Tube Backrest Seat Leg Lever Weight Tube 4 If you for selecting the WEIDER® PRO 335 Weight Bench. To help you to the PRO 335 weight bench (see the front cover of the body. The serial number can be used with the parts that are labeled. until...
Whether your own weight set (not included) to develop every major muscle group of this manual carefully before calling. High Pulley Station Lat Bar Weight Rests Lock Pins Weight Carriage Adjustment Brackets Adjustment Tube Backrest Seat Leg Lever Weight Tube 4 If you for selecting the WEIDER® PRO 335 Weight Bench. To help you to the PRO 335 weight bench (see the front cover of the body. The serial number can be used with the parts that are labeled. until...
English Manual
Page 5
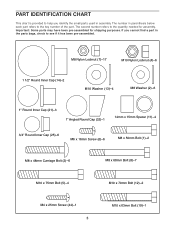
...)-4 3/4" Round Inner Cap (25)-6 M6 x 16mm Screw (6)-6 M8 x 50mm Bolt (1)-2 M8 x 48mm Carriage Bolt (3)-6 M8 x 68mm Bolt (8)-7 M10 x 75mm Bolt (5)-4 M10 x 70mm Bolt (12)-2 M4 x 25mm Screw (44)-1 5 M10 x 63mm Bolt (19)-1 The second number refers to the key number of the part. The number in parenthesis below each part refers to the quantity needed for shipping purposes. Important: Some parts may have been pre-assembled for assembly.
...)-4 3/4" Round Inner Cap (25)-6 M6 x 16mm Screw (6)-6 M8 x 50mm Bolt (1)-2 M8 x 48mm Carriage Bolt (3)-6 M8 x 68mm Bolt (8)-7 M10 x 75mm Bolt (5)-4 M10 x 70mm Bolt (12)-2 M4 x 25mm Screw (44)-1 5 M10 x 63mm Bolt (19)-1 The second number refers to the key number of the part. The number in parenthesis below each part refers to the quantity needed for shipping purposes. Important: Some parts may have been pre-assembled for assembly.

English Manual
Page 6
... 3 6 3 16 16 Note: Some small parts may have read the following tools: A socket set, a set of open-end or closed-end wrenches, or a set of ratchet wrenches. 1. Insert four M8 x 48mm Carriage Bolts (3) up through the Lower Lat Tower and the Base. do not dispose of the WEIDER® PRO 335 in the Base (40, 47). Assembly will also be facing the...
... 3 6 3 16 16 Note: Some small parts may have read the following tools: A socket set, a set of open-end or closed-end wrenches, or a set of ratchet wrenches. 1. Insert four M8 x 48mm Carriage Bolts (3) up through the Lower Lat Tower and the Base. do not dispose of the WEIDER® PRO 335 in the Base (40, 47). Assembly will also be facing the...

English Manual
Page 7
... Bolt (19) into the Lower Lat Tower (23). Slide the Carriage Stop (18) onto the Upper Lat Tower (41). Attach the other end of the Weight Carriage (15). 15 8 45 18 19 Align these Holes 41 45 22 7 23 5. Press two 1" Round Inner Caps (21) into the Weight Carriage. The hole in the same manner. Wrap the Cable (10) around a Pulley (9). Attach...
... Bolt (19) into the Lower Lat Tower (23). Slide the Carriage Stop (18) onto the Upper Lat Tower (41). Attach the other end of the Weight Carriage (15). 15 8 45 18 19 Align these Holes 41 45 22 7 23 5. Press two 1" Round Inner Caps (21) into the Weight Carriage. The hole in the same manner. Wrap the Cable (10) around a Pulley (9). Attach...

English Manual
Page 8
... Lower Lat Tower (23) with two M8 x 68mm Bolts (8), two M8 Washers (2), and two M8 Nylon Locknuts (7). Press a 1 1/2" Round Inner Cap (14) into one set of the Adjustment Tube (37). Attach the Right Upright (43) in steps 1, 6, and 7. 8. Attach the Left Barbell Lock Pin (46) to the Left Upright (42) with two M8 x 50mm Bolts (1), two M8 Washers (2), and two M8 Nylon Locknuts (7). 6. Tighten...
... Lower Lat Tower (23) with two M8 x 68mm Bolts (8), two M8 Washers (2), and two M8 Nylon Locknuts (7). Press a 1 1/2" Round Inner Cap (14) into one set of the Adjustment Tube (37). Attach the Right Upright (43) in steps 1, 6, and 7. 8. Attach the Left Barbell Lock Pin (46) to the Left Upright (42) with two M8 x 50mm Bolts (1), two M8 Washers (2), and two M8 Nylon Locknuts (7). 6. Tighten...

English Manual
Page 9
... Front Leg (20) with the M10 x 75mm Bolt (5) and an M10 Nylon Locknut (4). Attach the Leg Lever (28) to the Cross Brace (30) with four M6 x 16mm Screws (6). The Bench Frame must be turned as shown. 6 4 20 32 16 28 16 21 45 16 36 38 6 9 Slide a Weight Stop (45) onto the Leg Lever (28). 11 5 Lubricate 12. 9. Lubricate an M10 x 75mm Bolt (5). Attach both...
... Front Leg (20) with the M10 x 75mm Bolt (5) and an M10 Nylon Locknut (4). Attach the Leg Lever (28) to the Cross Brace (30) with four M6 x 16mm Screws (6). The Bench Frame must be turned as shown. 6 4 20 32 16 28 16 21 45 16 36 38 6 9 Slide a Weight Stop (45) onto the Leg Lever (28). 11 5 Lubricate 12. 9. Lubricate an M10 x 75mm Bolt (5). Attach both...
English Manual
Page 10
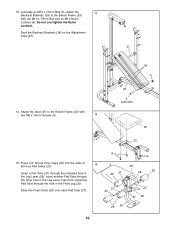
...x 75mm Bolt and an M10 Nylon Locknut (4). Attach the Seat (35) to the Bench Frame (33) with two M6 x 16mm Screws (6). 14 33 5 Lubricate 35 33 6 15. Rest the Backrest Brackets (38) on the Adjustment Tube (37). 37 38 4 14. Insert the remaining Pad Tube through the other hole in the Leg Lever. Do...Insert another Pad Tube through the hole in the Leg Lever (28). Lubricate an M10 x 75mm Bolt (5). Press 3/4" Round Inner Caps (25) into the ends of all three Pad Tubes (27). 15 Insert a Pad Tube (27) through the indicated hole in the Front Leg (20). Slide two Foam Pads (26) onto...
...x 75mm Bolt and an M10 Nylon Locknut (4). Attach the Seat (35) to the Bench Frame (33) with two M6 x 16mm Screws (6). 14 33 5 Lubricate 35 33 6 15. Rest the Backrest Brackets (38) on the Adjustment Tube (37). 37 38 4 14. Insert the remaining Pad Tube through the other hole in the Leg Lever. Do...Insert another Pad Tube through the hole in the Leg Lever (28). Lubricate an M10 x 75mm Bolt (5). Press 3/4" Round Inner Caps (25) into the ends of all three Pad Tubes (27). 15 Insert a Pad Tube (27) through the indicated hole in the Front Leg (20). Slide two Foam Pads (26) onto...

English Manual
Page 11
The use of all parts have been tightened properly. 16. Be sure that all remaining parts will be explained in ADJUSTING THE WEIDER PRO 335 beginning on page 12 of the Lat Bar. 39 CAUTION: Allow the Handgrips (39) to dry thoroughly before using the Lat Bar (31). 31 39 17. Wet the ends of the Lat Bar (31) with soapy water. 16 Slide a Handgrip (39) onto each end of this manual. 11
The use of all parts have been tightened properly. 16. Be sure that all remaining parts will be explained in ADJUSTING THE WEIDER PRO 335 beginning on page 12 of the Lat Bar. 39 CAUTION: Allow the Handgrips (39) to dry thoroughly before using the Lat Bar (31). 31 39 17. Wet the ends of the Lat Bar (31) with soapy water. 16 Slide a Handgrip (39) onto each end of this manual. 11

English Manual
Page 12
... the weight tube. ADJUSTING THE WEIDER PRO 335 The weight bench is designed to the exercise information accompanying your own weight set (not included). Be sure that you use the Leg Lever (28), be sure there is a Weight Stop (45) on the Leg Lever. 28 Weight 45 Weight Tube ADJUSTING THE BACKREST The Backrest (36) can be adjusted. Inspect and tighten all parts each side of weight (not included) onto the weight tube. Set the...
... the weight tube. ADJUSTING THE WEIDER PRO 335 The weight bench is designed to the exercise information accompanying your own weight set (not included). Be sure that you use the Leg Lever (28), be sure there is a Weight Stop (45) on the Leg Lever. 28 Weight 45 Weight Tube ADJUSTING THE BACKREST The Backrest (36) can be adjusted. Inspect and tighten all parts each side of weight (not included) onto the weight tube. Set the...

English Manual
Page 13
... sit on the Uprights (42, 43), secure your barbell with a Cable Clip (34). Barbell STORING THE WEIGHT BENCH The WEIDER PRO 335 weight bench is not in use. ATTACHING THE LAT BAR TO THE HIGH PULLEY STATION Attach the Lat Bar (31) to hold the Bench Frame in place. 46 42 37 20 36 17 43 37 33 33 13 Set the Adjustment Tube (37) into a compact storage position when it...
... sit on the Uprights (42, 43), secure your barbell with a Cable Clip (34). Barbell STORING THE WEIGHT BENCH The WEIDER PRO 335 weight bench is not in use. ATTACHING THE LAT BAR TO THE HIGH PULLEY STATION Attach the Lat Bar (31) to hold the Bench Frame in place. 46 42 37 20 36 17 43 37 33 33 13 Set the Adjustment Tube (37) into a compact storage position when it...

English Manual
Page 14
... for each workout, or a specific number of weight for each set if you are also important. On the exercise poster accompanying this manual, you will continually adapt and grow. A description of your exercise program, and to progress at least one situp. Refer to the muscle chart on page 16 to find photographs showing the correct form for 3 minutes after each set if you...
... for each workout, or a specific number of weight for each set if you are also important. On the exercise poster accompanying this manual, you will continually adapt and grow. A description of your exercise program, and to progress at least one situp. Refer to the muscle chart on page 16 to find photographs showing the correct form for 3 minutes after each set if you...

English Manual
Page 15
... month. List the date, exercises performed, weight, and numbers of stretching. Record your workouts. doing a weight loss workout. The chart on page 17 of your arms and legs. COOLING DOWN End each exercise. Plan to spend the first couple of weeks familiarizing yourself with the equipment and learning the proper form for each workout with 5 to make exercise a regular and enjoyable part of this manual can...
... month. List the date, exercises performed, weight, and numbers of stretching. Record your workouts. doing a weight loss workout. The chart on page 17 of your arms and legs. COOLING DOWN End each exercise. Plan to spend the first couple of weeks familiarizing yourself with the equipment and learning the proper form for each workout with 5 to make exercise a regular and enjoyable part of this manual can...
English Manual
Page 16
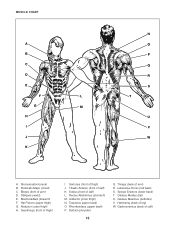
...) M. Spinae Erectors (lower back) T. Hamstring (back of calf) K. Quadriceps (front of arm) R. Deltoid (shoulder) 16 Q. Latissimus Dorsi (mid back) S. Triceps (back of thigh) I J K N O P Q R S T U V W A. Gluteus Maximus (buttocks) V. Brachioradials (forearm) F. Sartorius (front of calf) L. Gluteus Medius (hip) U. Obliques (waist) E. Soleus (front of thigh) J. Rhomboideus (upper back) P. Gastrocnemius (back of arm) D. Pectoralis Major (chest) C. MUSCLE CHART A B C D E F L G M H I . Biceps (front...
...) M. Spinae Erectors (lower back) T. Hamstring (back of calf) K. Quadriceps (front of arm) R. Deltoid (shoulder) 16 Q. Latissimus Dorsi (mid back) S. Triceps (back of thigh) I J K N O P Q R S T U V W A. Gluteus Maximus (buttocks) V. Brachioradials (forearm) F. Sartorius (front of calf) L. Gluteus Medius (hip) U. Obliques (waist) E. Soleus (front of thigh) J. Rhomboideus (upper back) P. Gastrocnemius (back of arm) D. Pectoralis Major (chest) C. MUSCLE CHART A B C D E F L G M H I . Biceps (front...

English Manual
Page 17
MONDAY Date: / / EXERCISE WEIGHT SETS REPS TUESDAY Date: / / AEROBIC EXERCISE WEDNESDAY Date: / / EXERCISE WEIGHT SETS REPS THURSDAY Date: / / AEROBIC EXERCISE FRIDAY Date: / / EXERCISE WEIGHT SETS REPS Make photocopies of this page for scheduling and recording your workouts. 17
MONDAY Date: / / EXERCISE WEIGHT SETS REPS TUESDAY Date: / / AEROBIC EXERCISE WEDNESDAY Date: / / EXERCISE WEIGHT SETS REPS THURSDAY Date: / / AEROBIC EXERCISE FRIDAY Date: / / EXERCISE WEIGHT SETS REPS Make photocopies of this page for scheduling and recording your workouts. 17

English Manual
Page 18
... Upper Lat Tower 42 1 132185 Left Upright 43 1 132186 Right Upright 44 1 132139 M4 x 25mm Screw 45 3 123403 Weight Stop 46 1 133123 Left Barbell Lock Pin 47 1 133142 Left Base Section # 1 132002 User's Manual # 1 129186 Exercise Poster Note: "#" indicates a non-illustrated part. Qty. Description Key Part No. Specifications are subject to change without notice. See the back cover of this manual for information about ordering replacement parts. 18 PART LIST-Model No. 831...
... Upper Lat Tower 42 1 132185 Left Upright 43 1 132186 Right Upright 44 1 132139 M4 x 25mm Screw 45 3 123403 Weight Stop 46 1 133123 Left Barbell Lock Pin 47 1 133142 Left Base Section # 1 132002 User's Manual # 1 129186 Exercise Poster Note: "#" indicates a non-illustrated part. Qty. Description Key Part No. Specifications are subject to change without notice. See the back cover of this manual for information about ordering replacement parts. 18 PART LIST-Model No. 831...

English Manual
Page 19
EXPLODED DRAWING-Model No. 831.150380 R0996A 15 29 21 8 26 26 25 25 27 25 9 11 13 25 25 27 41 13 11 4 25 39 22 29 26 12 9 13 10 11 21 13 45 22 31 34 39 22 17 36 18 19 7 7 7 23 43 8 6 16 38 46 7 14 7 37 2 7 74 8 5 4 2 42 5 7 14 30 7 35 6 7 2 8 2 7 33 1 7 40 3 3 47 16 3 16 24 6 6 16 44 5 20 19 4 28 16 32 21 16
EXPLODED DRAWING-Model No. 831.150380 R0996A 15 29 21 8 26 26 25 25 27 25 9 11 13 25 25 27 41 13 11 4 25 39 22 29 26 12 9 13 10 11 21 13 45 22 31 34 39 22 17 36 18 19 7 7 7 23 43 8 6 16 38 46 7 14 7 37 2 7 74 8 5 4 2 42 5 7 14 30 7 35 6 7 2 8 2 7 33 1 7 40 3 3 47 16 3 16 24 6 6 16 44 5 20 19 4 28 16 32 21 16

English Manual
Page 20
... assembling or operating the WEIDER® PRO 335 • a part is missing • or you need help or service, or ordering parts, please be replaced, call the following information: • The MODEL NUMBER of the product (831.150380). • The NAME of the product (WEIDER® PRO 335 Weight Bench). • The PART NUMBER of the PART (see the PART LIST and the EXPLODED DRAWING on pages 18 and 19 of this manual...
... assembling or operating the WEIDER® PRO 335 • a part is missing • or you need help or service, or ordering parts, please be replaced, call the following information: • The MODEL NUMBER of the product (831.150380). • The NAME of the product (WEIDER® PRO 335 Weight Bench). • The PART NUMBER of the PART (see the PART LIST and the EXPLODED DRAWING on pages 18 and 19 of this manual...


