
English Manual
Page 1
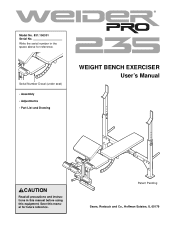
Write the serial number in this manual before using this manual for reference. Save this equipment. Model No. 831.150301 Serial No. Patent Pending Sears, Roebuck and Co., Hoffman Estates, IL 60179 Serial Number Decal (under seat) • Assembly • Adjustments • Part List and Drawing WEIGHT BENCH EXERCISER User's Manual CAUTION Read all precautions and instructions in the space above for future reference.
Write the serial number in this manual before using this manual for reference. Save this equipment. Model No. 831.150301 Serial No. Patent Pending Sears, Roebuck and Co., Hoffman Estates, IL 60179 Serial Number Decal (under seat) • Assembly • Adjustments • Part List and Drawing WEIGHT BENCH EXERCISER User's Manual CAUTION Read all precautions and instructions in the space above for future reference.
English Manual
Page 2
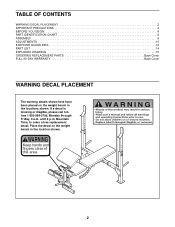
... Friday, 6 a.m. TABLE OF CONTENTS WARNING DECAL PLACEMENT 2 IMPORTANT PRECAUTIONS 3 BEFORE YOU BEGIN 4 PART IDENTIFICATION CHART 5 ASSEMBLY 6 ADJUSTMENTS 10 EXERCISE GUIDELINES 12 PART LIST 14 EXPLODED DRAWING 15 ORDERING REPLACEMENT PARTS Back Cover FULL 90-DAY WARRANTY Back Cover WARNING DECAL PLACEMENT The warning decals shown here have been placed on the weight bench in the locations shown. Place the decal on the weight bench in the location shown.
... Friday, 6 a.m. TABLE OF CONTENTS WARNING DECAL PLACEMENT 2 IMPORTANT PRECAUTIONS 3 BEFORE YOU BEGIN 4 PART IDENTIFICATION CHART 5 ASSEMBLY 6 ADJUSTMENTS 10 EXERCISE GUIDELINES 12 PART LIST 14 EXPLODED DRAWING 15 ORDERING REPLACEMENT PARTS Back Cover FULL 90-DAY WARRANTY Back Cover WARNING DECAL PLACEMENT The warning decals shown here have been placed on the weight bench in the locations shown. Place the decal on the weight bench in the location shown.
English Manual
Page 3
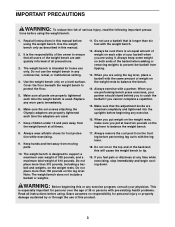
... adapters are using . Always wear athletic shoes for home use of the weight bench are inserted completely and tightened into the uprights before performing leg curls with pre-existing health problems. Read all instructions in this will cause the weight bench to balance the bench. 14. Always remove the curl post from moving parts. 10. If you feel pain or dizziness at all parts are properly tightened each time the weight bench...
... adapters are using . Always wear athletic shoes for home use of the weight bench are inserted completely and tightened into the uprights before performing leg curls with pre-existing health problems. Read all instructions in this will cause the weight bench to balance the bench. 14. Always remove the curl post from moving parts. 10. If you feel pain or dizziness at all parts are properly tightened each time the weight bench...
English Manual
Page 4
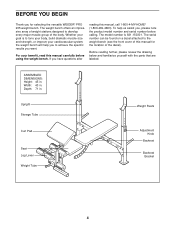
... parts that are labeled. To help you to the weight bench (see the front cover of the body. ASSEMBLED DIMENSIONS: Height: 45 in . The serial number can be found on a decal attached to achieve the specific results you have questions after reading this manual for selecting the versatile WEIDER® PRO 235 weight bench. Depth: 71 in . Upright Storage Tube Weight Rests Curl Pad Seat Leg Lever Weight Tube Adjustment Knob Backrest Backrest Bracket 4 The weight bench...
... parts that are labeled. To help you to the weight bench (see the front cover of the body. ASSEMBLED DIMENSIONS: Height: 45 in . The serial number can be found on a decal attached to achieve the specific results you have questions after reading this manual for selecting the versatile WEIDER® PRO 235 weight bench. Depth: 71 in . Upright Storage Tube Weight Rests Curl Pad Seat Leg Lever Weight Tube Adjustment Knob Backrest Backrest Bracket 4 The weight bench...
English Manual
Page 5
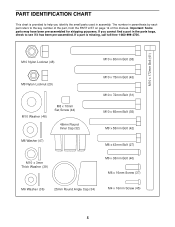
... help you cannot find a part in the parts bags, check to the key number of the part, from the PART LIST on page 14 of this manual. Important: Some parts may have been pre-assembled for shipping purposes. M10 x 172mm Bolt (41) M10 Nylon Locknut (48) M10 x 80mm Bolt (38) M8 Nylon Locknut (29) M10 Washer (46) M8 x 10mm Set Screw (44) 48mm Round...
... help you cannot find a part in the parts bags, check to the key number of the part, from the PART LIST on page 14 of this manual. Important: Some parts may have been pre-assembled for shipping purposes. M10 x 172mm Bolt (41) M10 Nylon Locknut (48) M10 x 80mm Bolt (38) M8 Nylon Locknut (29) M10 Washer (46) M8 x 10mm Set Screw (44) 48mm Round...
English Manual
Page 6
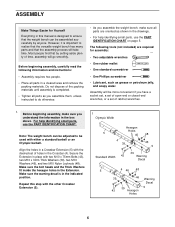
... identifying small parts, use the PART IDENTIFICATION CHART. The following information and instructions: • Assembly requires two people. • Place all parts are required for Yourself Everything in the drawings. • For help identifying small parts, use the PART IDENTIFICATION CHART on page 5. Repeat this manual is important to do otherwise. • As you assemble the weight bench, make sure you have a socket set, a set of open-end or...
... identifying small parts, use the PART IDENTIFICATION CHART. The following information and instructions: • Assembly requires two people. • Place all parts are required for Yourself Everything in the drawings. • For help identifying small parts, use the PART IDENTIFICATION CHART on page 5. Repeat this manual is important to do otherwise. • As you assemble the weight bench, make sure you have a socket set, a set of open-end or...
English Manual
Page 7
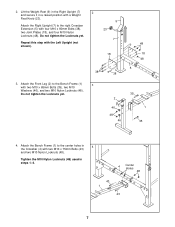
... a raised position with two M10 x 65mm Bolts (35), two M10 Washers (46), and two M10 Nylon Locknuts (48). Tighten the M10 Nylon Locknuts (48) used in steps 1-4. 4 Center Holes 48 43 1 43 7 Attach the Right Upright (7) to the Bench Frame (1) 3 with a Weight Rest Knob (23). Do not tighten the Locknuts yet. Do not tighten the Locknuts yet. 38 2 46 48 46...
... a raised position with two M10 x 65mm Bolts (35), two M10 Washers (46), and two M10 Nylon Locknuts (48). Tighten the M10 Nylon Locknuts (48) used in steps 1-4. 4 Center Holes 48 43 1 43 7 Attach the Right Upright (7) to the Bench Frame (1) 3 with a Weight Rest Knob (23). Do not tighten the Locknuts yet. Do not tighten the Locknuts yet. 38 2 46 48 46...
English Manual
Page 8
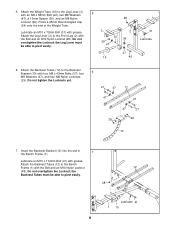
... to pivot easily. 48 Lubricate 41 1 10 8 Insert the Backrest Bracket (10) into the slot in 7 the Bench Frame (1). 5. Press a 25mm Round Angled Cap (34) onto the end of the Weight Tube. Attach the Backrest Tubes (12) to the Front Leg (2) with the Bolt and an M10 Nylon Locknut 12 (48). Do not tighten the Locknuts yet. 27...
... to pivot easily. 48 Lubricate 41 1 10 8 Insert the Backrest Bracket (10) into the slot in 7 the Bench Frame (1). 5. Press a 25mm Round Angled Cap (34) onto the end of the Weight Tube. Attach the Backrest Tubes (12) to the Front Leg (2) with the Bolt and an M10 Nylon Locknut 12 (48). Do not tighten the Locknuts yet. 27...
English Manual
Page 9
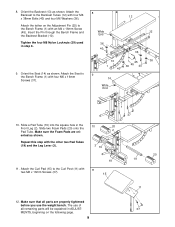
...properly tightened before you use of all parts are oriented as shown. Orient the Backrest (13) as shown. Attach the Seat to the Curl Post (11) with four M6 x 16mm 14 Screws (37). Attach the Backrest to the Bench Frame (1) with an M4 x 16mm Screw (45). Orient the Seat (... 20 19 19 11. Repeat this step with four M6 x 38mm Bolts (40) and four M6 Washers (36). Attach the tether on the following page. 9 Tighten the four M8 Nylon Locknuts (29) used in the Front Leg (2). The use the weight bench. Insert the Pin through the Bench Frame and the Backrest Bracket (10)....
...properly tightened before you use of all parts are oriented as shown. Orient the Backrest (13) as shown. Attach the Seat to the Curl Post (11) with four M6 x 16mm 14 Screws (37). Attach the Backrest to the Bench Frame (1) with an M4 x 16mm Screw (45). Orient the Seat (... 20 19 19 11. Repeat this step with four M6 x 38mm Bolts (40) and four M6 Washers (36). Attach the tether on the following page. 9 Tighten the four M8 Nylon Locknuts (29) used in the Front Leg (2). The use the weight bench. Insert the Pin through the Bench Frame and the Backrest Bracket (10)....
English Manual
Page 10
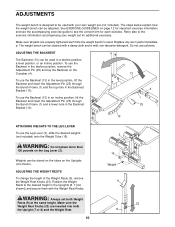
... Crossbar (4). ADJUSTING THE WEIGHT RESTS To change the height of the Weight Rests (9), remove the Weight Rest Knobs (23). Refer also to see the accompanying exercise guide to the exercise information accompanying your own weight set (not included). Make sure the Weight Rest Knobs (23) are properly tightened each exercise. To use solvents. ADJUSTING THE BACKREST The Backrest (13) can be used with your weight set both the Upright (7 or 8) and the Weight Rest...
... Crossbar (4). ADJUSTING THE WEIGHT RESTS To change the height of the Weight Rests (9), remove the Weight Rest Knobs (23). Refer also to see the accompanying exercise guide to the exercise information accompanying your own weight set (not included). Make sure the Weight Rest Knobs (23) are properly tightened each exercise. To use solvents. ADJUSTING THE BACKREST The Backrest (13) can be used with your weight set both the Upright (7 or 8) and the Weight Rest...
English Manual
Page 11
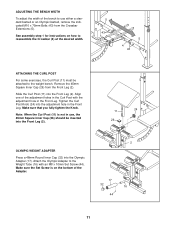
... exercises, the Curl Post (11) must be inserted into the Front Leg (2). 11 24 26 OLYMPIC WEIGHT ADAPTER Press a 48mm Round Inner Cap (32) into the Olympic Adapter (17). ADJUSTING THE BENCH WIDTH To adjust the width of the bench to the weight bench. See assembly step 1 for instructions on the bottom of the adjustment holes in use, the 45mm Square Inner Cap (26) should be attached to use...
... exercises, the Curl Post (11) must be inserted into the Front Leg (2). 11 24 26 OLYMPIC WEIGHT ADAPTER Press a 48mm Round Inner Cap (32) into the Olympic Adapter (17). ADJUSTING THE BENCH WIDTH To adjust the width of the bench to the weight bench. See assembly step 1 for instructions on the bottom of the adjustment holes in use, the 45mm Square Inner Cap (26) should be attached to use...
English Manual
Page 12
... first few months of your exercise program. EXERCISE FORM Maintaining proper form is an individual matter. Exhale during the exertion stage of each exercise depends upon the individual user. A "set . Weight Loss To lose weight, use a low amount of resistance and increase the number of repetitions in each workout, as well as running on a treadmill or riding on an elliptical or exercise bike, on the next page to...
... first few months of your exercise program. EXERCISE FORM Maintaining proper form is an individual matter. Exhale during the exertion stage of each exercise depends upon the individual user. A "set . Weight Loss To lose weight, use a low amount of resistance and increase the number of repetitions in each workout, as well as running on a treadmill or riding on an elliptical or exercise bike, on the next page to...
English Manual
Page 13
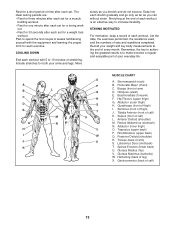
List the date, the exercises performed, the resistance used, and the numbers of every month. Record your weight and key body measurements at the end of each workout with the equipment and learning the proper form for each set. Biceps (front of arm) S. Obliques (waist) E. Brachioradials (forearm) F. COOLING DOWN End each workout is to make exercise a regular and enjoyable part of thigh) I J K L M N O P Q R S T U V W X MUSCLE CHART A. Stretching at the...
List the date, the exercises performed, the resistance used, and the numbers of every month. Record your weight and key body measurements at the end of each workout with the equipment and learning the proper form for each set. Biceps (front of arm) S. Obliques (waist) E. Brachioradials (forearm) F. COOLING DOWN End each workout is to make exercise a regular and enjoyable part of thigh) I J K L M N O P Q R S T U V W X MUSCLE CHART A. Stretching at the...
English Manual
Page 14
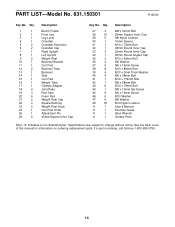
... Crossbar Cap Right Upright Left Upright Weight Rest Backrest Bracket Curl Post Backrest Tube Backrest Seat Curl Pad Weight Tube Olympic Adapter Joint Plate Pad Tube Foam Pad Weight Rest Cap Square Bushing Weight Rest Knob Curl Post Knob Adjustment Pin 45mm Square Inner Cap Key No. PART LIST-Model No. 831.150301 R1203A Key No. See the back cover of this manual for information on ordering replacement parts. Specifications are subject to...
... Crossbar Cap Right Upright Left Upright Weight Rest Backrest Bracket Curl Post Backrest Tube Backrest Seat Curl Pad Weight Tube Olympic Adapter Joint Plate Pad Tube Foam Pad Weight Rest Cap Square Bushing Weight Rest Knob Curl Post Knob Adjustment Pin 45mm Square Inner Cap Key No. PART LIST-Model No. 831.150301 R1203A Key No. See the back cover of this manual for information on ordering replacement parts. Specifications are subject to...

English Manual
Page 15
EXPLODED DRAWING-Model No. 831.150301 R1203A 13 9 45 45 23 21 22 33 7 5 18 18 39 27 15 48 47 11 48 46 48 46 45 28 36 40 37 29 10 28 12 12 36 47 27 36 40 36 41 9 29 45 45 38 43 39 22 6 4 45 6 14 45 48 43 22 46 48 26 48 24 35 1 45 39 45 43 25 43 39 5 38 20 46 48 26 46 2 31 37 26 35 3 20 20 26 32 17 26 29 16 47 30 33 26 44 34 47 42 28 28 19 19 28 20 28 20 46 18 18 48 48 21 22 23 33 8 15
EXPLODED DRAWING-Model No. 831.150301 R1203A 13 9 45 45 23 21 22 33 7 5 18 18 39 27 15 48 47 11 48 46 48 46 45 28 36 40 37 29 10 28 12 12 36 47 27 36 40 36 41 9 29 45 45 38 43 39 22 6 4 45 6 14 45 48 43 22 46 48 26 48 24 35 1 45 39 45 43 25 43 39 5 38 20 46 48 26 46 2 31 37 26 35 3 20 20 26 32 17 26 29 16 47 30 33 26 44 34 47 42 28 28 19 19 28 20 28 20 46 18 18 48 48 21 22 23 33 8 15
English Manual
Page 16
... apply when the WEIGHT BENCH EXERCISER is used commercially or for rental purposes. Sears, Roebuck and Co., Dept 817WA, Hoffman Estates, IL 60179 Part No. 206787 R1203A Printed in this WEIGHT BENCH EXERCISER, contact the nearest Sears Service Center throughout the United States and Sears will repair or replace the WEIGHT BENCH EXERCISER, free of purchase, if failure occurs due to state. This warranty gives you specific legal rights, and...
... apply when the WEIGHT BENCH EXERCISER is used commercially or for rental purposes. Sears, Roebuck and Co., Dept 817WA, Hoffman Estates, IL 60179 Part No. 206787 R1203A Printed in this WEIGHT BENCH EXERCISER, contact the nearest Sears Service Center throughout the United States and Sears will repair or replace the WEIGHT BENCH EXERCISER, free of purchase, if failure occurs due to state. This warranty gives you specific legal rights, and...


