

English Manual
Page 1
Model No. As a manufacturer, we are missing or damaged parts, we will provide immediate assistance, free of charge to providing complete customer satisfaction. Save this equipment. USERÕS MANUAL Serial Number Decal QUESTIONS? TO AVOID UNNECESSARY DELAYS, PLEASE CALL DIRECT TO OUR TOLL-FREE CUSTOMER HOT LINE. Write the serial number in this manual before using this manual for reference. WEBE03490 Serial No. If you have...
Model No. As a manufacturer, we are missing or damaged parts, we will provide immediate assistance, free of charge to providing complete customer satisfaction. Save this equipment. USERÕS MANUAL Serial Number Decal QUESTIONS? TO AVOID UNNECESSARY DELAYS, PLEASE CALL DIRECT TO OUR TOLL-FREE CUSTOMER HOT LINE. Write the serial number in this manual before using this manual for reference. WEBE03490 Serial No. If you have...
English Manual
Page 2
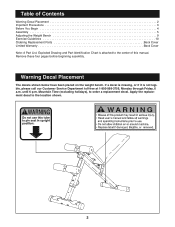
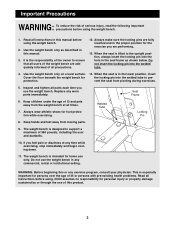
... is attached to the location shown. 2 Apply the replacement decal to the center of this manual. until 6 p.m. Remove these four pages before beginning assembly. Table of Contents Warning Decal Placement 2 Important Precautions 3 Before You Begin 4 Assembly 5 Adjusting the Weight Bench 9 Exercise Guidelines 10 Ordering Replacement Parts Back Cover Limited Warranty Back Cover Note: A Part List, Exploded Drawing and Part Identification Chart is not legible, please call our Customer Service Department toll-free at...
... is attached to the location shown. 2 Apply the replacement decal to the center of this manual. until 6 p.m. Remove these four pages before beginning assembly. Table of Contents Warning Decal Placement 2 Important Precautions 3 Before You Begin 4 Assembly 5 Adjusting the Weight Bench 9 Exercise Guidelines 10 Ordering Replacement Parts Back Cover Limited Warranty Back Cover Note: A Part List, Exploded Drawing and Part Identification Chart is not legible, please call our Customer Service Department toll-free at...
English Manual
Page 3
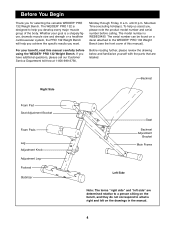
... institutional setting. Replace any exercise program, consult your physician. Welded Tube Locking Pin 8. Read all times. 7. ICON assumes no responsibility for the locking pin into the hole in the seat frame as described in this manual before using the weight bench. 2. Keep hands and feet away from pivoting during exercises. 5. This is designed to support a maximum of 35 or persons with pre-existing health problems. Read...
... institutional setting. Replace any exercise program, consult your physician. Welded Tube Locking Pin 8. Read all times. 7. ICON assumes no responsibility for the locking pin into the hole in the seat frame as described in this manual before using the weight bench. 2. Keep hands and feet away from pivoting during exercises. 5. This is designed to support a maximum of 35 or persons with pre-existing health problems. Read...
English Manual
Page 4
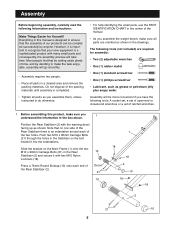
... selecting the versatile WEIDER¨ PRO 132 Weight Bench. Right Side Foam Pad Seat Adjustment Bracket Foam Pads Leg Adjustment Knob Adjustment Leg Footrest Stabilizer Backrest Seat Backrest Adjustment Bracket Main Frame Left Side Note: The terms Òright sideÓ and Òleft sideÓ are labeled. For your goal is right and left on a decal attached to help you achieve the specific results you...
... selecting the versatile WEIDER¨ PRO 132 Weight Bench. Right Side Foam Pad Seat Adjustment Bracket Foam Pads Leg Adjustment Knob Adjustment Leg Footrest Stabilizer Backrest Seat Backrest Adjustment Bracket Main Frame Left Side Note: The terms Òright sideÓ and Òleft sideÓ are labeled. For your goal is right and left on a decal attached to help you achieve the specific results you...
English Manual
Page 5
.... ¥ Tighten all parts in the Rear 10 Stabilizer (2) and secure it is a sophisticated product with the warning decal facing up as shown. Assembly Before beginning assembly, carefully read the following information and instructions: Make Things Easier for assembly: ¥ Two (2) adjustable wrenches ¥ One (1) rubber mallet ¥ One (1) standard screwdriver ¥ One (1) phillips screwdriver ¥ Lubricant, such as grease or...
.... ¥ Tighten all parts in the Rear 10 Stabilizer (2) and secure it is a sophisticated product with the warning decal facing up as shown. Assembly Before beginning assembly, carefully read the following information and instructions: Make Things Easier for assembly: ¥ Two (2) adjustable wrenches ¥ One (1) rubber mallet ¥ One (1) standard screwdriver ¥ One (1) phillips screwdriver ¥ Lubricant, such as grease or...
English Manual
Page 6
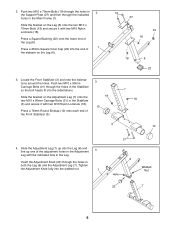
...Support Plate (27) and then through the indicated holes in both the Leg (6) and the Adjustment Leg (7). Slide the bracket on the Leg (6). 19 27 24 18 18 6 22 3. Insert the Adjustment Knob (23) through the holes in the Leg. Press a Square Bushing (22) onto the lower end of the Leg (6). 1 Press... 18 3 10 4. Press a 76mm Round Endcap (10) onto each end of the adjustment holes in the Adjustment 4 Leg with two M10 Nylon Locknuts (18). Locate the Front Stabilizer (3) and note the indentations around the holes. Tighten the Adjustment Knob fully into the Leg (6) and line up ...
...Support Plate (27) and then through the indicated holes in both the Leg (6) and the Adjustment Leg (7). Slide the bracket on the Leg (6). 19 27 24 18 18 6 22 3. Insert the Adjustment Knob (23) through the holes in the Leg. Press a Square Bushing (22) onto the lower end of the Leg (6). 1 Press... 18 3 10 4. Press a 76mm Round Endcap (10) onto each end of the adjustment holes in the Adjustment 4 Leg with two M10 Nylon Locknuts (18). Locate the Front Stabilizer (3) and note the indentations around the holes. Tighten the Adjustment Knob fully into the Leg (6) and line up ...
English Manual
Page 7
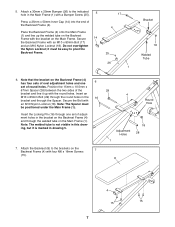
... has four sets of oval adjustment holes and one set of round holes. Note: The Spacer must be positioned under the Main Frame (1). Press a 25mm x 50mm Inner Cap (14) into the end of adjustment holes in the Main Frame (1) with four M6 x 16mm Screws 7 (15). 29 4 Round Hole Adjustment Holes 1...Locking Pin (16) through the Spacer. Attach the Backrest (8) to the brackets on the Main Frame (1). it is marked in the 16 bracket and through one 6 set of the Backrest Frame (4). Insert an M10 x 85mm Bolt (29) through the welded tube on the Backrest Frame (4) with a Bumper Screw (25...
... has four sets of oval adjustment holes and one set of round holes. Note: The Spacer must be positioned under the Main Frame (1). Press a 25mm x 50mm Inner Cap (14) into the end of adjustment holes in the Main Frame (1) with four M6 x 16mm Screws 7 (15). 29 4 Round Hole Adjustment Holes 1...Locking Pin (16) through the Spacer. Attach the Backrest (8) to the brackets on the Main Frame (1). it is marked in the 16 bracket and through one 6 set of the Backrest Frame (4). Insert an M10 x 85mm Bolt (29) through the welded tube on the Backrest Frame (4) with a Bumper Screw (25...
English Manual
Page 8
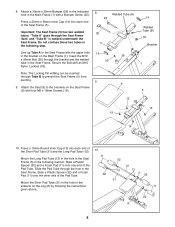
...Seat Frame (5) in the bracket on the Leg (6) by following the instructions given above. 10 11 32 32 13 31 12 13 5 32 11 32 6 8 Insert the M10 x 95mm Bolt (20) through Tube B to the indicated hole in the Main Frame (1) with the upper hole in the following step. Note: The Locking Pin... in the Seat Frame with a Bumper Screw (25). Slide the Pad Tube through the Seat Frame itself, and ÒTube BÓ is welded underneath the Seat Frame. Press a 19mm Round Inner Cap (13) into each end of the Pad Tube. Attach a 30mm x 25mm Bumper (26) to prevent the Seat Frame (5) ...
...Seat Frame (5) in the bracket on the Leg (6) by following the instructions given above. 10 11 32 32 13 31 12 13 5 32 11 32 6 8 Insert the M10 x 95mm Bolt (20) through Tube B to the indicated hole in the Main Frame (1) with the upper hole in the following step. Note: The Locking Pin... in the Seat Frame with a Bumper Screw (25). Slide the Pad Tube through the Seat Frame itself, and ÒTube BÓ is welded underneath the Seat Frame. Press a 19mm Round Inner Cap (13) into each end of the Pad Tube. Attach a 30mm x 25mm Bumper (26) to prevent the Seat Frame (5) ...
English Manual
Page 9
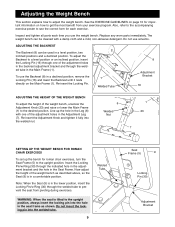
... upright position, always insert the locking pin into the welded tube. 9 Seat Frame (5) 9 Locking Pin (30) Adjustment Bracket Inspect and tighten all parts each exercise. The weight bench can be cleaned with one of the adjustment holes in the backrest adjustment bracket and through one of the adjustment holes in the Leg (6) with a damp cloth and a mild, non-abrasive detergent. Do not use the weight bench. Adjusting the Weight Bench...
... upright position, always insert the locking pin into the welded tube. 9 Seat Frame (5) 9 Locking Pin (30) Adjustment Bracket Inspect and tighten all parts each exercise. The weight bench can be cleaned with one of the adjustment holes in the backrest adjustment bracket and through one of the adjustment holes in the Leg (6) with a damp cloth and a mild, non-abrasive detergent. Do not use the weight bench. Adjusting the Weight Bench...
English Manual
Page 10
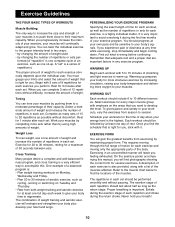
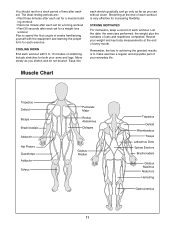
... your muscles by using high amounts of weight that adequate rest and a proper diet are important factors in each set . Exercise for 20 to 30 minutes, resting for each exercise is to push them to avoid overdoing it . Cross Training Many people desire a complete and well-balanced fitness program, and cross training is important. This requires moving only the appropriate parts of the...
... your muscles by using high amounts of weight that adequate rest and a proper diet are important factors in each set . Exercise for 20 to 30 minutes, resting for each exercise is to push them to avoid overdoing it . Cross Training Many people desire a complete and well-balanced fitness program, and cross training is important. This requires moving only the appropriate parts of the...
English Manual
Page 11
... after each set for a toning workout ¥ Rest 30 seconds after each set for a weight loss workout Plan to spend the first couple of weeks familiarizing yourself with 5 to make exercise a regular and enjoyable part of your weight and key body measurements at the end of each workout with the equipment and learning the proper form for both your arms and legs. Ease into...
... after each set for a toning workout ¥ Rest 30 seconds after each set for a weight loss workout Plan to spend the first couple of weeks familiarizing yourself with 5 to make exercise a regular and enjoyable part of your weight and key body measurements at the end of each workout with the equipment and learning the proper form for both your arms and legs. Ease into...
English Manual
Page 12
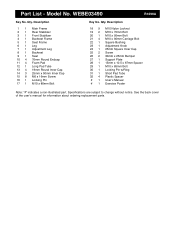
Part List - Qty. Specifications are subject to change without notice. See the back cover of the userÕs manual for information about ordering replacement parts. Model No. Description 1 1 Main Frame 2 1 Rear Stabilizer 3 1 Front Stabilizer 4 1 Backrest Frame 5 1 Seat Frame 6 1 Leg 7 1 Adjustment Leg 8 1 Backrest 9 1 Seat 10 4 76mm Round Endcap 11 4 Foam Pad 12 1 Long Pad Tube 13 4 19mm Round Inner Cap 14 3 25mm x 50mm Inner Cap 15 8 M6 x 16mm Screw 16...
Part List - Qty. Specifications are subject to change without notice. See the back cover of the userÕs manual for information about ordering replacement parts. Model No. Description 1 1 Main Frame 2 1 Rear Stabilizer 3 1 Front Stabilizer 4 1 Backrest Frame 5 1 Seat Frame 6 1 Leg 7 1 Adjustment Leg 8 1 Backrest 9 1 Seat 10 4 76mm Round Endcap 11 4 Foam Pad 12 1 Long Pad Tube 13 4 19mm Round Inner Cap 14 3 25mm x 50mm Inner Cap 15 8 M6 x 16mm Screw 16...
English Manual
Page 14
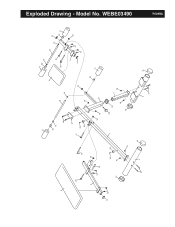
Exploded Drawing - WEBE03490 8 29 16 4 18 15 28 14 15 25 26 10 18 18 11 32 13 19 27 17 25 26 18 18 9 31 13 18 6 24 32 11 32 13 20 30 12 14 13 32 11 5 14 18 15 15 11 1 23 22 7 18 18 10 10 2 21 3 10 21 R1099A Model No.
Exploded Drawing - WEBE03490 8 29 16 4 18 15 28 14 15 25 26 10 18 18 11 32 13 19 27 17 25 26 18 18 9 31 13 18 6 24 32 11 32 13 20 30 12 14 13 32 11 5 14 18 15 15 11 1 23 22 7 18 18 10 10 2 21 3 10 21 R1099A Model No.
English Manual
Page 15
... us assist you . The MODEL NUMBER of the product (WEIDER¨ PRO 132 Weight Bench). 3. This warranty extends only to you , please be pre-authorized by ICON at one of its authorized service centers. ICON's obligation under normal use , costs of removal, installation or other rights which warranty claim is made must be prepared to give the following information when calling: 1. ICON is not responsible or liable...
... us assist you . The MODEL NUMBER of the product (WEIDER¨ PRO 132 Weight Bench). 3. This warranty extends only to you , please be pre-authorized by ICON at one of its authorized service centers. ICON's obligation under normal use , costs of removal, installation or other rights which warranty claim is made must be prepared to give the following information when calling: 1. ICON is not responsible or liable...


