
User Manual
Page 1
... there are missing or damaged parts, we are committed to you complete satisfaction through direct assistance from our factory. MST CAUTION Read all precautions and instructions in the space above for future reference. USERÕS MANUAL Serial Number Decal QUESTIONS? TO AVOID UNNECESSARY DELAYS, PLEASE CALL DIRECT TO OUR TOLL-FREE...
... there are missing or damaged parts, we are committed to you complete satisfaction through direct assistance from our factory. MST CAUTION Read all precautions and instructions in the space above for future reference. USERÕS MANUAL Serial Number Decal QUESTIONS? TO AVOID UNNECESSARY DELAYS, PLEASE CALL DIRECT TO OUR TOLL-FREE...

User Manual
Page 3
protection. vent the seat from moving parts. 9. Inspect and tighten all instructions before using. Seat Frame 6. Always wear athletic shoes for the exercise you are performing. 13. Keep hands and feet away from pivoting during exercises. 5. This ... pain or dizziness at all precautions. 12. WARNING: Before beginning this product. 3 It is intended for the locking pin into the welded tube. 4. Read all instructions in any worn parts immediately.
protection. vent the seat from moving parts. 9. Inspect and tighten all instructions before using. Seat Frame 6. Always wear athletic shoes for the exercise you are performing. 13. Keep hands and feet away from pivoting during exercises. 5. This ... pain or dizziness at all precautions. 12. WARNING: Before beginning this product. 3 It is intended for the locking pin into the welded tube. 4. Read all instructions in any worn parts immediately.

User Manual
Page 5
...the drawings. Do not dispose of the packing materials until assembly is completed. ¥ Tighten all parts as you assemble them, unless instructed to recognize that on the Main Frame (1) onto the two M10 x 72mm Carriage Bolts (21) in the Stabilizer so the bolt ... Round Endcap (10) onto each of the two holes. Note that your new equipment is designed to make sure you have the following information and instructions: Make Things Easier for assembly: ¥ Two (2) adjustable wrenches ¥ One (1) rubber mallet ¥ One (1) standard screwdriver ¥ One (1) phillips screwdriver...
...the drawings. Do not dispose of the packing materials until assembly is completed. ¥ Tighten all parts as you assemble them, unless instructed to recognize that on the Main Frame (1) onto the two M10 x 72mm Carriage Bolts (21) in the Stabilizer so the bolt ... Round Endcap (10) onto each of the two holes. Note that your new equipment is designed to make sure you have the following information and instructions: Make Things Easier for assembly: ¥ Two (2) adjustable wrenches ¥ One (1) rubber mallet ¥ One (1) standard screwdriver ¥ One (1) phillips screwdriver...
User Manual
Page 8
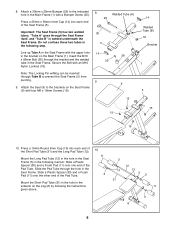
... the Pad Tube through Tube B to prevent the Seat Frame (5) from pivoting. 9. Mount the Short Pad Tube (31) in the hole in the following the instructions given above. 10 11 3 3 13 31 12 13 53 11 3 6 8 Mount the Long Pad Tube (12) in the hole in the Seat Frame (5) in the...
... the Pad Tube through Tube B to prevent the Seat Frame (5) from pivoting. 9. Mount the Short Pad Tube (31) in the hole in the following the instructions given above. 10 11 3 3 13 31 12 13 53 11 3 6 8 Mount the Long Pad Tube (12) in the hole in the Seat Frame (5) in the...


