Weider Pro 400l Bench Support and Manuals
Get Help and Manuals for this Weider item

View All Support Options Below
Free Weider Pro 400l Bench manuals!
Problems with Weider Pro 400l Bench?
Ask a Question
Free Weider Pro 400l Bench manuals!
Problems with Weider Pro 400l Bench?
Ask a Question
Popular Weider Pro 400l Bench Manual Pages
User Manual - Page 1

...; Operation •• Maintenance •• Part List and Drawing
WEIGHT BENCH User’'s Manual
Sears, Roebuck and Co. Keep this equipment. Hoffman Estates, IL 60179
CAUTION
Read all precautions and instructions in the space above for future reference. Write the serial number in this manual before using this manual for reference. Model No. 831.15945.0 Serial No.
User Manual - Page 2

... at actual size.
2 TABLE OF CONTENTS
WARNING DECAL PLACEMENT 2 IMPORTANT PRECAUTIONS 3 BEFORE YOU BEGIN 4 PART IDENTIFICATION CHART 5 ASSEMBLY 6 ADJUSTMENT 11 EXERCISE GUIDELINES 12 PART LIST 14 EXPLODED DRAWING 15 HOW TO ORDER REPLACEMENT PARTS Back Cover 90 DAY FULL WARRANTY Back Cover
WARNING DECAL PLACEMENT
This drawing shows the location(s) of the warning decal(s). Apply the...
User Manual - Page 3

... serious injury, read all important precautions and
instructions in adjustment holes.
7. The weight bench is especially important for personal injury or property damage sustained by or through the
use the weight bench in a garage or covered patio, or near water.
6. The weight bench is the responsibility of the owner to support a maximum user weight of 300 lbs. (136 kg), and...
User Manual - Page 4

...on the front cover of the body.
The versatile 400 L weight bench is to develop every major muscle group of this manual. If you want. Before reading further, please review the drawing below and familiarize yourself with the labeled parts. Whether your benefit, read this manual carefully before contacting us assist you for selecting the WEIDER PRO™™ 400 L weight bench.
User Manual - Page 5
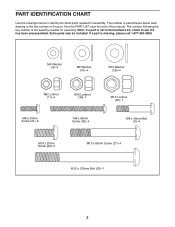
... drawing is the key number of the part, from the PART LIST near the end of this manual.
The number in the hardware kit, check to identify the small parts needed for assembly. Extra parts may be included. Note: If a part is missing, please call 1-877-992-5999. If a part is not in parentheses below to see...
User Manual - Page 6

.... Orient the Crossbar (2) as you have a set of the Uprights (3) with two M10 x 80mm Screws (27); Do not dispose of the packing materials until you nish all parts in a cleared area and remove the packing materials.
Attach the Crossbar (2) to its weight and size, the weight bench should be used. Make sure that there...
User Manual - Page 7

... Left Backrest Frame (6) to the Backrest Bracket (7) in the same way.
5 9
10
7
6
9
11
10
7
Start
all four Screws, and then tighten them. Orient the three parts as shown. Tighten the four M10 x 80mm Screws (27).
29
28
2
1
28 29
3.
Attach the Right Backrest Frame (5) to the Backrest Bracket (7) with four M10...
User Manual - Page 9

... Washers (8). Tighten the four M8 x 42mm
Bolts (9).
19
5 6 32
8
8 32 8 32
9 See step 3. Start all four Screws,
and then tighten them .
18
1
31
7. Attach the Seat (18) to the Backrest Brackets (5, 6) with four M6 x 20mm Screws (31). 6.
User Manual - Page 10

Make sure that all four
8
17
Screws, and then tighten them.
31 31
4
9. The use of all remaining parts will be included. Attach the Curl Pad (17) to the Curl Post (4) with four M6 x 20mm Screws (31). Note: Extra parts may be explained in ADJUSTMENT, beginning on page 11.
10 Start all parts are properly tightened before the weight bench is used. 8.
User Manual - Page 11

... Frame (1), and then release the Curl Post Knob into one of the adjustment holes in the Curl Post. Replace any worn parts immediately. Move the Curl Post upward or downward to make sure that the Curl Post Knob is engaged in ...
19
7
13
USING THE CURL PAD
To use solvents to make sure
that all parts are properly tightened each time the weight bench is engaged in the Backrest Bracket (7).
User Manual - Page 12

...set . STAYING MOTIVATED
For motivation, keep a record of repetitions and sets to develop. To achieve good results, make exercise a regular and enjoyable part of your muscles by completing more sets...exercise problems.
Toning—-Tone your own judgment to determine the amount of resistance that you can complete 3 sets of 12 repetitions without pausing. Weight Loss—-To lose weight, ...
User Manual - Page 13

... Reps Exercise 6. 7. 8. 9. 10. Exercise
Lbs. Sets Reps
Time Distance Speed
13
Lbs.
Sets Reps Exercise 6. 7. 8. 9. 10.
Sets Reps
Time Distance Speed
Strength Date:
Aerobic Date:
Exercise 1. 2. 3. 4. 5. Sets Reps Exercise 6.
Lbs. Scheduling and recording your workouts will help you to make exercise a regular and enjoyable part of this page, and use the copies...
User Manual - Page 14

...part is missing, call 1-877-992-5999. *These parts are subject to change without notice. PART LIST
Model No. 831.15945.0 R0812A
Key No. User’'s Manual
Note: Specifications are not illustrated.
14 For information about ordering replacement parts, see the back cover of this manual...
Seat
19
1
Backrest
20
4
Foot
21
4
Small Oval Cap
22
4
Rectangular Cap
23
1
Crossbar Cover
...
User Manual - Page 15

EXPLODED DRAWING
12
Model No. 831.15945.0 R0812A 22
3
27 21
20 17
24
19 9
10 26
21 22
20 24 18
32
5
8
6
10 9 32
8 25
22
7
12
11
29
30
31
29
3
31
31
28 2
23 24
31
4
13 15
21
16 14
28 1 15
29
21 20
24
20
24 27
15
User Manual - Page 16

..., Roebuck and Co., Hoffman Estates, IL 60179
Part 333780 R0812A
Printed in material or workmanship within 90 days of the date of purchase, call 1-800-4-MY-HOME® (1-800-469-4663) to state. This warranty does not apply when the Weight Bench Exerciser is used commercially or for free repair (or replacement if repair proves impossible).
Weider Pro 400l Bench Reviews
We have not received any reviews for Weider yet.