

English Manual
Page 2
WARNING DECAL PLACEMENT The decals shown here have been placed on the resistance system. CrossBow by WEIDER is missing or illegible, please call our Customer Service Department tollfree at 1-800-999-3756, Monday through Friday, 6 a.m. Apply the decal in the center of ...
WARNING DECAL PLACEMENT The decals shown here have been placed on the resistance system. CrossBow by WEIDER is missing or illegible, please call our Customer Service Department tollfree at 1-800-999-3756, Monday through Friday, 6 a.m. Apply the decal in the center of ...

English Manual
Page 3
...are exercising, stop immediately and begin cooling down. The resistance system is not designed to ensure that all parts are pushed against the crossbow spacer before using the resistance system. 17. Pull on the high pulley cables only while sitting on the pulleys at all times. ... stop immediately and make sure the fulcrum knob is used . 19. This is especially important for personal injury or property damage sustained by WEIDER™ Power Pak. Read all instructions before using the resistance system. 16. Cover the floor beneath the resistance system to protect the floor....
...are exercising, stop immediately and begin cooling down. The resistance system is not designed to ensure that all parts are pushed against the crossbow spacer before using the resistance system. 17. Pull on the high pulley cables only while sitting on the pulleys at all times. ... stop immediately and make sure the fulcrum knob is used . 19. This is especially important for personal injury or property damage sustained by WEIDER™ Power Pak. Read all instructions before using the resistance system. 16. Cover the floor beneath the resistance system to protect the floor....

English Manual
Page 4
... through Friday, 6 a.m. Depth: 80 in . Whether your cardiovascular system, the resistance system will help us assist you want. If you for selecting the innovative CrossBow by WEIDER™ 2000X resistance system. The model number is to tone your body, build dramatic muscle size and strength, or improve your goal is WESY77730. ASSEMBLED DIMENSIONS...: 64 in. Mountain Time (excluding holidays). Curl Bar Fulcrum Knob Upright Storage Knob Backrest Seat Leg Lever Floor Mat Top Frame Lat Tower High Pulley Crossbows "U"-Channel Foot Plate Low Pulley Base Plate Seat Knob 4
... through Friday, 6 a.m. Depth: 80 in . Whether your cardiovascular system, the resistance system will help us assist you want. If you for selecting the innovative CrossBow by WEIDER™ 2000X resistance system. The model number is to tone your body, build dramatic muscle size and strength, or improve your goal is WESY77730. ASSEMBLED DIMENSIONS...: 64 in. Mountain Time (excluding holidays). Curl Bar Fulcrum Knob Upright Storage Knob Backrest Seat Leg Lever Floor Mat Top Frame Lat Tower High Pulley Crossbows "U"-Channel Foot Plate Low Pulley Base Plate Seat Knob 4
English Manual
Page 9
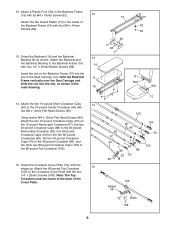
... the Seat Carriage and slide the rod into the slot in the inset drawing. 15 14. Orient the Crossbow Cover Plate (72), with four M4 x 16mm Screws (62). 13. Note: The Top Crossbow must be closer to the inside of the Cover Plate. 15 53 62 62 17 62 17 15 Rod... 105 36 67 95 96 100 85 79 44 85 85 100 85 88 20 101 85 105 Edges up . Attach the 80-pound Top Crossbow 15 (105) to the Backrest Frame (15) 14 with an M4 x 16mm Screw (62). 12 Attach the two Guard Plates (17) to the back of...
... the Seat Carriage and slide the rod into the slot in the inset drawing. 15 14. Orient the Crossbow Cover Plate (72), with four M4 x 16mm Screws (62). 13. Note: The Top Crossbow must be closer to the inside of the Cover Plate. 15 53 62 62 17 62 17 15 Rod... 105 36 67 95 96 100 85 79 44 85 85 100 85 88 20 101 85 105 Edges up . Attach the 80-pound Top Crossbow 15 (105) to the Backrest Frame (15) 14 with an M4 x 16mm Screw (62). 12 Attach the two Guard Plates (17) to the back of...

English Manual
Page 10
...Cable (80). If necessary, use the tip of a screwdriver to the indicated "U"channel on the 10-pound Center Crossbow (44) with two M8 x 19mm Button Head Screws (86). 17. Attach the Pulley inside of the Swivel ...the indicated rings are on the indicated end of the welded rod in the Swivel Arm. Attach the Crossbow Cover Plate to the indicated M10 x 140mm Carriage Bolt (73) with an M10 x 42mm Button ...Long Cable (80) around a 90mm Pulley (28). Attach the Pulley and a Pulley Guard (29) to the Crossbow Spacer (35) with an M10 x 102mm Button Head Bolt (24), two Pivot Bushings (74), and an M10...
...Cable (80). If necessary, use the tip of a screwdriver to the indicated "U"channel on the 10-pound Center Crossbow (44) with two M8 x 19mm Button Head Screws (86). 17. Attach the Pulley inside of the Swivel ...the indicated rings are on the indicated end of the welded rod in the Swivel Arm. Attach the Crossbow Cover Plate to the indicated M10 x 140mm Carriage Bolt (73) with an M10 x 42mm Button ...Long Cable (80) around a 90mm Pulley (28). Attach the Pulley and a Pulley Guard (29) to the Crossbow Spacer (35) with an M10 x 102mm Button Head Bolt (24), two Pivot Bushings (74), and an M10...

English Manual
Page 11
... (24), two Pivot Bushings (74), and an M10 Nylon Locknut (76). Wrap the Long Cable (80) around a 90mm Pulley (28). Make sure there are no Crossbows (not shown) under a 90mm Pulley (28) as shown. Attach a Pulley Housing (94) to the indicated M10 x 140mm Carriage Bolt (73) with an M4 x 5mm Screw... 22 104 80 28 76 11 Insert the Swivel Arm (22) into the welded tube on the 10-pound Center Crossbow (not shown). Have a second person pull on the 10-pound Center Crossbow (44) with an M10 x 42mm Button Head Bolt (71) and an M10 Nylon Locknut (76). 21 44 74 24...
... (24), two Pivot Bushings (74), and an M10 Nylon Locknut (76). Wrap the Long Cable (80) around a 90mm Pulley (28). Make sure there are no Crossbows (not shown) under a 90mm Pulley (28) as shown. Attach a Pulley Housing (94) to the indicated M10 x 140mm Carriage Bolt (73) with an M4 x 5mm Screw... 22 104 80 28 76 11 Insert the Swivel Arm (22) into the welded tube on the 10-pound Center Crossbow (not shown). Have a second person pull on the 10-pound Center Crossbow (44) with an M10 x 42mm Button Head Bolt (71) and an M10 Nylon Locknut (76). 21 44 74 24...

English Manual
Page 13
... adjust the resistance system. Also, refer to the accompanying exercise guide to the desired position. First, remove the Backrest (14) from your exercise program. The crossbows can be attached to the long cable (see ADJUSTING THE BACKREST on the hook under the Bench Rail (not shown). 34 Ball 21 33 80...
... adjust the resistance system. Also, refer to the accompanying exercise guide to the desired position. First, remove the Backrest (14) from your exercise program. The crossbows can be attached to the long cable (see ADJUSTING THE BACKREST on the hook under the Bench Rail (not shown). 34 Ball 21 33 80...

English Manual
Page 14
... the two "U"-channels. ADJUSTING THE RESISTANCE To add resistance, hold a "U"-channel on the Removable Crossbows (36, 67) must be pushed against the Crossbow Spacer (35). Repeat with Cable Clips. Note: The CrossBow by WEIDER™ 2000X resistance WARNING: When adding resist- ance, make sure that both ends of the Long Cable (80) is an optional...
... the two "U"-channels. ADJUSTING THE RESISTANCE To add resistance, hold a "U"-channel on the Removable Crossbows (36, 67) must be pushed against the Crossbow Spacer (35). Repeat with Cable Clips. Note: The CrossBow by WEIDER™ 2000X resistance WARNING: When adding resist- ance, make sure that both ends of the Long Cable (80) is an optional...

English Manual
Page 15
...fully tightened each time the resistance system is used in a level position or one of your hands when you tilt the system back. Turn the crossbow assembly vertically and engage the Fulcrum Knob into the side of three inclined positions. Be careful not to the Front Leg (6) (see the inset...(3). Next, remove the Storage Knob (30) from the Upright (3). Hold the Backrest vertically over the Seat (13) and lift the rod out of the crossbows. Tilt the resistance system back onto the Wheels (31) and roll it will prolong the life of the slot in the position closest to let...
...fully tightened each time the resistance system is used in a level position or one of your hands when you tilt the system back. Turn the crossbow assembly vertically and engage the Fulcrum Knob into the side of three inclined positions. Be careful not to the Front Leg (6) (see the inset...(3). Next, remove the Storage Knob (30) from the Upright (3). Hold the Backrest vertically over the Seat (13) and lift the rod out of the crossbows. Tilt the resistance system back onto the Wheels (31) and roll it will prolong the life of the slot in the position closest to let...
English Manual
Page 16
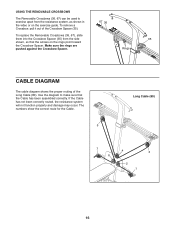
...If the Cable has not been correctly routed, the resistance system will not function properly and damage may occur. USING THE REMOVABLE CROSSBOWS The Removable Crossbows (36, 67) can be used to make sure that the arrows on the exercise guide. The numbers show the correct route ... 3 2 1 16 Make sure the rings are pushed against the Crossbow Spacer. 35 Rings CABLE DIAGRAM The cable diagram shows the proper routing of the Crossbow Spacer (35). 67 36 To replace the Removable Crossbows (36, 67), slide them into the Crossbow Spacer (35) from the resistance system, as shown in the video...
...If the Cable has not been correctly routed, the resistance system will not function properly and damage may occur. USING THE REMOVABLE CROSSBOWS The Removable Crossbows (36, 67) can be used to make sure that the arrows on the exercise guide. The numbers show the correct route ... 3 2 1 16 Make sure the rings are pushed against the Crossbow Spacer. 35 Rings CABLE DIAGRAM The cable diagram shows the proper routing of the Crossbow Spacer (35). 67 36 To replace the Removable Crossbows (36, 67), slide them into the Crossbow Spacer (35) from the resistance system, as shown in the video...

English Manual
Page 22
... Button Head Bolt Arm Bushing Foam Pad Front Leg Foot 90mm Pulley Pulley Guard Storage Knob Wheel Leg Lever Cable Short Cable Eyebolt Crossbow Spacer 20-pound Removable Crossbow Fulcrum Bushing 38mm Round Inner Cap 60mm Metal Spacer M10 x 113mm Button Head Bolt 38mm x 64mm Inner Cap 45mm Square Inner Cap ...Fulcrum Knob 10-pound Center Crossbow Seat Knob Bearing Wheel M10 Nut Leg Press Strap Short Handle Ankle Strap Cable Clip 26mm Spacer Plastic Foot 25mm Square Inner Cap Leg Lever...
... Button Head Bolt Arm Bushing Foam Pad Front Leg Foot 90mm Pulley Pulley Guard Storage Knob Wheel Leg Lever Cable Short Cable Eyebolt Crossbow Spacer 20-pound Removable Crossbow Fulcrum Bushing 38mm Round Inner Cap 60mm Metal Spacer M10 x 113mm Button Head Bolt 38mm x 64mm Inner Cap 45mm Square Inner Cap ...Fulcrum Knob 10-pound Center Crossbow Seat Knob Bearing Wheel M10 Nut Leg Press Strap Short Handle Ankle Strap Cable Clip 26mm Spacer Plastic Foot 25mm Square Inner Cap Leg Lever...

English Manual
Page 24
... the product through Friday, 6 a.m. Labor is authorized by ICON. ICON is not covered. Mountain Time (excluding holidays). Shipping of the resistance crossbows is not responsible or liable for a particular purpose is limited to replacing or repairing, at 1-800-999-3756, Monday through one of its ... performance of the product or damages with respect to freight damage, abuse, misuse, improper or abnormal usage or repairs not provided by WEIDER™ 2000X resistance system) • The SERIAL NUMBER of the product (see the front cover of this manual) • The KEY NUMBER ...
... the product through Friday, 6 a.m. Labor is authorized by ICON. ICON is not covered. Mountain Time (excluding holidays). Shipping of the resistance crossbows is not responsible or liable for a particular purpose is limited to replacing or repairing, at 1-800-999-3756, Monday through one of its ... performance of the product or damages with respect to freight damage, abuse, misuse, improper or abnormal usage or repairs not provided by WEIDER™ 2000X resistance system) • The SERIAL NUMBER of the product (see the front cover of this manual) • The KEY NUMBER ...