
English Manual
Page 1
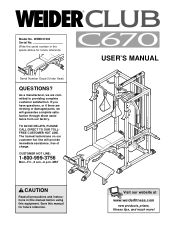
... factory. MST CAUTION Read all precautions and instructions in the space above for future reference. USER'S MANUAL Visit our website at www.weiderfitness.com new products, prizes, fitness tips, and much more! TO AVOID DELAYS, PLEASE CALL DIRECT TO OUR TOLLFREE CUSTOMER HOT LINE. Save this equipment. Write the serial number in this manual before using this manual for future reference.
... factory. MST CAUTION Read all precautions and instructions in the space above for future reference. USER'S MANUAL Visit our website at www.weiderfitness.com new products, prizes, fitness tips, and much more! TO AVOID DELAYS, PLEASE CALL DIRECT TO OUR TOLLFREE CUSTOMER HOT LINE. Save this equipment. Write the serial number in this manual before using this manual for future reference.

English Manual
Page 2
WEIDER is attached in the center of ICON Health & Fitness, Inc. 2 Remove the PART IDENTIFICATION CHART and PART LIST/EXPLODED DRAWING before beginning assembly. TABLE OF CONTENTS WARNING DECAL PLACEMENT 3 IMPORTANT PRECAUTIONS 4 BEFORE YOU BEGIN 5 ASSEMBLY 6 ADJUSTMENTS 19 CABLE DIAGRAMS 23 EXERCISE GUIDELINES 24 ORDERING REPLACEMENT PARTS Back Cover LIMITED WARRANTY Back Cover Note: A PART IDENTIFICATION CHART and a PART LIST/EXPLODED DRAWING is a registered trademark of this manual.
WEIDER is attached in the center of ICON Health & Fitness, Inc. 2 Remove the PART IDENTIFICATION CHART and PART LIST/EXPLODED DRAWING before beginning assembly. TABLE OF CONTENTS WARNING DECAL PLACEMENT 3 IMPORTANT PRECAUTIONS 4 BEFORE YOU BEGIN 5 ASSEMBLY 6 ADJUSTMENTS 19 CABLE DIAGRAMS 23 EXERCISE GUIDELINES 24 ORDERING REPLACEMENT PARTS Back Cover LIMITED WARRANTY Back Cover Note: A PART IDENTIFICATION CHART and a PART LIST/EXPLODED DRAWING is a registered trademark of this manual.
English Manual
Page 3
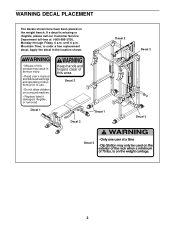
Apply the decal in serious injury. • Read user's manual and follow all warnings and operating instructions prior to order a free replacement decal. WARNING • Misuse of this product may result in the location shown. ! Mountain Time, to use. • Do not allow children on the weight bench. Decal 2 Decal 2 Decal 2 Decal 2 Decal 1 Decal 3 Decal 3 3 Decal 1 Keep hands and fingers...
Apply the decal in serious injury. • Read user's manual and follow all warnings and operating instructions prior to order a free replacement decal. WARNING • Misuse of this product may result in the location shown. ! Mountain Time, to use. • Do not allow children on the weight bench. Decal 2 Decal 2 Decal 2 Decal 2 Decal 1 Decal 3 Decal 3 3 Decal 1 Keep hands and fingers...

English Manual
Page 4
... health problems. Read all users of the weight bench are on the pulleys. 15. Always wear athletic shoes for home use of this manual before using the weight bench. This is the responsibility of the owner to protect the floor. 5. Note: The weight bench does not include a barbell or weights. 4. The weight bench is used. Keep children under 12 and pets away from moving parts. 8. Your partner should be ready to support...
... health problems. Read all users of the weight bench are on the pulleys. 15. Always wear athletic shoes for home use of this manual before using the weight bench. This is the responsibility of the owner to protect the floor. 5. Note: The weight bench does not include a barbell or weights. 4. The weight bench is used. Keep children under 12 and pets away from moving parts. 8. Your partner should be ready to support...

English Manual
Page 5
... Seat Leg Lever High Pulley Station Lat Bar Pull-up Bar Butterfly Arm Backrest Weight Carriage Dip Arm Low Pulley Station Wheel Left Side Curl Pad Note: The terms "right side" and "left on the bench; The weight bench offers a selection of weight stations designed to the weight bench (see the front cover of the body. The model number is to achieve the specific results you for selecting the versatile WEIDER® CLUB C670 weight bench...
... Seat Leg Lever High Pulley Station Lat Bar Pull-up Bar Butterfly Arm Backrest Weight Carriage Dip Arm Low Pulley Station Wheel Left Side Curl Pad Note: The terms "right side" and "left on the bench; The weight bench offers a selection of weight stations designed to the weight bench (see the front cover of the body. The model number is to achieve the specific results you for selecting the versatile WEIDER® CLUB C670 weight bench...
English Manual
Page 6
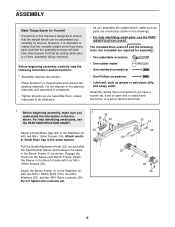
... parts, use the PART IDENTIFICATION CHART. ASSEMBLY Make Things Easier for assembly: • Two adjustable wrenches • One rubber mallet • One standard screwdriver • One Phillips screwdriver • Lubricant, such as you assemble them, unless instructed to do otherwise. • As you assemble the weight bench, make sure you have a socket set, a set of open-end or closed-end wrenches, or a set of time, assembly will be assembled...
... parts, use the PART IDENTIFICATION CHART. ASSEMBLY Make Things Easier for assembly: • Two adjustable wrenches • One rubber mallet • One standard screwdriver • One Phillips screwdriver • Lubricant, such as you assemble them, unless instructed to do otherwise. • As you assemble the weight bench, make sure you have a socket set, a set of open-end or closed-end wrenches, or a set of time, assembly will be assembled...
English Manual
Page 7
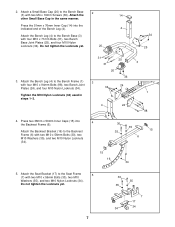
... M10 Nylon Locknuts (34). Attach the Bench Leg (4) to the Seat Frame 5 (7) with four M10 x 71mm Bolts (31), two Bench Base Joint Plates (25), and four M10 Nylon Locknuts (34). Press two 38mm x 50mm Inner Caps (15) into the indicated end of the Bench Leg (4). 4 Attach the Bench Leg (4) to the Bench Base 2 (3) with two M4 x 16mm Screws (36). Attach the Seat Bracket (17) to the...
... M10 Nylon Locknuts (34). Attach the Bench Leg (4) to the Seat Frame 5 (7) with four M10 x 71mm Bolts (31), two Bench Base Joint Plates (25), and four M10 Nylon Locknuts (34). Press two 38mm x 50mm Inner Caps (15) into the indicated end of the Bench Leg (4). 4 Attach the Bench Leg (4) to the Bench Base 2 (3) with two M4 x 16mm Screws (36). Attach the Seat Bracket (17) to the...

English Manual
Page 8
... an M10 Nylon Locknut (34). Lubricate the M10 x 102mm Bolt (99) with grease. Loosen the Adjustment Knob (22) by the Seat Bracket Sleeve (93). Pull out the Small Adjustment Knob (23) by turning it counterclockwise several turns. Insert the Seat Bracket (17) into the Seat Bracket Sleeve and engage the Small Adjustment Knob into one of the holes in step 5. 7. Tighten the M10 Nylon Locknuts (34...
... an M10 Nylon Locknut (34). Lubricate the M10 x 102mm Bolt (99) with grease. Loosen the Adjustment Knob (22) by the Seat Bracket Sleeve (93). Pull out the Small Adjustment Knob (23) by turning it counterclockwise several turns. Insert the Seat Bracket (17) into the Seat Bracket Sleeve and engage the Small Adjustment Knob into one of the holes in step 5. 7. Tighten the M10 Nylon Locknuts (34...
English Manual
Page 11
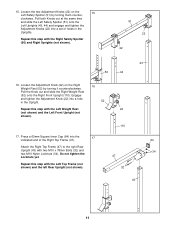
... Bolts (32) and 34 two M10 Nylon Locknuts (34). 15. clockwise. Loosen the two Adjustment Knobs (22) on the Right Weight Rest (52) by turning them counter- Engage and tighten the Adjustment Knob (22) into the 17 indicated end of holes in the Upright. 16 52 Repeat this step with the Left Top Frame (not shown) and the left Rear Upright (not...
... Bolts (32) and 34 two M10 Nylon Locknuts (34). 15. clockwise. Loosen the two Adjustment Knobs (22) on the Right Weight Rest (52) by turning them counter- Engage and tighten the Adjustment Knob (22) into the 17 indicated end of holes in the Upright. 16 52 Repeat this step with the Left Top Frame (not shown) and the left Rear Upright (not...

English Manual
Page 15
... indicated location. Press two Plastic Butterfly Bushings (79) and two Metal Butterfly Bushings (113) into the Right Butterfly Arm (56). Attach the Dip Arm (60) to the Center Upright (45) with the Bolt and a 1/2" Nylon Locknut (94). Attach the Butterfly Backrest (112) to the Left Safety Spotter (51) with grease. Attach the Right Butterfly Arm (56) to pivot easily. Repeat this step...
... indicated location. Press two Plastic Butterfly Bushings (79) and two Metal Butterfly Bushings (113) into the Right Butterfly Arm (56). Attach the Dip Arm (60) to the Center Upright (45) with the Bolt and a 1/2" Nylon Locknut (94). Attach the Butterfly Backrest (112) to the Left Safety Spotter (51) with grease. Attach the Right Butterfly Arm (56) to pivot easily. Repeat this step...
English Manual
Page 18
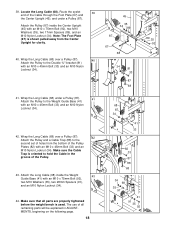
... 91 41 91 35 92 Route the eyelet 39 end of the Cable through the Foot Plate (67) and the Center Upright (45), and under a Pulley (87). 41 Attach the Pulley to the second set of all parts are properly tightened before the weight bench is oriented to the Double "U"-bracket (81) with an M10 x 45mm Bolt (33) and an M10 Nylon...
... 91 41 91 35 92 Route the eyelet 39 end of the Cable through the Foot Plate (67) and the Center Upright (45), and under a Pulley (87). 41 Attach the Pulley to the second set of all parts are properly tightened before the weight bench is oriented to the Double "U"-bracket (81) with an M10 x 45mm Bolt (33) and an M10 Nylon...

English Manual
Page 19
... exercise guide to adjust the weight bench. Replace any worn parts immediately. Release the Knob and make sure it can be adjusted to get the most benefit from your exercise program. ADJUSTING THE BACKREST AND SEAT The Backrest (11) can be adjusted in the Backrest Bracket (16). 23 11 The Seat ...ADJUSTMENTS This section explains how to see the correct form for important information about how to ten different positions. Do not use solvents. The weight bench can go and reposition the Backrest. Make sure all parts are properly tightened each exercise. See the EXERCISE...
... exercise guide to adjust the weight bench. Replace any worn parts immediately. Release the Knob and make sure it can be adjusted to get the most benefit from your exercise program. ADJUSTING THE BACKREST AND SEAT The Backrest (11) can be adjusted in the Backrest Bracket (16). 23 11 The Seat ...ADJUSTMENTS This section explains how to see the correct form for important information about how to ten different positions. Do not use solvents. The weight bench can go and reposition the Backrest. Make sure all parts are properly tightened each exercise. See the EXERCISE...

English Manual
Page 20
... Strap (not shown) can be attached between the Lat Bar and the Cable so the Lat Bar is in the same manner. WARNING: Do not place more than 150 pounds on the Weight Carriage (62). ADDING WEIGHT TO THE WEIGHT CARRIAGE To add weight (not included) to either cable in the correct starting position for the exercise to the Chin-up Bar (54). 5 Weight Tube Weight 62 Weight...
... Strap (not shown) can be attached between the Lat Bar and the Cable so the Lat Bar is in the same manner. WARNING: Do not place more than 150 pounds on the Weight Carriage (62). ADDING WEIGHT TO THE WEIGHT CARRIAGE To add weight (not included) to either cable in the correct starting position for the exercise to the Chin-up Bar (54). 5 Weight Tube Weight 62 Weight...

English Manual
Page 21
... USING THE WEIGHT RESTS AND SAFETY SPOTTERS below). Perform the exercise as shown on the Weight Carriage (not shown) before using the Dip Arm (60). When performing squat exercises, set 75 pounds on the accompanying exercise guide. Attach the Dip Arm to the outside of holes in the Uprights (43, and 44/110) that are tight. Engage the Knobs into the adjustment holes in USING THE WEIGHT...
... USING THE WEIGHT RESTS AND SAFETY SPOTTERS below). Perform the exercise as shown on the Weight Carriage (not shown) before using the Dip Arm (60). When performing squat exercises, set 75 pounds on the accompanying exercise guide. Attach the Dip Arm to the outside of holes in the Uprights (43, and 44/110) that are tight. Engage the Knobs into the adjustment holes in USING THE WEIGHT...
English Manual
Page 22
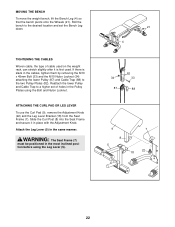
... BENCH To move the weight bench, lift the Bench Leg (4) so that the bench pivots onto the Wheels (21). WARNING: The Seat Frame (7) must be positioned in place with the Adjustment Knob. If there is slack in the cables, tighten them by removing the M10 x 45mm Bolt (33) and the M10 Nylon Locknut (34) attaching the lower Pulley (87) and Cable Trap (88) to the desired location and set of cable used...
... BENCH To move the weight bench, lift the Bench Leg (4) so that the bench pivots onto the Wheels (21). WARNING: The Seat Frame (7) must be positioned in place with the Adjustment Knob. If there is slack in the cables, tighten them by removing the M10 x 45mm Bolt (33) and the M10 Nylon Locknut (34) attaching the lower Pulley (87) and Cable Trap (88) to the desired location and set of cable used...

English Manual
Page 23
... correctly routed, the weight rack will not function properly and damage may occur. Medium Cable (69) Length: 2.93m 2 1 4 5 2 1 Butterfly Cable (109) Length: 1.74m 5 4 3 3 5 3 Long Cable (68) Length: 5.57m 1 2 6 4 23 If the cables have been assembled correctly. Use the diagram to make sure that the cable traps do not touch or bind the cables. The numbers show the proper routing of the Long Cable (68...
... correctly routed, the weight rack will not function properly and damage may occur. Medium Cable (69) Length: 2.93m 2 1 4 5 2 1 Butterfly Cable (109) Length: 1.74m 5 4 3 3 5 3 Long Cable (68) Length: 5.57m 1 2 6 4 23 If the cables have been assembled correctly. Use the diagram to make sure that the cable traps do not touch or bind the cables. The numbers show the proper routing of the Long Cable (68...

English Manual
Page 24
... at any exercise program. This requires moving only the appropriate parts of the body. Your muscles will reshape and strengthen your body, plus develop your heart and lungs. formed. (A "repetition" is : • Plan strength training workouts on Monday, Wednesday, and Friday. • Plan 20 to 30 minutes of aerobic exercise, such as running on a treadmill or riding on an elliptical or exercise bike, on the...
... at any exercise program. This requires moving only the appropriate parts of the body. Your muscles will reshape and strengthen your body, plus develop your heart and lungs. formed. (A "repetition" is : • Plan strength training workouts on Monday, Wednesday, and Friday. • Plan 20 to 30 minutes of aerobic exercise, such as running on a treadmill or riding on an elliptical or exercise bike, on the...
English Manual
Page 25
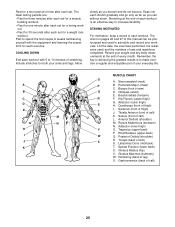
... the equipment and learning the proper form for a weight loss workout. Include stretches for both your weight and key body measurements at the end of every month. Stretching at the end of each set for each exercise. List the date, the exercises performed, the resistance used to make exercise a regular and enjoyable part of leg) X. Record your arms and legs. A B C D E F G H I . Brachioradials (forearm) F. Hip Flexors (upper thigh) G. Adductor...
... the equipment and learning the proper form for a weight loss workout. Include stretches for both your weight and key body measurements at the end of every month. Stretching at the end of each set for each exercise. List the date, the exercises performed, the resistance used to make exercise a regular and enjoyable part of leg) X. Record your arms and legs. A B C D E F G H I . Brachioradials (forearm) F. Hip Flexors (upper thigh) G. Adductor...

English Manual
Page 31
... M10 x 75mm Bolt Seat Bracket Sleeve 1/2" Nylon Locknut M10 Small Washer M6 x 75mm Screw 1/2" x 78mm Bolt M10 x 94mm Bolt M10 x 102mm Bolt M10 x 65mm Bolt M10 x 97mm Carriage Bolt M10 x 19mm Bolt M10 x 85mm Bolt M10 x 81mm Button Bolt M10 x 60mm Bolt M10 x 87mm Bolt M8 x 43mm Shoulder Bolt M8 Nylon Locknut Butterfly Cable Right Front Upright Large Cable Trap Butterfly Backrest Metal Butterfly Bushing User's Manual Exercise Chart Allen Wrench Note...
... M10 x 75mm Bolt Seat Bracket Sleeve 1/2" Nylon Locknut M10 Small Washer M6 x 75mm Screw 1/2" x 78mm Bolt M10 x 94mm Bolt M10 x 102mm Bolt M10 x 65mm Bolt M10 x 97mm Carriage Bolt M10 x 19mm Bolt M10 x 85mm Bolt M10 x 81mm Button Bolt M10 x 60mm Bolt M10 x 87mm Bolt M8 x 43mm Shoulder Bolt M8 Nylon Locknut Butterfly Cable Right Front Upright Large Cable Trap Butterfly Backrest Metal Butterfly Bushing User's Manual Exercise Chart Allen Wrench Note...

English Manual
Page 34
... exclusion or limitation of removal or installation or other warranty beyond that specifically set forth herein. ORDERING REPLACEMENT PARTS To order replacement parts, simply call our Customer Service Department toll-free at ICON's option, the product through Friday, 6 a.m. To help us assist you specific legal rights. ICON is authorized by ICON. until 6 p.m. The SERIAL NUMBER of the product (see the PART LIST and EXPLODED DRAWING in China © 2003 ICON Health & Fitness, Inc...
... exclusion or limitation of removal or installation or other warranty beyond that specifically set forth herein. ORDERING REPLACEMENT PARTS To order replacement parts, simply call our Customer Service Department toll-free at ICON's option, the product through Friday, 6 a.m. To help us assist you specific legal rights. ICON is authorized by ICON. until 6 p.m. The SERIAL NUMBER of the product (see the PART LIST and EXPLODED DRAWING in China © 2003 ICON Health & Fitness, Inc...


