

English Manual
Page 1
Save this equipment. HOFFMAN ESTATES, IL 60179 CAUTION Read all precautions and instructions in the space above for future reference. Visit our website at www.weiderfitness.com new products, prizes, fitness tips, and much more! Model No. 831.159711 Serial No. (Write the serial number in this manual before using this manual for reference.) Serial Number Decal (under seat) ® USER'S MANUAL SEARS, ROEBUCK AND CO.
Save this equipment. HOFFMAN ESTATES, IL 60179 CAUTION Read all precautions and instructions in the space above for future reference. Visit our website at www.weiderfitness.com new products, prizes, fitness tips, and much more! Model No. 831.159711 Serial No. (Write the serial number in this manual before using this manual for reference.) Serial Number Decal (under seat) ® USER'S MANUAL SEARS, ROEBUCK AND CO.

English Manual
Page 2
Remove the PART IDENTIFICATION CHART before beginning assembly. 2 TABLE OF CONTENTS IMPORTANT PRECAUTIONS 3 BEFORE YOU BEGIN 4 ASSEMBLY 5 ADJUSTMENT 15 WEIGHT RESISTANCE CHART 17 TROUBLE-SHOOTING AND MAINTENANCE 18 CABLE DIAGRAM 19 EXERCISE GUIDELINES 20 PART LIST 22 EXPLODED DRAWING 23 ORDERING REPLACEMENT PARTS Back Cover FULL 90 DAY WARRANTY Back Cover Note: A PART IDENTIFICATION CHART is attached in the center of this manual.
Remove the PART IDENTIFICATION CHART before beginning assembly. 2 TABLE OF CONTENTS IMPORTANT PRECAUTIONS 3 BEFORE YOU BEGIN 4 ASSEMBLY 5 ADJUSTMENT 15 WEIGHT RESISTANCE CHART 17 TROUBLE-SHOOTING AND MAINTENANCE 18 CABLE DIAGRAM 19 EXERCISE GUIDELINES 20 PART LIST 22 EXPLODED DRAWING 23 ORDERING REPLACEMENT PARTS Back Cover FULL 90 DAY WARRANTY Back Cover Note: A PART IDENTIFICATION CHART is attached in the center of this manual.

English Manual
Page 3
...weight system in a commercial, rental, or institutional setting. 4. Keep hands and feet away from the weight system at all of this manual and in this or any worn parts immediately. 12. Do not place more than 125 pounds on a level surface. Never release the...using . If either decal is especially important for personal injury or property damage sustained by or through Saturday, 7 a.m. WARNING: Before beginning this manual. 2. The decals shown below have been applied to protect the floor. 5. IMPORTANT PRECAUTIONS WARNING: To reduce the risk of all precautions. 3....
...weight system in a commercial, rental, or institutional setting. 4. Keep hands and feet away from the weight system at all of this manual and in this or any worn parts immediately. 12. Do not place more than 125 pounds on a level surface. Never release the...using . If either decal is especially important for personal injury or property damage sustained by or through Saturday, 7 a.m. WARNING: Before beginning this manual. 2. The decals shown below have been applied to protect the floor. 5. IMPORTANT PRECAUTIONS WARNING: To reduce the risk of all precautions. 3....
English Manual
Page 4
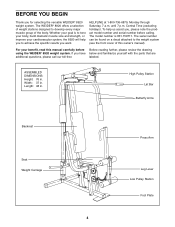
... note the product model number and serial number before Before reading further, please review the drawing using the WEIDER® 8920 weight system. If you for selecting the versatile WEIDER® 8920 weight system. HELPLINE at 1-800-736-6879, Monday through Saturday, 7 a.m. The model number is to... the weight system (see the front cover of the body. For your benefit, read this owner's manual). The serial number can be ...
... note the product model number and serial number before Before reading further, please review the drawing using the WEIDER® 8920 weight system. If you for selecting the versatile WEIDER® 8920 weight system. HELPLINE at 1-800-736-6879, Monday through Saturday, 7 a.m. The model number is to... the weight system (see the front cover of the body. For your benefit, read this owner's manual). The serial number can be ...
English Manual
Page 5
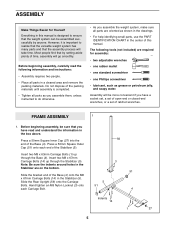
... them, unless instructed to do otherwise. • As you have read the following tools (not included) are required for Yourself Everything in this manual. Assembly will be assembled successfully by setting aside plenty of the Base (4) onto the M8 x 67mm Carriage Bolts (14) in a cleared area... information and instructions: • Assembly requires two people. • Place all parts are on the bottom. Do not dispose of this manual is designed to realize that the versatile weight system has many parts and that the weight system can be more convenient if you assemble the...
... them, unless instructed to do otherwise. • As you have read the following tools (not included) are required for Yourself Everything in this manual. Assembly will be assembled successfully by setting aside plenty of the Base (4) onto the M8 x 67mm Carriage Bolts (14) in a cleared area... information and instructions: • Assembly requires two people. • Place all parts are on the bottom. Do not dispose of this manual is designed to realize that the versatile weight system has many parts and that the weight system can be more convenient if you assemble the...

English Manual
Page 8
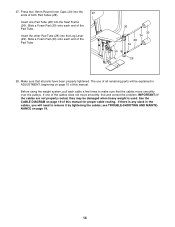
... between the Pulley and the hook on the Front Upright (42) with an M10 x 60mm Bolt (7) and an M10 Nylon Locknut (21). Before beginning this manual to hold the Cable in the groove of the cables. Be sure that the Cable Trap is positioned to verify proper cable routing. Attach the...
... between the Pulley and the hook on the Front Upright (42) with an M10 x 60mm Bolt (7) and an M10 Nylon Locknut (21). Before beginning this manual to hold the Cable in the groove of the cables. Be sure that the Cable Trap is positioned to verify proper cable routing. Attach the...
English Manual
Page 14
...). Before using the weight system, pull each end of all parts have been properly tightened. see TROUBLE-SHOOTING AND MAINTENANCE on page 15 of this manual. Press two 19mm Round Inner Caps (34) into the 27 ends of the Pad Tube. 36 30 34 28 34 30 29 28. Make sure..., you will need to make sure that the cables move smoothly, find and correct the problem. See the CABLE DIAGRAM on page 19 of this manual for proper cable routing. Slide a Foam Pad (30) onto each cable a few times to remove it by tightening the cables; 27. Slide a Foam Pad (30...
...). Before using the weight system, pull each end of all parts have been properly tightened. see TROUBLE-SHOOTING AND MAINTENANCE on page 15 of this manual. Press two 19mm Round Inner Caps (34) into the 27 ends of the Pad Tube. 36 30 34 28 34 30 29 28. Make sure..., you will need to make sure that the cables move smoothly, find and correct the problem. See the CABLE DIAGRAM on page 19 of this manual for proper cable routing. Slide a Foam Pad (30) onto each cable a few times to remove it by tightening the cables; 27. Slide a Foam Pad (30...

English Manual
Page 15
... up for the exercise to your workout, slide an equal amount of weight (not included) onto each exercise. Refer to the exercise guide accompanying this manual to the Long Cable (58) with two Cable Clips.
... up for the exercise to your workout, slide an equal amount of weight (not included) onto each exercise. Refer to the exercise guide accompanying this manual to the Long Cable (58) with two Cable Clips.

English Manual
Page 18
... "U"Bracket with the Bolt and Nylon Locknut. Note: If a cable tends to be removed by tightening the M8 Nylon Locknut (3) at the end of this manual. 66 15 57 21 12 3 23 18 Re-attach the Pulley and the Cable Trap to the other hole in the Long "U"Bracket (57). The...
... "U"Bracket with the Bolt and Nylon Locknut. Note: If a cable tends to be removed by tightening the M8 Nylon Locknut (3) at the end of this manual. 66 15 57 21 12 3 23 18 Re-attach the Pulley and the Cable Trap to the other hole in the Long "U"Bracket (57). The...

English Manual
Page 20
... progress at least one sit-up. Each workout should last about half as long as one day of rest. On the exercise guide accompanying this manual you will continually adapt and grow as possible without difficulty, increase the amount of weight. The exertion stage of each set . Never hold your body...
... progress at least one sit-up. Each workout should last about half as long as one day of rest. On the exercise guide accompanying this manual you will continually adapt and grow as possible without difficulty, increase the amount of weight. The exertion stage of each set . Never hold your body...

English Manual
Page 25
... x 115mm Bolt 65 1 25mm Square Inner Cap 66 5 Cable Trap 67 1 Weight Stop 68 1 M8 Washer 69 1 M10 x 20mm Bolt 70 3 Square Slider Bushing # 1 User's Manual # 1 Exercise Guide Note: "#" indicates a non-illustrated part. Specifications are subject to change without notice. 22 Qty. Qty. PART LIST-Model No. 831.159711 R0102A Key...
... x 115mm Bolt 65 1 25mm Square Inner Cap 66 5 Cable Trap 67 1 Weight Stop 68 1 M8 Washer 69 1 M10 x 20mm Bolt 70 3 Square Slider Bushing # 1 User's Manual # 1 Exercise Guide Note: "#" indicates a non-illustrated part. Specifications are subject to change without notice. 22 Qty. Qty. PART LIST-Model No. 831.159711 R0102A Key...

English Manual
Page 27
...The MODEL NUMBER of the product (831.159711) • The NAME of the product (WEIDER® 8920 weight system) • The KEY NUMBER and DESCRIPTION of charge. When requesting help assembling or operating the WEIDER® 8920 weight system • a part is used commercially or for immediate purchase or special order... occurs due to provide the following tollfree number 1-800-FON-PART (1-800-366-7278) The model number and serial number of this manual to state. All replacement parts are listed on pages 22 and 23 of your nearest SEARS Service Center. If you find the location...
...The MODEL NUMBER of the product (831.159711) • The NAME of the product (WEIDER® 8920 weight system) • The KEY NUMBER and DESCRIPTION of charge. When requesting help assembling or operating the WEIDER® 8920 weight system • a part is used commercially or for immediate purchase or special order... occurs due to provide the following tollfree number 1-800-FON-PART (1-800-366-7278) The model number and serial number of this manual to state. All replacement parts are listed on pages 22 and 23 of your nearest SEARS Service Center. If you find the location...


