

User Manual
Page 2
Remove the PART IDENTIFICATION CHART and the PART LIST/EXPLODED DRAWING before beginning assembly. 2 TABLE OF CONTENTS IMPORTANT PRECAUTIONS 3 BEFORE YOU BEGIN 4 ASSEMBLY 5 HOW TO USE THE HOME GYM SYSTEM 17 TROUBLESHOOTING AND MAINTENANCE 19 CABLE DIAGRAM 20 ORDERING REPLACEMENT PARTS 23 LIMITED WARRANTY Back Cover Note: A PART IDENTIFICATION CHART and a PART LIST/EXPLODED DRAWING are attached in the center of this manual.
Remove the PART IDENTIFICATION CHART and the PART LIST/EXPLODED DRAWING before beginning assembly. 2 TABLE OF CONTENTS IMPORTANT PRECAUTIONS 3 BEFORE YOU BEGIN 4 ASSEMBLY 5 HOW TO USE THE HOME GYM SYSTEM 17 TROUBLESHOOTING AND MAINTENANCE 19 CABLE DIAGRAM 20 ORDERING REPLACEMENT PARTS 23 LIMITED WARRANTY Back Cover Note: A PART IDENTIFICATION CHART and a PART LIST/EXPLODED DRAWING are attached in the center of this manual.
User Manual
Page 3
...-existing health problems. Read all of the pulleys. 11. Make sure that does not use of this manual and in the accompanying literature before using the home gym system. 2. Always disconnect the lat bar from the home gym system at all parts often. This is in this product. 3 Inspect and properly tighten all times. 5. IMPORTANT...
...-existing health problems. Read all of the pulleys. 11. Make sure that does not use of this manual and in the accompanying literature before using the home gym system. 2. Always disconnect the lat bar from the home gym system at all parts often. This is in this product. 3 Inspect and properly tighten all times. 5. IMPORTANT...
User Manual
Page 4
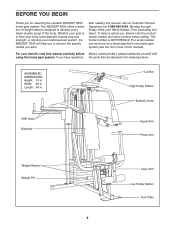
...4266, Monday through Friday, 8h00 until 18h00 Eastern Time (excluding holidays). after reading this manual carefully before calling. The serial number can be found on a decal attached to the home gym system (see the front cover of the body. ASSEMBLED DIMENSIONS: Height: 74 in ...serial number before Before reading further, please familiarize yourself with using the home gym system. Whether your cardiovascular system, the WEIDER® 8530 will help us assist you for selecting the versatile WEIDER® 8530 home gym system. The model number is to tone your body, build dramatic ...
...4266, Monday through Friday, 8h00 until 18h00 Eastern Time (excluding holidays). after reading this manual carefully before calling. The serial number can be found on a decal attached to the home gym system (see the front cover of the body. ASSEMBLED DIMENSIONS: Height: 74 in ...serial number before Before reading further, please familiarize yourself with using the home gym system. Whether your cardiovascular system, the WEIDER® 8530 will help us assist you for selecting the versatile WEIDER® 8530 home gym system. The model number is to tone your body, build dramatic ...
User Manual
Page 5
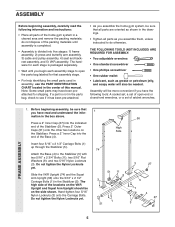
... and the Squat Arm Upright (56) onto the 5/16" x 2 1/2" Carriage Bolts (1) in the drawings. • Tighten all parts of this manual. Press 2" Outer Caps (51) onto the other two locations on the side shown. Do not tighten the Nylon Locknuts yet. The high side of ... information and instructions: • Place all parts as grease or petroleum jelly, and soapy water will be more convenient if you assemble the home gym system, be on the Stabilizer. Hand-tighten four 5/16" Nylon Locknuts (3) onto the Carriage Bolts. Before beginning assembly, be needed. do...
... and the Squat Arm Upright (56) onto the 5/16" x 2 1/2" Carriage Bolts (1) in the drawings. • Tighten all parts of this manual. Press 2" Outer Caps (51) onto the other two locations on the side shown. Do not tighten the Nylon Locknuts yet. The high side of ... information and instructions: • Place all parts as grease or petroleum jelly, and soapy water will be more convenient if you assemble the home gym system, be on the Stabilizer. Hand-tighten four 5/16" Nylon Locknuts (3) onto the Carriage Bolts. Before beginning assembly, be needed. do...
User Manual
Page 16
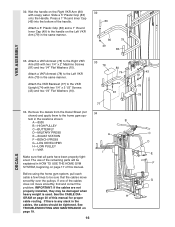
...on the Left VKR Arm (79) in the same manner. If one of this manual for proper cable routing. See TROUBLESHOOTING AND MAINTENANCE on the Right VKR Arm (80) with soapy water. 32. Before using the home gym system, pull each cable a few times to the VKR Upright (74) with two... the VKR Backrest (77) to be damaged when heavy weight is any slack in the cables, the cables should be explained in the locations shown: B A -8530 B -HIGH PULLEY C -BUTTERFLY D-MILITARY PRESS A E -SQUAT STATION F -BENCH PRESS G-LEG DEVELOPER H-LOW PULLEY I -VKR I Make sure that the cables ...
...on the Left VKR Arm (79) in the same manner. If one of this manual for proper cable routing. See TROUBLESHOOTING AND MAINTENANCE on the Right VKR Arm (80) with soapy water. 32. Before using the home gym system, pull each cable a few times to the VKR Upright (74) with two... the VKR Backrest (77) to be damaged when heavy weight is any slack in the cables, the cables should be explained in the locations shown: B A -8530 B -HIGH PULLEY C -BUTTERFLY D-MILITARY PRESS A E -SQUAT STATION F -BENCH PRESS G-LEG DEVELOPER H-LOW PULLEY I -VKR I Make sure that the cables ...
User Manual
Page 17
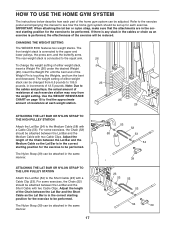
...the Lat Bar and the Medium Cable with a Cable Clip (53). CHANGING THE WEIGHT SETTING The WEIDER 8530 features two weight stacks. Refer to the exercise poster accompanying this manual to see how the home gym system should be attached between the Lat Bar and the Medium Cable so the Lat Bar is ... of the Chain between the Lat Bar and the Short Cable with a Cable Clip (53). HOW TO USE THE HOME GYM SYSTEM The instructions below describe how each part of the home gym system can be changed from the weight setting. The weight setting of either weight stack, insert a Weight Pin (26...
...the Lat Bar and the Medium Cable with a Cable Clip (53). CHANGING THE WEIGHT SETTING The WEIDER 8530 features two weight stacks. Refer to the exercise poster accompanying this manual to see how the home gym system should be attached between the Lat Bar and the Medium Cable so the Lat Bar is ... of the Chain between the Lat Bar and the Short Cable with a Cable Clip (53). HOW TO USE THE HOME GYM SYSTEM The instructions below describe how each part of the home gym system can be changed from the weight setting. The weight setting of either weight stack, insert a Weight Pin (26...
User Manual
Page 19
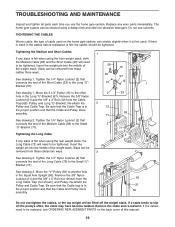
TROUBLESHOOTING AND MAINTENANCE Inspect and tighten all parts each time you use solvents. TIGHTENING THE CABLES Woven cable, the type of this manual. 19 Tightening the Long Cable If any worn parts immediately. If the cables need to be replaced, see ORDERING REPLACEMENT PARTS on the ... used . Insert the weight pin into the middle of the weight stack. See drawing 3. Be sure that the Cable trap is first used on the home gym system, can be removed from these cables two ways: 3 15 57 12 23 58 71 2 See drawing 2. Slack can stretch slightly when it ....
TROUBLESHOOTING AND MAINTENANCE Inspect and tighten all parts each time you use solvents. TIGHTENING THE CABLES Woven cable, the type of this manual. 19 Tightening the Long Cable If any worn parts immediately. If the cables need to be replaced, see ORDERING REPLACEMENT PARTS on the ... used . Insert the weight pin into the middle of the weight stack. See drawing 3. Be sure that the Cable trap is first used on the home gym system, can be removed from these cables two ways: 3 15 57 12 23 58 71 2 See drawing 2. Slack can stretch slightly when it ....


