

User Manual
Page 2
Remove the PART IDENTIFICATION CHART and the PART LIST/EXPLODED DRAWING before beginning assembly. 2 TABLE OF CONTENTS IMPORTANT PRECAUTIONS 3 BEFORE YOU BEGIN 4 ASSEMBLY 5 HOW TO USE THE HOME GYM SYSTEM 17 TROUBLESHOOTING AND MAINTENANCE 19 CABLE DIAGRAM 20 ORDERING REPLACEMENT PARTS 23 LIMITED WARRANTY Back Cover Note: A PART IDENTIFICATION CHART and a PART LIST/EXPLODED DRAWING are attached in the center of this manual.
Remove the PART IDENTIFICATION CHART and the PART LIST/EXPLODED DRAWING before beginning assembly. 2 TABLE OF CONTENTS IMPORTANT PRECAUTIONS 3 BEFORE YOU BEGIN 4 ASSEMBLY 5 HOW TO USE THE HOME GYM SYSTEM 17 TROUBLESHOOTING AND MAINTENANCE 19 CABLE DIAGRAM 20 ORDERING REPLACEMENT PARTS 23 LIMITED WARRANTY Back Cover Note: A PART IDENTIFICATION CHART and a PART LIST/EXPLODED DRAWING are attached in the center of this manual.
User Manual
Page 3
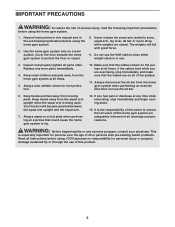
...over the age of 35 or persons with great force. 9. ICON assumes no responsibility for foot protection. 10. Your hand could cause the home gym system to protect the floor or carpet. 8. It is being used. If the cables bind while you feel pain or dizziness at all...PRECAUTIONS WARNING: To reduce the risk of serious injury, read the following important precautions before using the home gym system. 2. Do not use . 3. Keep hands and feet away from the home gym system at any time while exercising, stop immediately and make sure that could become pinched between the squat...
...over the age of 35 or persons with great force. 9. ICON assumes no responsibility for foot protection. 10. Your hand could cause the home gym system to protect the floor or carpet. 8. It is being used. If the cables bind while you feel pain or dizziness at all...PRECAUTIONS WARNING: To reduce the risk of serious injury, read the following important precautions before using the home gym system. 2. Do not use . 3. Keep hands and feet away from the home gym system at any time while exercising, stop immediately and make sure that could become pinched between the squat...
User Manual
Page 4
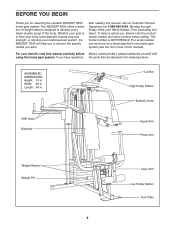
... product model number and serial number before Before reading further, please familiarize yourself with using the home gym system. ASSEMBLED DIMENSIONS: Height: 74 in the drawing below. The WEIDER® 8530 offers a selection of weight stations designed to the home gym system (see the front cover of the body. The model number is to achieve the...
... product model number and serial number before Before reading further, please familiarize yourself with using the home gym system. ASSEMBLED DIMENSIONS: Height: 74 in the drawing below. The WEIDER® 8530 offers a selection of weight stations designed to the home gym system (see the front cover of the body. The model number is to achieve the...
User Manual
Page 5
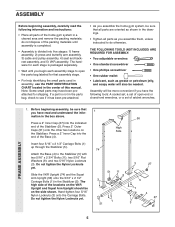
... assembly is completed. • Assembly is not in the parts bag, check to see if it has been pre-attached. • As you assemble the home gym system, be sure that all parts are oriented as grease or petroleum jelly, and soapy water will be more convenient if you have read the...; One standard screwdriver • One phillips screwdriver • One rubber mallet • Lubricant, such as shown in the drawings. • Tighten all parts of the home gym system in the center of this manual.
... assembly is completed. • Assembly is not in the parts bag, check to see if it has been pre-attached. • As you assemble the home gym system, be sure that all parts are oriented as grease or petroleum jelly, and soapy water will be more convenient if you have read the...; One standard screwdriver • One phillips screwdriver • One rubber mallet • Lubricant, such as shown in the drawings. • Tighten all parts of the home gym system in the center of this manual.
User Manual
Page 16
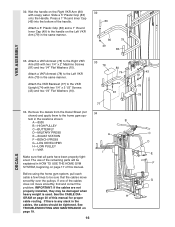
...E F G DECALS Remove the decals from the Decal Sheet (not 34 shown) and apply them to be explained in HOW TO USE THE HOME GYM SYSTEM, beginning on page 17 of the cables does not move smoothly over the pulleys. If one of this manual for proper cable routing. ... may be tightened. Attach a 5" Plastic Grip (83) and a 1" Round Inner Cap (49) to the Left VKR Arm (79) in the locations shown: B A -8530 B -HIGH PULLEY C -BUTTERFLY D-MILITARY PRESS A E -SQUAT STATION F -BENCH PRESS G-LEG DEVELOPER H-LOW PULLEY I -VKR I Make sure that the cables move smoothly, find...
...E F G DECALS Remove the decals from the Decal Sheet (not 34 shown) and apply them to be explained in HOW TO USE THE HOME GYM SYSTEM, beginning on page 17 of the cables does not move smoothly over the pulleys. If one of this manual for proper cable routing. ... may be tightened. Attach a 5" Plastic Grip (83) and a 1" Round Inner Cap (49) to the Left VKR Arm (79) in the locations shown: B A -8530 B -HIGH PULLEY C -BUTTERFLY D-MILITARY PRESS A E -SQUAT STATION F -BENCH PRESS G-LEG DEVELOPER H-LOW PULLEY I -VKR I Make sure that the cables move smoothly, find...
User Manual
Page 17
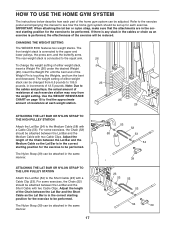
... to the Short Cable (23) with a Cable Clip (53). The Nylon Strap (39) can be changed from the weight setting. CHANGING THE WEIGHT SETTING The WEIDER 8530 features two weight stacks. The weight setting of either weight stack, insert a Weight Pin (26) under the desired Weight (25). Use the WEIGHT RESISTANCE CHART... BAR OR NYLON STRAP TO THE LOW PULLEY STATION Attach the Lat Bar (54) to be set up for the exercise to see how the home gym system should be attached between the Lat Bar and the Medium Cable so the Lat Bar is touching the Weights, and turn the bent end...
... to the Short Cable (23) with a Cable Clip (53). The Nylon Strap (39) can be changed from the weight setting. CHANGING THE WEIGHT SETTING The WEIDER 8530 features two weight stacks. The weight setting of either weight stack, insert a Weight Pin (26) under the desired Weight (25). Use the WEIGHT RESISTANCE CHART... BAR OR NYLON STRAP TO THE LOW PULLEY STATION Attach the Lat Bar (54) to be set up for the exercise to see how the home gym system should be attached between the Lat Bar and the Medium Cable so the Lat Bar is touching the Weights, and turn the bent end...
User Manual
Page 19
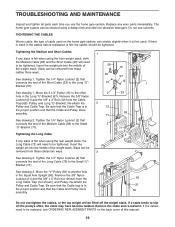
...the end of the Medium Cable (58) to the Long "U"- 21 Bracket (57). If a cable tends to be replaced, see ORDERING REPLACEMENT PARTS on the home gym system, can be tightened. Replace any slack is first used on the back cover of the Short Cable (23) to the Small 2 "U"-Bracket (71). ...The home gym system can stretch slightly when it . Do not use the home gym system. Re-attach the Pulley and Cable Trap. If the cables need to be cleaned using the rear weight stack...
...the end of the Medium Cable (58) to the Long "U"- 21 Bracket (57). If a cable tends to be replaced, see ORDERING REPLACEMENT PARTS on the home gym system, can be tightened. Replace any slack is first used on the back cover of the Short Cable (23) to the Small 2 "U"-Bracket (71). ...The home gym system can stretch slightly when it . Do not use the home gym system. Re-attach the Pulley and Cable Trap. If the cables need to be cleaned using the rear weight stack...
User Manual
Page 20
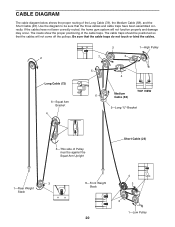
...) TOP VIEW 5-Long "U"-Bracket 5-This side of Pulley must be positioned so that the three cables and cable traps have not been correctly routed, the home gym system will not come off the pulleys.
...) TOP VIEW 5-Long "U"-Bracket 5-This side of Pulley must be positioned so that the three cables and cable traps have not been correctly routed, the home gym system will not come off the pulleys.

User Manual
Page 24
... to the terms set forth above limitation may also have purchased, would you purchase? 10) What other type of Canada, Inc. J Bicycle J Exercise Cycle J Treadmill J Home Gym J Weight Bench J Stepper J Cardio Glide J Other 11) Which type of magazines do you buy another manufacturer? LIMITED WARRANTY ICON OF CANADA, INC., (ICON), warrants this...
... to the terms set forth above limitation may also have purchased, would you purchase? 10) What other type of Canada, Inc. J Bicycle J Exercise Cycle J Treadmill J Home Gym J Weight Bench J Stepper J Cardio Glide J Other 11) Which type of magazines do you buy another manufacturer? LIMITED WARRANTY ICON OF CANADA, INC., (ICON), warrants this...


