

User Manual
Page 2
Remove the PART IDENTIFICATION CHART and the PART LIST/EXPLODED DRAWING before beginning assembly. 2 TABLE OF CONTENTS IMPORTANT PRECAUTIONS 3 BEFORE YOU BEGIN 4 ASSEMBLY 5 HOW TO USE THE HOME GYM SYSTEM 17 TROUBLESHOOTING AND MAINTENANCE 19 CABLE DIAGRAM 20 ORDERING REPLACEMENT PARTS 23 LIMITED WARRANTY Back Cover Note: A PART IDENTIFICATION CHART and a PART LIST/EXPLODED DRAWING are attached in the center of this manual.
Remove the PART IDENTIFICATION CHART and the PART LIST/EXPLODED DRAWING before beginning assembly. 2 TABLE OF CONTENTS IMPORTANT PRECAUTIONS 3 BEFORE YOU BEGIN 4 ASSEMBLY 5 HOW TO USE THE HOME GYM SYSTEM 17 TROUBLESHOOTING AND MAINTENANCE 19 CABLE DIAGRAM 20 ORDERING REPLACEMENT PARTS 23 LIMITED WARRANTY Back Cover Note: A PART IDENTIFICATION CHART and a PART LIST/EXPLODED DRAWING are attached in the center of this manual.
User Manual
Page 3
...not use . 3. ICON assumes no responsibility for foot protection. 10. Read all parts often. Inspect and properly tighten all instructions in this home gym system are raised. Replace any exercise program, consult your physician. Make sure that the cables remain on all times. 5. If you are ...immediately and begin cooling down. 13. Use the home gym system only on a foot plate when performing an exercise that all users of this manual and in use the lat bar. 6. Keep small children and pets away from the home gym system when performing an exercise that the cables are...
...not use . 3. ICON assumes no responsibility for foot protection. 10. Read all parts often. Inspect and properly tighten all instructions in this home gym system are raised. Replace any exercise program, consult your physician. Make sure that the cables remain on all times. 5. If you are ...immediately and begin cooling down. 13. Use the home gym system only on a foot plate when performing an exercise that all users of this manual and in use the lat bar. 6. Keep small children and pets away from the home gym system when performing an exercise that the cables are...
User Manual
Page 4
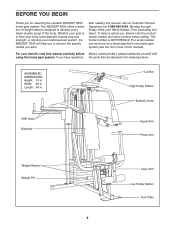
...number is to develop every major muscle group of this manual). For your cardiovascular system, the WEIDER® 8530 will help us assist you want. If you for selecting the versatile WEIDER® 8530 home gym system. The WEIDER® 8530 offers a selection of weight stations designed to tone ...your body, build dramatic muscle size and strength, or improve your benefit, read this manual, call our Customer Service Department at 1-888...
...number is to develop every major muscle group of this manual). For your cardiovascular system, the WEIDER® 8530 will help us assist you want. If you for selecting the versatile WEIDER® 8530 home gym system. The WEIDER® 8530 offers a selection of weight stations designed to tone ...your body, build dramatic muscle size and strength, or improve your benefit, read this manual, call our Customer Service Department at 1-888...
User Manual
Page 5
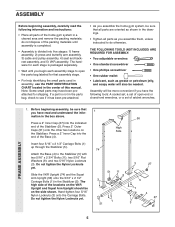
... assembly stage. • For help identifying the small parts used in assembly, use the PART IDENTIFICATION CHART located in the center of this manual. Press a 2" Inner Cap (27) into the end of the brackets on the VKR Upright and Squat Arm Upright should be needed. ...tighten the Nylon Locknuts yet. Hand-tighten four 5/16" Nylon Locknuts (3) onto the Carriage Bolts. Press a 2" Inner Cap into the indicated end of the home gym system in a cleared area and remove the packing materials; Insert four 5/16" x 2 1/2" Carriage Bolts (1) up through the Stabilizer (5). The hardware for...
... assembly stage. • For help identifying the small parts used in assembly, use the PART IDENTIFICATION CHART located in the center of this manual. Press a 2" Inner Cap (27) into the end of the brackets on the VKR Upright and Squat Arm Upright should be needed. ...tighten the Nylon Locknuts yet. Hand-tighten four 5/16" Nylon Locknuts (3) onto the Carriage Bolts. Press a 2" Inner Cap into the indicated end of the home gym system in a cleared area and remove the packing materials; Insert four 5/16" x 2 1/2" Carriage Bolts (1) up through the Stabilizer (5). The hardware for...
User Manual
Page 16
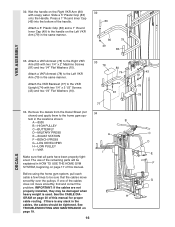
... a VKR Armrest (78) to the VKR Upright (74) with two 1/4" x 2" Machine Screws (81) and two 1/4" Flat Washers (10). If one of this manual. H GRAM on page 17 of the handle. 32. Wet the handle on page 19. 16 43 10 79 78 C D E F G DECALS IMPORTANT: If the...be explained in the locations shown: B A -8530 B -HIGH PULLEY C -BUTTERFLY D-MILITARY PRESS A E -SQUAT STATION F -BENCH PRESS G-LEG DEVELOPER H-LOW PULLEY I -VKR I Make sure that the cables move smoothly, find and correct the problem. tem in HOW TO USE THE HOME GYM SYSTEM, beginning on page 20 of the cables...
... a VKR Armrest (78) to the VKR Upright (74) with two 1/4" x 2" Machine Screws (81) and two 1/4" Flat Washers (10). If one of this manual. H GRAM on page 17 of the handle. 32. Wet the handle on page 19. 16 43 10 79 78 C D E F G DECALS IMPORTANT: If the...be explained in the locations shown: B A -8530 B -HIGH PULLEY C -BUTTERFLY D-MILITARY PRESS A E -SQUAT STATION F -BENCH PRESS G-LEG DEVELOPER H-LOW PULLEY I -VKR I Make sure that the cables move smoothly, find and correct the problem. tem in HOW TO USE THE HOME GYM SYSTEM, beginning on page 20 of the cables...
User Manual
Page 17
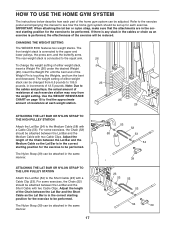
...25). Adjust the length of the Chain between the Lat Bar and the Medium Cable with two Cable Clips. CHANGING THE WEIGHT SETTING The WEIDER 8530 features two weight stacks. Use the WEIGHT RESISTANCE CHART on page 18 to find the approximate amount of resistance at each exercise station may...Cable with two Cable Clips. HOW TO USE THE HOME GYM SYSTEM The instructions below describe how each part of the home gym system can be attached in the same manner. Refer to the exercise poster accompanying this manual to see how the home gym system should be attached between the Lat Bar and ...
...25). Adjust the length of the Chain between the Lat Bar and the Medium Cable with two Cable Clips. CHANGING THE WEIGHT SETTING The WEIDER 8530 features two weight stacks. Use the WEIGHT RESISTANCE CHART on page 18 to find the approximate amount of resistance at each exercise station may...Cable with two Cable Clips. HOW TO USE THE HOME GYM SYSTEM The instructions below describe how each part of the home gym system can be attached in the same manner. Refer to the exercise poster accompanying this manual to see how the home gym system should be attached between the Lat Bar and ...
User Manual
Page 19
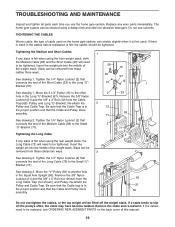
... cleaned using the front weight stack, both the Medium Cable (58) and the Short Cable (23) will be replaced, see ORDERING REPLACEMENT PARTS on the home gym system, can stretch slightly when it . Tightening the Medium and Short Cables 1 If any worn parts immediately. Remove the 3/8" Nylon Locknut (21) and the... into the middle of the Medium Cable (58) to slip off the weight stack. Do not use the home gym system. Insert the weight pin into the middle of this manual. 19 Be sure that the Cable and Pulley move smoothly. 71 See drawing 2. Slack can be removed from...
... cleaned using the front weight stack, both the Medium Cable (58) and the Short Cable (23) will be replaced, see ORDERING REPLACEMENT PARTS on the home gym system, can stretch slightly when it . Tightening the Medium and Short Cables 1 If any worn parts immediately. Remove the 3/8" Nylon Locknut (21) and the... into the middle of the Medium Cable (58) to slip off the weight stack. Do not use the home gym system. Insert the weight pin into the middle of this manual. 19 Be sure that the Cable and Pulley move smoothly. 71 See drawing 2. Slack can be removed from...


