
Canadian English Manual
Page 2
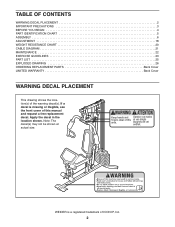
WEIDER is missing or illegible, see the front cover of this manual and request a free replacement decal. Apply the decal in the location shown. Note: The decal(s) may not be shown at actual size. TABLE OF CONTENTS WARNING DECAL PLACEMENT 2 IMPORTANT PRECAUTIONS 3 BEFORE YOU BEGIN 4 PART IDENTIFICATION CHART 5 ASSEMBLY 6 ADJUSTMENT 18 WEIGHT RESISTANCE...
WEIDER is missing or illegible, see the front cover of this manual and request a free replacement decal. Apply the decal in the location shown. Note: The decal(s) may not be shown at actual size. TABLE OF CONTENTS WARNING DECAL PLACEMENT 2 IMPORTANT PRECAUTIONS 3 BEFORE YOU BEGIN 4 PART IDENTIFICATION CHART 5 ASSEMBLY 6 ADJUSTMENT 18 WEIGHT RESISTANCE...
Canadian English Manual
Page 3
.... 6. This is especially important for personal injury or property damage sustained by persons weighing more than 300 lbs. (136 kg). 8. Your weight system is the responsibility of serious injury, read all precautions. 3. Do not use of all important precautions and instructions in serious injury or ... you experience pain while exercising, stop immediately and make sure that could become caught on your weight system at all times. 7. Inspect and properly tighten all users of the weight system are exercising, stop immediately and cool down. 16. Always wear athletic shoes for home ...
.... 6. This is especially important for personal injury or property damage sustained by persons weighing more than 300 lbs. (136 kg). 8. Your weight system is the responsibility of serious injury, read all precautions. 3. Do not use of all important precautions and instructions in serious injury or ... you experience pain while exercising, stop immediately and make sure that could become caught on your weight system at all times. 7. Inspect and properly tighten all users of the weight system are exercising, stop immediately and cool down. 16. Always wear athletic shoes for home ...

Canadian English Manual
Page 4
... this manual carefully before contacting us assist you, note the product model number and serial number before you for selecting the versatile WEIDER® 2980 X weight system. For your cardiovascular system, the weight system will help us . Before reading further, please familiarize yourself with the parts that are labeled in . (165 cm) Left Side...
... this manual carefully before contacting us assist you, note the product model number and serial number before you for selecting the versatile WEIDER® 2980 X weight system. For your cardiovascular system, the weight system will help us . Before reading further, please familiarize yourself with the parts that are labeled in . (165 cm) Left Side...
Canadian English Manual
Page 6
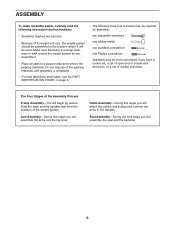
...instructions: • Assembly requires two persons. • Because of the packing materials until assembly is enough clearance to walk around the weight system as you will attach the cables and pulleys that form the skeleton of ratchet wrenches. Seat Assembly-During the final stage you ...: two adjustable wrenches one rubber mallet one standard screwdriver one Phillips screwdriver Assembly may be used. Do not dispose of its weight and size, the weight system should be assembled in a cleared area and remove the packing materials. Arm Assembly-During this stage you assemble it. ...
...instructions: • Assembly requires two persons. • Because of the packing materials until assembly is enough clearance to walk around the weight system as you will attach the cables and pulleys that form the skeleton of ratchet wrenches. Seat Assembly-During the final stage you ...: two adjustable wrenches one rubber mallet one standard screwdriver one Phillips screwdriver Assembly may be used. Do not dispose of its weight and size, the weight system should be assembled in a cleared area and remove the packing materials. Arm Assembly-During this stage you assemble it. ...
Canadian English Manual
Page 7
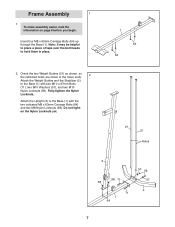
... Nylon Locknuts. To make assembly easier, read the information on page 6 before you begin. Orient the two Weight Guides (21) as shown, so the indicated holes are closer to the lower ends. 2 Attach the Weight Guides and the Stabilizer (2) to hold them in place. 2. Do not tighten the Nylon Locknuts yet. 1 64...
... Nylon Locknuts. To make assembly easier, read the information on page 6 before you begin. Orient the two Weight Guides (21) as shown, so the indicated holes are closer to the lower ends. 2 Attach the Weight Guides and the Stabilizer (2) to hold them in place. 2. Do not tighten the Nylon Locknuts yet. 1 64...
Canadian English Manual
Page 8
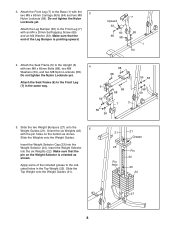
...the Leg Bumper (60) to the Front Leg (7) with the pin holes on the Weight Selector is pointing upward. Slide the two Weight Bumpers (27) onto the Weight Guides (21). Insert the Weight Selector into the Weight Selector (24). Orient the six Weights (22) 5 with an M4 x 20mm Self-tapping Screw (69) and an M4... sure that the pin on the bottom as shown. Make sure that the end of the included grease to the Front Leg (7) in the Top Weight (25). Attach the Front Leg (7) to the Upright (3) with the two M8 x 63mm Carriage Bolts (64) and two M8 3 Nylon Locknuts (58). ...
...the Leg Bumper (60) to the Front Leg (7) with the pin holes on the Weight Selector is pointing upward. Slide the two Weight Bumpers (27) onto the Weight Guides (21). Insert the Weight Selector into the Weight Selector (24). Orient the six Weights (22) 5 with an M4 x 20mm Self-tapping Screw (69) and an M4... sure that the pin on the bottom as shown. Make sure that the end of the included grease to the Front Leg (7) in the Top Weight (25). Attach the Front Leg (7) to the Upright (3) with the two M8 x 63mm Carriage Bolts (64) and two M8 3 Nylon Locknuts (58). ...

Canadian English Manual
Page 9
Attach the Top Frame (4) between the Weight Guides (21) with two M8 x 65mm Bolts (68), two M8 Washers (59), and two M8 Nylon Locknuts (58). Tighten the M8 Nylon Locknuts (58). 59 4 ...
Attach the Top Frame (4) between the Weight Guides (21) with two M8 x 65mm Bolts (68), two M8 Washers (59), and two M8 Nylon Locknuts (58). Tighten the M8 Nylon Locknuts (58). 59 4 ...

Canadian English Manual
Page 15
... 12mm Spacers (52), and an M10 Nylon Locknut (56). 56 57 52 4 48 55 52 57 71 27. Tighten the High Cable (55) into the Weight Selector (24) until all the slack is removed from the cables. Tighten the M12 Nut (82) against the Large Washer (78). 55 82 78 24...
... 12mm Spacers (52), and an M10 Nylon Locknut (56). 56 57 52 4 48 55 52 57 71 27. Tighten the High Cable (55) into the Weight Selector (24) until all the slack is removed from the cables. Tighten the M12 Nut (82) against the Large Washer (78). 55 82 78 24...
Canadian English Manual
Page 17
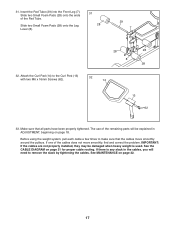
... parts will need to remove the slack by tightening the cables. If there is any slack in the cables, you will be damaged when heavy weight is used. Make sure that the cables move smoothly, find and correct the problem. Slide two Small Foam Pads (28) onto the Leg Lever (8). 31... (7). IMPORTANT: If the cables are not properly installed, they may be explained in ADJUSTMENT, beginning on page 21 for proper cable routing. Before using the weight system, pull each cable a few times to the Curl Post (13) with two M6 x 16mm Screws (62). 32 14 13 62 33. See MAINTENANCE on...
... parts will need to remove the slack by tightening the cables. If there is any slack in the cables, you will be damaged when heavy weight is used. Make sure that the cables move smoothly, find and correct the problem. Slide two Small Foam Pads (28) onto the Leg Lever (8). 31... (7). IMPORTANT: If the cables are not properly installed, they may be explained in ADJUSTMENT, beginning on page 21 for proper cable routing. Before using the weight system, pull each cable a few times to the Curl Post (13) with two M6 x 16mm Screws (62). 32 14 13 62 33. See MAINTENANCE on...
Canadian English Manual
Page 18
... station (see the correct form for the exercise to see USING THE LOCK LEVER on page 19). 18 Insert the Weight Pin so that the Lat Bar is used. The weight system can be attached at either pulley station in the correct starting position for each exercise station may vary from your... Handle Strap (not shown) can be attached 37 between the Lat Bar and the Cable so that the bent end touches the weight stack. Use the WEIGHT RESISTANCE CHART on page 23 for each time the weight system is 19 in the same way. Make sure all parts are properly tightened each 26...
... station (see the correct form for the exercise to see USING THE LOCK LEVER on page 19). 18 Insert the Weight Pin so that the Lat Bar is used. The weight system can be attached at either pulley station in the correct starting position for each exercise station may vary from your... Handle Strap (not shown) can be attached 37 between the Lat Bar and the Cable so that the bent end touches the weight stack. Use the WEIGHT RESISTANCE CHART on page 23 for each time the weight system is 19 in the same way. Make sure all parts are properly tightened each 26...
Canadian English Manual
Page 19
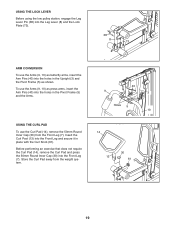
... the Pivot Frame (5) and the Arms. USING THE CURL PAD To use the Curl Pad (14), remove the 50mm Round Inner Cap (30) from the weight system. 40 9 3 Holes 5 10 14 30 13 61 7 19 Store the Curl Pad away from the Front Leg (7). Insert the Curl Post (13) into the...
... the Pivot Frame (5) and the Arms. USING THE CURL PAD To use the Curl Pad (14), remove the 50mm Round Inner Cap (30) from the weight system. 40 9 3 Holes 5 10 14 30 13 61 7 19 Store the Curl Pad away from the Front Leg (7). Insert the Curl Post (13) into the...
Canadian English Manual
Page 20
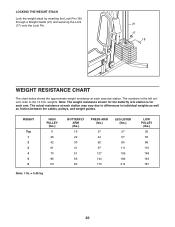
... 85 111 159 182 214 LOW PULLEY (lbs.) 26 55 86 119 148 163 187 20 weights. The actual resistance at each arm. LOCKING THE WEIGHT STACK Lock the weight stack by inserting the Lock Pin (18) through a Weight Guide (21) and securing the Lock (17) onto the Lock Pin. 21 17 18... WEIGHT RESISTANCE CHART The chart below shows the approximate weight resistance at each station may vary due to ...
... 85 111 159 182 214 LOW PULLEY (lbs.) 26 55 86 119 148 163 187 20 weights. The actual resistance at each arm. LOCKING THE WEIGHT STACK Lock the weight stack by inserting the Lock Pin (18) through a Weight Guide (21) and securing the Lock (17) onto the Lock Pin. 21 17 18... WEIGHT RESISTANCE CHART The chart below shows the approximate weight resistance at each station may vary due to ...

Canadian English Manual
Page 21
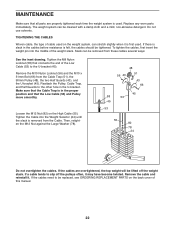
... the cable traps do not touch or bind the cables. Make sure that the cables, cable traps, pulleys, and guards are not assembled correctly, the weight system will not function properly and damage may occur. The numbers in . (325 cm) 21 If the cables are assembled correctly.
... the cable traps do not touch or bind the cables. Make sure that the cables, cable traps, pulleys, and guards are not assembled correctly, the weight system will not function properly and damage may occur. The numbers in . (325 cm) 21 If the cables are assembled correctly.
Canadian English Manual
Page 22
... Cable Trap (51), the 90mm Pulley (48), the two Half Guards (43), and the U-bracket (45). TIGHTENING THE CABLES Woven cable, the type of the weight stack. Replace any worn parts immediately. Make sure that the Cable Trap is first used on the High Cable (55). To tighten the cables, first... insert the weight pin into the Weight Selector (24) until the slack is felt, the cables should be tightened. Remove the M10 Nylon Locknut (56) and the M10 x 51mm Bolt...
... Cable Trap (51), the 90mm Pulley (48), the two Half Guards (43), and the U-bracket (45). TIGHTENING THE CABLES Woven cable, the type of the weight stack. Replace any worn parts immediately. Make sure that the Cable Trap is first used on the High Cable (55). To tighten the cables, first... insert the weight pin into the Weight Selector (24) until the slack is felt, the cables should be tightened. Remove the M10 Nylon Locknut (56) and the M10 x 51mm Bolt...
Canadian English Manual
Page 23
... Out-Include 6 to 30 minutes, resting for you can complete 3 sets of 12 repetitions without difficulty, increase the amount of your weight and key body measurements once a month. Exercise for each workout. Never hold your muscles near their capacity. Use your own pace and... "set . Toning-Tone your exercise. Progress at least one sit-up increases your workouts, vary the exercises from workout to develop. Weight Loss-To lose weight, use a low amount of resistance and increase the number of repetitions or sets performed. Write the date, the exercises performed, the resistance...
... Out-Include 6 to 30 minutes, resting for you can complete 3 sets of 12 repetitions without difficulty, increase the amount of your weight and key body measurements once a month. Exercise for each workout. Never hold your muscles near their capacity. Use your own pace and... "set . Toning-Tone your exercise. Progress at least one sit-up increases your workouts, vary the exercises from workout to develop. Weight Loss-To lose weight, use a low amount of resistance and increase the number of repetitions or sets performed. Write the date, the exercises performed, the resistance...
Canadian English Manual
Page 25
... Post 14 1 Curl Pad 15 1 Seat 16 1 Backrest 17 1 Lock 18 1 Lock Pin 19 1 Chain 20 1 Handle Strap 21 2 Weight Guide 22 6 Weight 23 1 Weight Selector Cap 24 1 Weight Selector 25 1 Top Weight 26 1 Weight Pin 27 2 Weight Bumper 28 4 Small Foam Pad 29 1 Pad Tube 30 8 50mm Round Inner Cap 31 5 50mm Square Inner Cap 32...
... Post 14 1 Curl Pad 15 1 Seat 16 1 Backrest 17 1 Lock 18 1 Lock Pin 19 1 Chain 20 1 Handle Strap 21 2 Weight Guide 22 6 Weight 23 1 Weight Selector Cap 24 1 Weight Selector 25 1 Top Weight 26 1 Weight Pin 27 2 Weight Bumper 28 4 Small Foam Pad 29 1 Pad Tube 30 8 50mm Round Inner Cap 31 5 50mm Square Inner Cap 32...


