
English Manual
Page 2
... beyond that specifically set forth herein. TABLE OF CONTENTS LIMITED WARRANTY IMPORTANT PRECAUTIONS BEFORE YOU BEGIN PART IDENTIFICATION CHART ASSEMBLY ADJUSTING THE WEIGHT BENCH EXERCISE GUIDELINES PART LIST EXPLODED DRAWING ORDERING REPLACEMENT PARTS • 2 3 4 5 6 12 14 18 19 Back Cover LIMITED WARRANTY ICON...warranty extends only to be pre-authorized by ICON. ICON HEALTH & FITNESS, INC., 1500 S. 1000 W., LOGAN, UT 84321-9813 WEIDER is limited in workmanship and material, under this product to the original purchaser. All products for a period of ninety (90) days ...
... beyond that specifically set forth herein. TABLE OF CONTENTS LIMITED WARRANTY IMPORTANT PRECAUTIONS BEFORE YOU BEGIN PART IDENTIFICATION CHART ASSEMBLY ADJUSTING THE WEIGHT BENCH EXERCISE GUIDELINES PART LIST EXPLODED DRAWING ORDERING REPLACEMENT PARTS • 2 3 4 5 6 12 14 18 19 Back Cover LIMITED WARRANTY ICON...warranty extends only to be pre-authorized by ICON. ICON HEALTH & FITNESS, INC., 1500 S. 1000 W., LOGAN, UT 84321-9813 WEIDER is limited in workmanship and material, under this product to the original purchaser. All products for a period of ninety (90) days ...
English Manual
Page 3
... in this prod IMPORTANT PRECAUTIONS WARNING: To reduce the risk of serious injury, read the following important precautions before using the weight bench. 11. Do not place more than 150 pounds, including a weight bar and weights, on the weight rests;'do not place, more than 120 pbunds on each side of your...
... in this prod IMPORTANT PRECAUTIONS WARNING: To reduce the risk of serious injury, read the following important precautions before using the weight bench. 11. Do not place more than 150 pounds, including a weight bar and weights, on the weight rests;'do not place, more than 120 pbunds on each side of your...
English Manual
Page 4
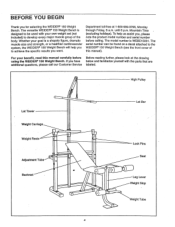
...please look at 1-800-999-3756, Monday through Friday, 6 a.m. The model number is designed to be found on a decal attached to the WEIDER° 150 Weight Bench (see the front cover of the body. For your goal is a shapely figure, dramatic muscle size and strength, or a healthier cardiovascular system,... your own weight set (not included) to develop every major muscle group of this manual carefully before calling. The versatile WEIDER. 150 Weight Bench is WEBE15061. The serial number can be used with the parts that are additional questions, please call our Customer Service labeled.
...please look at 1-800-999-3756, Monday through Friday, 6 a.m. The model number is designed to be found on a decal attached to the WEIDER° 150 Weight Bench (see the front cover of the body. For your goal is a shapely figure, dramatic muscle size and strength, or a healthier cardiovascular system,... your own weight set (not included) to develop every major muscle group of this manual carefully before calling. The versatile WEIDER. 150 Weight Bench is WEBE15061. The serial number can be used with the parts that are additional questions, please call our Customer Service labeled.
English Manual
Page 9
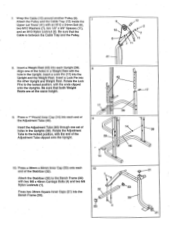
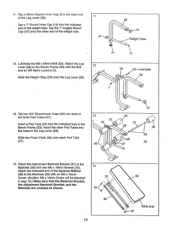
...into the other Upright and Weight Rest. Insert a Lock Pin into the Upright and the Weight Rest. Attach the Stabilizer (32) to the Bench Frame (33) with the ends clipped onto the Uprights. Press two 38mm Square Inner Caps (21) into each Upright (39). Be sure .... Rotate the Adjustment Tube to the locked position, with two M8 x 48mm Carriage Bolts (4) and two M8 Nylon Locknuts (1). 7. Insert a Weight Rest (42) into the Bench Frame (33). 10 ........._ 1r IP 7 32 :" : . , 53 4 • gr___..--21 o 53 33 21 o 46 14 10. Align one set of 9 the Adjustment ...
...into the other Upright and Weight Rest. Insert a Lock Pin into the Upright and the Weight Rest. Attach the Stabilizer (32) to the Bench Frame (33) with the ends clipped onto the Uprights. Press two 38mm Square Inner Caps (21) into each Upright (39). Be sure .... Rotate the Adjustment Tube to the locked position, with two M8 x 48mm Carriage Bolts (4) and two M8 Nylon Locknuts (1). 7. Insert a Weight Rest (42) into the Bench Frame (33). 10 ........._ 1r IP 7 32 :" : . , 53 4 • gr___..--21 o 53 33 21 o 46 14 10. Align one set of 9 the Adjustment ...
English Manual
Page 10
... (27) into each end of the Leg Lever (28). Weight Tube 21 14 12. Tap a 38mm Square Inner Cap (21) into the holes in the Bench Frame (33). Insert the other end of the weight tube. Lubricate the M8 x 56mm Bolt (22). Slide two Foam Pads (26) onto each Pad Tube... 0:' ' • 33 , - 11. Tap the 1" Angled Round Cap (47) onto the other Pad Tubes into each of the Backrest Br•acket (38) to the Bench Frame (33) with two M6 x 16mm Screws (18). Attach the Adjustment Backrest Bracket (37) to the Backrest (36) with the Bolt and an M8 Nylon...
... (27) into each end of the Leg Lever (28). Weight Tube 21 14 12. Tap a 38mm Square Inner Cap (21) into the holes in the Bench Frame (33). Insert the other end of the weight tube. Lubricate the M8 x 56mm Bolt (22). Slide two Foam Pads (26) onto each Pad Tube... 0:' ' • 33 , - 11. Tap the 1" Angled Round Cap (47) onto the other Pad Tubes into each of the Backrest Br•acket (38) to the Bench Frame (33) with two M6 x 16mm Screws (18). Attach the Adjustment Backrest Bracket (37) to the Backrest (36) with the Bolt and an M8 Nylon...
English Manual
Page 11
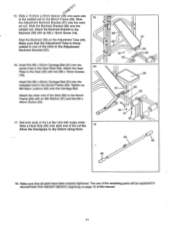
... of the Seat (35) to the Backrest (36) with two M6 x 16mm Screws (18). Attach the other end of the slots in ADJUSTING THE WEIGHT BENCH, beginning on page 12 of the welded rod on the Adjustment Tube (46). The use of the remaining parts will be explained in the Adjustment... Backrest Bracket (37). 16. Attach the Backrest Bracket to the Bench Frame (33) with soapy water. Insert the M6 x 52mm Carriage Bolt (51) into the indicated hole in the Seat Plate (50). Attach the Seat 16...
... of the Seat (35) to the Backrest (36) with two M6 x 16mm Screws (18). Attach the other end of the slots in ADJUSTING THE WEIGHT BENCH, beginning on page 12 of the welded rod on the Adjustment Tube (46). The use of the remaining parts will be explained in the Adjustment... Backrest Bracket (37). 16. Attach the Backrest Bracket to the Bench Frame (33) with soapy water. Insert the M6 x 52mm Carriage Bolt (51) into the indicated hole in the Seat Plate (50). Attach the Seat 16...
English Manual
Page 12
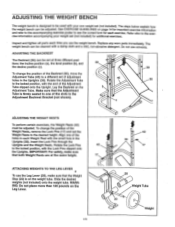
... the small hole in the Adjustment Backrest Bracket (not shown). Insert the Lock Pins through the Uprights and the Weight Rests. ADJUSTING THE WEIGHT BENCH The weight bench is designed to be used with your weight set (not included). See EXERCISE GUIDELINES on the Leg Lever. 1 "I • 0 28 0...(46) to a different set the Weight Rests to the locked position, with a damp cloth and a mild, non-abrasive detergent. The weight bench can be adjusted. To change the position of adjustment holes in each time you use solvents. Rotate the Lock Pins 42 to the desired height...
... the small hole in the Adjustment Backrest Bracket (not shown). Insert the Lock Pins through the Uprights and the Weight Rests. ADJUSTING THE WEIGHT BENCH The weight bench is designed to be used with your weight set (not included). See EXERCISE GUIDELINES on the Leg Lever. 1 "I • 0 28 0...(46) to a different set the Weight Rests to the locked position, with a damp cloth and a mild, non-abrasive detergent. The weight bench can be adjusted. To change the position of adjustment holes in each time you use solvents. Rotate the Lock Pins 42 to the desired height...
English Manual
Page 14
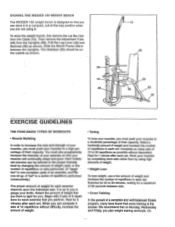
STORING THE WEIDER 150 WEIGHT BENCH The WEIDER 150 weight bench is designed so that you can store it . To store the weight bench, first remove the Lat Bar (44) from the Uprights (39). Slide the Bench Frame (33) in each exercise that cross training is a series of repetitions performed consecutively.) The proper amount of 8 repetitions for each set...
STORING THE WEIDER 150 WEIGHT BENCH The WEIDER 150 weight bench is designed so that you can store it . To store the weight bench, first remove the Lat Bar (44) from the Uprights (39). Slide the Bench Frame (33) in each exercise that cross training is a series of repetitions performed consecutively.) The proper amount of 8 repetitions for each set...
English Manual
Page 18
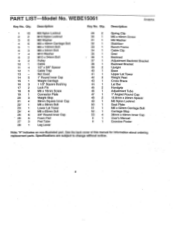
... 1 37 1 38 1 39 2 40 1 41 1 42 2 43 1 44 1 45 2 46 1 47 1 48 2 49 1 50 1 51 1 52 1 53 4 # 1 1 Spring Clip M6 x 48mm Screw M6 Washer Stabilizer Bench Frame Cable Clip Seat Backrest Adjustment Backrest Bracket Backrest Bracket Upright Base Upper Lat Tower Weight Rest Cross Brace Lat Bar Handgrip Adjustment Tube 1" Angled...
... 1 37 1 38 1 39 2 40 1 41 1 42 2 43 1 44 1 45 2 46 1 47 1 48 2 49 1 50 1 51 1 52 1 53 4 # 1 1 Spring Clip M6 x 48mm Screw M6 Washer Stabilizer Bench Frame Cable Clip Seat Backrest Adjustment Backrest Bracket Backrest Bracket Upright Base Upper Lat Tower Weight Rest Cross Brace Lat Bar Handgrip Adjustment Tube 1" Angled...
English Manual
Page 20
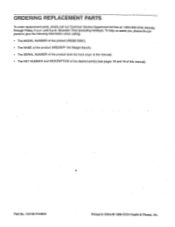
until 6 p.m. pared to give the following information when calling: • The MODEL NUMBER of the product (WEBE15061). • The NAME of the product (WEIDER° 150 Weight Bench). • The SERIAL NUMBER of the product (see the front coyer of this manual). • The KEY NUMBER and DESCRIPTION of the desired part(s) (see ...
until 6 p.m. pared to give the following information when calling: • The MODEL NUMBER of the product (WEBE15061). • The NAME of the product (WEIDER° 150 Weight Bench). • The SERIAL NUMBER of the product (see the front coyer of this manual). • The KEY NUMBER and DESCRIPTION of the desired part(s) (see ...


