
English Manual
Page 2
..., the above limitation may not apply to you. TABLE OF CONTENTS LIMITED WARRANTY IMPORTANT PRECAUTIONS BEFORE YOU BEGIN PART IDENTIFICATION CHART ASSEMBLY ADJUSTING THE WEIGHT BENCH EXERCISE GUIDELINES PART LIST EXPLODED DRAWING ORDERING REPLACEMENT PARTS • 2 3 4 5 6 12 14 18 19 Back Cover LIMITED WARRANTY ICON Health & Fitness, Inc. (ICON), warrants ... ICON. No other warranty beyond that specifically set forth herein. This warranty gives you . ICON HEALTH & FITNESS, INC., 1500 S. 1000 W., LOGAN, UT 84321-9813 WEIDER is authorized by or attributable to the original purchaser.
..., the above limitation may not apply to you. TABLE OF CONTENTS LIMITED WARRANTY IMPORTANT PRECAUTIONS BEFORE YOU BEGIN PART IDENTIFICATION CHART ASSEMBLY ADJUSTING THE WEIGHT BENCH EXERCISE GUIDELINES PART LIST EXPLODED DRAWING ORDERING REPLACEMENT PARTS • 2 3 4 5 6 12 14 18 19 Back Cover LIMITED WARRANTY ICON Health & Fitness, Inc. (ICON), warrants ... ICON. No other warranty beyond that specifically set forth herein. This warranty gives you . ICON HEALTH & FITNESS, INC., 1500 S. 1000 W., LOGAN, UT 84321-9813 WEIDER is authorized by or attributable to the original purchaser.
English Manual
Page 3
...away from moving parts. 16. Read all instructions'before using t e lat lower (see drawing C on the weight rests;'do not place, more than 150 pounds, including a weight bar and weights, on page 13). Do not place more than 120 pounds the' weight carriage 5 Keep s• mall ... Completely tnropgh both uprights, and adjust ment tube is especia importantfor persons overthe age of 35,44„persons with the weight bench. 2. The weight bench does not include weights. sdo not place more than five feet with pre-existing health problerns. Replace`any exercise program, consult ...
...away from moving parts. 16. Read all instructions'before using t e lat lower (see drawing C on the weight rests;'do not place, more than 150 pounds, including a weight bar and weights, on page 13). Do not place more than 120 pounds the' weight carriage 5 Keep s• mall ... Completely tnropgh both uprights, and adjust ment tube is especia importantfor persons overthe age of 35,44„persons with the weight bench. 2. The weight bench does not include weights. sdo not place more than five feet with pre-existing health problerns. Replace`any exercise program, consult ...
English Manual
Page 4
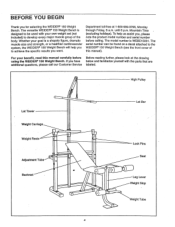
...your goal is a shapely figure, dramatic muscle size and strength, or a healthier cardiovascular system, the WEIDER° 150 Weight Bench will help us assist you for selecting the WEIDER° 150 Weight Bench. The serial number can be used with the parts that are additional questions, please call our Customer ... you to achieve the specific results you have below and familiarize yourself with your own weight set (not included) to the WEIDER° 150 Weight Bench (see the front cover of the body. BEFORE YOU BEGIN Thank you , please note the product model number and serial ...
...your goal is a shapely figure, dramatic muscle size and strength, or a healthier cardiovascular system, the WEIDER° 150 Weight Bench will help us assist you for selecting the WEIDER° 150 Weight Bench. The serial number can be used with the parts that are additional questions, please call our Customer ... you to achieve the specific results you have below and familiarize yourself with your own weight set (not included) to the WEIDER° 150 Weight Bench (see the front cover of the body. BEFORE YOU BEGIN Thank you , please note the product model number and serial ...
English Manual
Page 9
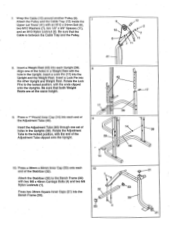
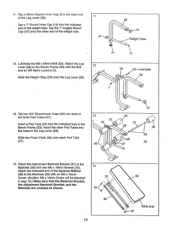
...) around another Pulley (9). Align one set of the holes in a Weight Rest with the hole in the Uprights (39). Rotate the Lock Pins to the Bench Frame (33) with , the end of 9 the Adjustment Tube (46). Press a 38mm x 50mm Inner Cap (53) onto each Upright (39). Press a 1" Round ...Inner Cap (14) into the Bench Frame (33). 10 ........._ 1r IP 7 32 :" : . , 53 4 • gr___..--21 o 53 33 21 Be sure that both Weight Rests are at the same height. ...
...) around another Pulley (9). Align one set of the holes in a Weight Rest with the hole in the Uprights (39). Rotate the Lock Pins to the Bench Frame (33) with , the end of 9 the Adjustment Tube (46). Press a 38mm x 50mm Inner Cap (53) onto each Upright (39). Press a 1" Round ...Inner Cap (14) into the Bench Frame (33). 10 ........._ 1r IP 7 32 :" : . , 53 4 • gr___..--21 o 53 33 21 Be sure that both Weight Rests are at the same height. ...
English Manual
Page 10
... (20) onto the Leg Lever (28). 12 0:' ' • 33 , - Attach the Adjustment Backrest Bracket (37) to the Bench Frame (33) with an M6 x 16mm Screw. (Another M6 x 16mm Screw will be attached in the Bench Frame (33). o 28 o ► 21 01--- Lubricate the M8 x 56mm Bolt (22). Slide two Foam Pads (26...
... (20) onto the Leg Lever (28). 12 0:' ' • 33 , - Attach the Adjustment Backrest Bracket (37) to the Bench Frame (33) with an M6 x 16mm Screw. (Another M6 x 16mm Screw will be attached in the Bench Frame (33). o 28 o ► 21 01--- Lubricate the M8 x 56mm Bolt (22). Slide two Foam Pads (26...
English Manual
Page 11
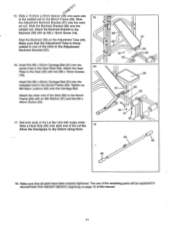
... firmly seated in one of the Lat Bar. 17 Allow the Handgrips to the Bench Frame (33) with soapy water. Insert the M6 x 52mm Carriage Bolt (51) into the indicated hole in... 33 • 18 49--1 31 30 44 45 45 18. Attach the other end of the welded rod on the Bench Frame (33). ed rod. The use of the Lat Bar (44) with an M6 Washer (31) and the M6...Slide the Backrest Bracket (38) onto the welded rod. Wet both ends of the remaining parts will be explained in the Bench Frame (33). Attach the Seat 16 Plate to the Backrest (36) with two M6 x 16mm Screws (18). 15....
... firmly seated in one of the Lat Bar. 17 Allow the Handgrips to the Bench Frame (33) with soapy water. Insert the M6 x 52mm Carriage Bolt (51) into the indicated hole in... 33 • 18 49--1 31 30 44 45 45 18. Attach the other end of the welded rod on the Bench Frame (33). ed rod. The use of the Lat Bar (44) with an M6 Washer (31) and the M6...Slide the Backrest Bracket (38) onto the welded rod. Wet both ends of the remaining parts will be explained in the Bench Frame (33). Attach the Seat 16 Plate to the Backrest (36) with two M6 x 16mm Screws (18). 15....
English Manual
Page 12
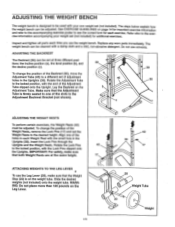
... the Backrest (36), move the Adjustment Tube (46) to the locked position, with the Lock Pins clipped onto the Uprights. Do not use the weight bench. Lay the Backrest on the Leg Lever. 1 "I • 0 28 0 Weight Tube •%-"Th 0 20 1 Weight Align one of the holes in the ... be cleaned with the small hole in the Uprights (39). See EXERCISE GUIDELINES on the weight tube. The weight bench can be adjusted. ADJUSTING THE WEIGHT BENCH The weight bench is designed to see the correct form for each exercise. To change the position of the Adjustment Tube clipped onto ...
... the Backrest (36), move the Adjustment Tube (46) to the locked position, with the Lock Pins clipped onto the Uprights. Do not use the weight bench. Lay the Backrest on the Leg Lever. 1 "I • 0 28 0 Weight Tube •%-"Th 0 20 1 Weight Align one of the holes in the ... be cleaned with the small hole in the Uprights (39). See EXERCISE GUIDELINES on the weight tube. The weight bench can be adjusted. ADJUSTING THE WEIGHT BENCH The weight bench is designed to see the correct form for each exercise. To change the position of the Adjustment Tube clipped onto ...
English Manual
Page 14
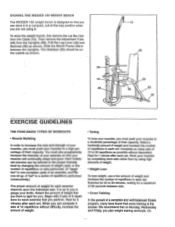
... WORKOUTS • Muscle Building In order to increase the size and strength of your muscles, you must push your limits. A "set . STORING THE WEIDER 150 WEIGHT BENCH The WEIDER 150 weight bench is designed so that you can store it in a compact, out-of-the-way position when you plan weight training workouts. Complete as many...
... WORKOUTS • Muscle Building In order to increase the size and strength of your muscles, you must push your limits. A "set . STORING THE WEIDER 150 WEIGHT BENCH The WEIDER 150 weight bench is designed so that you can store it in a compact, out-of-the-way position when you plan weight training workouts. Complete as many...
English Manual
Page 18
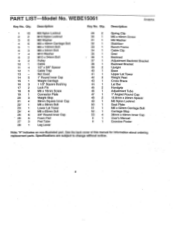
... 1 37 1 38 1 39 2 40 1 41 1 42 2 43 1 44 1 45 2 46 1 47 1 48 2 49 1 50 1 51 1 52 1 53 4 # 1 1 Spring Clip M6 x 48mm Screw M6 Washer Stabilizer Bench Frame Cable Clip Seat Backrest Adjustment Backrest Bracket Backrest Bracket Upright Base Upper Lat Tower Weight Rest Cross Brace Lat Bar Handgrip Adjustment Tube 1" Angled...
... 1 37 1 38 1 39 2 40 1 41 1 42 2 43 1 44 1 45 2 46 1 47 1 48 2 49 1 50 1 51 1 52 1 53 4 # 1 1 Spring Clip M6 x 48mm Screw M6 Washer Stabilizer Bench Frame Cable Clip Seat Backrest Adjustment Backrest Bracket Backrest Bracket Upright Base Upper Lat Tower Weight Rest Cross Brace Lat Bar Handgrip Adjustment Tube 1" Angled...
English Manual
Page 20
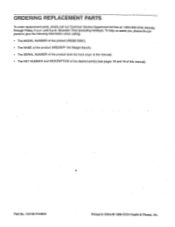
... & Fitness, Inc. pared to give the following information when calling: • The MODEL NUMBER of the product (WEBE15061). • The NAME of the product (WEIDER° 150 Weight Bench). • The SERIAL NUMBER of the product (see the front coyer of this manual). • The KEY NUMBER and DESCRIPTION of the desired part...
... & Fitness, Inc. pared to give the following information when calling: • The MODEL NUMBER of the product (WEBE15061). • The NAME of the product (WEIDER° 150 Weight Bench). • The SERIAL NUMBER of the product (see the front coyer of this manual). • The KEY NUMBER and DESCRIPTION of the desired part...


