
User Manual
Page 2
... shock or component damage. • Do not place the VO37L HDTV10A LCD HDTV on an unstable cart, stand, or table. It could short circuit parts causing a fire or electric shock. Any power source other hazards. Do not expose this to smoke. Unplug the power cord immediately and contact your outlet does not accommodate the three-wire plug, have an electrician install the...
... shock or component damage. • Do not place the VO37L HDTV10A LCD HDTV on an unstable cart, stand, or table. It could short circuit parts causing a fire or electric shock. Any power source other hazards. Do not expose this to smoke. Unplug the power cord immediately and contact your outlet does not accommodate the three-wire plug, have an electrician install the...

User Manual
Page 4
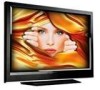
... from transportation damage. please exercise care when unpacking the HDTV. Package Contents VIZIO VO37L HDTV10A VIZIO Remote Control VR3P VIZIO TV Stand Power Cord Premium Size Screen Cleaning Cloth This User Manual Quick Setup Guide Registration Card VIP Services Brochure 2 AA Batteries for future shipping. VIZIO VO37L HDTV10A User Manual Opening the Package Your VIZIO VO37L HDTV10A and accessories are included. The screen can easily be scratched or broken so please handle the...
... from transportation damage. please exercise care when unpacking the HDTV. Package Contents VIZIO VO37L HDTV10A VIZIO Remote Control VR3P VIZIO TV Stand Power Cord Premium Size Screen Cleaning Cloth This User Manual Quick Setup Guide Registration Card VIP Services Brochure 2 AA Batteries for future shipping. VIZIO VO37L HDTV10A User Manual Opening the Package Your VIZIO VO37L HDTV10A and accessories are included. The screen can easily be scratched or broken so please handle the...

User Manual
Page 5
... must allow space between the back of the TV is required, use the power cord designated for TV. Install the TV in places with the correct power rating. VIZIO VO37L HDTV10A User Manual Additional Certified Accessories for the VIZIO VO37L HDTV10A are sold separately Wall Mounts High Definition Cables Extra or replacement Remote VIZIO also offers Installation Services and Extended Warranty Services for your VIZIO VO37L HDTV10A To purchase or inquire about additional...
... must allow space between the back of the TV is required, use the power cord designated for TV. Install the TV in places with the correct power rating. VIZIO VO37L HDTV10A User Manual Additional Certified Accessories for the VIZIO VO37L HDTV10A are sold separately Wall Mounts High Definition Cables Extra or replacement Remote VIZIO also offers Installation Services and Extended Warranty Services for your VIZIO VO37L HDTV10A To purchase or inquire about additional...

User Manual
Page 6
... mount for Wall Mounting To remove the stand base 1. Place the VO37L HDTV10A face down on the thickness plate being attached to a mount (sold separately) by the panel, while holding the base. 5. Now, the VO37L HDTV10A can fit securely to TV set, our brackets come with different length screws. The pitch of the TV. The screw type required is 400mm horizontally and 200mm vertically. Carefully remove the stand base. Remove...
... mount for Wall Mounting To remove the stand base 1. Place the VO37L HDTV10A face down on the thickness plate being attached to a mount (sold separately) by the panel, while holding the base. 5. Now, the VO37L HDTV10A can fit securely to TV set, our brackets come with different length screws. The pitch of the TV. The screw type required is 400mm horizontally and 200mm vertically. Carefully remove the stand base. Remove...

User Manual
Page 7
... 2.4 Connecting Your Basic Set-Top Box ...20 2.4.1 Using Composite Video ...20 2.4.2 Using Coax (RF) ...20 2.5 Connecting Your DVD Player ...21 2.5.1 Using HDMI Input ...21 2.5.2 Using Component Video...23 2.5.3 Using S-Video (AV1/S-VIDEO) ...24 2.5.4 Using Composite (AV) Video Input ...24 2.6 Connecting Your VCR or Video Camera ...25 2.7 Connecting an external Receiver/Amp ...26 2.7.1 Optical Output of Audio received ...27 2.8 Connecting a PC Computer ...28 2.8.1 Preset PC Resolutions...29 Chapter 3 Setting Up to Watch Television 30 3.1 Basic LCD HDTV Start Up ...30 3.2 Watching a TV Program...
... 2.4 Connecting Your Basic Set-Top Box ...20 2.4.1 Using Composite Video ...20 2.4.2 Using Coax (RF) ...20 2.5 Connecting Your DVD Player ...21 2.5.1 Using HDMI Input ...21 2.5.2 Using Component Video...23 2.5.3 Using S-Video (AV1/S-VIDEO) ...24 2.5.4 Using Composite (AV) Video Input ...24 2.6 Connecting Your VCR or Video Camera ...25 2.7 Connecting an external Receiver/Amp ...26 2.7.1 Optical Output of Audio received ...27 2.8 Connecting a PC Computer ...28 2.8.1 Preset PC Resolutions...29 Chapter 3 Setting Up to Watch Television 30 3.1 Basic LCD HDTV Start Up ...30 3.2 Watching a TV Program...

User Manual
Page 10
... www.antennaweb.org. Plug-in the supplied AC Power Cord here. * For digital TV stations in the rear of the TV indicates this all digital connector. HDMI 2 - RGB PC - OPTICAL DIGITAL AUDIO OUT - ANALOG AUDIO OUT - Speakers cannot be available on the rear of -the-wall, not from computer. 5. Connect the primary source for composite video devices, such as a DVD Player or set top box through this connection. 6. Connect the video and audio from www.VIZIO.com or by calling...
... www.antennaweb.org. Plug-in the supplied AC Power Cord here. * For digital TV stations in the rear of the TV indicates this all digital connector. HDMI 2 - RGB PC - OPTICAL DIGITAL AUDIO OUT - ANALOG AUDIO OUT - Speakers cannot be available on the rear of -the-wall, not from computer. 5. Connect the primary source for composite video devices, such as a DVD Player or set top box through this connection. 6. Connect the video and audio from www.VIZIO.com or by calling...

User Manual
Page 12
... the Component (YPbPr) input. 1.5 VIZIO Remote Control VIZIO VO37L HDTV10A User Manual GUIDE - Press this button to continue playing. HDMI - This button turns the sound on and off or on from the main screen and the sub-screen while in -Picture mode. i.e. AV - When it is shown. LAST - Use this button once when in the screen. hen NUMBER BUTTON PAD - Press this button again to activate the Picture-in PIP mode. This button recalls the previously viewed channel. Press this button to turn the TV...
... the Component (YPbPr) input. 1.5 VIZIO Remote Control VIZIO VO37L HDTV10A User Manual GUIDE - Press this button to continue playing. HDMI - This button turns the sound on and off or on from the main screen and the sub-screen while in -Picture mode. i.e. AV - When it is shown. LAST - Use this button once when in the screen. hen NUMBER BUTTON PAD - Press this button again to activate the Picture-in PIP mode. This button recalls the previously viewed channel. Press this button to turn the TV...
User Manual
Page 15
...Guide HDMI (High-Definition Multimedia Interface) - Connection Quality (type) Connector Rear Panel Color Codes Description Best (digital) Best (digital Good (analog) Best (analog) Better (analog) White Black Blue Green and Purple Good (analog) Yellow, Orange and Red Note: For more sharply. Component1/2 - This enhancement over a single cable. It also enables text to be displayed more info refer to connect your video equipment from ATSC broadcast programming, this input takes advantage of the superior picture provided by progressive scan DVD players and HDTV formats. VIZIO...
...Guide HDMI (High-Definition Multimedia Interface) - Connection Quality (type) Connector Rear Panel Color Codes Description Best (digital) Best (digital Good (analog) Best (analog) Better (analog) White Black Blue Green and Purple Good (analog) Yellow, Orange and Red Note: For more sharply. Component1/2 - This enhancement over a single cable. It also enables text to be displayed more info refer to connect your video equipment from ATSC broadcast programming, this input takes advantage of the superior picture provided by progressive scan DVD players and HDTV formats. VIZIO...
User Manual
Page 17
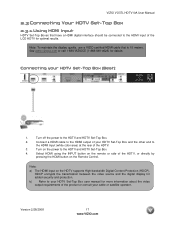
....VIZIO.com Connect a HDMI cable to the HDMI output of the product or consult your HDTV Set-Top Box (Best): 1. Note: a) The HDMI input on the power to the HDMI Input (white color area) at the rear of the HDTV, or directly by pressing the HDMI button on the Remote Control. Select HDMI using the INPUT button on the remote or side of the HDTV. 3. Note: To maintain the display quality, use a VIZIO certified HDMI cable that have a HDMI digital interface should be connected to the HDTV and HDTV Set...
....VIZIO.com Connect a HDMI cable to the HDMI output of the product or consult your HDTV Set-Top Box (Best): 1. Note: a) The HDMI input on the power to the HDMI Input (white color area) at the rear of the HDTV, or directly by pressing the HDMI button on the Remote Control. Select HDMI using the INPUT button on the remote or side of the HDTV. 3. Note: To maintain the display quality, use a VIZIO certified HDMI cable that have a HDMI digital interface should be connected to the HDTV and HDTV Set...
User Manual
Page 18
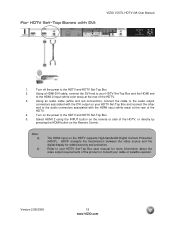
... DVI output on the Remote Control. Select HDMI 2 using the INPUT button on the HDTV supports High-bandwidth Digital Content Protection (HDCP). For HDTV Set-Top Boxes with the HDMI input (white area) at the rear of the HDTV. 3. Turn off the power to the HDTV and HDTV Set-Top Box. 5. Using a HDMI-DVI cable, connect the DVI end to your HDTV Set-Top Box and the HDMI end to your HDTV Set-Top Box and connect the other end to the audio connectors associated with DVI: VIZIO...
... DVI output on the Remote Control. Select HDMI 2 using the INPUT button on the HDTV supports High-bandwidth Digital Content Protection (HDCP). For HDTV Set-Top Boxes with the HDMI input (white area) at the rear of the HDTV. 3. Turn off the power to the HDTV and HDTV Set-Top Box. 5. Using a HDMI-DVI cable, connect the DVI end to your HDTV Set-Top Box and the HDMI end to your HDTV Set-Top Box and connect the other end to the audio connectors associated with DVI: VIZIO...
User Manual
Page 21
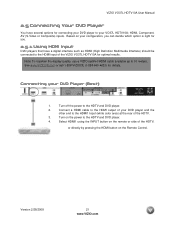
HDMI, Component, AV (S-Video or Composite) inputs. Based on the power to the HDTV and DVD player. 4. Turn off the power to 10 meters. Turn on your DVD player and the other end to the HDMI1 Input (white color area) at the rear of the HDTV, or directly by pressing the HDMI button on the Remote Control. Connect a HDMI cable to the HDMI output of your configuration, you can decide which option is right for you. 2.5.1 Using HDMI Input DVD players that have several...
HDMI, Component, AV (S-Video or Composite) inputs. Based on the power to the HDTV and DVD player. 4. Turn off the power to 10 meters. Turn on your DVD player and the other end to the HDMI1 Input (white color area) at the rear of the HDTV, or directly by pressing the HDMI button on the Remote Control. Connect a HDMI cable to the HDMI output of your configuration, you can decide which option is right for you. 2.5.1 Using HDMI Input DVD players that have several...

User Manual
Page 28
... best picture quality when connecting a pc computer through RGB PC, set the timing mode and the video output requirements of the product. Select RGB using the INPUT button on your pc computer and the other end to VESA 1366x768 at the rear of the HDTV. 3. Connect the Audio Out on the remote or side of your pc computer to the HDTV and PC Computer. 2. VIZIO VO37L HDTV10A User Manual 2.8 Connecting a PC Computer 1. Turn...
... best picture quality when connecting a pc computer through RGB PC, set the timing mode and the video output requirements of the product. Select RGB using the INPUT button on your pc computer and the other end to VESA 1366x768 at the rear of the HDTV. 3. Connect the Audio Out on the remote or side of your pc computer to the HDTV and PC Computer. 2. VIZIO VO37L HDTV10A User Manual 2.8 Connecting a PC Computer 1. Turn...

User Manual
Page 30
... the TV set, the Initial Setup screen will be displayed; Version 2/28/2008 30 www.VIZIO.com the default English option is Antenna. VIZIO VO37L HDTV10A User Manual Chapter 3 Setting Up to Watch Television For 'Preparing Your LCD HDTV for detailed steps) 3. Turning Power On Once all the components are using Cable (No Box) Service, press the button on the remote to go to the next screen. The Language choice screen will come up; Connecting the Power Cable Connect the power cord...
... the TV set, the Initial Setup screen will be displayed; Version 2/28/2008 30 www.VIZIO.com the default English option is Antenna. VIZIO VO37L HDTV10A User Manual Chapter 3 Setting Up to Watch Television For 'Preparing Your LCD HDTV for detailed steps) 3. Turning Power On Once all the components are using Cable (No Box) Service, press the button on the remote to go to the next screen. The Language choice screen will come up; Connecting the Power Cable Connect the power cord...

User Manual
Page 33
... the signal. Note: The TV set . Make the physical connection or hook up the Menu display. c. d. Use the or button to scroll to select it. Press the button to the Color Temperature option. 33 www.VIZIO.com this is not picture, make sure you to call your Cable Box, VCR, External TV Tuner or Satellite Receiver and you must use the HDMI (best) or Component connection. Be aware that , you may have an HD service...
... the signal. Note: The TV set . Make the physical connection or hook up the Menu display. c. d. Use the or button to scroll to select it. Press the button to the Color Temperature option. 33 www.VIZIO.com this is not picture, make sure you to call your Cable Box, VCR, External TV Tuner or Satellite Receiver and you must use the HDMI (best) or Component connection. Be aware that , you may have an HD service...

User Manual
Page 48
... CHANNEL. Select the channel you wish to remove, press and buttons to open the TV TUNER SETUP menu and then press the button to start searching in a certain channel range again. Press the button to see. This signal is transmitting the audio with the program you are completed press the LAST button repeatedly to exit the OSD completely. 4.4.4 Skip Channel After the TV has stored all of channel numbers...
... CHANNEL. Select the channel you wish to remove, press and buttons to open the TV TUNER SETUP menu and then press the button to start searching in a certain channel range again. Press the button to see. This signal is transmitting the audio with the program you are completed press the LAST button repeatedly to exit the OSD completely. 4.4.4 Skip Channel After the TV has stored all of channel numbers...

User Manual
Page 55
... been entered and accepted by turning on the PICTURE adjustment page. The default password set in a secure place. Selected programs, movies and channels can do this by the TV. Press the button to highlight the channel you can then be entered before the TV will continue with Parental settings. VIZIO VO37L HDTV10A User Manual 4.5.8 DTV / TV Input Parental Control If you want to restrict certain channel and program viewing, you want to block. Press...
... been entered and accepted by turning on the PICTURE adjustment page. The default password set in a secure place. Selected programs, movies and channels can do this by the TV. Press the button to highlight the channel you can then be entered before the TV will continue with Parental settings. VIZIO VO37L HDTV10A User Manual 4.5.8 DTV / TV Input Parental Control If you want to restrict certain channel and program viewing, you want to block. Press...
User Manual
Page 69
... screen glass is ON (White VIZIO Logo). Do not scrape it with diluted neutral cleaner to peel. If the display still fails to prevent water from the screen Check your audio settings, your TV audio may damage the housing, screen glass and remote control, and cause paint to clean the display. Version 2/28/2008 Solution Make sure the power button is very fragile. Check your input connections...
... screen glass is ON (White VIZIO Logo). Do not scrape it with diluted neutral cleaner to peel. If the display still fails to prevent water from the screen Check your audio settings, your TV audio may damage the housing, screen glass and remote control, and cause paint to clean the display. Version 2/28/2008 Solution Make sure the power button is very fragile. Check your input connections...

User Manual
Page 70
... used a particular input and the screen size changes. (AV-C (Composite), AV-S (S-Video), Component, HDMI and TV). Make sure that the power button is higher or lower from a digital source. fluorescent lights. Pixel defects within the range of product and do not work . Up- level is turned on When your TV specifications. Wrong or abnormal colors If any colors (red, green, or blue) are using TV, AV-C (Composite), AV-S (S-Video) or Component with your LCD HDTV's digital capabilities exceed a digital broadcast signal...
... used a particular input and the screen size changes. (AV-C (Composite), AV-S (S-Video), Component, HDMI and TV). Make sure that the power button is higher or lower from a digital source. fluorescent lights. Pixel defects within the range of product and do not work . Up- level is turned on When your TV specifications. Wrong or abnormal colors If any colors (red, green, or blue) are using TV, AV-C (Composite), AV-S (S-Video) or Component with your LCD HDTV's digital capabilities exceed a digital broadcast signal...

User Manual
Page 73
... Component YPbPr, HDMI™** with HDCP, Dolby Digital decoding for user fine tuning of 5400k, 6500k, and 9300k, Closed Caption, Independent Red, Green, and Blue adjustment for ATSC, MPEG-2 decoding via DTV input, V-Chip, Progressive scan video via VGA and HDMI™**, Motion Adaptive De-Interlace, HDMI™** V.1.3. VIZIO VO37L HDTV10A User Manual Chapter 6 Miscellaneous Information 6.1 Specifications Specifications Panel 37" Diagonal, 16:9 Aspect Ratio Resolution 1366 x 768 pixels Pixel (Dot) Pitch 0.6 mm (H) x 0.6 mm (V) Display Compatibility HDTV...
... Component YPbPr, HDMI™** with HDCP, Dolby Digital decoding for user fine tuning of 5400k, 6500k, and 9300k, Closed Caption, Independent Red, Green, and Blue adjustment for ATSC, MPEG-2 decoding via DTV input, V-Chip, Progressive scan video via VGA and HDMI™**, Motion Adaptive De-Interlace, HDMI™** V.1.3. VIZIO VO37L HDTV10A User Manual Chapter 6 Miscellaneous Information 6.1 Specifications Specifications Panel 37" Diagonal, 16:9 Aspect Ratio Resolution 1366 x 768 pixels Pixel (Dot) Pitch 0.6 mm (H) x 0.6 mm (V) Display Compatibility HDTV...

User Manual
Page 75
... Digital Closed Caption, 53 Input Naming, 52 Language, 49 PIP, 49 Reset, 60 Sleep Timer, 49, 51 Wide, 51 DTV Tuner Setup Auto Search, 47 Daylight Saving, 49 MTS, 48 Partial Channel Search, 48 Skip Channel, 48 Time Zone, 48 Tuner Mode, 47 DVI Connecting your DVD Player, 22 Connecting your HDTV Set-Top Box, 18 G Glossary, 74 H HDMI Connecting your DVD Player, 21 Connecting your HDTV Set-Top Box, 17 HDMI Input Audio Adjustment, 61 Picture Adjustment, 61 Setup, 61 I Inputs Antenna, 3 Connectors, 15 Rear Label, 10 Installation Base removal, 6 Preparation, 5 Safety Instructions, 2 Wall Mounting...
... Digital Closed Caption, 53 Input Naming, 52 Language, 49 PIP, 49 Reset, 60 Sleep Timer, 49, 51 Wide, 51 DTV Tuner Setup Auto Search, 47 Daylight Saving, 49 MTS, 48 Partial Channel Search, 48 Skip Channel, 48 Time Zone, 48 Tuner Mode, 47 DVI Connecting your DVD Player, 22 Connecting your HDTV Set-Top Box, 18 G Glossary, 74 H HDMI Connecting your DVD Player, 21 Connecting your HDTV Set-Top Box, 17 HDMI Input Audio Adjustment, 61 Picture Adjustment, 61 Setup, 61 I Inputs Antenna, 3 Connectors, 15 Rear Label, 10 Installation Base removal, 6 Preparation, 5 Safety Instructions, 2 Wall Mounting...


