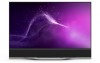

User Manual
Page 2
... Regulatory Information 40 Connecting to Factory Default Settings 26 Using the Guided Setup Menu 27 Using Guided Setup 27 Using the Info Window 27 Adjusting More Picture Settings 13 Adjusting the Picture Mode Edit Settings 13 Saving a Custom Picture Mode 14 Locking/Unlocking a Custom Picture Mode 14 Deleting a Custom Picture Mode 15 Resetting Picture Mode 15 Adjusting the Color Tuner Settings 16 Adjusting the Audio Settings 18 Adjusting Advance Audio Setting 18 Setting Timers 19 Setting the Sleep Timer 19 Setting the Auto Power Off Feature 19 Using VIZIO Internet Apps Plus...
... Regulatory Information 40 Connecting to Factory Default Settings 26 Using the Guided Setup Menu 27 Using Guided Setup 27 Using the Info Window 27 Adjusting More Picture Settings 13 Adjusting the Picture Mode Edit Settings 13 Saving a Custom Picture Mode 14 Locking/Unlocking a Custom Picture Mode 14 Deleting a Custom Picture Mode 15 Resetting Picture Mode 15 Adjusting the Color Tuner Settings 16 Adjusting the Audio Settings 18 Adjusting Advance Audio Setting 18 Setting Timers 19 Setting the Sleep Timer 19 Setting the Auto Power Off Feature 19 Using VIZIO Internet Apps Plus...

User Manual
Page 4
... components may cause fire or electric shock. Do not expose your TV to repair or service your TV, hold the AC/DC power adapter, Overloading can damage the remote control or injure the operator. Continuous • Insert batteries in fire or electric shock. If water penetrates into your dealer. If any object drops into your TV, unplug the power cord...
... components may cause fire or electric shock. Do not expose your TV to repair or service your TV, hold the AC/DC power adapter, Overloading can damage the remote control or injure the operator. Continuous • Insert batteries in fire or electric shock. If water penetrates into your dealer. If any object drops into your TV, unplug the power cord...
User Manual
Page 5
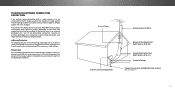
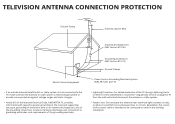
... screen of the coaxial cable is left unattended or unused for long periods of time, unplug the TV from the wall outlet and disconnect the antenna or cable system. Ground Clamp Antenna Lead In Wire Electric Service Equipment Antenna Discharge Unit (NEC Section 810-20) Grounding Conductors (NEC Section 810-21) Ground Clamps Power Service Grounding Electrode System (NEC ART 250, part H) v TELEVISION ANTENNA CONNECTION...
... screen of the coaxial cable is left unattended or unused for long periods of time, unplug the TV from the wall outlet and disconnect the antenna or cable system. Ground Clamp Antenna Lead In Wire Electric Service Equipment Antenna Discharge Unit (NEC Section 810-20) Grounding Conductors (NEC Section 810-21) Ground Clamps Power Service Grounding Electrode System (NEC ART 250, part H) v TELEVISION ANTENNA CONNECTION...

User Manual
Page 10
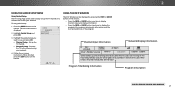
... Timers • Adjust the Network settings • Adjust the Channel settings • Set up Closed Captioning • Name Inputs • Adjust TV settings • Access the Guided Setup • Access the User Manual VIZIO TV SETTINGS Picture Audio Timers Network Devices System Guided Setup User Manual NAVIGATING THE ON-SCREEN MENU To open the on-screen menu, press the MENU button on -screen menu, you wish to recognize. Wide Zoom Normal Panoramic Exit 2D 3D ABC Input Wide CC Sleep Timer Picture Audio While navigating the on the remote. The selected input is displayed...
... Timers • Adjust the Network settings • Adjust the Channel settings • Set up Closed Captioning • Name Inputs • Adjust TV settings • Access the Guided Setup • Access the User Manual VIZIO TV SETTINGS Picture Audio Timers Network Devices System Guided Setup User Manual NAVIGATING THE ON-SCREEN MENU To open the on-screen menu, press the MENU button on -screen menu, you wish to recognize. Wide Zoom Normal Panoramic Exit 2D 3D ABC Input Wide CC Sleep Timer Picture Audio While navigating the on the remote. The selected input is displayed...

User Manual
Page 11
... buttons on page 24 for an alternate way of the screen. Contrast - Off + 85 + 50 + 50 + 59 +0 +9 More Picture Picture Mode Edit Color Calibration Wide Zoom Normal Panoramic Exit 2D 3D ABC Input Wide CC Sleep Timer Picture Audio Network Settings Help FULL-SIZED AND CENTERED (OVERLAY) Wide Exit VIZIO PICTURE Picture Mode Standard Wide Auto Brightness Control Backlight - Contrast - Since the 4:3 aspect ratio is already formatted for widescreen viewing (1.85:1 or 2.35:1), then black...
... buttons on page 24 for an alternate way of the screen. Contrast - Off + 85 + 50 + 50 + 59 +0 +9 More Picture Picture Mode Edit Color Calibration Wide Zoom Normal Panoramic Exit 2D 3D ABC Input Wide CC Sleep Timer Picture Audio Network Settings Help FULL-SIZED AND CENTERED (OVERLAY) Wide Exit VIZIO PICTURE Picture Mode Standard Wide Auto Brightness Control Backlight - Contrast - Since the 4:3 aspect ratio is already formatted for widescreen viewing (1.85:1 or 2.35:1), then black...

User Manual
Page 12
... the MENU button on -screen menu is displayed. 2. The on the remote. The PICTURE menu is useful in NetworakdjSuestttiinnggs theHefllpesh tones in the picture. Adjusts the black level of the picture. This setting is displayed. 3. Use the Arrow buttons on the remote to highlight Picture Mode, then use the Left/Right Arrow buttons to change each of the picture. Contrast - Tint - Ultra Color Spectrum More Picture Picture Mode Edit Color Calibration Standard + 85 + 50 + 50 + 59 +0 +9 Standard • Vivid mode sets the picture settings...
... the MENU button on -screen menu is displayed. 2. The on the remote. The PICTURE menu is useful in NetworakdjSuestttiinnggs theHefllpesh tones in the picture. Adjusts the black level of the picture. This setting is displayed. 3. Use the Arrow buttons on the remote to highlight Picture Mode, then use the Left/Right Arrow buttons to change each of the picture. Contrast - Tint - Ultra Color Spectrum More Picture Picture Mode Edit Color Calibration Standard + 85 + 50 + 50 + 59 +0 +9 Standard • Vivid mode sets the picture settings...

User Manual
Page 13
... buttons to custom picture modes. (Available after a custom picture mode is centered and completely fills the screen. Prevent changes to Calibrated picture mode. (Available after a custom picture mode is optimized for the source. Inputs assigned to that custom picture mode will be set to custom picture modes. • Unlock Picture Mode - Reset the picture mode settings to highlight More Picture, and then press OK. 2. Wide Zoo Exit 2D Input W Sleep Timer Pic Network Set 13 From the PICTURE menu, use as a PC monitor. • Normal is locked...
... buttons to custom picture modes. (Available after a custom picture mode is centered and completely fills the screen. Prevent changes to Calibrated picture mode. (Available after a custom picture mode is optimized for the source. Inputs assigned to that custom picture mode will be set to custom picture modes. • Unlock Picture Mode - Reset the picture mode settings to highlight More Picture, and then press OK. 2. Wide Zoo Exit 2D Input W Sleep Timer Pic Network Set 13 From the PICTURE menu, use as a PC monitor. • Normal is locked...

User Manual
Page 18
... and HDMI ARC output when connected to change the setting: • Base - Wide Zoom Exit 2D Input Wid Sleep Timer Pictu Network Settin 18 Adjusts low-frequency sounds. • Treble - VIZIO - Surround Balance - Adjusts the volume of the surround sound. • Subwoofer - Adjusts the synchronization between program content, AV formats, and input sources. Sets the volume control properties for example). • Analog Audio Out - Use the Arrow buttons on the TV Sound Bar Off remote to the subwoofer. Turns the Sound Bar on -screen menu...
... and HDMI ARC output when connected to change the setting: • Base - Wide Zoom Exit 2D Input Wid Sleep Timer Pictu Network Settin 18 Adjusts low-frequency sounds. • Treble - VIZIO - Surround Balance - Adjusts the volume of the surround sound. • Subwoofer - Adjusts the synchronization between program content, AV formats, and input sources. Sets the volume control properties for example). • Analog Audio Out - Use the Arrow buttons on the TV Sound Bar Off remote to the subwoofer. Turns the Sound Bar on -screen menu...

User Manual
Page 20
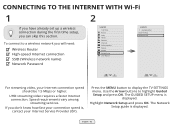
... displayed. 4. Use the Arrow buttons on the remote. VIZIO NETWORK Wired Connection Disconnected Wireless Access Points More Access Points WPS Manual Setup Hidden Network Test Connection 6. ricDetuNsrseS. Server Audio - Press the EXIT button on the remote to highlight Network and press OK. From the NETWORK menu, highlight Manual Setup and press OK. Using the keyboard on the remote to Off. 3. To change the setting to highlight Save and press OK. To change the settings manually, use the Arrow buttons on your network's password...
... displayed. 4. Use the Arrow buttons on the remote. VIZIO NETWORK Wired Connection Disconnected Wireless Access Points More Access Points WPS Manual Setup Hidden Network Test Connection 6. ricDetuNsrseS. Server Audio - Press the EXIT button on the remote to highlight Network and press OK. From the NETWORK menu, highlight Manual Setup and press OK. Using the keyboard on the remote to Off. 3. To change the setting to highlight Save and press OK. To change the settings manually, use the Arrow buttons on your network's password...

User Manual
Page 24
... Input source. • Stretch expands the display image to fill the screen. Each mode displays the picture differently. Press the EXIT button on your remote control to enter a name for your TV (Up to 10 characters long) To create a custom name for an alternate way of the display image. To change the screen aspect ratio from the SYSTEM menu: 1. 2 Changing the View Mode Settings You can resize the video...
... Input source. • Stretch expands the display image to fill the screen. Each mode displays the picture differently. Press the EXIT button on your remote control to enter a name for your TV (Up to 10 characters long) To create a custom name for an alternate way of the display image. To change the screen aspect ratio from the SYSTEM menu: 1. 2 Changing the View Mode Settings You can resize the video...
User Manual
Page 27
... GUIDE button one morning only to discover that his pals. VIZIO GUIDED SETUP Channel Setup Network Setup 3. Follow the on the way? Connect the TV to the Internet using your network. Who knows what he'll encounter on -screen instructions. When finished, press the EXIT button on the remote. To use and press OK: • Channel Setup - 2 USING THE GUIDED SETUP MENU Using Guided Setup The TV's Setup App can be used to easily set up the TV channel or to connect...
... GUIDE button one morning only to discover that his pals. VIZIO GUIDED SETUP Channel Setup Network Setup 3. Follow the on the way? Connect the TV to the Internet using your network. Who knows what he'll encounter on -screen instructions. When finished, press the EXIT button on the remote. To use and press OK: • Channel Setup - 2 USING THE GUIDED SETUP MENU Using Guided Setup The TV's Setup App can be used to easily set up the TV channel or to connect...

User Manual
Page 36
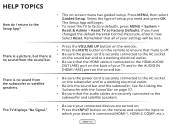
... using an antenna, the signal strength of product and do not constitute a defective product. 36 Ensure your device's user manual for Channels on the screen. • Ensure all cables are securely attached to this type of the channel may not display correctly. The TV displays "No Signal." • Press the INPUT button on page 25. • Select a pre-set picture mode. See Adjusting the Picture Settings on the remote control to select a different input source...
... using an antenna, the signal strength of product and do not constitute a defective product. 36 Ensure your device's user manual for Channels on the screen. • Ensure all cables are securely attached to this type of the channel may not display correctly. The TV displays "No Signal." • Press the INPUT button on page 25. • Select a pre-set picture mode. See Adjusting the Picture Settings on the remote control to select a different input source...
User Manual
Page 41
... THE TERMS OF THIS WARRANTY, DO NOT USE THE VIZIO PRODUCT AND, Your Obligations Before Service misuse, modifications or adjustments; (i) installation, set forth below data and downloaded applications is What This Warranty Covers serviced, regardless of original purchase. Replacement parts and VIZIO's labor are 32 inches or larger will usually be located in interstate or international commerce, the email address or telephone number below for What...
... THE TERMS OF THIS WARRANTY, DO NOT USE THE VIZIO PRODUCT AND, Your Obligations Before Service misuse, modifications or adjustments; (i) installation, set forth below data and downloaded applications is What This Warranty Covers serviced, regardless of original purchase. Replacement parts and VIZIO's labor are 32 inches or larger will usually be located in interstate or international commerce, the email address or telephone number below for What...
Installation Guide
Page 2
... damage the remote control or injure the operator. Incorrect polarities may result in any abnormality occurs. Do not expose batteries to excessive heat such as power-supply cord or plug is used as a radiator, heater, oven, amplifier etc. Doing so could short circuit parts causing a fire or electric shock. To totally disconnect power, unplug the power cord. • The lightning flash with liquids...
... damage the remote control or injure the operator. Incorrect polarities may result in any abnormality occurs. Do not expose batteries to excessive heat such as power-supply cord or plug is used as a radiator, heater, oven, amplifier etc. Doing so could short circuit parts causing a fire or electric shock. To totally disconnect power, unplug the power cord. • The lightning flash with liquids...
Installation Guide
Page 3
...antenna discharge unit, connection to earth in wire to an antenna discharge unit, size of the grounding conductors, location of time, unplug the TV from the wall outlet and disconnect the antenna or cable system. • Power Lines: Do not locate the antenna near overhead light or power circuits, or where it could fall into such power lines or circuits. TELEVISION ANTENNA CONNECTION PROTECTION Ground Clamp Antenna... Electrical Code, ANSI/NFPSA 70, provides information with regard to proper grounding of the mast and supporting structure, grounding of the lead-in the building installation.
...antenna discharge unit, connection to earth in wire to an antenna discharge unit, size of the grounding conductors, location of time, unplug the TV from the wall outlet and disconnect the antenna or cable system. • Power Lines: Do not locate the antenna near overhead light or power circuits, or where it could fall into such power lines or circuits. TELEVISION ANTENNA CONNECTION PROTECTION Ground Clamp Antenna... Electrical Code, ANSI/NFPSA 70, provides information with regard to proper grounding of the mast and supporting structure, grounding of the lead-in the building installation.
Installation Guide
Page 62
... Internet connection SSID (Wireless network name) Network Password 2 VIZIO TV SETTINGS Picture Audio Timers Network Channels CC Closed Captions Devices System Guided Setup User Manual Wide VIZIO GUIDED SETUP ZoCohmannelNSoetrumpal Panoramic Network Setup Exit 2D 3D ABC Input Wide CC Sleep Timer Picture Audio Network Settings Help Wide Exit Input Sleep Timer Networ For streaming video, your Internet connection speed should be 1.5 Mbps or higher. To connect to display the TV SETTINGS menu. The Network Setup guide is displayed. Use the Arrow buttons to highlight Guided Setup...
... Internet connection SSID (Wireless network name) Network Password 2 VIZIO TV SETTINGS Picture Audio Timers Network Channels CC Closed Captions Devices System Guided Setup User Manual Wide VIZIO GUIDED SETUP ZoCohmannelNSoetrumpal Panoramic Network Setup Exit 2D 3D ABC Input Wide CC Sleep Timer Picture Audio Network Settings Help Wide Exit Input Sleep Timer Networ For streaming video, your Internet connection speed should be 1.5 Mbps or higher. To connect to display the TV SETTINGS menu. The Network Setup guide is displayed. Use the Arrow buttons to highlight Guided Setup...
Installation Guide
Page 72
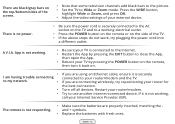
... audio cables are turned on. • Press the INPUT button on -screen menu has guided setup. If you need and press OK. English - 72 There is no sound from the subwoofer or satellite speakers. • Be sure the power cord is securely connected to the AC socket on page 57. • Be sure that all of your settings will begin. • To reset the TV to factory defaults, press MENU...
... audio cables are turned on. • Press the INPUT button on -screen menu has guided setup. If you need and press OK. English - 72 There is no sound from the subwoofer or satellite speakers. • Be sure the power cord is securely connected to the AC socket on page 57. • Be sure that all of your settings will begin. • To reset the TV to factory defaults, press MENU...
Installation Guide
Page 73
... batteries are connecting wirelessly, try plugging the power cord into a different outlet. Restart your external device. The remote is connected to the Internet. • Restart the App by pressing the EXIT button to close the App, then open the App. • Reboot your router for the best connection. English - 73 Press the WIDE button, highlight Wide or Zoom, and press OK. • Adjust the video settings of...
... batteries are connecting wirelessly, try plugging the power cord into a different outlet. Restart your external device. The remote is connected to the Internet. • Restart the App by pressing the EXIT button to close the App, then open the App. • Reboot your router for the best connection. English - 73 Press the WIDE button, highlight Wide or Zoom, and press OK. • Adjust the video settings of...
Installation Guide
Page 74
.... FCC Warning Changes or modifications not expressly approved by unauthorized modification to radio communications. LIMITED WARRANTY ON PARTS AND LABOR Covers units purchased as installation and set-up issues or any , must utilize either repair or replace the Product at its sole option and discretion. Type of the servicer. Product returns to the VIZIO service center. VIZIO Technical Support will provide instructions for packing and...
.... FCC Warning Changes or modifications not expressly approved by unauthorized modification to radio communications. LIMITED WARRANTY ON PARTS AND LABOR Covers units purchased as installation and set-up issues or any , must utilize either repair or replace the Product at its sole option and discretion. Type of the servicer. Product returns to the VIZIO service center. VIZIO Technical Support will provide instructions for packing and...
Installation Guide
Page 75
... power surges, signal issues, damages from the same customer location. Products with the required part number. Recertified Warranty NINETY DAY LIMITED WARRANTY ON PARTS AND LABOR Covers units purchased and currently located in -home. Parts and Labor There will provide instructions for service. Pre-authorization is capable of customer misuse, modifications or adjustments, as well as originally purchased. Items not covered include but VIZIO will repair, replace...
... power surges, signal issues, damages from the same customer location. Products with the required part number. Recertified Warranty NINETY DAY LIMITED WARRANTY ON PARTS AND LABOR Covers units purchased and currently located in -home. Parts and Labor There will provide instructions for service. Pre-authorization is capable of customer misuse, modifications or adjustments, as well as originally purchased. Items not covered include but VIZIO will repair, replace...


