User Manual
Page 7
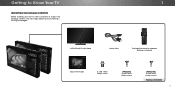
VIZIO LED UHDTV with Stand 1 Power Cord INPUT LIST EXIT MENU INFO BACK VOL GUIDE CH 3D 1 2 3 4 5 6 7 8 9 ENTER 0 Two-Sided Remote with Keyboard (Batteries Included) Quick Start Guide 4 x M5 14mm Phillips Screws (P552ui-B2) 4 x M6 18mm Phillips Screws (P652ui-B2) 4 x M6 16mm Phillips Screws PACKAGE CONTENTS 7 Use the images below to inspect the package contents. Getting to Know Your TV INSPECTING THE PACKAGE CONTENTS Before installing your new TV, take a moment to ensure nothing is missing or damaged.
VIZIO LED UHDTV with Stand 1 Power Cord INPUT LIST EXIT MENU INFO BACK VOL GUIDE CH 3D 1 2 3 4 5 6 7 8 9 ENTER 0 Two-Sided Remote with Keyboard (Batteries Included) Quick Start Guide 4 x M5 14mm Phillips Screws (P552ui-B2) 4 x M6 18mm Phillips Screws (P652ui-B2) 4 x M6 16mm Phillips Screws PACKAGE CONTENTS 7 Use the images below to inspect the package contents. Getting to Know Your TV INSPECTING THE PACKAGE CONTENTS Before installing your new TV, take a moment to ensure nothing is missing or damaged.
User Manual
Page 8
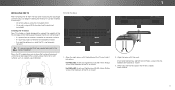
...tighten four (4) M5 14mm Phillips screws into the back of the base as shown. However, the TV can begin installing the TV. For P552ui-B2: Insert and tighten four (4) M6 18mm Phillips screws into the bottom of the TV as shown. 3. Your TV can be installed in the base installation... of the TV and keep it from the box and inspecting the package contents you are finished, place the TV on a clean, flat surface. For P652ui-B2: Insert and tighten four (4) M6 16mm Phillips screws into place. Place the TV screen-down on a stable, level surface. 8 1 INSTALLING THE TV After ...
...tighten four (4) M5 14mm Phillips screws into the back of the base as shown. However, the TV can begin installing the TV. For P552ui-B2: Insert and tighten four (4) M6 18mm Phillips screws into the bottom of the TV as shown. 3. Your TV can be installed in the base installation... of the TV and keep it from the box and inspecting the package contents you are finished, place the TV on a clean, flat surface. For P652ui-B2: Insert and tighten four (4) M6 16mm Phillips screws into place. Place the TV screen-down on a stable, level surface. 8 1 INSTALLING THE TV After ...
User Manual
Page 9
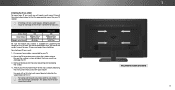
Consult the information below to use cables with your mount. Screw Size: Hole Pattern: Weight w/o Stand: P552ui-B2 M6 300mm (V) x 300mm (H) 40.65 lbs P652ui-B2 M6 400mm (V) x 400mm (H) 59.97 lbs Be sure the mount you may want to find the appropriate mount for your TV model: Installing a TV on a ...
Consult the information below to use cables with your mount. Screw Size: Hole Pattern: Weight w/o Stand: P552ui-B2 M6 300mm (V) x 300mm (H) 40.65 lbs P652ui-B2 M6 400mm (V) x 400mm (H) 59.97 lbs Be sure the mount you may want to find the appropriate mount for your TV model: Installing a TV on a ...
User Manual
Page 64
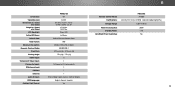
... Ratio: Pixel Pitch: Viewing Angle: HDMI Inputs: Component Video Inputs: Composite Inputs: RF Antenna Input: USB Port: Ethernet: Audio Outputs: OSD Language: Ambient Light Sensor: P652ui-B2 65" 64.52" 57.40" x 35.36" x 10.12" 57.40" x 32.83" x 2.28" 67.68 lbs 59.97 lbs Direct LED 64 Zones 240... Component) 1 1 1 RCA Analog Stereo Output, Optical Digital English, French, Spanish Yes B Remote Control Model: Certifications: Voltage Range: Power Consumption: Standby Power: Zero Bright Pixel Guarantee: P652ui-B2 XRT500 UL/CUL, FCC Class B, HDMI 1.4b/2.0, Dolby Digital Plus 120V @ 60 Hz 360W
... Ratio: Pixel Pitch: Viewing Angle: HDMI Inputs: Component Video Inputs: Composite Inputs: RF Antenna Input: USB Port: Ethernet: Audio Outputs: OSD Language: Ambient Light Sensor: P652ui-B2 65" 64.52" 57.40" x 35.36" x 10.12" 57.40" x 32.83" x 2.28" 67.68 lbs 59.97 lbs Direct LED 64 Zones 240... Component) 1 1 1 RCA Analog Stereo Output, Optical Digital English, French, Spanish Yes B Remote Control Model: Certifications: Voltage Range: Power Consumption: Standby Power: Zero Bright Pixel Guarantee: P652ui-B2 XRT500 UL/CUL, FCC Class B, HDMI 1.4b/2.0, Dolby Digital Plus 120V @ 60 Hz 360W
Quickstart Guide (English)
Page 5
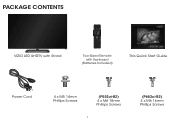
PACKAGE CONTENTS VIZIO LED UHDTV with Stand Two-Sided Remote with Keyboard (Batteries Included) This Quick Start Guide Power Cord 4 x M5 14mm Phillips Screws (P552ui-B2) 4 x M6 18mm Phillips Screws 5 (P652ui-B2) 4 x M6 16mm Phillips Screws
PACKAGE CONTENTS VIZIO LED UHDTV with Stand Two-Sided Remote with Keyboard (Batteries Included) This Quick Start Guide Power Cord 4 x M5 14mm Phillips Screws (P552ui-B2) 4 x M6 18mm Phillips Screws 5 (P652ui-B2) 4 x M6 16mm Phillips Screws
Quickstart Guide (English)
Page 6
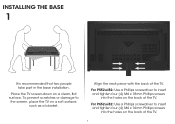
INSTALLING THE BASE 1 It is recommended that two people take part in the base installation. Align the neck piece with the back of the TV. 6 To prevent scratches or damage to the screen, place the TV on a clean, flat surface. For P652ui-B2: Use a Phillips screwdriver to insert and tighten four (4) M6 x 18mm Phillips screws into the holes on the back of the TV. Place the TV screen-down on a soft surface, such as a blanket. For P552ui-B2: Use a Phillips screwdriver to insert and tighten four (4) M6 x 16mm Phillips screws into the holes on the back of the TV.
INSTALLING THE BASE 1 It is recommended that two people take part in the base installation. Align the neck piece with the back of the TV. 6 To prevent scratches or damage to the screen, place the TV on a clean, flat surface. For P652ui-B2: Use a Phillips screwdriver to insert and tighten four (4) M6 x 18mm Phillips screws into the holes on the back of the TV. Place the TV screen-down on a soft surface, such as a blanket. For P552ui-B2: Use a Phillips screwdriver to insert and tighten four (4) M6 x 16mm Phillips screws into the holes on the back of the TV.


