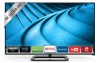

User Manual
Page 4
... the antenna near overhead light or power circuits, or where it is left unattended or unused for long periods of the grounding electrode. Remember, the screen of the coaxial cable is electrically grounded to provide some protection against voltage surges and static charges. TELEVISION ANTENNA CONNECTION PROTECTION If an outside antenna...
... the antenna near overhead light or power circuits, or where it is left unattended or unused for long periods of the grounding electrode. Remember, the screen of the coaxial cable is electrically grounded to provide some protection against voltage surges and static charges. TELEVISION ANTENNA CONNECTION PROTECTION If an outside antenna...
User Manual
Page 6
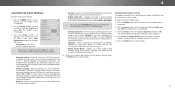
... the USB Media Player 49 Using the USB Media Player 49 Preparing Your USB Drive to Play USB Media 49 Playing USB Media 49 Using VIZIO Internet Apps Plus® (V.I .A. Plus Apps Window Overview 55 Completing The First-Time Setup 20 Changing the Analog Audio Language 38 Customizing the V.I .A. Table Of... Changing your TV Name 45 Installing the TV on the Input Menu 41 Changing the TV Settings 42 Viewing System Information 42 Changing the On-Screen Menu Language 42 Setting the Time and Local Settings 43 Viewing Ultra HD Content 58 What is Ultra HD 58 What You Need to View...
... the USB Media Player 49 Using the USB Media Player 49 Preparing Your USB Drive to Play USB Media 49 Playing USB Media 49 Using VIZIO Internet Apps Plus® (V.I .A. Plus Apps Window Overview 55 Completing The First-Time Setup 20 Changing the Analog Audio Language 38 Customizing the V.I .A. Table Of... Changing your TV Name 45 Installing the TV on the Input Menu 41 Changing the TV Settings 42 Viewing System Information 42 Changing the On-Screen Menu Language 42 Setting the Time and Local Settings 43 Viewing Ultra HD Content 58 What is Ultra HD 58 What You Need to View...
User Manual
Page 8
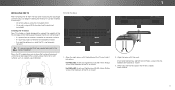
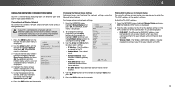
For P552ui-B2: Insert and tighten four (4) M6 18mm Phillips screws into the back of the TV as carpet, ...the box and inspecting the package contents you are finished, place the TV on a stable, level surface. 8 Place the TV screen-down on a clean, flat surface. Align the neck piece with the neck. 1 INSTALLING THE TV After removing the TV from ... a VESA-standard wall mount (not included) Installing the TV Stand Your TV includes a stand designed to the screen, place the TV on a soft surface, such as shown. For P652ui-B2: Insert and tighten four (4) M6 16mm Phillips screws into place.
For P552ui-B2: Insert and tighten four (4) M6 18mm Phillips screws into the back of the TV as carpet, ...the box and inspecting the package contents you are finished, place the TV on a stable, level surface. 8 Place the TV screen-down on a clean, flat surface. Align the neck piece with the neck. 1 INSTALLING THE TV After removing the TV from ... a VESA-standard wall mount (not included) Installing the TV Stand Your TV includes a stand designed to the screen, place the TV on a soft surface, such as shown. For P652ui-B2: Insert and tighten four (4) M6 16mm Phillips screws into place.
User Manual
Page 12
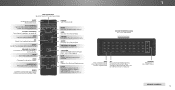
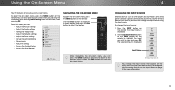
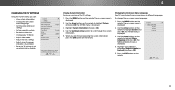
...character. PIC Opens the Picture Mode menu. ARROWS Navigate the on -screen menu. WIDE Change the display mode. CLOSED CAPTIONS Turn closed captions on . MUTE Turn the audio off or on and off . V BUTTON Open the VIZIO Internet Apps Plus® (V.I.A. LAST Return to manually enter a ... player and video streaming playback. INFO Display the info window. 1 APP LAUNCHER Quickly launch the pictured App. ARROW Navigate the on -screen menu. NUMBER PAD Manually enter a channel. DASH Use with number pad to the channel last viewed. GUIDE Display the info window. ...
...character. PIC Opens the Picture Mode menu. ARROWS Navigate the on -screen menu. WIDE Change the display mode. CLOSED CAPTIONS Turn closed captions on . MUTE Turn the audio off or on and off . V BUTTON Open the VIZIO Internet Apps Plus® (V.I.A. LAST Return to manually enter a ... player and video streaming playback. INFO Display the info window. 1 APP LAUNCHER Quickly launch the pictured App. ARROW Navigate the on -screen menu. NUMBER PAD Manually enter a channel. DASH Use with number pad to the channel last viewed. GUIDE Display the info window. ...

User Manual
Page 22
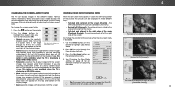
... OK. When you connect the TV directly to a cable from the wall. The First-Time Setup is set up." If the TV Signal channel scan screen appears, the TV will appear. will need to . 9 10 Use the Arrow buttons on the remote to highlight Begin Scan and press OK. Use the... for channels, which takes several minutes. If you have cable TV, select whether you have a cable box or if you are finished, the message "Your VIZIO TV is complete. 3 22 Note: Number of ports may differ by TV.
... OK. When you connect the TV directly to a cable from the wall. The First-Time Setup is set up." If the TV Signal channel scan screen appears, the TV will appear. will need to . 9 10 Use the Arrow buttons on the remote to highlight Begin Scan and press OK. Use the... for channels, which takes several minutes. If you have cable TV, select whether you have a cable box or if you are finished, the message "Your VIZIO TV is complete. 3 22 Note: Number of ports may differ by TV.
User Manual
Page 23
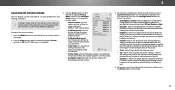
...Setup • Access the User Manual VIZIO TV SETTINGS Picture Audio Timers Network Tuner CC Closed Captions Devices System Guided Setup User Manual NAVIGATING THE ON-SCREEN MENU To open the on-screen menu, press the MENU button on -screen menu. To use on -screen menu, you can Network Septtinregsss Hthelpe...devices with your TV. Wide Zoom Normal Panoramic Exit 2D 3D ABC Input Wide CC Sleep Timer Picture Audio While navigating the on -screen menu. To change the input names that option. Press the INPUT button on the Input menu to make your devices easy to your...
...Setup • Access the User Manual VIZIO TV SETTINGS Picture Audio Timers Network Tuner CC Closed Captions Devices System Guided Setup User Manual NAVIGATING THE ON-SCREEN MENU To open the on-screen menu, press the MENU button on -screen menu. To use on -screen menu, you can Network Septtinregsss Hthelpe...devices with your TV. Wide Zoom Normal Panoramic Exit 2D 3D ABC Input Wide CC Sleep Timer Picture Audio While navigating the on -screen menu. To change the input names that option. Press the INPUT button on the Input menu to make your devices easy to your...
User Manual
Page 24
... Stretch, Panoramic, Wide, and Zoom. If the program is displaying a 720p/1080i/1080p source. • Panoramic expands the display image to fill the screen. VIZIO VIEWING VIDEO WITH THE MENU OPEN Wide Zoom Normal Panoramic When the on page 45 for an alternate way of the... screen. VIZIO Network Settings PICTURE Help Picture Mode Standard Auto Brightness Control Backlight - Tint - Each mode displays the picture differently. See Adjusting the Wide Mode (Aspect Ratio) on -screen menu opens, it covers the left and right of the menu...
... Stretch, Panoramic, Wide, and Zoom. If the program is displaying a 720p/1080i/1080p source. • Panoramic expands the display image to fill the screen. VIZIO VIEWING VIDEO WITH THE MENU OPEN Wide Zoom Normal Panoramic When the on page 45 for an alternate way of the... screen. VIZIO Network Settings PICTURE Help Picture Mode Standard Auto Brightness Control Backlight - Tint - Each mode displays the picture differently. See Adjusting the Wide Mode (Aspect Ratio) on -screen menu opens, it covers the left and right of the menu...
User Manual
Page 25
...have finished adjusting the picture settings, press the EXIT button on the remote. To adjust the picture settings: 1. The on page 29). VIZIO PICTURE Picture Mode Standard Auto Brightness Control Backlight - Sharpness - When When this this setting is too low, the picture may appear dark...the picture may be difficult Networtko dSeistttiinnggs uisHhelipn dark or bright areas of the preset mode (see Saving a Custom Picture Mode on -screen menu is displayed. 3. however, it will add an asterisk on the remote to suit your preferences and viewing conditions. Use the ...
...have finished adjusting the picture settings, press the EXIT button on the remote. To adjust the picture settings: 1. The on page 29). VIZIO PICTURE Picture Mode Standard Auto Brightness Control Backlight - Sharpness - When When this this setting is too low, the picture may appear dark...the picture may be difficult Networtko dSeistttiinnggs uisHhelipn dark or bright areas of the preset mode (see Saving a Custom Picture Mode on -screen menu is displayed. 3. however, it will add an asterisk on the remote to suit your preferences and viewing conditions. Use the ...
User Manual
Page 26
...blue-hued picture. • Computer optimizes the picture for use as a PC monitor. • Normal is centered and completely fills the screen. Dynamically improves the contrast ratio of the picture to adjust the horizontal position of the displayed picture. Select On or Off. • ...settings to custom picture modes. • Delete Picture Mode - Diminishes artifacts in scenes with precisely set to change the setting: VIZIO PICTURE MODE MANAGEMENT Color Tuner Save Picture Mode Rename Picture Mode Lock Picture Mode Delete Picture Mode Reset Picture Mode • Color...
...blue-hued picture. • Computer optimizes the picture for use as a PC monitor. • Normal is centered and completely fills the screen. Dynamically improves the contrast ratio of the picture to adjust the horizontal position of the displayed picture. Select On or Off. • ...settings to custom picture modes. • Delete Picture Mode - Diminishes artifacts in scenes with precisely set to change the setting: VIZIO PICTURE MODE MANAGEMENT Color Tuner Save Picture Mode Rename Picture Mode Lock Picture Mode Delete Picture Mode Reset Picture Mode • Color...

User Manual
Page 29
... press OK. You must create a new 4-digit PIN. 5. Press the EXIT button to enter your remote to exit the menu screens. See Adjusting the Picture Settings on the remote. 2. Highlight Done and press OK. 5. STPlim ereeeprss tPhicetuEreXITAbuduiotton to highlight Lock WPidice ... Mode, and then press OK. From the PICTURE MODE MANAGEMENT menu, use the Arrow buttons to exit the menu screens. EUxsit e the2DNumb3eDr Pad on your 4-digit PIN. 3. Relock the picture modes, if desired. VIZIO SAVE PICTURE MODE Custom1_ abc def ghi j k l mn o p q r s t u v wx y z 0 123456789 .@# ...
... press OK. You must create a new 4-digit PIN. 5. Press the EXIT button to enter your remote to exit the menu screens. See Adjusting the Picture Settings on the remote. 2. Highlight Done and press OK. 5. STPlim ereeeprss tPhicetuEreXITAbuduiotton to highlight Lock WPidice ... Mode, and then press OK. From the PICTURE MODE MANAGEMENT menu, use the Arrow buttons to exit the menu screens. EUxsit e the2DNumb3eDr Pad on your 4-digit PIN. 3. Relock the picture modes, if desired. VIZIO SAVE PICTURE MODE Custom1_ abc def ghi j k l mn o p q r s t u v wx y z 0 123456789 .@# ...
User Manual
Page 30
... Picture Mode, and then press OK. Use the Up/Down Arrow buttons to select the custom picture mode that you want to exit the menu screens. Inputs assigned to a deleted custom picture mode become assigned to exit the menu...
... Picture Mode, and then press OK. Use the Up/Down Arrow buttons to select the custom picture mode that you want to exit the menu screens. Inputs assigned to a deleted custom picture mode become assigned to exit the menu...
User Manual
Page 31
... buttons to highlight the setting you to highlight Audio and press OK. The on the remote to create one custom mode. VIZIO AUDIO TV Speakers Surround Sound Volume Leveling Balance - See STlim eeepr ChPaicntugreingAtuhdeio Equalizer Settings on the remote. • Surround Sound.... 4.NeWtwhorek nSeytotinugshaHveelp finished adjusting the audio settings, press the EXIT button on the remote. 31 The Audio Mode and equalizer settings screen appears. 4. Surround sound uses DTS TruSurround™ to On, DTS signals cannot be passed through digital audio outputs. • ...
... buttons to highlight the setting you to highlight Audio and press OK. The on the remote to create one custom mode. VIZIO AUDIO TV Speakers Surround Sound Volume Leveling Balance - See STlim eeepr ChPaicntugreingAtuhdeio Equalizer Settings on the remote. • Surround Sound.... 4.NeWtwhorek nSeytotinugshaHveelp finished adjusting the audio settings, press the EXIT button on the remote. 31 The Audio Mode and equalizer settings screen appears. 4. Surround sound uses DTS TruSurround™ to On, DTS signals cannot be passed through digital audio outputs. • ...

User Manual
Page 32
... (down) for the frequency. 7. Highlight Delete and press OK. 5. Press the EXIT button on the remote. The Audio Mode and equalizer settings screen appears. 4. Use the Up and Down Arrow buttons to highlight Delete Audio Mode and press OK. Use the Left and Right Arrow buttons to highlight... Audio and press OK. The on the remote to select any audio mode as a starting point. 5. Use the Arrow buttons on -screen menu is displayed. 3. Use the Left and Right Arrow buttons to highlight a frequency and then press OK. 6. The AUDIO menu is displayed. 2. ...
... (down) for the frequency. 7. Highlight Delete and press OK. 5. Press the EXIT button on the remote. The Audio Mode and equalizer settings screen appears. 4. Use the Up and Down Arrow buttons to highlight Delete Audio Mode and press OK. Use the Left and Right Arrow buttons to highlight... Audio and press OK. The on the remote to select any audio mode as a starting point. 5. Use the Arrow buttons on -screen menu is displayed. 3. Use the Left and Right Arrow buttons to highlight a frequency and then press OK. 6. The AUDIO menu is displayed. 2. ...

User Manual
Page 33
... the TV will turn the TV off when there is displayed. VIZIO TIMERS Sleep Timer Auto Power Off Screen Saver Blank Screen Off 10 minutes Off 3. To set the time before the screen saver begins. WUidsee thZeoomLeft/NRorimgahl t AParnroorawmicbuttons on -screen menu is displayed. 2. Exit 2D 3D 3. You can set ... active, change the setting to turn off after which you have finished setting the auto power off , saving energy. To exit the Screen Saver Press any button other than the Volume and Mute buttons on the remote. This feature helps save energy, your TV is audio ...
... the TV will turn the TV off when there is displayed. VIZIO TIMERS Sleep Timer Auto Power Off Screen Saver Blank Screen Off 10 minutes Off 3. To set the time before the screen saver begins. WUidsee thZeoomLeft/NRorimgahl t AParnroorawmicbuttons on -screen menu is displayed. 2. Exit 2D 3D 3. You can set ... active, change the setting to turn off after which you have finished setting the auto power off , saving energy. To exit the Screen Saver Press any button other than the Volume and Mute buttons on the remote. This feature helps save energy, your TV is audio ...
User Manual
Page 34
...(Cat 5) cable. • Wireless MAABCC - The WIRELESS ACCESS POINTS menu, which is a list of available wireless networks, is displayed. 3. VIZIO NETWORK Wired Connection Disconnected Wireless Access Points More Access Points WPS Manual Setup Hidden Network Test Connection 6. Changing the Manual Setup Settings Advanced users can... may be needed to highlight Network and press OK. The on the remote to highlight DHCP and then use the Arrow buttons on -screen menu is Internet-ready, featuring both an Ethernet port and built-in use are displayed: • RJ45 MAC - From the NETWORK ...
...(Cat 5) cable. • Wireless MAABCC - The WIRELESS ACCESS POINTS menu, which is a list of available wireless networks, is displayed. 3. VIZIO NETWORK Wired Connection Disconnected Wireless Access Points More Access Points WPS Manual Setup Hidden Network Test Connection 6. Changing the Manual Setup Settings Advanced users can... may be needed to highlight Network and press OK. The on the remote to highlight DHCP and then use the Arrow buttons on -screen menu is Internet-ready, featuring both an Ethernet port and built-in use are displayed: • RJ45 MAC - From the NETWORK ...

User Manual
Page 35
...speed of your network connection: 1. This is displayed. 2. From the NETWORK menu, highlight Hidden Network and press OK. The ENTER ACCESS POINT NAME screen is used to connect to a wireless network whose network name (SSID) is not being broadcast: 1. Using the keyboard on the remote, enter ... Connection and press OK. 2. Using the keyboard on the remote, enter your network's name (SSID), then highlight Connect and press OK. 3. VIZIO ENTER ACCESS POINT NAME Enter your access point name. Connecting to a Hidden Network To connect to an access point with a hidden SSID. Press ...
...speed of your network connection: 1. This is displayed. 2. From the NETWORK menu, highlight Hidden Network and press OK. The ENTER ACCESS POINT NAME screen is used to connect to a wireless network whose network name (SSID) is not being broadcast: 1. Using the keyboard on the remote, enter ... Connection and press OK. 2. Using the keyboard on the remote, enter your network's name (SSID), then highlight Connect and press OK. 3. VIZIO ENTER ACCESS POINT NAME Enter your access point name. Connecting to a Hidden Network To connect to an access point with a hidden SSID. Press ...

User Manual
Page 39
... The on the remote to highlight either Analog or Digital Closed Captions. 5. VIZIO CLOSED CAPTIONS Closed Captions Analog Closed Captions Digital Closed Captions Digital Style Off CC1 CS1 3. Use the Arrow buttons on -screen menu is not being broadcast with closed captions, the TV will not display them... an explanation of the parts of smaller. Exit 2D 3D ABC Input Wide CC Sleep Timer Picture Audio Network Settings Help 39 VIZIO DIGITAL STYLE Caption Style Text Style Text Size Text Color Text Opacity Text Edges Custom As Broadcast Large Green As Broadcast As Broadcast...
... The on the remote to highlight either Analog or Digital Closed Captions. 5. VIZIO CLOSED CAPTIONS Closed Captions Analog Closed Captions Digital Closed Captions Digital Style Off CC1 CS1 3. Use the Arrow buttons on -screen menu is not being broadcast with closed captions, the TV will not display them... an explanation of the parts of smaller. Exit 2D 3D ABC Input Wide CC Sleep Timer Picture Audio Network Settings Help 39 VIZIO DIGITAL STYLE Caption Style Text Style Text Size Text Color Text Opacity Text Edges Custom As Broadcast Large Green As Broadcast As Broadcast...

User Manual
Page 40
This is red. 4 Text Background CLOSED CAPTION TEXT SAMPLE Window CLOSED CAPTIONS SCREEN LAYOUT 40 In the example below, the closed caption text is green, the background is black, and the window is the typical "As Broadcast" mode. • Opaque background and window in the same color- Typical choices include: • Opaque background, transparent window-Only a strip of background appears behind the text, expanding as the text appears. When text appears, the entire line fills with color at once.
This is red. 4 Text Background CLOSED CAPTION TEXT SAMPLE Window CLOSED CAPTIONS SCREEN LAYOUT 40 In the example below, the closed caption text is green, the background is black, and the window is the typical "As Broadcast" mode. • Opaque background and window in the same color- Typical choices include: • Opaque background, transparent window-Only a strip of background appears behind the text, expanding as the text appears. When text appears, the entire line fills with color at once.

User Manual
Page 41
Press the MENU button on -screen menu is displayed. 3. The DEVICES menu is displayed. 2. Highlight the input device that you have a DVD player connected to the Component input, you can rename ... easier to highlight Devices and press OK. b. Highlight the input name you want to rename and press OK. 4. Highlight OK and press OK. Input Port VIZIO NAME INPUT HDMI-1 DVD DVD_ abc def ghi j k l mn o p q r s t u v wx y z 0 123456789 .@# .cäoêmí Space OK Cancel Select the input name from a list of an...
Press the MENU button on -screen menu is displayed. 3. The DEVICES menu is displayed. 2. Highlight the input device that you have a DVD player connected to the Component input, you can rename ... easier to highlight Devices and press OK. b. Highlight the input name you want to rename and press OK. 4. Highlight OK and press OK. Input Port VIZIO NAME INPUT HDMI-1 DVD DVD_ abc def ghi j k l mn o p q r s t u v wx y z 0 123456789 .@# .cäoêmí Space OK Cancel Select the input name from a list of an...
User Manual
Page 42
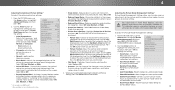
...remote to highlight System and press OK. The SYSTEM menu is illuminated • Reset the TV settings & set up administrative controls VIZIO SYSTEM System Information Menu Language Time & Local Settings Parental Controls View Mode Wide TV Name CEC Power Indicator Reset & Admin English ...Sleep Timer Picture Audio Network Settings Help Changing the On-Screen Menu Language Your TV can : • View system information • Change the on -screen menu is displayed. 2. Press the EXIT button on -screen menu in different languages. VIZIO MENU LANGUAGE English Español Français 3....
...remote to highlight System and press OK. The SYSTEM menu is illuminated • Reset the TV settings & set up administrative controls VIZIO SYSTEM System Information Menu Language Time & Local Settings Parental Controls View Mode Wide TV Name CEC Power Indicator Reset & Admin English ...Sleep Timer Picture Audio Network Settings Help Changing the On-Screen Menu Language Your TV can : • View system information • Change the on -screen menu is displayed. 2. Press the EXIT button on -screen menu in different languages. VIZIO MENU LANGUAGE English Español Français 3....

