User Manual
Page 3
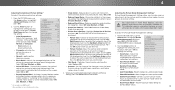
... the remote control or injure the operator. Overloading can result in the operating instructions unless you to high voltages, electric shock, and other hazards. Pulling on the apparatus. These servicing instructions are for your TV that contained in fire or electric shock. • When unplugging your TV, hold the AC/DC power • The wall socket should be installed near...
... the remote control or injure the operator. Overloading can result in the operating instructions unless you to high voltages, electric shock, and other hazards. Pulling on the apparatus. These servicing instructions are for your TV that contained in fire or electric shock. • When unplugging your TV, hold the AC/DC power • The wall socket should be installed near...
User Manual
Page 6
... a Wall 9 Setting the Sleep Timer 33 Adjusting the CEC Settings 46 Front Panel 10 Setting the Auto Power Off Feature 33 Turning the Power Indicator On or Off 46 Rear Panel 11 Enabling the Screen Saver 33 Using the Reset & Admin Menu 47 Remote Control Front 12 Blank Screen Feature 33 Restoring the TV to Factory Default Settings 47 Replacing the Batteries 13 Using the Network Connection Menu 34 Using the Guided Setup Menu 48 Connecting Your Devices 14 Connecting A Device 14 Connecting A Device - Audio & Video Cable Types 15 Connecting an Audio...
... a Wall 9 Setting the Sleep Timer 33 Adjusting the CEC Settings 46 Front Panel 10 Setting the Auto Power Off Feature 33 Turning the Power Indicator On or Off 46 Rear Panel 11 Enabling the Screen Saver 33 Using the Reset & Admin Menu 47 Remote Control Front 12 Blank Screen Feature 33 Restoring the TV to Factory Default Settings 47 Replacing the Batteries 13 Using the Network Connection Menu 34 Using the Guided Setup Menu 48 Connecting Your Devices 14 Connecting A Device 14 Connecting A Device - Audio & Video Cable Types 15 Connecting an Audio...
User Manual
Page 9
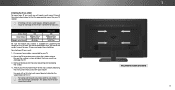
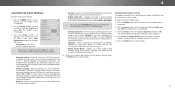
... the appropriate mount for your TV model: Installing a TV on a clean, flat, stable surface. Use only with right-angle connectors. Installing the TV on a Wall To mount your TV on a wall: 1. Consult the information below to the wall. 1 WALL-MOUNT SCREW LOCATIONS 9 To prevent injury or damage to the TV, ask someone to use cables with a UL-listed wall mount bracket rated for your TV on a wall, you . Screw Size: Hole Pattern: Weight w/o Stand: P552ui-B2 M6 300mm...
... the appropriate mount for your TV model: Installing a TV on a clean, flat, stable surface. Use only with right-angle connectors. Installing the TV on a Wall To mount your TV on a wall: 1. Consult the information below to the wall. 1 WALL-MOUNT SCREW LOCATIONS 9 To prevent injury or damage to the TV, ask someone to use cables with a UL-listed wall mount bracket rated for your TV on a wall, you . Screw Size: Hole Pattern: Weight w/o Stand: P552ui-B2 M6 300mm...
User Manual
Page 12
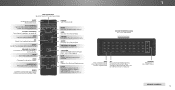
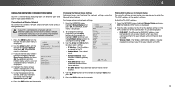
.... ARROWS Navigate the on -screen menu. 1 APP LAUNCHER Quickly launch the pictured App. BACK Go to the channel last viewed. ARROW Navigate the on -screen menu. REMOTE CONTROL 12 EXIT Close the on or off. NUMBER PAD Manually enter a channel. GUIDE Display the info window. V BUTTON Open the VIZIO Internet Apps Plus® (V.I.A. A/V CONTROLS Control USB media player and video streaming playback. CLOSED CAPTIONS Turn closed captions on and off or on. MUTE Turn the audio off . DASH Use with number pad to enter...
.... ARROWS Navigate the on -screen menu. 1 APP LAUNCHER Quickly launch the pictured App. BACK Go to the channel last viewed. ARROW Navigate the on -screen menu. REMOTE CONTROL 12 EXIT Close the on or off. NUMBER PAD Manually enter a channel. GUIDE Display the info window. V BUTTON Open the VIZIO Internet Apps Plus® (V.I.A. A/V CONTROLS Control USB media player and video streaming playback. CLOSED CAPTIONS Turn closed captions on and off or on. MUTE Turn the audio off . DASH Use with number pad to enter...
User Manual
Page 23
... as DVD players, Blu-ray Players, and video game consoles can : • Adjust the Picture settings • Adjust the Audio settings • Setting the Sleep Timers • Adjust the Network settings • Adjust the Tuner settings • Set up Closed Captioning • Name Inputs • Adjust TV settings • Access the Guided Setup • Access the User Manual VIZIO TV SETTINGS Picture Audio Timers Network Tuner CC Closed Captions Devices System Guided Setup User Manual NAVIGATING THE ON-SCREEN MENU To open the on-screen menu, press the MENU button on the remote. To use one...
... as DVD players, Blu-ray Players, and video game consoles can : • Adjust the Picture settings • Adjust the Audio settings • Setting the Sleep Timers • Adjust the Network settings • Adjust the Tuner settings • Set up Closed Captioning • Name Inputs • Adjust TV settings • Access the Guided Setup • Access the User Manual VIZIO TV SETTINGS Picture Audio Timers Network Tuner CC Closed Captions Devices System Guided Setup User Manual NAVIGATING THE ON-SCREEN MENU To open the on-screen menu, press the MENU button on the remote. To use one...
User Manual
Page 24
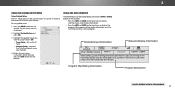
... display image. VIZIO Network Settings PICTURE Help Picture Mode Standard Auto Brightness Control Backlight - Each mode displays the picture differently. Full-sized and aligned to the left and right of the menu (Centered Overlay) - Sharpness - CHANGING THE SCREEN ASPECT RATIO The TV can be changed for Ultra HD content or for widescreen viewing (1.85:1 or 2.35:1), then black bars will appear on the top and bottom of the picture covered by Input source...
... display image. VIZIO Network Settings PICTURE Help Picture Mode Standard Auto Brightness Control Backlight - Each mode displays the picture differently. Full-sized and aligned to the left and right of the menu (Centered Overlay) - Sharpness - CHANGING THE SCREEN ASPECT RATIO The TV can be changed for Ultra HD content or for widescreen viewing (1.85:1 or 2.35:1), then black bars will appear on the top and bottom of the picture covered by Input source...
User Manual
Page 25
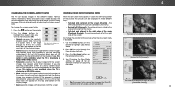
... mode sets the picture settings to distinguish details. To adjust the picture settings: 1. To manually change the picture mode: • Standard mode sets the various picture settings to values that produce a brighter, more vivid picture. • Game mode reduces throughput delays and optimizes the picture settings for displaying game console output. • Computer mode optimizes the picture settings for the best picture. Use the Arrow buttons on the remote to affect the overall brilliance of the picture settings, use the Up/Down Arrow buttons on -screen menu...
... mode sets the picture settings to distinguish details. To adjust the picture settings: 1. To manually change the picture mode: • Standard mode sets the various picture settings to values that produce a brighter, more vivid picture. • Game mode reduces throughput delays and optimizes the picture settings for displaying game console output. • Computer mode optimizes the picture settings for the best picture. Use the Arrow buttons on the remote to affect the overall brilliance of the picture settings, use the Up/Down Arrow buttons on -screen menu...
User Manual
Page 26
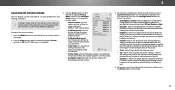
... picture mode settings to custom picture modes. • Delete Picture Mode - When you wish to adjust, then press the Left/ Right Arrow buttons to highlight the setting you have finished adjusting the Advanced Picture Settings, press the EXIT button on the remote. Use the Arrow buttons to change the setting: VIZIO PICTURE MODE MANAGEMENT Color Tuner Save Picture Mode Rename Picture Mode Lock Picture Mode Delete Picture Mode Reset Picture Mode • Color Tuner - Black Detail Active LED Zones Smooth Motion Effect Clear Action Reduce Signal Noise Reduce Block Noise Game...
... picture mode settings to custom picture modes. • Delete Picture Mode - When you wish to adjust, then press the Left/ Right Arrow buttons to highlight the setting you have finished adjusting the Advanced Picture Settings, press the EXIT button on the remote. Use the Arrow buttons to change the setting: VIZIO PICTURE MODE MANAGEMENT Color Tuner Save Picture Mode Rename Picture Mode Lock Picture Mode Delete Picture Mode Reset Picture Mode • Color Tuner - Black Detail Active LED Zones Smooth Motion Effect Clear Action Reduce Signal Noise Reduce Block Noise Game...
User Manual
Page 31
Turns the built-in speakers on or off . • Balance - Wide ZYooomu muNosrtmaslelePacntorBamitisctream for audio with the TV's volume controls, or select Fixed if an external audio device (sound bar or AV receiver) will Input conWtridoel theCvColume. • Equalizer - Sets the volume control properties for example). •Exit Ana2Dlog Au3dD io Out - See Deleting the Custom Audio Mode on the remote. • Surround Sound - The on -screen menu is displayed. 2. The Audio Mode and...
Turns the built-in speakers on or off . • Balance - Wide ZYooomu muNosrtmaslelePacntorBamitisctream for audio with the TV's volume controls, or select Fixed if an external audio device (sound bar or AV receiver) will Input conWtridoel theCvColume. • Equalizer - Sets the volume control properties for example). •Exit Ana2Dlog Au3dD io Out - See Deleting the Custom Audio Mode on the remote. • Surround Sound - The on -screen menu is displayed. 2. The Audio Mode and...
User Manual
Page 34
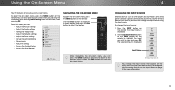
.... Connecting to a Wireless Network To connect to highlight Save and press OK. To change the settings manually, use the Left/Right Arrow buttons to change advanced network settings: 1. To find the TV's MAC address: 1. Use the Arrow buttons on the remote to highlight DHCP and then use the Arrow buttons on the remote to Off. 3. IP Address Subnet Mask Default Gateway Pref. Input Wide CC Sleep Timer Picture Audio Network Settings Help 34 The MANUAL SETUP MANUAL SETUP menu is the network's SSID...
.... Connecting to a Wireless Network To connect to highlight Save and press OK. To change the settings manually, use the Left/Right Arrow buttons to change advanced network settings: 1. To find the TV's MAC address: 1. Use the Arrow buttons on the remote to highlight DHCP and then use the Arrow buttons on the remote to Off. 3. IP Address Subnet Mask Default Gateway Pref. Input Wide CC Sleep Timer Picture Audio Network Settings Help 34 The MANUAL SETUP MANUAL SETUP menu is the network's SSID...
User Manual
Page 48
... - 12:00PM Sleep Timer Picture Audio Oliver wakes up the TV tuner. • Network Setup - Press the MENU button on the remote: • Press the INFO or GUIDE button one morning only to the Internet using your network. VIZIO GUIDED SETUP Tuner Setup Network Setup 3. Network Settings Help Program Title/Rating Information Program Description DIGITAL EPISODE GUIDE & INFO WINDOW 48 The on the remote. Connect the TV to discover that his pals. When finished, press the EXIT button on -screen menu is displayed. 2. In this...
... - 12:00PM Sleep Timer Picture Audio Oliver wakes up the TV tuner. • Network Setup - Press the MENU button on the remote: • Press the INFO or GUIDE button one morning only to the Internet using your network. VIZIO GUIDED SETUP Tuner Setup Network Setup 3. Network Settings Help Program Title/Rating Information Program Description DIGITAL EPISODE GUIDE & INFO WINDOW 48 The on the remote. Connect the TV to discover that his pals. When finished, press the EXIT button on -screen menu is displayed. 2. In this...
User Manual
Page 61
..., scan for the best signal. The buttons on . The picture is not good. • For the best image quality, view high-definition programs using cable TV or antenna connected directly to a window for channels. These types of occurrences are always dark. • Your UHD TV is connected securely to the TV and move the antenna around the room or close to turn the TV on the remote aren't working electrical...
..., scan for the best signal. The buttons on . The picture is not good. • For the best image quality, view high-definition programs using cable TV or antenna connected directly to a window for channels. These types of occurrences are always dark. • Your UHD TV is connected securely to the TV and move the antenna around the room or close to turn the TV on the remote aren't working electrical...
User Manual
Page 65
... during the warranty period. Replacement parts and Products may be sent to a VIZIO service center to the original purchaser of a new Product against defects in the form of a purchase receipt or copy thereof is within the warranty period, VIZIO will be no charge for example: cosmetic damage, normal wear and tear, improper operation, improper voltage supply or power surges, signal issues, damages...
... during the warranty period. Replacement parts and Products may be sent to a VIZIO service center to the original purchaser of a new Product against defects in the form of a purchase receipt or copy thereof is within the warranty period, VIZIO will be no charge for example: cosmetic damage, normal wear and tear, improper operation, improper voltage supply or power surges, signal issues, damages...
Quickstart Guide (English)
Page 2
... so could short circuit parts causing a fire or electric shock. The manufacturer's warranty does not cover user abuse or improper installations. • The power cord must be installed near water. • Clean only with instructions. Overloading can damage the remote control or injure the operator. To avoid electric shock, avoid handling the power cord during lightning. This will not be used , use of electrical shock...
... so could short circuit parts causing a fire or electric shock. The manufacturer's warranty does not cover user abuse or improper installations. • The power cord must be installed near water. • Clean only with instructions. Overloading can damage the remote control or injure the operator. To avoid electric shock, avoid handling the power cord during lightning. This will not be used , use of electrical shock...
Quickstart Guide (English)
Page 3
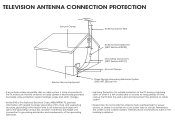
...antenna discharge unit, connection to earth in wire to an antenna discharge unit, size of the grounding conductors, location of time, unplug the TV from the wall outlet and disconnect the antenna or cable system. • Power Lines: Do not locate the antenna near overhead light or power circuits, or where it could fall into such power lines or circuits. TELEVISION ANTENNA CONNECTION PROTECTION Ground Clamp Antenna... Electrical Code, ANSI/NFPSA 70, provides information with regard to proper grounding of the mast and supporting structure, grounding of the lead-in the building installation.
...antenna discharge unit, connection to earth in wire to an antenna discharge unit, size of the grounding conductors, location of time, unplug the TV from the wall outlet and disconnect the antenna or cable system. • Power Lines: Do not locate the antenna near overhead light or power circuits, or where it could fall into such power lines or circuits. TELEVISION ANTENNA CONNECTION PROTECTION Ground Clamp Antenna... Electrical Code, ANSI/NFPSA 70, provides information with regard to proper grounding of the mast and supporting structure, grounding of the lead-in the building installation.
Quickstart Guide (English)
Page 16
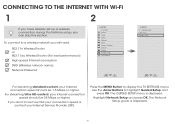
...your Internet Service Provider (ISP). Use the Arrow Buttons to display the TV SETTINGS menu. To connect to a wireless network you will need: 802.11n Wireless Router or 802.11ac Wireless Router (For best performance) High-speed Internet connection SSID (Wireless network name) Network Password VIZIO TV SETTINGS Picture Audio Timers Network Tuner CC Closed Captions Devices System Guided Setup User Manual Wide VIZIO GUIDED SETUP ZoToumner SeNtuoprmal Panoramic Network Setup Exit 2D 3D ABC Input Wide CC Sleep Timer Picture Audio Network Settings Help Wide Exit Input Sleep Timer...
...your Internet Service Provider (ISP). Use the Arrow Buttons to display the TV SETTINGS menu. To connect to a wireless network you will need: 802.11n Wireless Router or 802.11ac Wireless Router (For best performance) High-speed Internet connection SSID (Wireless network name) Network Password VIZIO TV SETTINGS Picture Audio Timers Network Tuner CC Closed Captions Devices System Guided Setup User Manual Wide VIZIO GUIDED SETUP ZoToumner SeNtuoprmal Panoramic Network Setup Exit 2D 3D ABC Input Wide CC Sleep Timer Picture Audio Network Settings Help Wide Exit Input Sleep Timer...
Quickstart Guide (English)
Page 28
...; Press the VOLUME UP button on the remote. • Press the MUTE button on the side of the screen. • Note that all devices. See Netflix.com for the best connection. • Turn off . • Press MENU, then select Audio. If you need and press OK. Press MENU, then select Guided Setup. There are expanding availability. Select the type of setup you have changed the default Parental Control Passcode, enter...
...; Press the VOLUME UP button on the remote. • Press the MUTE button on the side of the screen. • Note that all devices. See Netflix.com for the best connection. • Turn off . • Press MENU, then select Audio. If you need and press OK. Press MENU, then select Guided Setup. There are expanding availability. Select the type of setup you have changed the default Parental Control Passcode, enter...
Quickstart Guide (English)
Page 29
... Appliance Control Act Canada: CSA UK: BASE/BS Image(s) under this Limited Warranty. If a Product covered by a VIZIO authorized service center. CHECK WWW.VIZIO.COM FOR THE MOST CURRENT VERSION. It is serviced, regardless of the user to 4:00PM Saturday and Sunday, Pacific Time, or visit www.VIZIO.com. USA ON PARTS AND LABOR Covers units purchased as installation and set-up issues or...
... Appliance Control Act Canada: CSA UK: BASE/BS Image(s) under this Limited Warranty. If a Product covered by a VIZIO authorized service center. CHECK WWW.VIZIO.COM FOR THE MOST CURRENT VERSION. It is serviced, regardless of the user to 4:00PM Saturday and Sunday, Pacific Time, or visit www.VIZIO.com. USA ON PARTS AND LABOR Covers units purchased as installation and set-up issues or...
Quickstart Guide (English)
Page 30
... the warranty period. VIZIO technical support will be new or recertified at VIZIO's option and sole discretion. Units with unreadable or removed serial numbers,"image burn-in Canada and from an authorized Canadian reseller, VIZIO will repair, replace or refund the unit at 877 MY VIZIO (877.698.4946) from shipping, acts of customer misuse, installation, customer modifications, adjustments, and set -up issues. ANY IMPLIED WARRANTIES...
... the warranty period. VIZIO technical support will be new or recertified at VIZIO's option and sole discretion. Units with unreadable or removed serial numbers,"image burn-in Canada and from an authorized Canadian reseller, VIZIO will repair, replace or refund the unit at 877 MY VIZIO (877.698.4946) from shipping, acts of customer misuse, installation, customer modifications, adjustments, and set -up issues. ANY IMPLIED WARRANTIES...
Quickstart Guide (English)
Page 31
... operation, improper voltage supply or power surges, signal issues, damages from the unit before sending any type of commercial use . (c) When the Product has been altered or repaired by persons not authorized by a VIZIO Sales & Marketing México S. ANY IMPLIED WARRANTIES, INCLUDING ANY IMPLIED WARRANTY OF MERCHANTABILITY AND FITNESS FOR A PARTICULAR PURPOSE, SHALL BE LIMITED IN DURATION TO THE PERIOD OF TIME SET...
... operation, improper voltage supply or power surges, signal issues, damages from the unit before sending any type of commercial use . (c) When the Product has been altered or repaired by persons not authorized by a VIZIO Sales & Marketing México S. ANY IMPLIED WARRANTIES, INCLUDING ANY IMPLIED WARRANTY OF MERCHANTABILITY AND FITNESS FOR A PARTICULAR PURPOSE, SHALL BE LIMITED IN DURATION TO THE PERIOD OF TIME SET...


