
Download
Page 2
... DTS Licensing Limited.DTS, the Symbol, & DTS and the Symbol together are registered trademarks, and DTS Studio Sound is the setting in which power savings will increase power consumption that could exceed the limits necessary to qualify for ENERGY STAR in the "factory default" setting and this is a trademark of Dolby Laboratories...
... DTS Licensing Limited.DTS, the Symbol, & DTS and the Symbol together are registered trademarks, and DTS Studio Sound is the setting in which power savings will increase power consumption that could exceed the limits necessary to qualify for ENERGY STAR in the "factory default" setting and this is a trademark of Dolby Laboratories...
Download
Page 3
...• To reduce the risk of electric shock or component damage, switch off the power before operating your VIZIO product, visit our website at www.VIZIO.com or call toll free at www.VIZIO.com • Complete and mail the enclosed registration card Extended Warranties For peace of ...this symbol, please read the accompanying helpful tip. Install in a safe place for replacement of the obsolete outlet. • Protect the power cord from the apparatus. • Only use attachments/accessories specified by the manufacturer. Be sure to inspect the package contents to operate ...
...• To reduce the risk of electric shock or component damage, switch off the power before operating your VIZIO product, visit our website at www.VIZIO.com or call toll free at www.VIZIO.com • Complete and mail the enclosed registration card Extended Warranties For peace of ...this symbol, please read the accompanying helpful tip. Install in a safe place for replacement of the obsolete outlet. • Protect the power cord from the apparatus. • Only use attachments/accessories specified by the manufacturer. Be sure to inspect the package contents to operate ...
Download
Page 4
...; Use only with the cart, stand, tripod, bracket, or table specified by the manufacturer, or sold with arrowhead symbol within the inside of power source indicated on the label. Any other hazards. Wait before turning on your TV to avoid causing fire, electric shock, or component damage. &#...voltages, electric shock, and other voltage than the voltage specified. For more information, contact your dealer. • When connected to a power outlet, power is intended to alert the user to rain or moisture. Do not place your TV to the presence of the display. Do not ...
...; Use only with the cart, stand, tripod, bracket, or table specified by the manufacturer, or sold with arrowhead symbol within the inside of power source indicated on the label. Any other hazards. Wait before turning on your TV to avoid causing fire, electric shock, or component damage. &#...voltages, electric shock, and other voltage than the voltage specified. For more information, contact your dealer. • When connected to a power outlet, power is intended to alert the user to rain or moisture. Do not place your TV to the presence of the display. Do not ...
Download
Page 5
... in this case may cause fire or electric shock. • Follow instructions for repair. To reduce the risk of your TV, hold the AC/DC power adapter, not the cord. h• The lightning flash with instructions. If your dealer for moving your TV. • When unplugging your TV changes substantially...and contact your TV is dropped and the housing is damaged, the internal components may be used as vases, shall be placed on the power cord may cause the batteries to dripping or splashing and no objects filled with liquids, such as the disconnect device, the disconnect device shall...
... in this case may cause fire or electric shock. • Follow instructions for repair. To reduce the risk of your TV, hold the AC/DC power adapter, not the cord. h• The lightning flash with instructions. If your dealer for moving your TV. • When unplugging your TV changes substantially...and contact your TV is dropped and the housing is damaged, the internal components may be used as vases, shall be placed on the power cord may cause the batteries to dripping or splashing and no objects filled with liquids, such as the disconnect device, the disconnect device shall...
Download
Page 6
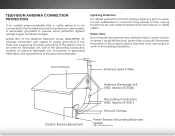
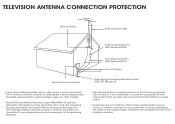
... For added protection of the TV during a lightning storm or when it could fall into such power lines or circuits. Power Lines Do not locate the antenna near overhead light or power circuits, or where it is left unattended or unused for long periods of the grounding electrode. ...Ground Clamp Antenna Lead In Wire Electric Service Equipment Antenna Discharge Unit (NEC Section 810-20) Grounding Conductors (NEC Section 810-21) Ground Clamps Power Service Grounding Electrode...
... For added protection of the TV during a lightning storm or when it could fall into such power lines or circuits. Power Lines Do not locate the antenna near overhead light or power circuits, or where it is left unattended or unused for long periods of the grounding electrode. ...Ground Clamp Antenna Lead In Wire Electric Service Equipment Antenna Discharge Unit (NEC Section 810-20) Grounding Conductors (NEC Section 810-21) Ground Clamps Power Service Grounding Electrode...
Download
Page 7
... Audio Settings 32 Changing the Equalizer Settings 33 Deleting the Custom Audio Mode 33 Setting Timers 34 Setting the Sleep Timer 34 Setting the Auto Power Off Feature 34 Using the Network Connection Menu 35 Connecting to a Wireless Network 35 Changing the Manual Setup Settings 35 Finding MAC Addresses for Network...
... Audio Settings 32 Changing the Equalizer Settings 33 Deleting the Custom Audio Mode 33 Setting Timers 34 Setting the Sleep Timer 34 Setting the Auto Power Off Feature 34 Using the Network Connection Menu 35 Connecting to a Wireless Network 35 Changing the Manual Setup Settings 35 Finding MAC Addresses for Network...
Download
Page 8
... the Content Locks 46 Changing the On-Screen Menu Language 47 Setting the Time and Local Settings 47 Adjusting the CEC Settings 48 Turning the Power Indicator On or Off 48 Using the Reset & Admin Menu 49 Restoring the TV to Factory Default Settings 49 Using the Guided Setup Menu 49... 51 Using the USB Media Player 51 Preparing Your USB Drive to the My Apps Tab 58 Deleting an App from the TV 51 Using VIZIO Internet Apps Plus® (V.I.A. Plus Apps Window 58 Adding an App to Play USB Media 51 Playing USB Media 51 Removing the USB Drive from...
... the Content Locks 46 Changing the On-Screen Menu Language 47 Setting the Time and Local Settings 47 Adjusting the CEC Settings 48 Turning the Power Indicator On or Off 48 Using the Reset & Admin Menu 49 Restoring the TV to Factory Default Settings 49 Using the Guided Setup Menu 49... 51 Using the USB Media Player 51 Preparing Your USB Drive to the My Apps Tab 58 Deleting an App from the TV 51 Using VIZIO Internet Apps Plus® (V.I.A. Plus Apps Window 58 Adding an App to Play USB Media 51 Playing USB Media 51 Removing the USB Drive from...
Download
Page 9
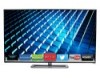
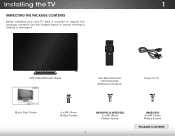
VIZIO LED HDTV with Stand Two-Sided Remote with Keyboard (Batteries Included) Power Cord Quick Start Guide 4 x M5 14mm Phillips Screws (M492i-B2 & M552i-B2) 4 x M6 18mm Phillips Screws 3 (M652i-B2) 4 x M6 16mm Phillips Screws PACKAGE CONTENTS Installing the TV 1 INSPECTING THE PACKAGE CONTENTS Before installing your new TV, take a moment to ensure nothing is missing or damaged. Use the images below to inspect the package contents.
VIZIO LED HDTV with Stand Two-Sided Remote with Keyboard (Batteries Included) Power Cord Quick Start Guide 4 x M5 14mm Phillips Screws (M492i-B2 & M552i-B2) 4 x M6 18mm Phillips Screws 3 (M652i-B2) 4 x M6 16mm Phillips Screws PACKAGE CONTENTS Installing the TV 1 INSPECTING THE PACKAGE CONTENTS Before installing your new TV, take a moment to ensure nothing is missing or damaged. Use the images below to inspect the package contents.
Download
Page 13
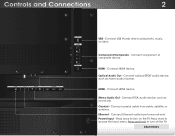
... optical/SPDIF audio device, such as sound bar. Controls and Connections 2 REAR PANEL USB - Stereo Audio Out - Connect Ethernet cable from cable, satellite, or antenna. Power/Input - Press once to turn on the TV.
... optical/SPDIF audio device, such as sound bar. Controls and Connections 2 REAR PANEL USB - Stereo Audio Out - Connect Ethernet cable from cable, satellite, or antenna. Power/Input - Press once to turn on the TV.
Download
Page 14
The power indicator flashes on when the TV turns on page 48. 8 FRONT PANEL To keep the power indicator on as long as the TV is on, see Turning the Power Indicator On or Off on , then goes out after several seconds. 2 FRONT PANEL REMOTE SENSOR & POWER INDICATOR When using the remote, aim it directly at this sensor.
The power indicator flashes on when the TV turns on page 48. 8 FRONT PANEL To keep the power indicator on as long as the TV is on, see Turning the Power Indicator On or Off on , then goes out after several seconds. 2 FRONT PANEL REMOTE SENSOR & POWER INDICATOR When using the remote, aim it directly at this sensor.
Download
Page 15
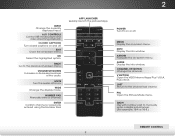
... menu. ENTER Confirm channel or passcode entered using the Number Pad. ARROW Navigate the on -screen menu. OK Select the highlighted option. POWER Turn TV on and off . CHANNEL UP/DOWN Change the channel. DASH Use with number pad to the previous on-screen menu. GUIDE... 18-5.) REMOTE CONTROL 9 VOLUME UP/DOWN Increase or decrease loudness of the audio. APP LAUNCHER Quickly launch the pictured App. V BUTTON Open the VIZIO Internet Apps Plus® (V.I.A. WIDE Change the display mode. PIC Open the Picture Mode menu. INFO Display the info window. 2 INPUT Change the...
... menu. ENTER Confirm channel or passcode entered using the Number Pad. ARROW Navigate the on -screen menu. OK Select the highlighted option. POWER Turn TV on and off . CHANNEL UP/DOWN Change the channel. DASH Use with number pad to the previous on-screen menu. GUIDE... 18-5.) REMOTE CONTROL 9 VOLUME UP/DOWN Increase or decrease loudness of the audio. APP LAUNCHER Quickly launch the pictured App. V BUTTON Open the VIZIO Internet Apps Plus® (V.I.A. WIDE Change the display mode. PIC Open the Picture Mode menu. INFO Display the info window. 2 INPUT Change the...
Download
Page 25
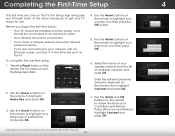
... remote to review the Terms and Conditions and Privacy Policy. Before you begin the first-time setup: • Your TV should be installed and the power cord should be connected to an electrical outlet. • Your devices should be connected. • If you have a wireless network, have the network password ...you through each of the steps necessary to get your TV ready for use . To complete the first-time setup: 1. Press the Power button on the remote.The TV powers on the remote, then highlight Connect and press OK. 7. Select Home Use for in -store display. Use the Arrow buttons on ...
... remote to review the Terms and Conditions and Privacy Policy. Before you begin the first-time setup: • Your TV should be installed and the power cord should be connected to an electrical outlet. • Your devices should be connected. • If you have a wireless network, have the network password ...you through each of the steps necessary to get your TV ready for use . To complete the first-time setup: 1. Press the Power button on the remote.The TV powers on the remote, then highlight Connect and press OK. 7. Select Home Use for in -store display. Use the Arrow buttons on ...
Download
Page 40
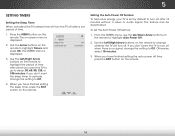
... the Left/Right Arrow buttons on the remote to highlight the period of time. 1. When you want the TV to go to highlight Auto Power Off. 2.WiUdese thZoeomLeftN/oRrmigalhtPAanrorroamwicbuttons on the remote. Otherwise, select 10 minutes. ABC Input Wide CC Sleep Timer Picture Audio Network Settings Help 34 ...the remote to Off. 4. Use the Arrow buttons on -screen menu is set by default to turn off when there is displayed. VIZIO TIMERS Sleep Timer Auto Power Off Off 10 minutes 3. This feature can be deactivated. If you don't want the TV to turn the TV off after 10...
... the Left/Right Arrow buttons on the remote to highlight the period of time. 1. When you want the TV to go to highlight Auto Power Off. 2.WiUdese thZoeomLeftN/oRrmigalhtPAanrorroamwicbuttons on the remote. Otherwise, select 10 minutes. ABC Input Wide CC Sleep Timer Picture Audio Network Settings Help 34 ...the remote to Off. 4. Use the Arrow buttons on -screen menu is set by default to turn off when there is displayed. VIZIO TIMERS Sleep Timer Auto Power Off Off 10 minutes 3. This feature can be deactivated. If you don't want the TV to turn the TV off after 10...
Download
Page 50
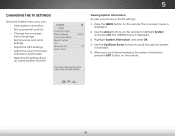
... on-screen menu language • Set time zone and local settings • Adjust the CEC settings • Adjust the when the power indicator is displayed. 3. Exit 2D 3D 4. 5 CHANGING THE TV SETTINGS Using the System menu, you are finished reviewing the system ... the TV settings: 1. When you can: • View system information • Set up administrative controls VIZIO SYSTEM System Information Menu Language Time & Local Settings Parental Controls CEC Power Indicator Reset & Admin English Off View status information for the TV, current input and your network.
... on-screen menu language • Set time zone and local settings • Adjust the CEC settings • Adjust the when the power indicator is displayed. 3. Exit 2D 3D 4. 5 CHANGING THE TV SETTINGS Using the System menu, you are finished reviewing the system ... the TV settings: 1. When you can: • View system information • Set up administrative controls VIZIO SYSTEM System Information Menu Language Time & Local Settings Parental Controls CEC Power Indicator Reset & Admin English Off View status information for the TV, current input and your network.
Download
Page 54
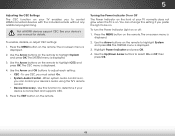
... on-screen menu is displayed. 2. Use the Arrow buttons on the remote to be on. Highlight Power Indicator and press OK. 4. To enable, disable, or adjust CEC settings: 1. To use CEC,...3. When system audio control is on. Press the EXIT button on the remote. Turning the Power Indicator On or Off The Power Indicator on the front of your TV normally does not glow when the TV is on, ...Use the Arrow buttons on the remote to select On or Off, then press OK. 48 To turn the Power Indicator Light on the remote. Press the MENU button on or off: 1. Not all HDMI devices support CEC...
... on-screen menu is displayed. 2. Use the Arrow buttons on the remote to be on. Highlight Power Indicator and press OK. 4. To enable, disable, or adjust CEC settings: 1. To use CEC,...3. When system audio control is on. Press the EXIT button on the remote. Turning the Power Indicator On or Off The Power Indicator on the front of your TV normally does not glow when the TV is on, ...Use the Arrow buttons on the remote to select On or Off, then press OK. 48 To turn the Power Indicator Light on the remote. Press the MENU button on or off: 1. Not all HDMI devices support CEC...
Download
Page 67
... inserted matching the - See Adjusting the Picture Settings on page 24. • Press the INPUT button on . Ensure your device's user manual for channels. The power is on, but there is no image on the screen. • Ensure all cables are connected to turn the TV on the remote to the... button on page 32. • Check the audio connections of the channel may be low. Devices differ; The colors on page 32. There is no power. • Ensure the TV is plugged into a working . • Ensure you are securely attached. See Adjusting the Picture Settings on page 24. • Check all...
... inserted matching the - See Adjusting the Picture Settings on page 24. • Press the INPUT button on . Ensure your device's user manual for channels. The power is on, but there is no image on the screen. • Ensure all cables are connected to turn the TV on the remote to the... button on page 32. • Check the audio connections of the channel may be low. Devices differ; The colors on page 32. There is no power. • Ensure the TV is plugged into a working . • Ensure you are securely attached. See Adjusting the Picture Settings on page 24. • Check all...
Download
Page 71
...modifications or adjustments, as well as originally purchased.You will provide instructions for parts or labor during the warranty period. Limitations and Exclusions VIZIO's one (1) year of non-commercial usage and ninety (90) days of the original warranty or for example: cosmetic damage, normal wear... and tear, improper operation, improper voltage supply or power surges, signal issues, damages from the unit before it is not covered under this occurs, your product, refer to the VIZIO service center. This warranty does not cover, for ninety (90) days from...
...modifications or adjustments, as well as originally purchased.You will provide instructions for parts or labor during the warranty period. Limitations and Exclusions VIZIO's one (1) year of non-commercial usage and ninety (90) days of the original warranty or for example: cosmetic damage, normal wear... and tear, improper operation, improper voltage supply or power surges, signal issues, damages from the unit before it is not covered under this occurs, your product, refer to the VIZIO service center. This warranty does not cover, for ninety (90) days from...

Download
Page 72
... B digital device, pursuant to Part 15 of the FCC Rules. If this equipment. This device complies with Part 15 of the FCC Rules. VIZIO offers to provide source code to you on CD-ROM for a processing fee covering the cost of performing such distribution, such as the cost of... (the "Open Source Software"), to deal in the Open Source Software without restriction, including without limitation the rights to use an AC/DC power adapter that is no guarantee that to radio communications. The manufacturer is not responsible for compliance with the instructions, may cause harmful interference to...
... B digital device, pursuant to Part 15 of the FCC Rules. If this equipment. This device complies with Part 15 of the FCC Rules. VIZIO offers to provide source code to you on CD-ROM for a processing fee covering the cost of performing such distribution, such as the cost of... (the "Open Source Software"), to deal in the Open Source Software without restriction, including without limitation the rights to use an AC/DC power adapter that is no guarantee that to radio communications. The manufacturer is not responsible for compliance with the instructions, may cause harmful interference to...
Download
Page 2
... disconnect device shall remain readily operable. • CAUTION - For more information, contact your dealer. • When connected to a power outlet, power is damaged, the internal components may cause fire or electric shock. • Slots and openings in the back and bottom of electric... be of sufficient magnitude to smoke or moisture may function abnormally. Install in accordance with the apparatus. To totally disconnect power, unplug the power cord. • The lightning flash with arrowhead symbol within an equilateral triangle is required, contact your TV close to ...
... disconnect device shall remain readily operable. • CAUTION - For more information, contact your dealer. • When connected to a power outlet, power is damaged, the internal components may cause fire or electric shock. • Slots and openings in the back and bottom of electric... be of sufficient magnitude to smoke or moisture may function abnormally. Install in accordance with the apparatus. To totally disconnect power, unplug the power cord. • The lightning flash with arrowhead symbol within an equilateral triangle is required, contact your TV close to ...
Download
Page 3
...TV from the wall outlet and disconnect the antenna or cable system. • Power Lines: Do not locate the antenna near overhead light or power circuits, or where it could fall into such power lines or circuits. TELEVISION ANTENNA CONNECTION PROTECTION Ground Clamp Antenna Lead In Wire Antenna... Discharge Unit (NEC Section 810-20) Grounding Conductors (NEC Section 810-21) Ground Clamps Electric Service Equipment Power Service Grounding Electrode System (NEC ART 250, part H) • If an outside antenna/satellite dish or cable system is to be ...
...TV from the wall outlet and disconnect the antenna or cable system. • Power Lines: Do not locate the antenna near overhead light or power circuits, or where it could fall into such power lines or circuits. TELEVISION ANTENNA CONNECTION PROTECTION Ground Clamp Antenna Lead In Wire Antenna... Discharge Unit (NEC Section 810-20) Grounding Conductors (NEC Section 810-21) Ground Clamps Electric Service Equipment Power Service Grounding Electrode System (NEC ART 250, part H) • If an outside antenna/satellite dish or cable system is to be ...


