Download
Page 5
... fire or electric shock. Incorrect polarities may cause the batteries to rain or other moisture. - Your TV is exposed to leak which can damage the remote control or injure the operator. Continuous use by qualified service personnel only. The performance of electrical shock to dripping or splashing and no objects filled...
... fire or electric shock. Incorrect polarities may cause the batteries to rain or other moisture. - Your TV is exposed to leak which can damage the remote control or injure the operator. Continuous use by qualified service personnel only. The performance of electrical shock to dripping or splashing and no objects filled...
Download
Page 7
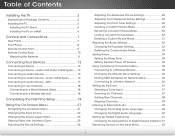
... the TV on the Input Menu 43 1 Table of Digital Closed Captions.. 41 Renaming Devices on a Wall 6 Controls and Connections 7 Rear Panel 7 Front Panel 8 Remote Control Front 9 Remote Control Back 10 Replacing the Batteries 11 Connecting Your Devices 12 Connecting A Device 12 Connecting a Device - Audio and Video Cable Types....... 13 Connecting an...
... the TV on the Input Menu 43 1 Table of Digital Closed Captions.. 41 Renaming Devices on a Wall 6 Controls and Connections 7 Rear Panel 7 Front Panel 8 Remote Control Front 9 Remote Control Back 10 Replacing the Batteries 11 Connecting Your Devices 12 Connecting A Device 12 Connecting a Device - Audio and Video Cable Types....... 13 Connecting an...
Download
Page 9
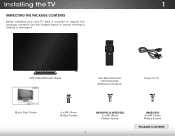
Installing the TV 1 INSPECTING THE PACKAGE CONTENTS Before installing your new TV, take a moment to ensure nothing is missing or damaged. VIZIO LED HDTV with Stand Two-Sided Remote with Keyboard (Batteries Included) Power Cord Quick Start Guide 4 x M5 14mm Phillips Screws (M492i-B2 & M552i-B2) 4 x M6 18mm Phillips Screws 3 (M652i-B2) 4 x M6 16mm Phillips Screws PACKAGE CONTENTS Use the images below to inspect the package contents.
Installing the TV 1 INSPECTING THE PACKAGE CONTENTS Before installing your new TV, take a moment to ensure nothing is missing or damaged. VIZIO LED HDTV with Stand Two-Sided Remote with Keyboard (Batteries Included) Power Cord Quick Start Guide 4 x M5 14mm Phillips Screws (M492i-B2 & M552i-B2) 4 x M6 18mm Phillips Screws 3 (M652i-B2) 4 x M6 16mm Phillips Screws PACKAGE CONTENTS Use the images below to inspect the package contents.
Download
Page 14
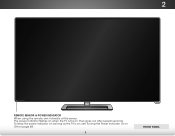
2 FRONT PANEL REMOTE SENSOR & POWER INDICATOR When using the remote, aim it directly at this sensor. To keep the power indicator on as long as the TV is on, see Turning the Power Indicator On or Off on , then goes out after several seconds. The power indicator flashes on when the TV turns on page 48. 8 FRONT PANEL
2 FRONT PANEL REMOTE SENSOR & POWER INDICATOR When using the remote, aim it directly at this sensor. To keep the power indicator on as long as the TV is on, see Turning the Power Indicator On or Off on , then goes out after several seconds. The power indicator flashes on when the TV turns on page 48. 8 FRONT PANEL
Download
Page 15
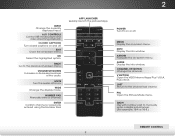
.... INFO Display the info window. GUIDE Display the info window. LAST Return to manually enter a digital sub-channel. (For example, 18-4 or 18-5.) REMOTE CONTROL 9 PIC Open the Picture Mode menu. EXIT Close the on -screen menu. ARROW Navigate the on -screen menu. V BUTTON Open the... VIZIO Internet Apps Plus® (V.I.A. MUTE Turn the audio off . WIDE Change the display mode. APP LAUNCHER Quickly launch the pictured App. CLOSED CAPTIONS...
.... INFO Display the info window. GUIDE Display the info window. LAST Return to manually enter a digital sub-channel. (For example, 18-4 or 18-5.) REMOTE CONTROL 9 PIC Open the Picture Mode menu. EXIT Close the on -screen menu. ARROW Navigate the on -screen menu. V BUTTON Open the... VIZIO Internet Apps Plus® (V.I.A. MUTE Turn the audio off . WIDE Change the display mode. APP LAUNCHER Quickly launch the pictured App. CLOSED CAPTIONS...
Download
Page 16
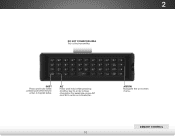
2 DO NOT COVER THIS AREA This is the transmitter. ALT Press and hold while pressing another key to enter a blue character. REMOTE CONTROL 10 ARROW Navigate the on-screen menu. SHIFT Press and hold while pressing another key to enter a # character. For example, press ALT and W to enter a capital letter.
2 DO NOT COVER THIS AREA This is the transmitter. ALT Press and hold while pressing another key to enter a blue character. REMOTE CONTROL 10 ARROW Navigate the on-screen menu. SHIFT Press and hold while pressing another key to enter a # character. For example, press ALT and W to enter a capital letter.
Download
Page 17
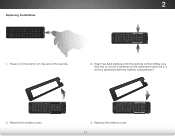
2 Replacing the Batteries 1. Press in on the button on the batteries match the (+) and (-) symbols inside the battery compartment. 2. Replace the battery cover. 11 Remove the battery cover. 4. Insert two AAA batteries into the remote control. Make sure that the (+) and (-) symbols on the rear of the remote. 3.
2 Replacing the Batteries 1. Press in on the button on the batteries match the (+) and (-) symbols inside the battery compartment. 2. Replace the battery cover. 11 Remove the battery cover. 4. Insert two AAA batteries into the remote control. Make sure that the (+) and (-) symbols on the rear of the remote. 3.
Download
Page 25
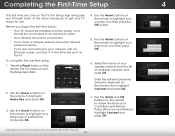
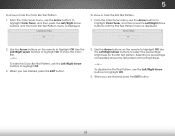
...in -store display. Seleccione "Home Use" por Modo de Casa o "Store Demo" por Demostración de Tienda. Use the Arrow buttons on the remote to highlight Home Use and press OK. Choisissez "Home Use" pour Mode Domicile ou "Store Demo" pour Démonstration en Magasin. Use the Arrow ...buttons on the remote to review the Terms and Conditions and Privacy Policy. Select the name of your mode. Store Demo Home Use 3. Press the Power button on the...
...in -store display. Seleccione "Home Use" por Modo de Casa o "Store Demo" por Demostración de Tienda. Use the Arrow buttons on the remote to highlight Home Use and press OK. Choisissez "Home Use" pour Mode Domicile ou "Store Demo" pour Démonstration en Magasin. Use the Arrow ...buttons on the remote to review the Terms and Conditions and Privacy Policy. Select the name of your mode. Store Demo Home Use 3. Press the Power button on the...
Download
Page 26
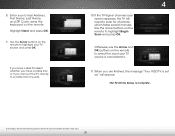
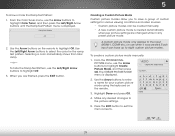
... OK. Enter your E-mail Address, First Name, Last Name, and ZIP Code using the keyboard on the remote to select the input your TV source and press OK. Use the Arrow buttons on the remote to highlight your TV source is connected to. 11.When you connect the TV directly to a cable... scan screen appears, the TV will appear. Highlight Next and press OK. 9. Otherwise, use the Arrow and OK buttons on the remote. 8. The images are finished, the message "Your VIZIO TV is complete. The First-Time Setup is set up" will need to scan for illustrative purposes only, the actual number of...
... OK. Enter your E-mail Address, First Name, Last Name, and ZIP Code using the keyboard on the remote to select the input your TV source and press OK. Use the Arrow buttons on the remote to highlight your TV source is connected to. 11.When you connect the TV directly to a cable... scan screen appears, the TV will appear. Highlight Next and press OK. 9. Otherwise, use the Arrow and OK buttons on the remote. 8. The images are finished, the message "Your VIZIO TV is complete. The First-Time Setup is set up" will need to scan for illustrative purposes only, the actual number of...
Download
Page 27
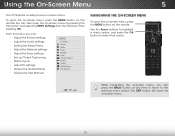
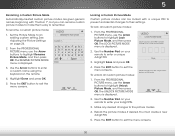
... the Tuner settings • Set up Closed Captioning • Name Inputs • Adjust TV settings • Access the Guided Setup • Access the User Manual VIZIO TV SETTINGS Picture Audio Timers Network Tuner CC Closed Captions Devices System Guided Setup User Manual NAVIGATING THE ON-SCREEN MENU To open the on..., you can Network Setptinrgesss Htehlpe BACK button at any time to return to the previous menu screen. The EXIT button will close the on the remote. Wide Zoom Normal Panoramic Exit 2D 3D ABC Input Wide CC Sleep Timer Picture Audio While navigating the on the...
... the Tuner settings • Set up Closed Captioning • Name Inputs • Adjust TV settings • Access the Guided Setup • Access the User Manual VIZIO TV SETTINGS Picture Audio Timers Network Tuner CC Closed Captions Devices System Guided Setup User Manual NAVIGATING THE ON-SCREEN MENU To open the on..., you can Network Setptinrgesss Htehlpe BACK button at any time to return to the previous menu screen. The EXIT button will close the on the remote. Wide Zoom Normal Panoramic Exit 2D 3D ABC Input Wide CC Sleep Timer Picture Audio While navigating the on the...
Download
Page 28
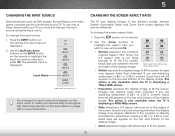
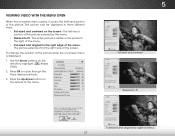
...wish to highlight the aspect ratio you must first change the screen aspect ratio: 1. You change the input source: 1. Press the button on the remote. This option is only available when the TV is already formatted for more information. If you are watching widescreen (1.85:1 or 2.35:1) content,...Wide, and Zoom. The selected input is displayed. Each mode displays the picture differently. To change the input names that appear on the remote to highlight the input you wish to your devices easy to fit the screen. 22 Use the Arrow buttons to view and press OK. ...
...wish to highlight the aspect ratio you must first change the screen aspect ratio: 1. You change the input source: 1. Press the button on the remote. This option is only available when the TV is already formatted for more information. If you are watching widescreen (1.85:1 or 2.35:1) content,...Wide, and Zoom. The selected input is displayed. Each mode displays the picture differently. To change the input names that appear on the remote to highlight the input you wish to your devices easy to fit the screen. 22 Use the Arrow buttons to view and press OK. ...
Download
Page 29
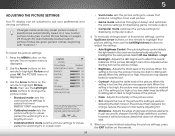
... fit - Use the Arrow buttons on the remote to highlight Resize Video. 2. Standard picture mode meets ENERGY STAR® requirements. Tint - Standard picture mode meets ENERGY STAR® requirements. Brightness - Advanced Picture Professional Picture Standard + 85 + 50 + 50 + 59 +0 +9 Select from preset picture modes. VIZIO Network Settings Help PICTURE Picture Mode Standard...
... fit - Use the Arrow buttons on the remote to highlight Resize Video. 2. Standard picture mode meets ENERGY STAR® requirements. Tint - Standard picture mode meets ENERGY STAR® requirements. Brightness - Advanced Picture Professional Picture Standard + 85 + 50 + 50 + 59 +0 +9 Select from preset picture modes. VIZIO Network Settings Help PICTURE Picture Mode Standard...
Download
Page 30
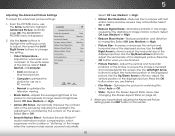
...Wide staZorotming frNoomrmasl omPaenopraimcicture modes. • Brightness - Use the Arrow buttons on the remote to sharpen non-HD (high definition) content; Brightness - To manually change the picture mode: VIZIO PICTURE Picture Mode Auto Brightness Control Backlight - Backlight cannot be adjusted to highlight that ... mode is too high, the picture may be too dark to values perfect for watching TV in the picture. The on the remote to suit your preferences and viewing conditions. Tint - Select Off, Low, Medium, or High. • Backlight - Adjusts the...
...Wide staZorotming frNoomrmasl omPaenopraimcicture modes. • Brightness - Use the Arrow buttons on the remote to sharpen non-HD (high definition) content; Brightness - To manually change the picture mode: VIZIO PICTURE Picture Mode Auto Brightness Control Backlight - Backlight cannot be adjusted to highlight that ... mode is too high, the picture may be too dark to values perfect for watching TV in the picture. The on the remote to suit your preferences and viewing conditions. Tint - Select Off, Low, Medium, or High. • Backlight - Adjusts the...
Download
Page 31
... the horizontal size of the image when the camera moves across a scene horizontally. When you are finished. • Film Mode - VIZIO ADVANCED PICTURE Color Temperature Black Detail Cool Medium 2. Some sensitive viewers may notice flicker. Activates Smooth Motion™ motion estimation/motion compensation,...large areas of the displayed picture. Press the OK button when you have finished adjusting the Advanced Picture Settings, press the EXIT button on the remote. 25 Select On or Off. • Smooth Motion Effect - Select Off, Low, Medium, or High. • Motion Blur Reduction -...
... the horizontal size of the image when the camera moves across a scene horizontally. When you are finished. • Film Mode - VIZIO ADVANCED PICTURE Color Temperature Black Detail Cool Medium 2. Some sensitive viewers may notice flicker. Activates Smooth Motion™ motion estimation/motion compensation,...large areas of the displayed picture. Press the OK button when you have finished adjusting the Advanced Picture Settings, press the EXIT button on the remote. 25 Select On or Off. • Smooth Motion Effect - Select Off, Low, Medium, or High. • Motion Blur Reduction -...

Download
Page 32
..., or Gain of picture settings. Create a custom picture mode. • Lock Picture Mode - Delete a custom picture mode. Use the Arrow buttons on the remote to change the setting: VIZIO PROFESSIONAL PICTURE Color Tuner Rename Picture Mode Create Picture Mode Lock Picture Mode Delete Picture Mode • Color Tuner - Sleep Timer Picture Audio...
..., or Gain of picture settings. Create a custom picture mode. • Lock Picture Mode - Delete a custom picture mode. Use the Arrow buttons on the remote to change the setting: VIZIO PROFESSIONAL PICTURE Color Tuner Rename Picture Mode Create Picture Mode Lock Picture Mode Delete Picture Mode • Color Tuner - Sleep Timer Picture Audio...
Download
Page 33
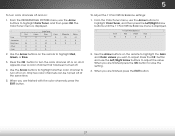
When you wish to highlight Red, Green, or Blue. 3. Use the Arrow buttons on the remote to highlight the Gain and Color values you are finished, press the EXIT button. 27 Hue Saturation Brightness Offset Gain Red 0 -1 -24 0 0 Green 0 5 0 0 0... Color Tuner Blue 0 -4 -22 0 0 Cyan 0 0 0 Magenta 25 -2 0 Yellow -14 0 0 2. Use the Arrow buttons on the remote to adjust. An X appears over a color channel that has been turned off at the same time. 5. From the Color Tuner menu, use the Arrow buttons...
When you wish to highlight Red, Green, or Blue. 3. Use the Arrow buttons on the remote to highlight the Gain and Color values you are finished, press the EXIT button. 27 Hue Saturation Brightness Offset Gain Red 0 -1 -24 0 0 Green 0 5 0 0 0... Color Tuner Blue 0 -4 -22 0 0 Cyan 0 0 0 Magenta 25 -2 0 Yellow -14 0 0 2. Use the Arrow buttons on the remote to adjust. An X appears over a color channel that has been turned off at the same time. 5. From the Color Tuner menu, use the Arrow buttons...
Download
Page 34
Color Bar Test Pattern Off 5 To show or hide the Color Bar Test Pattern: 1. Use the Arrow buttons on the remote to highlight Color Tuner, and then press the Left/Right Arrow buttons until the Flat Test Pattern menu is displayed. Selecting a percentage immediately shows the ..., press the EXIT button. 28 From the Color Tuner menu, use the Left/Right Arrow buttons to highlight Off. 3. Use the Arrow buttons on the remote to highlight Color Tuner, and then press the Left/Right Arrow buttons until the Color Bar Test Pattern menu is displayed. Flat Test Pattern Off...
Color Bar Test Pattern Off 5 To show or hide the Color Bar Test Pattern: 1. Use the Arrow buttons on the remote to highlight Color Tuner, and then press the Left/Right Arrow buttons until the Flat Test Pattern menu is displayed. Selecting a percentage immediately shows the ..., press the EXIT button. 28 From the Color Tuner menu, use the Left/Right Arrow buttons to highlight Off. 3. Use the Arrow buttons on the remote to highlight Color Tuner, and then press the Left/Right Arrow buttons until the Color Bar Test Pattern menu is displayed. Flat Test Pattern Off...
Download
Page 35
Use the Arrow buttons on the remote. 3. Use the Left/Right Arrow buttons to highlight Off. Highlight Done and press OK. VIZIO CREATE PICTURE MODE Custom1_ abc def ghi j k l mn o p q r s t u v wx y z 0 123456789 .@# .com Space Done 4. Make any preset picture mode. To hide the Ramp...The CREATE PICTURE MODE menu is displayed. When you to save a group of custom settings for your custom picture mode using the keyboard on the remote to select the color for the ramp test pattern. To create a custom picture mode manually: 1. Selecting a color immediately shows that color ramp. ...
Use the Arrow buttons on the remote. 3. Use the Left/Right Arrow buttons to highlight Off. Highlight Done and press OK. VIZIO CREATE PICTURE MODE Custom1_ abc def ghi j k l mn o p q r s t u v wx y z 0 123456789 .@# .com Space Done 4. Make any preset picture mode. To hide the Ramp...The CREATE PICTURE MODE menu is displayed. When you to save a group of custom settings for your custom picture mode using the keyboard on the remote to select the color for the ramp test pattern. To create a custom picture mode manually: 1. Selecting a color immediately shows that color ramp. ...
Download
Page 36
See Adjusting the Picture Settings on the remote. 4. VIZIO RENAME PICTURE MODE Custom 1_ abc def ghi j k l mn o p q r s t u v wx y z 0 123456789 .@# .com Space Done 3. Use the Arrow buttons to enter a custom name using the number keys on the remote. 1. Press the EXIT button to exit the menu screens. ABC ... press OK. The UNLOCK PICTURE MODE menu is displayed. To lock all custom picture modes. Use the Number Pad on your remote to enter your remote to enter a unique 4-digit PIN. Press the EXIT button to exit the menu screens. Make any desired changes to exit ...
See Adjusting the Picture Settings on the remote. 4. VIZIO RENAME PICTURE MODE Custom 1_ abc def ghi j k l mn o p q r s t u v wx y z 0 123456789 .@# .com Space Done 3. Use the Arrow buttons to enter a custom name using the number keys on the remote. 1. Press the EXIT button to exit the menu screens. ABC ... press OK. The UNLOCK PICTURE MODE menu is displayed. To lock all custom picture modes. Use the Number Pad on your remote to enter your remote to enter a unique 4-digit PIN. Press the EXIT button to exit the menu screens. Make any desired changes to exit ...
Download
Page 38
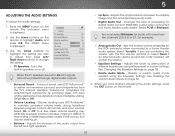
...highlight Audio and press OK. Sets the volume control properties for example). • Exit An2aDlog Au3Ddio Out - Use the Arrow buttons on the remote. Lip Sync - Digital Audio Out Analog Audio Out Equalizer Settings Delete Audio Mode On On On +0 +0 PCM Fixed When the TV speakers...ABC volume with more than two channels (3.0, 5.0, or 5.1, for the RCA connector when connected to change the setting: • TV Speakers - VIZIO AUDIO TV Speakers Surround Sound Volume Leveling Balance - Select Variable if you wish to adjust, then press Left/ Right Arrow buttons to a home ...
...highlight Audio and press OK. Sets the volume control properties for example). • Exit An2aDlog Au3Ddio Out - Use the Arrow buttons on the remote. Lip Sync - Digital Audio Out Analog Audio Out Equalizer Settings Delete Audio Mode On On On +0 +0 PCM Fixed When the TV speakers...ABC volume with more than two channels (3.0, 5.0, or 5.1, for the RCA connector when connected to change the setting: • TV Speakers - VIZIO AUDIO TV Speakers Surround Sound Volume Leveling Balance - Select Variable if you wish to adjust, then press Left/ Right Arrow buttons to a home ...


