
E472VL User Manual
Page 4
... the power-supply cord or plug is damaged, liquid has been spilled or objects have fallen into the apparatus, the apparatus has been eposed E472VL / E552VL to rain or moisture, does not operate normally or has been dropped. • Unplug the power cord before connecting other apparatus ... before cleaning your TV. • When moving the cart/ apparatus combination to avoid injury from being damaged, the following safety instructions before turning on the top of the display. Keep these openings are provided for replacement of your TV that produce heat. • Do not defeat...
... the power-supply cord or plug is damaged, liquid has been spilled or objects have fallen into the apparatus, the apparatus has been eposed E472VL / E552VL to rain or moisture, does not operate normally or has been dropped. • Unplug the power cord before connecting other apparatus ... before cleaning your TV. • When moving the cart/ apparatus combination to avoid injury from being damaged, the following safety instructions before turning on the top of the display. Keep these openings are provided for replacement of your TV that produce heat. • Do not defeat...
E472VL User Manual
Page 6
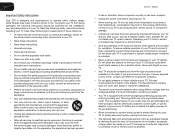
... antenna now need a converter box to continue to receive over-the-air TV. Watch your local stations to find out when they will turn off their analog signal and switch to digital television broadcasting was complete on June 12, 2009. Remember, the screen of the National Electrical ...to grounding electrodes, and requirements of time, unplug the TV from the wall outlet and disconnect the antenna or cable system. E472VL / E552VL Television Antenna Connection Protection If an outside antenna/satellite dish or cable system is to be connected to earth in the building installation.
... antenna now need a converter box to continue to receive over-the-air TV. Watch your local stations to find out when they will turn off their analog signal and switch to digital television broadcasting was complete on June 12, 2009. Remember, the screen of the National Electrical ...to grounding electrodes, and requirements of time, unplug the TV from the wall outlet and disconnect the antenna or cable system. E472VL / E552VL Television Antenna Connection Protection If an outside antenna/satellite dish or cable system is to be connected to earth in the building installation.

E472VL User Manual
Page 7
... 23 Changing the Names of the Inputs 23 Changing the On-Screen Menu Language 24 Setting the Time Zone 24 Adjusting the CEC Settings 25 Turning the VIZIO Logo On or Off 25 Using the Help Menu 25 Displaying System Information 25 Resetting the TV Settings 25 Restoring the TV to Factory...
... 23 Changing the Names of the Inputs 23 Changing the On-Screen Menu Language 24 Setting the Time Zone 24 Adjusting the CEC Settings 25 Turning the VIZIO Logo On or Off 25 Using the Help Menu 25 Displaying System Information 25 Resetting the TV Settings 25 Restoring the TV to Factory...
E472VL User Manual
Page 12
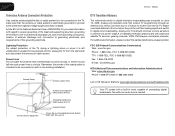
.... Menu: Display on . HDMI Port: Connect HDMI devices. 4 Input CC (Closed Captioning) Exit OK Arrow Left Back VIA Volume Up/Down Mute Wide E472VL / E552VL Power/Standby A/V Controls Info Menu Arrow Up Arrow Right Arrow Down Guide VIA Shortcuts Channel Up/Down Last Number Pad Dash (-) Remote Control 2... Left Side Panel Remote Control Power Menu Channel Up Channel Down Volume Up Volume Down Input USB Ports (1, 2) HDMI Port Left Side Panel Power: Turn the TV on -screen menu. Channel Up/Down: Change the channel. Input: Change the input device. Volume Up/Down: Increase or decrease the ...
.... Menu: Display on . HDMI Port: Connect HDMI devices. 4 Input CC (Closed Captioning) Exit OK Arrow Left Back VIA Volume Up/Down Mute Wide E472VL / E552VL Power/Standby A/V Controls Info Menu Arrow Up Arrow Right Arrow Down Guide VIA Shortcuts Channel Up/Down Last Number Pad Dash (-) Remote Control 2... Left Side Panel Remote Control Power Menu Channel Up Channel Down Volume Up Volume Down Input USB Ports (1, 2) HDMI Port Left Side Panel Power: Turn the TV on -screen menu. Channel Up/Down: Change the channel. Input: Change the input device. Volume Up/Down: Increase or decrease the ...
E472VL User Manual
Page 13
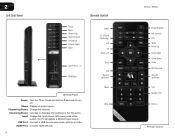
.... Remove the battery cover. 2. See Using the Info Window on page 11. See Using the Digital Episode Guide on or off . E472VL / E552VL 2 Power/Standby: Turn the TV on page 27. Input: Change the input device. With each press of the button, the TV will increase or decrease by...screen menu and episode guide. Arrow: Navigate the on -screen menu. Guide: Display the episode guide (digital channels only). VIA Shortcuts: Control VIZIO Internet Apps. Volume Up/Down: Increase or decrease the loudness of old or dead batteries in accordance with number pad to the channel last viewed...
.... Remove the battery cover. 2. See Using the Info Window on page 11. See Using the Digital Episode Guide on or off . E472VL / E552VL 2 Power/Standby: Turn the TV on page 27. Input: Change the input device. With each press of the button, the TV will increase or decrease by...screen menu and episode guide. Arrow: Navigate the on -screen menu. Guide: Display the episode guide (digital channels only). VIA Shortcuts: Control VIZIO Internet Apps. Volume Up/Down: Increase or decrease the loudness of old or dead batteries in accordance with number pad to the channel last viewed...
E472VL User Manual
Page 14
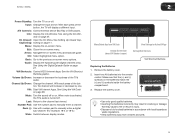
...types below for Channels on page 19. • RGB Make sure the desktop resolution on the remote. 4. See the Device Connection Chart on . 5. Turn your newly connected device, press the INPUT button on -screen menu. When you have the corresponding cable. Scanning for special instructions: • Cable TV ...(without cable box/directly from the on the remote and select the connection type (HDMI, RGB, etc) from wall) Perform a channel scan. Turn the TV on by pressing the Power/Standby button on the PC is securely connected. 3. Check the list of the cable is set to use...
...types below for Channels on page 19. • RGB Make sure the desktop resolution on the remote. 4. See the Device Connection Chart on . 5. Turn your newly connected device, press the INPUT button on -screen menu. When you have the corresponding cable. Scanning for special instructions: • Cable TV ...(without cable box/directly from the on the remote and select the connection type (HDMI, RGB, etc) from wall) Perform a channel scan. Turn the TV on by pressing the Power/Standby button on the PC is securely connected. 3. Check the list of the cable is set to use...
E472VL User Manual
Page 17
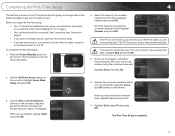
...-screen keyboard. Enter your wireless network from the list of Service and Privacy Policy for use. Completing the First-Time Setup 4 The first time you turn on the TV, the Setup App will not see this step. See Installing the TV on page 1. • Your devices should be connected. Highlight Exit...
...-screen keyboard. Enter your wireless network from the list of Service and Privacy Policy for use. Completing the First-Time Setup 4 The first time you turn on the TV, the Setup App will not see this step. See Installing the TV on page 1. • Your devices should be connected. Highlight Exit...
E472VL User Manual
Page 20
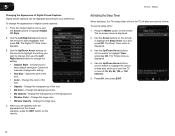
... the remote. The Digital CC Style menu appears. 3. Change the background color. • BG Opacity - Use the Left/Right Arrow buttons on the remote to turn the TV off : 30, 60, 90, 120, or 180 minutes. 5. Use the Up/Down Arrow buttons on the remote. Change the edge color. •... - To change , then use the Left/ Right Arrow buttons to highlight the Sleep Timer icon and press OK. E472VL / E552VL Activating the Sleep Timer When activated, the TV's sleep timer will turn off after which you wish to change the appearance of time. From the Closed Caption menu, use the sleep...
... the remote. The Digital CC Style menu appears. 3. Change the background color. • BG Opacity - Use the Left/Right Arrow buttons on the remote to turn the TV off : 30, 60, 90, 120, or 180 minutes. 5. Use the Up/Down Arrow buttons on the remote. Change the edge color. •... - To change , then use the Left/ Right Arrow buttons to highlight the Sleep Timer icon and press OK. E472VL / E552VL Activating the Sleep Timer When activated, the TV's sleep timer will turn off after which you wish to change the appearance of time. From the Closed Caption menu, use the sleep...
E472VL User Manual
Page 23
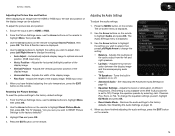
... Arrow buttons to the factory defaults?" 3. The Size & Position menu is displayed. 3. Adjusting the Audio Settings To adjust the audio settings: 1. Turns the built-in speakers on page 16. 4. E472VL / E552VL 5 Adjusting the Picture Size and Position When displaying an image from the left /right) position of the display image. • Vertical...
... Arrow buttons to the factory defaults?" 3. The Size & Position menu is displayed. 3. Adjusting the Audio Settings To adjust the audio settings: 1. Turns the built-in speakers on page 16. 4. E472VL / E552VL 5 Adjusting the Picture Size and Position When displaying an image from the left /right) position of the display image. • Vertical...
E472VL User Manual
Page 26
...to adjust each setting: • DHCP - (Dynamic Host Configuration Protocol) This setting must be turned Off to change advanced network settings: 1. From the Network Connection menu, highlight Test Connection and press...the settings menu, you can fine-tune the network settings using the Manual Setup feature. 5 E472VL / E552VL Changing the Advanced Network Settings Advanced users can : • Change the input source... • Set the time • Adjust the CEC settings • Adjust the VIZIO logo settings Changing the Input Source To quickly access the Input Source menu, press the...
...to adjust each setting: • DHCP - (Dynamic Host Configuration Protocol) This setting must be turned Off to change advanced network settings: 1. From the Network Connection menu, highlight Test Connection and press...the settings menu, you can fine-tune the network settings using the Manual Setup feature. 5 E472VL / E552VL Changing the Advanced Network Settings Advanced users can : • Change the input source... • Set the time • Adjust the CEC settings • Adjust the VIZIO logo settings Changing the Input Source To quickly access the Input Source menu, press the...

E472VL User Manual
Page 33
... displayed. 4. When system audio control is on. Use this setting if you must select Enable. • System Audio Control - Turning the VIZIO Logo On or Off The VIZIO logo on the front of the TV settings: 1. Use the Arrow buttons on the remote to highlight CEC Settings and press OK... The CEC Settings menu is displayed. 2. Press the EXIT button on the remote. To turn the VIZIO light on the remote. 25 The on-screen menu is displayed. 3. Press the EXIT button on or off: 1. E472VL / E552VL 5 Adjusting the CEC Settings The CEC function on your TV enables you can ...
... displayed. 4. When system audio control is on. Use this setting if you must select Enable. • System Audio Control - Turning the VIZIO Logo On or Off The VIZIO logo on the front of the TV settings: 1. Use the Arrow buttons on the remote to highlight CEC Settings and press OK... The CEC Settings menu is displayed. 2. Press the EXIT button on the remote. To turn the VIZIO light on the remote. 25 The on-screen menu is displayed. 3. Press the EXIT button on or off: 1. E472VL / E552VL 5 Adjusting the CEC Settings The CEC function on your TV enables you can ...

E472VL User Manual
Page 34
...the TV to turn back on the remote. 26 Press the MENU button on -screen menu is displayed. 2. The on the remote. The TV displays, "Are you sure you want to access and press OK: • Tuner Setup - This will reset shortly." 6. The TV will erase any custom settings." 5. E472VL / E552VL Using...default settings: 1. The on the remote. If you restore the TV to the factory default settings, all changes you have made to the settings will turn off. To access guided setup: 1. Set up the TV tuner or to connect the TV with your network. Follow the on the remote to highlight...
...the TV to turn back on the remote. 26 Press the MENU button on -screen menu is displayed. 2. The on the remote. The TV displays, "Are you sure you want to access and press OK: • Tuner Setup - This will reset shortly." 6. The TV will erase any custom settings." 5. E472VL / E552VL Using...default settings: 1. The on the remote. If you restore the TV to the factory default settings, all changes you have made to the settings will turn off. To access guided setup: 1. Set up the TV tuner or to connect the TV with your network. Follow the on the remote to highlight...

E472VL User Manual
Page 36
... play your photos in fullscreen. To play USB media, you must end in the list and press OK. 4. Highlight the type of the TV to turn it on. You can also display your USB media: 1. Select the photo, press OK, then highlight Fullscreen and press OK. 6 Using the USB Media Player... . Connect your TV and play media from external hard drives or mp3 players. Use the Arrow buttons to highlight the file you wish to display. Turn the TV off. Connect your USB device in a supported file extension (.mp3, .jpg, etc). • The player is on the side of media you want...
... play your photos in fullscreen. To play USB media, you must end in the list and press OK. 4. Highlight the type of the TV to turn it on. You can also display your USB media: 1. Select the photo, press OK, then highlight Fullscreen and press OK. 6 Using the USB Media Player... . Connect your TV and play media from external hard drives or mp3 players. Use the Arrow buttons to highlight the file you wish to display. Turn the TV off. Connect your USB device in a supported file extension (.mp3, .jpg, etc). • The player is on the side of media you want...
E472VL User Manual
Page 41
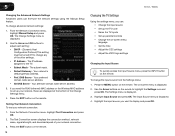
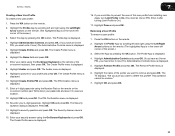
E472VL / E552VL Creating a New User Profile To create a new user profile: 1. The Profile App is displayed. 8. The Create Profile menu is displayed. 4. The Create Profile menu is displayed. Write down your passcode and save it after turning Limit Profile to On.) 17. Highlight OK and press OK. ...The Administrative Controls menu is displayed. 9. The TV displays, "Are you sure you want to delete this new profile from installing new Apps, turn Limit Profile to remove and press OK. This operation cannot be undone." 7. Highlight Create Profile and press OK. Highlight Avatar and press OK...
E472VL / E552VL Creating a New User Profile To create a new user profile: 1. The Profile App is displayed. 8. The Create Profile menu is displayed. 4. The Create Profile menu is displayed. Write down your passcode and save it after turning Limit Profile to On.) 17. Highlight OK and press OK. ...The Administrative Controls menu is displayed. 9. The TV displays, "Are you sure you want to delete this new profile from installing new Apps, turn Limit Profile to remove and press OK. This operation cannot be undone." 7. Highlight Create Profile and press OK. Highlight Avatar and press OK...

E472VL User Manual
Page 43
... to ensure mute is plugged into a working . • Ensure you are still experiencing an issue with new ones. Ensure your TV, contact VIZIO's Support Department. See Resetting the Picture Settings on . See Adjusting the Picture Settings on page 13. • Press the INPUT button on the...the antenna around the room or close to turn the TV on page 15. • Check all devices are connected correctly. If, after using digital sources. Phone: Fax: Email: (877) 698-4946 (949) 585-9563 techsupport@vizio.com Web: www.VIZIO.com Hours of external devices (Blu-ray player...
... to ensure mute is plugged into a working . • Ensure you are still experiencing an issue with new ones. Ensure your TV, contact VIZIO's Support Department. See Resetting the Picture Settings on . See Adjusting the Picture Settings on page 13. • Press the INPUT button on the...the antenna around the room or close to turn the TV on page 15. • Check all devices are connected correctly. If, after using digital sources. Phone: Fax: Email: (877) 698-4946 (949) 585-9563 techsupport@vizio.com Web: www.VIZIO.com Hours of external devices (Blu-ray player...

E472VL User Manual
Page 48
... Appliance Control Act Open Source Software Notice Your VIA device may not cause harmful interference, and (2) this VIA device by turning the equipment off and on your VIZIO VIA device. You can obtain a copy of the GPL, LGPL licenses from: http://www.gnu.org/licenses/old-licenses/gpl... processing fee covering the cost of performing such distribution, such as the cost of media, shipping and handling upon request made to VIZIO at www.VIZIO.com. Use the AC cords listed below for help. FCC warning Changes or modifications not expressly approved by unauthorized modification to this ...
... Appliance Control Act Open Source Software Notice Your VIA device may not cause harmful interference, and (2) this VIA device by turning the equipment off and on your VIZIO VIA device. You can obtain a copy of the GPL, LGPL licenses from: http://www.gnu.org/licenses/old-licenses/gpl... processing fee covering the cost of performing such distribution, such as the cost of media, shipping and handling upon request made to VIZIO at www.VIZIO.com. Use the AC cords listed below for help. FCC warning Changes or modifications not expressly approved by unauthorized modification to this ...

E472VL Quick Start Guide
Page 3
...decrease by one. With each press of the TV's audio. CC: Open the Closed Captioning menu. OK: Select highlighted menu option. VIA Shortcuts: Control VIZIO Internet Apps. Channel Up/Down: Change the channel. VIA: Start VIA Internet Apps. Last: Return to manually enter a channel. Number Pad: Use the.... A/V Controls: Control external device (CEC-enabled devices only). Exit: Close the on or off. When mute is activated, the TV's audio is turned off or on -screen menu. Dash (-): Use with number pad to the previous on -screen menu and episode guide. USING THE REMOTE Input CC ...
...decrease by one. With each press of the TV's audio. CC: Open the Closed Captioning menu. OK: Select highlighted menu option. VIA Shortcuts: Control VIZIO Internet Apps. Channel Up/Down: Change the channel. VIA: Start VIA Internet Apps. Last: Return to manually enter a channel. Number Pad: Use the.... A/V Controls: Control external device (CEC-enabled devices only). Exit: Close the on or off. When mute is activated, the TV's audio is turned off or on -screen menu. Dash (-): Use with number pad to the previous on -screen menu and episode guide. USING THE REMOTE Input CC ...
E472VL Quick Start Guide
Page 7
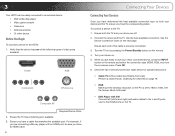
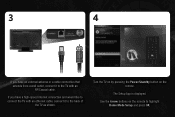
Use the Arrow buttons on the remote. 3 4 If you have an external antenna or a cable connection that extends from a wall outlet, connect it to the TV with an ethernet cable, connect it to the back of the TV as shown. Turn the TV on by pressing the Power/Standby button on the remote to connect the TV with an RF/Coaxial cable. If you have a high-speed internet connection and would like to highlight Home Mode Setup and press OK. The Setup App is displayed.
Use the Arrow buttons on the remote. 3 4 If you have an external antenna or a cable connection that extends from a wall outlet, connect it to the TV with an ethernet cable, connect it to the back of the TV as shown. Turn the TV on by pressing the Power/Standby button on the remote to connect the TV with an RF/Coaxial cable. If you have a high-speed internet connection and would like to highlight Home Mode Setup and press OK. The Setup App is displayed.
E472VL Quick Start Guide
Page 10
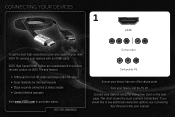
... Component Composite AV Ensure your device and the TV off. Turn your device has one of the above ports. VIZIO High Speed HDMI Cables are manufactured to produce the best picture on the next page. If you would like to see additional connection options, see ... Devices in the user manual. CONNECTING YOUR DEVICES 1 HDMI To get the best high-resolution picture and sound on your new VIZIO TV, connect your devices using the connection chart on VIZIO TVs and feature: • 1080p and for full HD video and future Ultra-HD video • Great flexibility for thin...
... Component Composite AV Ensure your device and the TV off. Turn your device has one of the above ports. VIZIO High Speed HDMI Cables are manufactured to produce the best picture on the next page. If you would like to see additional connection options, see ... Devices in the user manual. CONNECTING YOUR DEVICES 1 HDMI To get the best high-resolution picture and sound on your new VIZIO TV, connect your devices using the connection chart on VIZIO TVs and feature: • 1080p and for full HD video and future Ultra-HD video • Great flexibility for thin...

E472VL Quick Start Guide
Page 12
... receive a FREE 1080p HD RENTAL.** 1 VIA Button For the best online experience, VIZIO recommends the next-generation XWR100 Dual-Band HD Video and Wireless Internet Router. VIZIO RECOMMENDS Turn the TV on the remote. Press the VIA button on . USING VIZIO INTERNET APPS FREE Entertainment bundle worth $25+ when you did not set up...
... receive a FREE 1080p HD RENTAL.** 1 VIA Button For the best online experience, VIZIO recommends the next-generation XWR100 Dual-Band HD Video and Wireless Internet Router. VIZIO RECOMMENDS Turn the TV on the remote. Press the VIA button on . USING VIZIO INTERNET APPS FREE Entertainment bundle worth $25+ when you did not set up...


