Download
Page 7
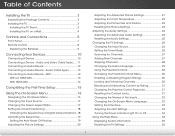
... an Audio Device - Audio and Video Cable Types....... 11 Connecting an Audio Device 12 Connecting an Audio Device - Table of the Inputs 32 Changing the On-Screen Menu Language 32 Setting the Time Zone 33 Adjusting the CEC Settings 33 Turning the Power Indicator Light On or Off 34 Using the Help...
... an Audio Device - Audio and Video Cable Types....... 11 Connecting an Audio Device 12 Connecting an Audio Device - Table of the Inputs 32 Changing the On-Screen Menu Language 32 Setting the Time Zone 33 Adjusting the CEC Settings 33 Turning the Power Indicator Light On or Off 34 Using the Help...
Download
Page 28
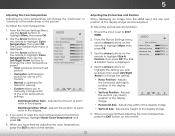
...highlight Color Temperature, then press OK. Blue Gain - Green Offset - When you to manually change each of the color temperature settings: VIZIO Color Temperature Color Temperature Red Gain - The Size & Position menu is displayed. 3. Adjusts the horizontal (left/right) position of the...Red/Green/Blue Offset - Adjusts the position of each color in the display. To adjust the picture size and position: 1. Position - + 32 press OK. - Green Gain - Adjusts the amount of each color in the display. 4. Adjusts the height of the display image. •...
...highlight Color Temperature, then press OK. Blue Gain - Green Offset - When you to manually change each of the color temperature settings: VIZIO Color Temperature Color Temperature Red Gain - The Size & Position menu is displayed. 3. Adjusts the horizontal (left/right) position of the...Red/Green/Blue Offset - Adjusts the position of each color in the display. To adjust the picture size and position: 1. Position - + 32 press OK. - Green Gain - Adjusts the amount of each color in the display. 4. Adjusts the height of the display image. •...

Download
Page 38
To change the on the remote to highlight the Settings icon and press OK. Use the Arrow buttons on -screen menu language: 1. VIZIO Name Input Input Source Input Labels TV TV Custom 4. Highlight the input label you want to rename and press OK. 5. To change the name of ... Language and press OK. Highlight the input you can rename the inputs. Press the MENU button on -screen menu in different languages. Network Settings Help 32 Highlight Input Source and press OK. If you would like to use a preset input label, highlight Input Labels and press OK. Changing the On-Screen...
To change the on the remote to highlight the Settings icon and press OK. Use the Arrow buttons on -screen menu language: 1. VIZIO Name Input Input Source Input Labels TV TV Custom 4. Highlight the input label you want to rename and press OK. 5. To change the name of ... Language and press OK. Highlight the input you can rename the inputs. Press the MENU button on -screen menu in different languages. Network Settings Help 32 Highlight Input Source and press OK. If you would like to use a preset input label, highlight Input Labels and press OK. Changing the On-Screen...
Download
Page 49
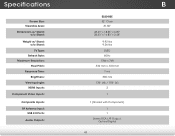
Specifications B Screen Size: Viewable Area: Dimensions w/ Stand: w/o Stand: Weight w/ Stand: w/o Stand: TV Type: Refresh Rate: Maximum Resolution: Pixel Pitch: Response Time: Brightness: Viewing Angle: HDMI Inputs: Component Video Inputs: Composite Inputs: RF Antenna Input: USB 2.0 Ports: Audio Outputs: E320-B0E 32" Class 31.50" 28.43" x 18.55" x 6.87" 28.43" x 16.83" x 2.48" 9.92 lbs 9.26 lbs DLED 60 Hz 1366 x 768 .510 mm x .510 mm 7 ms 300 nits 178° (H) / 178° (V) 2 1 1 (Shared with Component) 1 1 Stereo RCA L/R Output, Optical Digital 43
Specifications B Screen Size: Viewable Area: Dimensions w/ Stand: w/o Stand: Weight w/ Stand: w/o Stand: TV Type: Refresh Rate: Maximum Resolution: Pixel Pitch: Response Time: Brightness: Viewing Angle: HDMI Inputs: Component Video Inputs: Composite Inputs: RF Antenna Input: USB 2.0 Ports: Audio Outputs: E320-B0E 32" Class 31.50" 28.43" x 18.55" x 6.87" 28.43" x 16.83" x 2.48" 9.92 lbs 9.26 lbs DLED 60 Hz 1366 x 768 .510 mm x .510 mm 7 ms 300 nits 178° (H) / 178° (V) 2 1 1 (Shared with Component) 1 1 Stereo RCA L/R Output, Optical Digital 43


