Download
Page 3
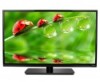
To get the most out of your new VIZIO product, read these instructions before operating your TV. We recommend that produce heat. • Do not defeat the safety purpose of the polarized or grounding-type plug. Read the following instructions should ...for future reference. Install in electric shock or fire.To prevent your TV from being walked on or pinched, particularly at plugs, convenience receptacles, and the point where they exit from being damaged, the following safety instructions before using your VIZIO product at (877) 878-4946. Product Registration To purchase or inquire...
To get the most out of your new VIZIO product, read these instructions before operating your TV. We recommend that produce heat. • Do not defeat the safety purpose of the polarized or grounding-type plug. Read the following instructions should ...for future reference. Install in electric shock or fire.To prevent your TV from being walked on or pinched, particularly at plugs, convenience receptacles, and the point where they exit from being damaged, the following safety instructions before using your VIZIO product at (877) 878-4946. Product Registration To purchase or inquire...
Download
Page 4
... apply pressure or throw objects at least three feet should be installed near your TV and easily accessible. • Only power of your TV during electrical storms. • Unplug your TV. Do not expose your TV close to smoke or moisture may compromise the integrity of electric shock to protect ...within the inside of time. For more information, contact your dealer. • When connected to a power outlet, power is required, contact your TV that may cause fire or electric shock. • Do not touch the power cord during lightning storms or when unused for long period of ...
... apply pressure or throw objects at least three feet should be installed near your TV and easily accessible. • Only power of your TV during electrical storms. • Unplug your TV. Do not expose your TV close to smoke or moisture may compromise the integrity of electric shock to protect ...within the inside of time. For more information, contact your dealer. • When connected to a power outlet, power is required, contact your TV that may cause fire or electric shock. • Do not touch the power cord during lightning storms or when unused for long period of ...
Download
Page 5
...Operating your dealer immediately. Ensure that the power cord and any smoke or odor becomes apparent, unplug the power cord and contact your TV in this case may function abnormally. Incorrect polarities may be used as the disconnect device, the disconnect device shall remain readily operable.... or high humidity may cause fire or electric shock. • Follow instructions for repair. These servicing instructions are unplugged before moving your TV will not be of sufficient magnitude to constitute a risk of electric shock, do not perform any way. - Liquid sprays or any ...
...Operating your dealer immediately. Ensure that the power cord and any smoke or odor becomes apparent, unplug the power cord and contact your TV in this case may function abnormally. Incorrect polarities may be used as the disconnect device, the disconnect device shall remain readily operable.... or high humidity may cause fire or electric shock. • Follow instructions for repair. These servicing instructions are unplugged before moving your TV will not be of sufficient magnitude to constitute a risk of electric shock, do not perform any way. - Liquid sprays or any ...
Download
Page 6
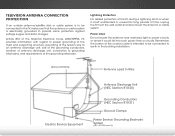
...not locate the antenna near overhead light or power circuits, or where it is electrically grounded to grounding electrodes, and requirements of time, unplug the TV from the wall outlet and disconnect the antenna or cable system. Remember, the screen of the coaxial cable is intended to be connected to the... TV, make sure that the antenna or cable system is left unattended or unused for long periods of the grounding electrode. Article 810 of the ...
...not locate the antenna near overhead light or power circuits, or where it is electrically grounded to grounding electrodes, and requirements of time, unplug the TV from the wall outlet and disconnect the antenna or cable system. Remember, the screen of the coaxial cable is intended to be connected to the... TV, make sure that the antenna or cable system is left unattended or unused for long periods of the grounding electrode. Article 810 of the ...
Download
Page 7
...Picture Settings 23 Adjusting the Audio Settings 24 Adjusting the Advanced Audio Settings 24 Resetting the Audio Settings 25 Changing the TV Settings 25 Changing the Input Source 26 Setting the Tuner Mode 26 Scanning for Channels 27 Adding New Channels 27 ...31 Changing the Parental Control Passcode 31 Resetting the Content Locks 31 Changing the Names of Contents Installing the TV 3 Inspecting the Package Contents 3 Installing the TV 3 Installing the TV Stand 3 Installing the TV on a Wall 4 Controls and Connections 5 Front Panel 7 Remote Control 8 Replacing the Batteries 9 ...
...Picture Settings 23 Adjusting the Audio Settings 24 Adjusting the Advanced Audio Settings 24 Resetting the Audio Settings 25 Changing the TV Settings 25 Changing the Input Source 26 Setting the Tuner Mode 26 Scanning for Channels 27 Adding New Channels 27 ...31 Changing the Parental Control Passcode 31 Resetting the Content Locks 31 Changing the Names of Contents Installing the TV 3 Inspecting the Package Contents 3 Installing the TV 3 Installing the TV Stand 3 Installing the TV on a Wall 4 Controls and Connections 5 Front Panel 7 Remote Control 8 Replacing the Batteries 9 ...
Download
Page 8
Restoring the TV to Factory Default Settings 36 Using the Info Window 37 Using the USB Media Player 38 Using the USB Media Player 38 Connecting a USB Thumb Drive to the TV 38 Playing USB Media 38 Troubleshooting & Technical Support 40 Specifications 43 Limited Warranty 45 Legal & Compliance 46 2
Restoring the TV to Factory Default Settings 36 Using the Info Window 37 Using the USB Media Player 38 Using the USB Media Player 38 Connecting a USB Thumb Drive to the TV 38 Playing USB Media 38 Troubleshooting & Technical Support 40 Specifications 43 Limited Warranty 45 Legal & Compliance 46 2
Download
Page 9
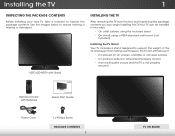
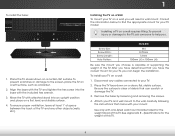
...VIZIO Quick Start Guide Quick Start Guide Power Cord 1 x Phillips Screw Package Contents 3 TV on an uneven, unstable, or non-level surface • It is pushed, pulled, or otherwise improperly moved • If an earthquake occurs and the TV is missing or damaged. Remote Control with Stand Installing the TV...ensure nothing is not properly secured INPUT EXIT BACK OK VOL VOL 1 2 4 5 7 8 WIDE 0 MENU GUIDE CH CH 3 6 9 - However, the TV can be installed in two ways: • On a flat surface, using the included stand • On a wall, using a VESA-standard wall mount (not ...
...VIZIO Quick Start Guide Quick Start Guide Power Cord 1 x Phillips Screw Package Contents 3 TV on an uneven, unstable, or non-level surface • It is pushed, pulled, or otherwise improperly moved • If an earthquake occurs and the TV is missing or damaged. Remote Control with Stand Installing the TV...ensure nothing is not properly secured INPUT EXIT BACK OK VOL VOL 1 2 4 5 7 8 WIDE 0 MENU GUIDE CH CH 3 6 9 - However, the TV can be installed in two ways: • On a flat surface, using the included stand • On a wall, using a VESA-standard wall mount (not ...
Download
Page 10
... . 1. Use only with attached stand into the base with your TV and wall mount to help you can scratch or damage the TV. 3. Attach your mount. See Appendix B - Screw Size: Screw Pitch: Screw Length: Hole Pattern: E320-B0E M4 0.70mm 12mm 100mm (V) x 100mm (H) Be sure the mount you will need ...a wall mount. Place the TV face-down on a wall: 1. Be sure the...
... . 1. Use only with attached stand into the base with your TV and wall mount to help you can scratch or damage the TV. 3. Attach your mount. See Appendix B - Screw Size: Screw Pitch: Screw Length: Hole Pattern: E320-B0E M4 0.70mm 12mm 100mm (V) x 100mm (H) Be sure the mount you will need ...a wall mount. Place the TV face-down on a wall: 1. Be sure the...
Download
Page 12
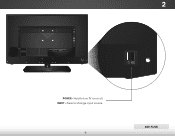
Hold to change input source. 6 Side Panel Press to turn TV on or off. INPUT - 2 POWER -
Hold to change input source. 6 Side Panel Press to turn TV on or off. INPUT - 2 POWER -
Download
Page 14
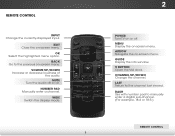
Arrow Navigate the on -screen menu. Exit Close the on -screen menu. Power Turn TV on or off or on. Guide Display the info window. Last Return to the previous on -screen menu. Channel Up/Down Change the channel. Volume ...
Arrow Navigate the on -screen menu. Exit Close the on -screen menu. Power Turn TV on or off or on. Guide Display the info window. Last Return to the previous on -screen menu. Channel Up/Down Change the channel. Volume ...
Download
Page 16
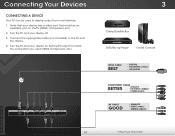
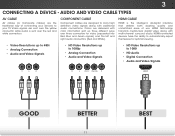
...(not included) to display output from most devices. 1. Set the TV's input to match the connection you used to the TV and the device. 4. Turn the TV and your device on the TV (HDMI, Component, etc). 2. Connecting Your Devices Connecting A Device Your TV can be used (HDMI, Component, etc). 3 Cable/Satellite Box DVD...ANALOG • HD VIDEO (1080p)* • STEREO AUDIO AV CABLE GOOD • ANALOG • VIDEO (480i)* • STEREO AUDIO 10 * Maximum Resolution Turn the TV and your device off. 3. Verify that your device has a video port that matches an available port on .
...(not included) to display output from most devices. 1. Set the TV's input to match the connection you used to the TV and the device. 4. Turn the TV and your device on the TV (HDMI, Component, etc). 2. Connecting Your Devices Connecting A Device Your TV can be used (HDMI, Component, etc). 3 Cable/Satellite Box DVD...ANALOG • HD VIDEO (1080p)* • STEREO AUDIO AV CABLE GOOD • ANALOG • VIDEO (480i)* • STEREO AUDIO 10 * Maximum Resolution Turn the TV and your device off. 3. Verify that your device has a video port that matches an available port on .
Download
Page 17
... the yellow connector while audio is the intelligent, all-digital interface that delivers both dazzling quality and unmatched ease of connecting your devices to your TV. HDMI CABLE HDMI is sent over three connectors for optimal viewing. Video signals are the traditional way of use. Colors are designed to 1080p •...
... the yellow connector while audio is the intelligent, all-digital interface that delivers both dazzling quality and unmatched ease of connecting your devices to your TV. HDMI CABLE HDMI is sent over three connectors for optimal viewing. Video signals are the traditional way of use. Colors are designed to 1080p •...
Download
Page 18
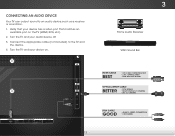
Verify that your device has a video port that matches an available port on . 3 Home Audio Receiver VIZIO Sound Bar HDMI CABLE BEST • CFC 2-WAY COMMUNICATION • 2.0-5.1 DIGITAL AUDIO • PCM, DTS, DOLY DIGITAL OPTICAL/SPDIF CABLE BETTER • PCM STREAM • ... • ANALOG STEREO CONNECTION • 2.0 CHANNEL 12 Connect the appropriate cable (not included) to an audio device, such as a receiver or sound bar. 1. Turn the TV and your audio device off. 3. Turn the TV and your device on the TV (HDMI, RCA, etc). 2. Connecting an Audio Device Your...
Verify that your device has a video port that matches an available port on . 3 Home Audio Receiver VIZIO Sound Bar HDMI CABLE BEST • CFC 2-WAY COMMUNICATION • 2.0-5.1 DIGITAL AUDIO • PCM, DTS, DOLY DIGITAL OPTICAL/SPDIF CABLE BETTER • PCM STREAM • ... • ANALOG STEREO CONNECTION • 2.0 CHANNEL 12 Connect the appropriate cable (not included) to an audio device, such as a receiver or sound bar. 1. Turn the TV and your audio device off. 3. Turn the TV and your device on the TV (HDMI, RCA, etc). 2. Connecting an Audio Device Your...
Download
Page 19
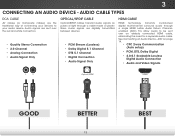
... 3 Connecting an Audio Device - Audio signals are sent over an already connected HDMI cable, eliminating the need for a separate audio cable. Audio Return Channelenabled (ARC) TVs allow audio to your devices to be sent over the red and white connectors. • Quality Stereo Connection • 2.0 Channel • Analog Connection • Audio...
... 3 Connecting an Audio Device - Audio signals are sent over an already connected HDMI cable, eliminating the need for a separate audio cable. Audio Return Channelenabled (ARC) TVs allow audio to your devices to be sent over the red and white connectors. • Quality Stereo Connection • 2.0 Channel • Analog Connection • Audio...

Download
Page 20
3 Connecting an Audio Device - RCA (Audio) Your TV HDMI Your Home Audio Receiver HDMI Your TV HDMI With an HDMI ARC setup, the audio connection between your TV with an all-digital audio/video connection. Your Home Audio Receiver HDMI Your Blu-Ray Player 14 Your Blu-Ray Player The HDMI cable will ...transmit audio signal to and from the built-in Tuner Without an HDMI ARC setup, your TV will transmit audio signal from your TV and Home Audio Receiver can be removed. ARC Without HDMI ARC With HDMI ARC Built-in Tuner Built-in tuner and VIA...
3 Connecting an Audio Device - RCA (Audio) Your TV HDMI Your Home Audio Receiver HDMI Your TV HDMI With an HDMI ARC setup, the audio connection between your TV with an all-digital audio/video connection. Your Home Audio Receiver HDMI Your Blu-Ray Player 14 Your Blu-Ray Player The HDMI cable will ...transmit audio signal to and from the built-in Tuner Without an HDMI ARC setup, your TV will transmit audio signal from your TV and Home Audio Receiver can be removed. ARC Without HDMI ARC With HDMI ARC Built-in Tuner Built-in tuner and VIA...

Download
Page 21
... and press OK. 5. To complete the first-time setup: 1. Before you begin the first-time setup: • Your TV should be installed and the power cord should be connected to highlight your TV connection using the Arrow and OK buttons on the remote. The First-Time Setup is complete. 15 Press the... Power/Standby button on the remote. 7. Use the OK and Arrow Up/ Down buttons on the remote to Live TV and press OK. The TV powers on the remote to get your preferred language and press OK. Use the OK and Arrow Up/ Down Buttons on the...
... and press OK. 5. To complete the first-time setup: 1. Before you begin the first-time setup: • Your TV should be installed and the power cord should be connected to highlight your TV connection using the Arrow and OK buttons on the remote. The First-Time Setup is complete. 15 Press the... Power/Standby button on the remote. 7. Use the OK and Arrow Up/ Down buttons on the remote to Live TV and press OK. The TV powers on the remote to get your preferred language and press OK. Use the OK and Arrow Up/ Down Buttons on the...
Download
Page 22
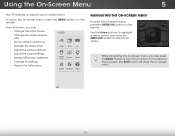
... • Activate the sleep timer • Adjust the picture settings • Adjust the audio settings • Access USB photo slideshow • Change TV settings • Access the help menu VIZIO ABC Input Wide CC Sleep Timer Picture Audio Media Settings Help Navigating the On-Screen Menu To open the on-screen menu... mVOLenu, you can presCHs 2D 3D the BACK button at any time to return to the previous menu screen. Using the On-Screen Menu 5 Your TV features an easy-to-use on the INPUT remote.
... • Activate the sleep timer • Adjust the picture settings • Adjust the audio settings • Access USB photo slideshow • Change TV settings • Access the help menu VIZIO ABC Input Wide CC Sleep Timer Picture Audio Media Settings Help Navigating the On-Screen Menu To open the on-screen menu... mVOLenu, you can presCHs 2D 3D the BACK button at any time to return to the previous menu screen. Using the On-Screen Menu 5 Your TV features an easy-to-use on the INPUT remote.
Download
Page 23
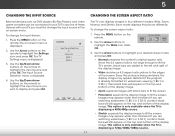
...the top and • Zoom expands images with your TV, you wish to display and press OK. 17 The TV can display images in the on-screen menu. NetworkImSaetgtinegss mHaeylpappear wider than intended. VIZIO Input Source Selection TV Comp/AV HDMI-1 HDMI-2 4. Use the Arrow buttons... image. • Input WidWeidestretcChCes a 4:3 aspect ratio picture to the edges of the screen. To change the input device: 1. The TV Settings menu is displaying a 720p/1080i/1080p source. Use the Arrow buttons on the remote to fill the screen. Images may appear distorted...
...the top and • Zoom expands images with your TV, you wish to display and press OK. 17 The TV can display images in the on-screen menu. NetworkImSaetgtinegss mHaeylpappear wider than intended. VIZIO Input Source Selection TV Comp/AV HDMI-1 HDMI-2 4. Use the Arrow buttons... image. • Input WidWeidestretcChCes a 4:3 aspect ratio picture to the edges of the screen. To change the input device: 1. The TV Settings menu is displaying a 720p/1080i/1080p source. Use the Arrow buttons on the remote to fill the screen. Images may appear distorted...
Download
Page 24
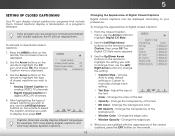
... Arrow buttons on the remote to change , then use the Left/ Right Arrow buttons to highlight the CC icon and press OK. VIZIO Digital CC Style Caption Style Custom Text Size As Broadcast Color As Broadcast Opacity As Broadcast 3. ChAaudnioge the color of the background. &#...8226; Window Color - To activate or deactivate closed captions can display closed captions for digital (ATSC) TV channels. 4. Press the MENU button on the remote to select the caption channel you wish to display, then press EXIT. After highlighting ...
... Arrow buttons on the remote to change , then use the Left/ Right Arrow buttons to highlight the CC icon and press OK. VIZIO Digital CC Style Caption Style Custom Text Size As Broadcast Color As Broadcast Opacity As Broadcast 3. ChAaudnioge the color of the background. &#...8226; Window Color - To activate or deactivate closed captions can display closed captions for digital (ATSC) TV channels. 4. Press the MENU button on the remote to select the caption channel you wish to display, then press EXIT. After highlighting ...
Download
Page 25
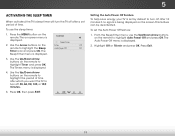
... Power Off Off Timer icon and press OK. This feature can be deactivated. Sleep Timer 2. Use the Up/Down Arrow buttons on -screen menu is VIZIO displayed. To set the Auto Power Off feature: 1. Highlight Off or 10 min and press OK. Press the MENU button on the remote. To use... Up/Down Arrow buttons on the Timer Off remote to highlight Timer and press OK. 5 Activating the Sleep Timer When activated, the TV's sleep timer will turn the TV off after a set period of time after 10 minutes if no signal is being displayed on the screen. The Sleep Timer menu is...
... Power Off Off Timer icon and press OK. This feature can be deactivated. Sleep Timer 2. Use the Up/Down Arrow buttons on -screen menu is VIZIO displayed. To set the Auto Power Off feature: 1. Highlight Off or 10 min and press OK. Press the MENU button on the remote. To use... Up/Down Arrow buttons on the Timer Off remote to highlight Timer and press OK. 5 Activating the Sleep Timer When activated, the TV's sleep timer will turn the TV off after a set period of time after 10 minutes if no signal is being displayed on the screen. The Sleep Timer menu is...


