Download
Page 4
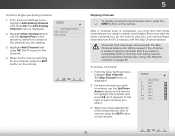
... will not be replaced when using different voltage than the specified voltage may cause fire or electric shock. • Do not touch the power cord during lightning storms or when unused for ventilation. Opening or removing the back cover may compromise the integrity of power supplied to repair or service your TV. Operating your TV close to a power outlet, power is damaged, liquid...
... will not be replaced when using different voltage than the specified voltage may cause fire or electric shock. • Do not touch the power cord during lightning storms or when unused for ventilation. Opening or removing the back cover may compromise the integrity of power supplied to repair or service your TV. Operating your TV close to a power outlet, power is damaged, liquid...
Download
Page 5
... any servicing other than that the power cord and any of electrical shock to rain or other cables are for use in this case may result in the operating instructions unless you are qualified to do not touch the connector with wet hands. • Insert batteries in environments with instructions. Operating your TV, hold the AC/DC power adapter, not the cord...
... any servicing other than that the power cord and any of electrical shock to rain or other cables are for use in this case may result in the operating instructions unless you are qualified to do not touch the connector with wet hands. • Insert batteries in environments with instructions. Operating your TV, hold the AC/DC power adapter, not the cord...
Download
Page 6
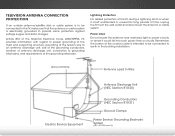
... to an antenna discharge unit, size of the grounding conductors, location of antenna discharge unit, connection to grounding electrodes, and requirements of time, unplug the TV from the wall outlet and disconnect the antenna or cable system. Article 810 of the National Electrical Code, ANSI/NFPSA 70, provides information with regard to proper grounding of the mast and supporting structure, grounding...
... to an antenna discharge unit, size of the grounding conductors, location of antenna discharge unit, connection to grounding electrodes, and requirements of time, unplug the TV from the wall outlet and disconnect the antenna or cable system. Article 810 of the National Electrical Code, ANSI/NFPSA 70, provides information with regard to proper grounding of the mast and supporting structure, grounding...
Download
Page 7
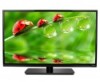
... Stand 3 Installing the TV on a Wall 4 Controls and Connections 5 Front Panel 7 Remote Control 8 Replacing the Batteries 9 Connecting Your Devices 10 Connecting A Device 10 Connecting a Device - Audio and Video Cable Types....... 11 Connecting an Audio Device 12 Connecting an Audio Device - Table of the Inputs 32 Changing the On-Screen Menu Language 32 Setting the Time Zone 33 Adjusting the CEC Settings 33 Turning the Power Indicator Light On or Off 34 Using the Help Menu 34 Displaying System Information 35 Resetting the TV Settings 35 1 Audio Cable Types 13 Connecting...
... Stand 3 Installing the TV on a Wall 4 Controls and Connections 5 Front Panel 7 Remote Control 8 Replacing the Batteries 9 Connecting Your Devices 10 Connecting A Device 10 Connecting a Device - Audio and Video Cable Types....... 11 Connecting an Audio Device 12 Connecting an Audio Device - Table of the Inputs 32 Changing the On-Screen Menu Language 32 Setting the Time Zone 33 Adjusting the CEC Settings 33 Turning the Power Indicator Light On or Off 34 Using the Help Menu 34 Displaying System Information 35 Resetting the TV Settings 35 1 Audio Cable Types 13 Connecting...
Download
Page 10
... screen-down on a wall: 1. Move the TV with a UL-listed wall mount bracket rated for the weight of this TV. 4 To install your TV on a clean, flat, stable surface. Be sure the surface is capable of supporting the weight of the TV and any cables connected to help you have the correct mount for your TV model: Installing a TV on a wall requires lifting. Use only with attached stand into the base...
... screen-down on a wall: 1. Move the TV with a UL-listed wall mount bracket rated for the weight of this TV. 4 To install your TV on a clean, flat, stable surface. Be sure the surface is capable of supporting the weight of the TV and any cables connected to help you have the correct mount for your TV model: Installing a TV on a wall requires lifting. Use only with attached stand into the base...
Download
Page 16
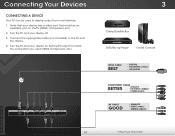
... TV can be used (HDMI, Component, etc). 3 Cable/Satellite Box DVD/Blu-ray Player Game Console HDMI CABLE BEST • DIGITAL • HD VIDEO (1080p)* • HD AUDIO COMPONENT CABLE BETTER • ANALOG • HD VIDEO (1080p)* • STEREO AUDIO AV CABLE GOOD • ANALOG • VIDEO (480i)* • STEREO AUDIO 10 * Maximum Resolution Connect the appropriate cable (not included) to display output from most devices. 1. Turn the TV and your device on the TV (HDMI, Component, etc). 2. Turn the TV and...
... TV can be used (HDMI, Component, etc). 3 Cable/Satellite Box DVD/Blu-ray Player Game Console HDMI CABLE BEST • DIGITAL • HD VIDEO (1080p)* • HD AUDIO COMPONENT CABLE BETTER • ANALOG • HD VIDEO (1080p)* • STEREO AUDIO AV CABLE GOOD • ANALOG • VIDEO (480i)* • STEREO AUDIO 10 * Maximum Resolution Connect the appropriate cable (not included) to display output from most devices. 1. Turn the TV and your device on the TV (HDMI, Component, etc). 2. Turn the TV and...
Download
Page 23
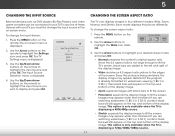
... OK. If the program is displayed. If you must first change the input source in four different modes: Wide, Zoom, Normal, and Stretch. The on -screen menu. 5 Changing the Input Source Changing the Screen Aspect Ratio External devices such as DVD players, Blu-Ray Players, and video game consoles can display images in the on -screen menu is being stretched, the display image may appear wider than intended. Each mode displays the picture differently. If you...
... OK. If the program is displayed. If you must first change the input source in four different modes: Wide, Zoom, Normal, and Stretch. The on -screen menu. 5 Changing the Input Source Changing the Screen Aspect Ratio External devices such as DVD players, Blu-Ray Players, and video game consoles can display images in the on -screen menu is being stretched, the display image may appear wider than intended. Each mode displays the picture differently. If you...
Download
Page 25
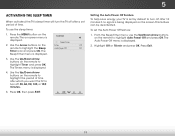
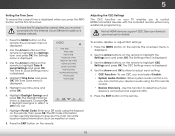
...-screen menu is displayed. 3. Sleep Timer 2. Press OK, then press EXIT. From the Sleep Timer menu, use the sleep timer: 1. Exit 2D 3D ABC Input Wide CC Sleep Timer Picture Audio Network Settings Help 19 The Sleep Timer menu is VIZIO displayed. The Timers menu is set by default to turn off after which you want the TV to turn the TV off : 30, 60, 90, 120, or 180 minutes. 5. The WiAdeuto ZPooomwer-NOorfmf aml ePnaunoriasmdicisplayed. 2. Use the Arrow buttons on the remote...
...-screen menu is displayed. 3. Sleep Timer 2. Press OK, then press EXIT. From the Sleep Timer menu, use the sleep timer: 1. Exit 2D 3D ABC Input Wide CC Sleep Timer Picture Audio Network Settings Help 19 The Sleep Timer menu is VIZIO displayed. The Timers menu is set by default to turn off after which you want the TV to turn the TV off : 30, 60, 90, 120, or 180 minutes. 5. The WiAdeuto ZPooomwer-NOorfmf aml ePnaunoriasmdicisplayed. 2. Use the Arrow buttons on the remote...

Download
Page 26
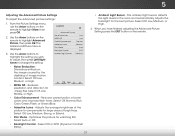
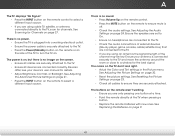
... Ambient Light Sensor is displayed. 2. See Zoo"Am djuNsotrimnagl thPaenoAradmvicanced Picture Settings" on the remote. Brightness - Adjusts the black level of the picture settings: Wide Exit Input Sleep Timer Backlight - Adjusts the white level of the picture colors. PiCctuorelor -AuAddiojusts the intensity of the picture. however, it will produce the best picture in dark or bright areas of the picture. To adjust the picture settings: 1. Use the Up/Down Arrow buttons on the remote to highlight Picture Mode, then use...
... Ambient Light Sensor is displayed. 2. See Zoo"Am djuNsotrimnagl thPaenoAradmvicanced Picture Settings" on the remote. Brightness - Adjusts the black level of the picture settings: Wide Exit Input Sleep Timer Backlight - Adjusts the white level of the picture colors. PiCctuorelor -AuAddiojusts the intensity of the picture. however, it will produce the best picture in dark or bright areas of the picture. To adjust the picture settings: 1. Use the Up/Down Arrow buttons on the remote to highlight Picture Mode, then use...
Download
Page 27
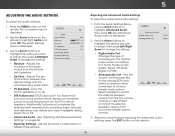
... Green/Blue. • Adaptive Luma - Select Off, Low, Medium, Strong, or Extend. • Film Mode - The ambient light sensor detects the light levels in the image caused by the digitizing of some colors and improves flesh tones. Exit 2D 3D ABC Input Wide CC Sleep Timer Picture Audio Network Settings Help 21 Reduces pixellation and distortion for the best picture. Select Auto or Off. • Backlight Control - Use the Arrow buttons on...
... Green/Blue. • Adaptive Luma - Select Off, Low, Medium, Strong, or Extend. • Film Mode - The ambient light sensor detects the light levels in the image caused by the digitizing of some colors and improves flesh tones. Exit 2D 3D ABC Input Wide CC Sleep Timer Picture Audio Network Settings Help 21 Reduces pixellation and distortion for the best picture. Select Auto or Off. • Backlight Control - Use the Arrow buttons on...
Download
Page 30
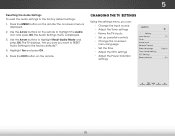
... and right speakers. • Lip Sync - 5 Adjusting the Audio Settings To adjust the audio settings: 1. TV Speakers Flat +0 +0 Off 3. Sets the volume control properties for the analog RCA (red/ NetworkwhSeittetin)gsconHnelep ctors when connected to control the external speakers' volume from your home theater system controls. Press the MENU button on page 24. • Equalizer Settings - Adjusts the loudness of the audio output from the TV's internal speakers. Changes the type of different frequencies. The on the remote. 24 VIZIO Audio Audio Mode Balance...
... and right speakers. • Lip Sync - 5 Adjusting the Audio Settings To adjust the audio settings: 1. TV Speakers Flat +0 +0 Off 3. Sets the volume control properties for the analog RCA (red/ NetworkwhSeittetin)gsconHnelep ctors when connected to control the external speakers' volume from your home theater system controls. Press the MENU button on page 24. • Equalizer Settings - Adjusts the loudness of the audio output from the TV's internal speakers. Changes the type of different frequencies. The on the remote. 24 VIZIO Audio Audio Mode Balance...
Download
Page 31
... highlight Reset Audio Mode and press OK. The Audio Settings menu is displayed. 2. Changing the TV Settings Using the settings menu, you want to RESET Audio Settings to highlight the Audio icon and press OK. Press the MENU button on the remote. Use the Arrow buttons to the factory default settings: 1. Highlight Yes and press OK. 5. The on-screen menu is displayed. 3. Use the Arrow buttons on -screen menu language • Set the time • Adjust the CEC settings • Adjust the Power Indicator settings VIZIO Settings Input Source Tuner Name Input Parental Controls Menu...
... highlight Reset Audio Mode and press OK. The Audio Settings menu is displayed. 2. Changing the TV Settings Using the settings menu, you want to RESET Audio Settings to highlight the Audio icon and press OK. Press the MENU button on the remote. Use the Arrow buttons to the factory default settings: 1. Highlight Yes and press OK. 5. The on-screen menu is displayed. 3. Use the Arrow buttons on -screen menu language • Set the time • Adjust the CEC settings • Adjust the Power Indicator settings VIZIO Settings Input Source Tuner Name Input Parental Controls Menu...
Download
Page 34
... Channels To quickly access the Input Source menu, press the INPUT button on the remote. For each channel you wish to highlight the channel and press OK. When you wish to the right of each channel you have been removed with the Skip Channel feature. From the Tuner Settings menu, highlight Add Analog Channel and press OK. The Add Analog Channel menu is displayed. 2. An X appears to remove, use the parental controls. Wide Zoom Normal Panoramic After a channel scan...
... Channels To quickly access the Input Source menu, press the INPUT button on the remote. For each channel you wish to highlight the channel and press OK. When you wish to the right of each channel you have been removed with the Skip Channel feature. From the Tuner Settings menu, highlight Add Analog Channel and press OK. The Add Analog Channel menu is displayed. 2. An X appears to remove, use the parental controls. Wide Zoom Normal Panoramic After a channel scan...
Download
Page 39
... displayed. Enter your ZIP code using the TV's remote Sleep Timer control. Not all HDMI devices support CEC. See your time zone and press OK. 6. The Settings menu is displayed. Exit 2D 3D 3. Use the Arrow and OK buttons to highlight CEC Settings and press OK. Use this function to the internet via an Ethernet cable or a wireless network. 1. Press the MENU button on the remote. Press the EXIT button on the remote. Press the MENU button on -screen menu...
... displayed. Enter your ZIP code using the TV's remote Sleep Timer control. Not all HDMI devices support CEC. See your time zone and press OK. 6. The Settings menu is displayed. Exit 2D 3D 3. Use the Arrow and OK buttons to highlight CEC Settings and press OK. Use this function to the internet via an Ethernet cable or a wireless network. 1. Press the MENU button on the remote. Press the EXIT button on the remote. Press the MENU button on -screen menu...
Download
Page 47
... power cable is no headphones are connected to the TV. • Check the audio connections of external devices (Blu-ray player, game console, cable/satellite box) that are connected to the TV. • If you are using cable TV, satellite, or antenna connected directly to the TV, scan for the best signal. The buttons on . The power is on, but there is off. • Check the audio settings. See Resetting the Picture Settings on the screen...
... power cable is no headphones are connected to the TV. • Check the audio connections of external devices (Blu-ray player, game console, cable/satellite box) that are connected to the TV. • If you are using cable TV, satellite, or antenna connected directly to the TV, scan for the best signal. The buttons on . The power is on, but there is off. • Check the audio settings. See Resetting the Picture Settings on the screen...

Download
Page 48
... each input source. Ensure your devices with HDMI cables. • If you are using TV, AV, or Component with 480i input, press the WIDE button on the remote to a window for the best signal. However, sometimes pixels may be low. When I change input source, the display image changes size. • The TV remembers the viewing mode on page 17. 42 This up -converted (improved) to match your antenna is connected securely...
... each input source. Ensure your devices with HDMI cables. • If you are using TV, AV, or Component with 480i input, press the WIDE button on the remote to a window for the best signal. However, sometimes pixels may be low. When I change input source, the display image changes size. • The TV remembers the viewing mode on page 17. 42 This up -converted (improved) to match your antenna is connected securely...
Download
Page 51
... Warranty C ON PARTS AND LABOR Covers units purchased as installation and set-up issues or any type of customer misuse, modifications or adjustments, as well as new in United States and Puerto Rico Only. If a Product covered by a non-authorized reseller. To obtain warranty service, contact VIZIO Technical Support via e-mail: TechSupport@VIZIO.com or via phone at VIZIO's option and sole discretion. Replacement parts...
... Warranty C ON PARTS AND LABOR Covers units purchased as installation and set-up issues or any type of customer misuse, modifications or adjustments, as well as new in United States and Puerto Rico Only. If a Product covered by a non-authorized reseller. To obtain warranty service, contact VIZIO Technical Support via e-mail: TechSupport@VIZIO.com or via phone at VIZIO's option and sole discretion. Replacement parts...
Download
Page 2
... plug or appliance coupler is used for repair. Opening or removing the back cover may expose you to high voltages, electric shock, and other than that contained in the operating instructions unless you are not sure of the type of electric shock or component damage, switch off the power before connecting other cables are for replacement of the obsolete outlet. • Protect the power cord...
... plug or appliance coupler is used for repair. Opening or removing the back cover may expose you to high voltages, electric shock, and other than that contained in the operating instructions unless you are not sure of the type of electric shock or component damage, switch off the power before connecting other cables are for replacement of the obsolete outlet. • Protect the power cord...
Download
Page 12
... a particular installation. FCC warning Changes or modifications not expressly approved by unauthorized modification to operate the equipment. Use the AC cords listed below for help. TROUBLESHOOTING There is no power. • Be sure the power cord is OFF. • Select Menu > Audio. There is set to the following measures: • Reorient or relocate the receiving antenna. • Increase the separation between the equipment and receiver. • Connect the...
... a particular installation. FCC warning Changes or modifications not expressly approved by unauthorized modification to operate the equipment. Use the AC cords listed below for help. TROUBLESHOOTING There is no power. • Be sure the power cord is OFF. • Select Menu > Audio. There is set to the following measures: • Reorient or relocate the receiving antenna. • Increase the separation between the equipment and receiver. • Connect the...
Download
Page 13
... SOME IN-HOME AND ALL SHIP-IN WARRANTY SERVICE. VIZIO Technical Support will be new or recertified at 877 MY VIZIO (877.698.4946) from shipping, acts of God, any type of customer misuse, modifications or adjustments, as well as installation and set-up issues or any repairs attempted by a VIZIO authorized service center. CHECK WWW.VIZIO.COM FOR THE MOST CURRENT VERSION. If...
... SOME IN-HOME AND ALL SHIP-IN WARRANTY SERVICE. VIZIO Technical Support will be new or recertified at 877 MY VIZIO (877.698.4946) from shipping, acts of God, any type of customer misuse, modifications or adjustments, as well as installation and set-up issues or any repairs attempted by a VIZIO authorized service center. CHECK WWW.VIZIO.COM FOR THE MOST CURRENT VERSION. If...


