Download
Page 3
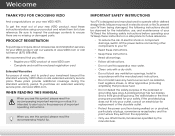
...To get the most out of important operating instructions. Important Safety Instructions Your TV is intended to alert you see this Manual When you to your TV. • Read these instructions. • Keep these instructions before using your product and retain them for ... services for future reference. These plans provide additional coverage during the standard warranty period. When you either: • Register your VIZIO product at www.VIZIO.com • Complete and mail the enclosed registration card Extended Warranties For peace of the polarized or grounding-type plug. When ...
...To get the most out of important operating instructions. Important Safety Instructions Your TV is intended to alert you see this Manual When you to your TV. • Read these instructions. • Keep these instructions before using your product and retain them for ... services for future reference. These plans provide additional coverage during the standard warranty period. When you either: • Register your VIZIO product at www.VIZIO.com • Complete and mail the enclosed registration card Extended Warranties For peace of the polarized or grounding-type plug. When ...
Download
Page 14
... Go to the previous on or off or on -screen menu. V Button Open the VIA dock. Number Pad Manually enter a channel. Guide Display the info window. Menu Display the on . Last Return to manually enter a digital sub-channel. (For example, 18-4 or 18-5.) Remote Control 8 Volume Up/Down Increase or decrease loudness...
... Go to the previous on or off or on -screen menu. V Button Open the VIA dock. Number Pad Manually enter a channel. Guide Display the info window. Menu Display the on . Last Return to manually enter a digital sub-channel. (For example, 18-4 or 18-5.) Remote Control 8 Volume Up/Down Increase or decrease loudness...
Download
Page 24
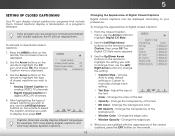
... closed captions: 1. Use the Arrow buttons on the remote to manually change the appearance of the closed captions you wish to see, use the Left/Right Arrow buttons on -screen menu is displayed. 3. VIZIO Digital CC Style Caption Style Custom Text Size As Broadcast Color As..., press the EXIT button on the remote. 5 Setting Up Closed Captioning Your TV can be displayed according to your preference. VIZIO Closed Caption Analog Closed Caption Off Digital Closed Caption Off Digital CC Style As Broadcast Caption channels usually display different languages. The ...
... closed captions: 1. Use the Arrow buttons on the remote to manually change the appearance of the closed captions you wish to see, use the Left/Right Arrow buttons on -screen menu is displayed. 3. VIZIO Digital CC Style Caption Style Custom Text Size As Broadcast Color As..., press the EXIT button on the remote. 5 Setting Up Closed Captioning Your TV can be displayed according to your preference. VIZIO Closed Caption Analog Closed Caption Off Digital Closed Caption Off Digital CC Style As Broadcast Caption channels usually display different languages. The ...

Download
Page 26
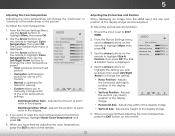
...and press OK. Use the Arrow buttons on page 21. When this setting is too high, the picture may be used to manually change each of the picture colors. ContraAsBtC- When this setting is too low, the picture may appear dark. Network Tint -..., Golf, Basketball, and Baseball modes optimize the picture settings for other sports. • Custom picture mode allows you to sharpen non-HD (high definition) content; VIZIO Picture Settings Picture Mode Backlight Brightness Contrast Color Tint Sharpness Custom - + 50 - + 50 - + 50 - + 50 - +0 - +0 More 4. PiCctuorelor ...
...and press OK. Use the Arrow buttons on page 21. When this setting is too high, the picture may be used to manually change each of the picture colors. ContraAsBtC- When this setting is too low, the picture may appear dark. Network Tint -..., Golf, Basketball, and Baseball modes optimize the picture settings for other sports. • Custom picture mode allows you to sharpen non-HD (high definition) content; VIZIO Picture Settings Picture Mode Backlight Brightness Contrast Color Tint Sharpness Custom - + 50 - + 50 - + 50 - + 50 - +0 - +0 More 4. PiCctuorelor ...
Download
Page 28
...) position of the display NetworkimSaetgtineg.s Help • Vertical Position - Blue Gain - Red/Green/Blue Offset - From the Picture Settings menu, VIZIO use the Arrow buttons on the remote to ATV/ HDMI. Use the Arrow buttons to highlight the setting you to highlight More, then press OK...then press OK. Adjusts the width of the display image can be adjusted. The Color Temperature menu is optimized for use the Arrow buttons to manually change the "warmness" or "coolness" of the white areas of the display image. 5. Use the Arrow buttons on the Vertical Size - ...
...) position of the display NetworkimSaetgtineg.s Help • Vertical Position - Blue Gain - Red/Green/Blue Offset - From the Picture Settings menu, VIZIO use the Arrow buttons on the remote to ATV/ HDMI. Use the Arrow buttons to highlight the setting you to highlight More, then press OK...then press OK. Adjusts the width of the display image can be adjusted. The Color Temperature menu is optimized for use the Arrow buttons to manually change the "warmness" or "coolness" of the white areas of the display image. 5. Use the Arrow buttons on the Vertical Size - ...
Download
Page 39
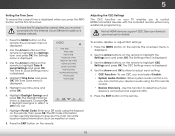
The Settings menu is Wide Zoom Normal Panoramic displayed. 2. Highlight your device's user manual for details. Highlight Daylight Savings and press OK. Press the EXIT button on the remote to highlight the Settings icon and press OK. To enable, ... press OK. Use the Arrow buttons on the remote to give you must select Enable. • System Audio Control - The Time Zone menu is displayed. 2. VIZIO Time Zone Alaska (US) Hawaii (US) Pacific (US, CAN) Mountain (US, CAN) Central (US, CAN) Eastern (US, CAN) Atlantic (CAN) Newfoundland (CAN) Indiana (US) Arizona...
The Settings menu is Wide Zoom Normal Panoramic displayed. 2. Highlight your device's user manual for details. Highlight Daylight Savings and press OK. Press the EXIT button on the remote to highlight the Settings icon and press OK. To enable, ... press OK. Use the Arrow buttons on the remote to give you must select Enable. • System Audio Control - The Time Zone menu is displayed. 2. VIZIO Time Zone Alaska (US) Hawaii (US) Pacific (US, CAN) Mountain (US, CAN) Central (US, CAN) Eastern (US, CAN) Atlantic (CAN) Newfoundland (CAN) Indiana (US) Arizona...
Download
Page 47
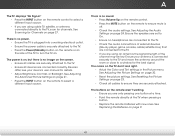
.... The buttons on the remote aren't working electrical outlet. • Ensure the power cable is off. • Check the audio settings. Ensure your device's user manual for Channels on page 27. See Replacing the Batteries on page 24. A The TV displays "No Signal." • Press the INPUT button on the remote...
.... The buttons on the remote aren't working electrical outlet. • Ensure the power cable is off. • Check the audio settings. Ensure your device's user manual for Channels on page 27. See Replacing the Batteries on page 24. A The TV displays "No Signal." • Press the INPUT button on the remote...

Download
Page 5
DOWNLOAD THE FULL USER MANUAL 1 2 Help VIZIO reduce paper waste. You can download the Full User Manual under the Product Downloads section of the TV in the space above or select your TV. Download the Full User Manual for illustrative purposes only. Page shown is for your TV model from the drop down menu. Using a computer, navigate to: http://store.VIZIO.com/support Enter the model number of the Support tab. Actual page content will vary.
DOWNLOAD THE FULL USER MANUAL 1 2 Help VIZIO reduce paper waste. You can download the Full User Manual under the Product Downloads section of the TV in the space above or select your TV. Download the Full User Manual for illustrative purposes only. Page shown is for your TV model from the drop down menu. Using a computer, navigate to: http://store.VIZIO.com/support Enter the model number of the Support tab. Actual page content will vary.
Download
Page 7
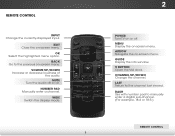
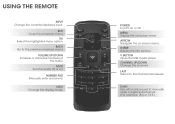
... 0 MENU GUIDE CH CH 3 6 9 - EXIT Close the on -screen menu. OK Select the highlighted menu option. NUMBER PAD Manually enter a channel. POWER Turn TV on or off or on. LAST Return to manually enter a digital sub-channel. (For example, 18-4 or 18-5.) WIDE Change the display mode. ARROW Navigate the on -screen...
... 0 MENU GUIDE CH CH 3 6 9 - EXIT Close the on -screen menu. OK Select the highlighted menu option. NUMBER PAD Manually enter a channel. POWER Turn TV on or off or on. LAST Return to manually enter a digital sub-channel. (For example, 18-4 or 18-5.) WIDE Change the display mode. ARROW Navigate the on -screen...

