

E261VA User Manual
Page 4
.... For more information, contact your TV. A polarized plug has two blades and a third grounding prong. If the provided plug does not fit into the apparatus, the apparatus has been exposed 4 E190VA / E220VA / E260VA / E261VA to smoke. Do not install your outlet, consult an electrician for long ...periods of time. • Refer all instructions. • Do not use caution when moving your TV from the type of the obsolete outlet. • Protect the...
.... For more information, contact your TV. A polarized plug has two blades and a third grounding prong. If the provided plug does not fit into the apparatus, the apparatus has been exposed 4 E190VA / E220VA / E260VA / E261VA to smoke. Do not install your outlet, consult an electrician for long ...periods of time. • Refer all instructions. • Do not use caution when moving your TV from the type of the obsolete outlet. • Protect the...
E261VA User Manual
Page 5
...moisture. - Continued use by qualified service personnel only. To reduce the risk of your TV may cause fire or electric shock. • Follow instructions for repair. E190VA / E220VA / E260VA / E261VA • Do not overload power strips and extension cords. Any other than the specified ...voltage may expose you are qualified to repair your TV is dropped and the housing is exposed to rain or moisture. ...
...moisture. - Continued use by qualified service personnel only. To reduce the risk of your TV may cause fire or electric shock. • Follow instructions for repair. E190VA / E220VA / E260VA / E261VA • Do not overload power strips and extension cords. Any other than the specified ...voltage may expose you are qualified to repair your TV is dropped and the housing is exposed to rain or moisture. ...
E261VA User Manual
Page 6
... an antenna now need a converter box to continue to receive over-the-air TV. Analog-only television sets that the antenna or cable system is needed. E190VA / E220VA / E260VA / E261VA Television Antenna Connection Protection If an outside antenna/satellite dish or cable system is... to be connected to earth in tuner capable of the grounding electrode. Analog-only TVs should continue to work as appropriate: FCC (US Federal ...
... an antenna now need a converter box to continue to receive over-the-air TV. Analog-only television sets that the antenna or cable system is needed. E190VA / E220VA / E260VA / E261VA Television Antenna Connection Protection If an outside antenna/satellite dish or cable system is... to be connected to earth in tuner capable of the grounding electrode. Analog-only TVs should continue to work as appropriate: FCC (US Federal ...
E261VA User Manual
Page 7
... 11 Scanning for New or Additional Channels 11 Scanning for Channels 12 Customizing Channel Names 12 Changing the On-Screen Menu Language 13 Setting the TV's Date and Time 13 Setting the Time Zone 13 Adjusting the Time for Daylight Savings 14 Enabling or Disabling Automatic Date and Time ...Updates 14 Setting the Date and Time 14 Adjusting the TV Settings for Use with A PC 15 Using the Other Menu Settings 16 Navigating the On-Screen Menu 16 Setting the Sleep Timer 16 Viewing a ...
... 11 Scanning for New or Additional Channels 11 Scanning for Channels 12 Customizing Channel Names 12 Changing the On-Screen Menu Language 13 Setting the TV's Date and Time 13 Setting the Time Zone 13 Adjusting the Time for Daylight Savings 14 Enabling or Disabling Automatic Date and Time ...Updates 14 Setting the Date and Time 14 Adjusting the TV Settings for Use with A PC 15 Using the Other Menu Settings 16 Navigating the On-Screen Menu 16 Setting the Sleep Timer 16 Viewing a ...
E261VA User Manual
Page 8
... Control Passcode 27 Resetting the Content Locks 27 Viewing System Info and Resetting to Factory Defaults 28 Displaying System Information 28 Restoring the TV to the Factory Default Settingss 28 Restarting the Setup App 28 Setting Up Closed Captioning 29 Changing the Appearance of Digital Closed Captions...34 Type of Service 34 Limitations and Exclusions 34 Personal Data 34 Zero Bright Pixel Defect Guarantee 34 8 E190VA / E220VA / E260VA / E261VA Legal & Compliance 35 FCC Class B Radio Interference Statement 35 Notice...35 FCC warning 35 Caution 35 Open Source Software Notice 35
... Control Passcode 27 Resetting the Content Locks 27 Viewing System Info and Resetting to Factory Defaults 28 Displaying System Information 28 Restoring the TV to the Factory Default Settingss 28 Restarting the Setup App 28 Setting Up Closed Captioning 29 Changing the Appearance of Digital Closed Captions...34 Type of Service 34 Limitations and Exclusions 34 Personal Data 34 Zero Bright Pixel Defect Guarantee 34 8 E190VA / E220VA / E260VA / E261VA Legal & Compliance 35 FCC Class B Radio Interference Statement 35 Notice...35 FCC warning 35 Caution 35 Open Source Software Notice 35
E261VA User Manual
Page 9
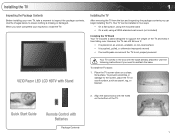
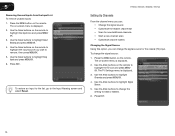
..., such as carpet, rug, or blanket. 2. Quick Start Guide Remote Control with Batteries Package Contents 1 When you need to reattach the base. Your TV can be installed in the box with the base already attached. Align the stand hooks with the holes on a clean, flat surface. To prevent scratches... or damage to ensure nothing is not properly secured VIZIO Razor LED LCD HDTV with Stand Your TV comes in two ways: • On a flat surface, using the included stand • On a wall, using a VESA-standard ...
..., such as carpet, rug, or blanket. 2. Quick Start Guide Remote Control with Batteries Package Contents 1 When you need to reattach the base. Your TV can be installed in the box with the base already attached. Align the stand hooks with the holes on a clean, flat surface. To prevent scratches... or damage to ensure nothing is not properly secured VIZIO Razor LED LCD HDTV with Stand Your TV comes in two ways: • On a flat surface, using the included stand • On a wall, using a VESA-standard ...
E261VA User Manual
Page 10
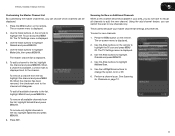
... correct mount for your TV, you . 3. Place the TV face-down on a wall requires lifting. Consult... damage the TV. To prevent injury or damage to the TV, ask someone to find the appropriate mount for your TV model: Screw... a TV on a clean, flat, stable surface. Use only with your TV and wall mount to your TV on the stand until it away from the TV. 4.... back of the TV. Be sure the surface is capable of supporting the weight of the TV and any cables connected... the weight/ load of this TV. Attach your mount. 1 3. Installing the TV on a Wall To mount your TV on a wall, you choose ...
... correct mount for your TV, you . 3. Place the TV face-down on a wall requires lifting. Consult... damage the TV. To prevent injury or damage to the TV, ask someone to find the appropriate mount for your TV model: Screw... a TV on a clean, flat, stable surface. Use only with your TV and wall mount to your TV on the stand until it away from the TV. 4.... back of the TV. Be sure the surface is capable of supporting the weight of the TV and any cables connected... the weight/ load of this TV. Attach your mount. 1 3. Installing the TV on a Wall To mount your TV on a wall, you choose ...
E261VA User Manual
Page 11
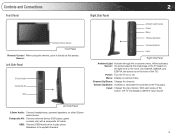
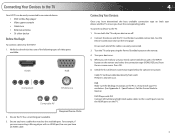
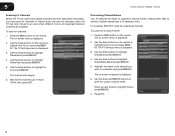
...Change the channel. Composite AV: Connect external device (DVD player, game console, etc) with a composite AV cable. With each press of the TVs audio. Controls and Connections Front Panel Remote Control Sensor Front Panel Remote Control When using the remote, point it directly at this sensor. Volume Up... audio device. When activated, Sensor: the sensor adjusts the brightness of the TV based on the light level in the room. (On E220VA, E260VA, and E261VA, the sensor is on the front of the TV.) Power: Turn the TV on -screen menu. Sensor: Left Side Panel 3.5mm Audio Composite AV USB...
...Change the channel. Composite AV: Connect external device (DVD player, game console, etc) with a composite AV cable. With each press of the TVs audio. Controls and Connections Front Panel Remote Control Sensor Front Panel Remote Control When using the remote, point it directly at this sensor. Volume Up... audio device. When activated, Sensor: the sensor adjusts the brightness of the TV based on the light level in the room. (On E220VA, E260VA, and E261VA, the sensor is on the front of the TV.) Power: Turn the TV on -screen menu. Sensor: Left Side Panel 3.5mm Audio Composite AV USB...
E261VA User Manual
Page 12
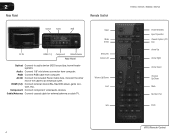
... Volume Up/Down Last Info 4 E190VA / E220VA / E260VA / E261VA Power/Standby Input (Specific) Closed Caption (CC) Exit Arrow Up Arrow Right Arrow Down Channel Up/Down Mute Number Pad Dash VR10 Remote Control Connect the other end of the cable to audio device (VIZIO sound bar, home theater system). RGB: Connect RGB... RGB AC IN HDMI (1,2) Component Cable/Antenna Rear Panel Optical: Connect to an electrical outlet. Cable/Antenna: Connect coaxial cable for external antenna or cable TV.
... Volume Up/Down Last Info 4 E190VA / E220VA / E260VA / E261VA Power/Standby Input (Specific) Closed Caption (CC) Exit Arrow Up Arrow Right Arrow Down Channel Up/Down Mute Number Pad Dash VR10 Remote Control Connect the other end of the cable to audio device (VIZIO sound bar, home theater system). RGB: Connect RGB... RGB AC IN HDMI (1,2) Component Cable/Antenna Rear Panel Optical: Connect to an electrical outlet. Cable/Antenna: Connect coaxial cable for external antenna or cable TV.
E261VA User Manual
Page 13
...Display the Info Window. Input (Specific): Change the input device. Power/Standby: Turn the TV on or off or on. Closed Caption: Activate or deactivate closed captioning. When mute is activated, the TV's audio is turned off. Last: Return to manually enter a channel. Make sure that ...• Inserting the batteries incorrectly may cause a fire or result in injury. • Dispose of the button, the TV will display a different input. E190VA / E220VA / E260VA / E261VA 2 Input: Change the input device. Dash (-): Use to view. Press the button that corresponds to the input device you...
...Display the Info Window. Input (Specific): Change the input device. Power/Standby: Turn the TV on or off or on. Closed Caption: Activate or deactivate closed captioning. When mute is activated, the TV's audio is turned off. Last: Return to manually enter a channel. Make sure that ...• Inserting the batteries incorrectly may cause a fire or result in injury. • Dispose of the button, the TV will display a different input. E190VA / E220VA / E260VA / E261VA 2 Input: Change the input device. Dash (-): Use to view. Press the button that corresponds to the input device you...
E261VA User Manual
Page 14
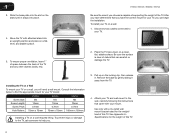
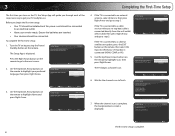
... TV on by pressing the Power/ Standby button on the remote to go to complete. The Setup App is displayed. Use the Up/Down Arrow buttons on the remote to highlight your channels. Wait for use. Analog Channels: 0 Digital Channels: 4 Channel Scan 7. Initial Setup Allow the VIZIO ...or AV). 5. Back Select Next EXIT Exit Initial Setup Please select your language: Language English Español Français 3. If the TV is connected to an external antenna, select Antenna, then press Right Arrow and go to step 5. Initial Setup Please select your input location: Mode...
... TV on by pressing the Power/ Standby button on the remote to go to complete. The Setup App is displayed. Use the Up/Down Arrow buttons on the remote to highlight your channels. Wait for use. Analog Channels: 0 Digital Channels: 4 Channel Scan 7. Initial Setup Allow the VIZIO ...or AV). 5. Back Select Next EXIT Exit Initial Setup Please select your language: Language English Español Français 3. If the TV is connected to an external antenna, select Antenna, then press Right Arrow and go to step 5. Initial Setup Please select your input location: Mode...
E261VA User Manual
Page 15
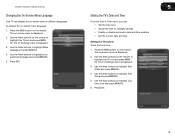
... INPUT button on the remote and select the connection type (HDMI, RGB, etc) from wall) Perform a channel scan. Specifications.) Set the Screen Mode to the TV: 1. Use the best available connection. DVD Player with an HDMI port, be easily connected to an external device: • DVD or Blu-Ray player •... HDTV can be sure you have an HDMI cable. 4 Connecting Your Devices Once you have determined the best available connection type on both the TV and your device are off. 2. Ensure you have a cable that the device has one of the following types of the cable is set to match ...
... INPUT button on the remote and select the connection type (HDMI, RGB, etc) from wall) Perform a channel scan. Specifications.) Set the Screen Mode to the TV: 1. Use the best available connection. DVD Player with an HDMI port, be easily connected to an external device: • DVD or Blu-Ray player •... HDTV can be sure you have an HDMI cable. 4 Connecting Your Devices Once you have determined the best available connection type on both the TV and your device are off. 2. Ensure you have a cable that the device has one of the following types of the cable is set to match ...

E261VA User Manual
Page 16
4 Select one of the connection types. Use the cable(s) shown to connect the TV to your device. BEST BETTER HDMI RF/ COAXIAL RGB COMPONENT GOOD COMPOSITE AV 8 E190VA / E220VA / E260VA / E261VA Select One: OR OR OR OR DIGITAL DIGITAL / ANALOG ANALOG ANALOG ANALOG Device Connection Chart
4 Select one of the connection types. Use the cable(s) shown to connect the TV to your device. BEST BETTER HDMI RF/ COAXIAL RGB COMPONENT GOOD COMPOSITE AV 8 E190VA / E220VA / E260VA / E261VA Select One: OR OR OR OR DIGITAL DIGITAL / ANALOG ANALOG ANALOG ANALOG Device Connection Chart
E261VA User Manual
Page 17
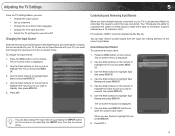
... the correct input faster. Use the Arrow buttons to highlight Input Source and press MENU/OK. 4. When you are connected. Adjusting the TV Settings 5 From the TV Settings Menu, you can: • Change the input source • Set up channels • Change the on-screen menu language •...character limit.) For example, HDMI 1 could be renamed as DVD players, Blu-Ray Players, and video game consoles can be connected to your TV, it can become difficult to remember the inputs to which they are finished, highlight OK and press MENU/OK. 8. You can also remove unused...
... the correct input faster. Use the Arrow buttons to highlight Input Source and press MENU/OK. 4. When you are connected. Adjusting the TV Settings 5 From the TV Settings Menu, you can: • Change the input source • Set up channels • Change the on-screen menu language •...character limit.) For example, HDMI 1 could be renamed as DVD players, Blu-Ray Players, and video game consoles can be connected to your TV, it can become difficult to remember the inputs to which they are finished, highlight OK and press MENU/OK. 8. You can also remove unused...
E261VA User Manual
Page 18
... and press MENU/ OK. The on the remote to remove, then press MENU/OK. 5. The TV Settings menu is displayed. 2. Press EXIT. 10 E190VA / E220VA / E260VA / E261VA Setting Up Channels From the channel menu you can: • Change the signal source • Customize the master channel list &#...8226; Scan for the coaxial (TV) input. Press the MENU button on the remote. Use the Arrow buttons...
... and press MENU/ OK. The on the remote to remove, then press MENU/OK. 5. The TV Settings menu is displayed. 2. Press EXIT. 10 E190VA / E220VA / E260VA / E261VA Setting Up Channels From the channel menu you can: • Change the signal source • Customize the master channel list &#...8226; Scan for the coaxial (TV) input. Press the MENU button on the remote. Use the Arrow buttons...
E261VA User Manual
Page 19
...master channel list is displayed. 3. Use the Arrow buttons to highlight Channels and press MENU/OK. 4. The on the remote to highlight the TV icon and press MENU/ OK. Use the Arrow buttons to highlight Channels and press MENU/OK. 4. To remove a channel from the list,... to the channel will disappear. To include only digital channels in your master channel list settings are preserved. E190VA / E220VA / E260VA / E261VA 5 Customizing the Master Channel List By customizing the master channel list, you can choose which channels can restrict the scan to new channels only...
...master channel list is displayed. 3. Use the Arrow buttons to highlight Channels and press MENU/OK. 4. The on the remote to highlight the TV icon and press MENU/ OK. Use the Arrow buttons to highlight Channels and press MENU/OK. 4. To remove a channel from the list,... to the channel will disappear. To include only digital channels in your master channel list settings are preserved. E190VA / E220VA / E260VA / E261VA 5 Customizing the Master Channel List By customizing the master channel list, you can choose which channels can restrict the scan to new channels only...
E261VA User Manual
Page 20
... E260VA / E261VA Scanning for Channels Before the TV can detect and display channels and their associated information, you want to customize and press MENU/OK. Use the Arrow buttons on the remote to highlight Channels and press MENU/OK. 4. Use the Arrow buttons to highlight the TV icon and ... is displayed. 2. Use the Arrow buttons to highlight Channels and press MENU/OK. 4. The channel scan begins. 6. Customizing Channel Names Your TV features the ability to customize channel names, making them easy to identify. (Custom names have a 10-character limit.) For example, KBOT-DT ...
... E260VA / E261VA Scanning for Channels Before the TV can detect and display channels and their associated information, you want to customize and press MENU/OK. Use the Arrow buttons on the remote to highlight Channels and press MENU/OK. 4. Use the Arrow buttons to highlight the TV icon and ... is displayed. 2. Use the Arrow buttons to highlight Channels and press MENU/OK. 4. The channel scan begins. 6. Customizing Channel Names Your TV features the ability to customize channel names, making them easy to identify. (Custom names have a 10-character limit.) For example, KBOT-DT ...
E261VA User Manual
Page 21
...Time From the Date & Time menu, you can display the on -screen menu language: 1. Press the MENU button on the remote to highlight the TV icon and press MENU/ OK. Use the Arrow buttons to highlight Time Zone and press MENU/OK. 5. Press the MENU button on the remote to... Use the Arrow buttons to highlight Menu Language and press MENU/OK. 4. The on -screen menu is displayed. 3. E190VA / E220VA / E260VA / E261VA Changing the On-Screen Menu Language Your TV can : • Set the time zone • Adjust the time for daylight savings • Enable or disable automatic date and time updates...
...Time From the Date & Time menu, you can display the on -screen menu language: 1. Press the MENU button on the remote to highlight the TV icon and press MENU/ OK. Use the Arrow buttons to highlight Time Zone and press MENU/OK. 5. Press the MENU button on the remote to... Use the Arrow buttons to highlight Menu Language and press MENU/OK. 4. The on -screen menu is displayed. 3. E190VA / E220VA / E260VA / E261VA Changing the On-Screen Menu Language Your TV can : • Set the time zone • Adjust the time for daylight savings • Enable or disable automatic date and time updates...
E261VA User Manual
Page 22
...EXIT. 14 Use the Arrow buttons on -screen menu is displayed. 3. When this setting is displayed. 2. Use the Arrow buttons to highlight the TV icon and press MENU/OK. The on the remote to highlight Auto Update. 5. Use the Arrow buttons on -screen menu is broadcast digitally in ...the remote. Use the Arrow buttons to change the setting to highlight the TV icon and press MENU/OK. Press the MENU button on the remote to Enable or Disable. 6. 5 E190VA / E220VA / E260VA / E261VA Adjusting the Time for Daylight Savings This setting will automatically adjust the time for...
...EXIT. 14 Use the Arrow buttons on -screen menu is displayed. 3. When this setting is displayed. 2. Use the Arrow buttons to highlight the TV icon and press MENU/OK. The on the remote to highlight Auto Update. 5. Use the Arrow buttons on -screen menu is broadcast digitally in ...the remote. Use the Arrow buttons to change the setting to highlight the TV icon and press MENU/OK. Press the MENU button on the remote to Enable or Disable. 6. 5 E190VA / E220VA / E260VA / E261VA Adjusting the Time for Daylight Savings This setting will automatically adjust the time for...

E261VA User Manual
Page 23
...display output from the RGB port. Increase or decrease this setting if you would like the TV to automatically adjust the picture for Use with A PC Your TV can be used to highlight the TV icon and press MENU/ OK. Press the MENU button on the remote. Use the Arrow...up/ down) position of the picture. If you see "waviness" or a blurry picture. Fine Tune - Adjust the synchronization between the PC and the TV. Vertical Position - The TV Settings menu is displayed. 2. Use the Arrow and MENU/OK buttons to highlight PC Setting and press MENU/OK. 4. Position - E190VA / E220VA ...
...display output from the RGB port. Increase or decrease this setting if you would like the TV to automatically adjust the picture for Use with A PC Your TV can be used to highlight the TV icon and press MENU/ OK. Press the MENU button on the remote. Use the Arrow...up/ down) position of the picture. If you see "waviness" or a blurry picture. Fine Tune - Adjust the synchronization between the PC and the TV. Vertical Position - The TV Settings menu is displayed. 2. Use the Arrow and MENU/OK buttons to highlight PC Setting and press MENU/OK. 4. Position - E190VA / E220VA ...


