

E261VA User Manual
Page 4
... instructions before turning on your TV cabinet. Doing so could short circuit parts causing a fire or electric shock. If you are provided for your safety. This may form in a bookcase or cabinet unless proper ventilation is provided. • Never push any ventilation openings. The manufacturer's warranty does not cover user abuse or improper installations. • The power cord...
... instructions before turning on your TV cabinet. Doing so could short circuit parts causing a fire or electric shock. If you are provided for your safety. This may form in a bookcase or cabinet unless proper ventilation is provided. • Never push any ventilation openings. The manufacturer's warranty does not cover user abuse or improper installations. • The power cord...
E261VA User Manual
Page 5
... shock. • The wall socket should be installed near your TV and easily accessible. • Only power of your TV. The performance of the marked voltage can damage the remote control or injure the operator. Overloading can result in any servicing other hazards. Opening or removing the back cover may expose you are for repair. Unplug the power cord immediately and contact...
... shock. • The wall socket should be installed near your TV and easily accessible. • Only power of your TV. The performance of the marked voltage can damage the remote control or injure the operator. Overloading can result in any servicing other hazards. Opening or removing the back cover may expose you are for repair. Unplug the power cord immediately and contact...
E261VA User Manual
Page 6
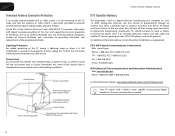
...-20) Your TV comes with cable and satellite TV services, gaming consoles, VCRs, DVD players, and similar products. Power Lines Do not locate the antenna near overhead light or power circuits, or where it is needed. Analog-only TVs should continue to proper grounding of the mast and supporting structure, grounding of time, unplug the TV from the wall outlet and disconnect the antenna or cable system.
...-20) Your TV comes with cable and satellite TV services, gaming consoles, VCRs, DVD players, and similar products. Power Lines Do not locate the antenna near overhead light or power circuits, or where it is needed. Analog-only TVs should continue to proper grounding of the mast and supporting structure, grounding of time, unplug the TV from the wall outlet and disconnect the antenna or cable system.
E261VA User Manual
Page 7
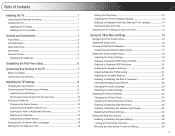
... the TV Stand 1 Installing the TV on a Wall 2 Controls and Connections 3 Front Panel 3 Left Side Panel 3 Right Side Panel 3 Rear Panel 4 Remote Control 4 Replacing the Batteries 5 Completing the First-Time Setup 6 Connecting Your Devices to the TV 7 Before You Begin 7 Connecting Your Devices 7 Adjusting the TV Settings 9 Changing the Input Source 9 Customizing and Removing Input Names 9 Customizing Input Names 9 Removing Unused Inputs from the Input List 10 Setting Up Channels 10 Changing the Signal Source 10 Customizing the Master Channel List 11 Scanning for New...
... the TV Stand 1 Installing the TV on a Wall 2 Controls and Connections 3 Front Panel 3 Left Side Panel 3 Right Side Panel 3 Rear Panel 4 Remote Control 4 Replacing the Batteries 5 Completing the First-Time Setup 6 Connecting Your Devices to the TV 7 Before You Begin 7 Connecting Your Devices 7 Adjusting the TV Settings 9 Changing the Input Source 9 Customizing and Removing Input Names 9 Customizing Input Names 9 Removing Unused Inputs from the Input List 10 Setting Up Channels 10 Changing the Signal Source 10 Customizing the Master Channel List 11 Scanning for New...
E261VA User Manual
Page 8
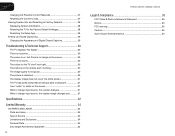
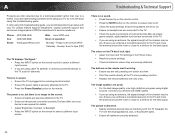
... Locks 27 Viewing System Info and Resetting to Factory Defaults 28 Displaying System Information 28 Restoring the TV to the Factory Default Settingss 28 Restarting the Setup App 28 Setting Up Closed Captioning 29 Changing the Appearance of Digital Closed Captions 29 Troubleshooting & Technical Support 30 The TV displays "No Signal 30 There is no power 30 The power is on, but there is no image on the screen 30 There is no sound...
... Locks 27 Viewing System Info and Resetting to Factory Defaults 28 Displaying System Information 28 Restoring the TV to the Factory Default Settingss 28 Restarting the Setup App 28 Setting Up Closed Captioning 29 Changing the Appearance of Digital Closed Captions 29 Troubleshooting & Technical Support 30 The TV displays "No Signal 30 There is no power 30 The power is on, but there is no image on the screen 30 There is no sound...
E261VA User Manual
Page 9
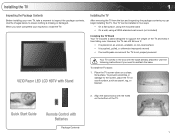
... damage to support the weight of the TV. Quick Start Guide Remote Control with the holes on a clean, flat surface. Installing the TV After removing the TV from the box and inspecting the package contents you can be installed in two ways: • On a flat surface, using the included stand • On a wall, using a VESA-standard wall mount (not included) Installing the TV Stand Your TV includes a stand designed to the screen, place...
... damage to support the weight of the TV. Quick Start Guide Remote Control with the holes on a clean, flat surface. Installing the TV After removing the TV from the box and inspecting the package contents you can be installed in two ways: • On a flat surface, using the included stand • On a wall, using a VESA-standard wall mount (not included) Installing the TV Stand Your TV includes a stand designed to the screen, place...
E261VA User Manual
Page 10
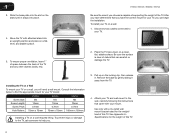
... a UL-listed wall mount bracket rated for your TV on a flat, level, and stable surface. Consult the information below to your TV and wall mount to help you have the correct mount for the weight of this TV. Use only with attached stand into place. 4. To ensure proper ventilation, leave 1" of space between the back of the TV and any cables connected to find...
... a UL-listed wall mount bracket rated for your TV on a flat, level, and stable surface. Consult the information below to your TV and wall mount to help you have the correct mount for the weight of this TV. Use only with attached stand into place. 4. To ensure proper ventilation, leave 1" of space between the back of the TV and any cables connected to find...
E261VA User Manual
Page 11
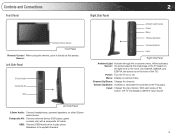
...the TVs audio. USB: Connect USB thumb drive to play photo slideshow or to update firmware. 3 Menu: Display on -screen menu. Composite AV: Connect external device (DVD player, game console, etc) with a composite AV cable. Input: Change the input device. Sensor: Left Side Panel 3.5mm Audio Composite AV USB 2 Right Side Panel Ambient Light Sensor Power Menu Channel Up/Down Volume Up/Down Input Right Side Panel Ambient Light Activate through the on -screen menu. Controls and Connections Front Panel Remote Control Sensor Front Panel Remote Control When using the remote, point it...
...the TVs audio. USB: Connect USB thumb drive to play photo slideshow or to update firmware. 3 Menu: Display on -screen menu. Composite AV: Connect external device (DVD player, game console, etc) with a composite AV cable. Input: Change the input device. Sensor: Left Side Panel 3.5mm Audio Composite AV USB 2 Right Side Panel Ambient Light Sensor Power Menu Channel Up/Down Volume Up/Down Input Right Side Panel Ambient Light Activate through the on -screen menu. Controls and Connections Front Panel Remote Control Sensor Front Panel Remote Control When using the remote, point it...
E261VA User Manual
Page 13
... closed captioning. Arrow : Navigate the on or off. Mute: Turn the sound off . Power/Standby: Turn the TV on -screen menu and episode guide. Up/Down: Channel Change the channel. Number Pad: Use the number pad to the channel last viewed. Remove the battery cover. 2. Make sure that the (+) and (-) symbols on -screen menu. Exit: Close the on the batteries match the (+) and (-) symbols inside the battery compartment. 3. Last: Return to manually enter a channel. Replace...
... closed captioning. Arrow : Navigate the on or off. Mute: Turn the sound off . Power/Standby: Turn the TV on -screen menu and episode guide. Up/Down: Channel Change the channel. Number Pad: Use the number pad to the channel last viewed. Remove the battery cover. 2. Make sure that the (+) and (-) symbols on -screen menu. Exit: Close the on the batteries match the (+) and (-) symbols inside the battery compartment. 3. Last: Return to manually enter a channel. Replace...
E261VA User Manual
Page 14
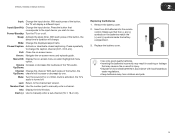
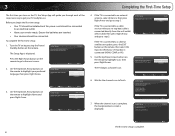
... Arrow. Analog Channels: 0 Digital Channels: 4 Channel Scan 7. Initial Setup completed EXIT Exit Complete Back Next The first-time setup is displayed. Ensure the batteries are inserted. • Your devices should be connected. Turn the TV on by pressing the Power/ Standby button on the remote to an electrical outlet. • Have your cable or antenna to the next screen. If the TV is connected directly from the wall outlet) select Cable, then...
... Arrow. Analog Channels: 0 Digital Channels: 4 Channel Scan 7. Initial Setup completed EXIT Exit Complete Back Next The first-time setup is displayed. Ensure the batteries are inserted. • Your devices should be connected. Turn the TV on by pressing the Power/ Standby button on the remote to an electrical outlet. • Have your cable or antenna to the next screen. If the TV is connected directly from the wall outlet) select Cable, then...
E261VA User Manual
Page 15
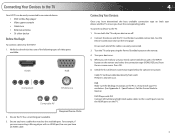
... the HDTV: 1. Connect the device and the TV. Ensure each end of video ports available: HDMI RGB Component RF/Antenna Composite AV Required Device Ports 2. Press OK. 6. Ensure you are ready to use your newly connected device, press the INPUT button on the remote and select the connection type (HDMI, RGB, etc) from wall) Perform a channel scan. To connect a device to the HDMI ports on the TV. 7 Specifications.) Set the Screen Mode to match your TV's resolution...
... the HDTV: 1. Connect the device and the TV. Ensure each end of video ports available: HDMI RGB Component RF/Antenna Composite AV Required Device Ports 2. Press OK. 6. Ensure you are ready to use your newly connected device, press the INPUT button on the remote and select the connection type (HDMI, RGB, etc) from wall) Perform a channel scan. To connect a device to the HDMI ports on the TV. 7 Specifications.) Set the Screen Mode to match your TV's resolution...
E261VA User Manual
Page 24
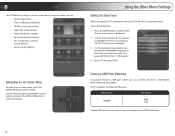
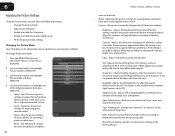
... play USB media, you can : • Set the sleep timer • View a USB photo slideshow • Set the screen aspect ratio • Adjust the audio settings • Adjust the picture settings • Set up the parental controls • Get system info or reset to power off after which you can connect and share a USB thumb drive containing your images onto a USB thumb drive. 16 Press the MENU button on the remote. Using this menu, you want the TV to factory defaults...
... play USB media, you can : • Set the sleep timer • View a USB photo slideshow • Set the screen aspect ratio • Adjust the audio settings • Adjust the picture settings • Set up the parental controls • Get system info or reset to power off after which you can connect and share a USB thumb drive containing your images onto a USB thumb drive. 16 Press the MENU button on the remote. Using this menu, you want the TV to factory defaults...
E261VA User Manual
Page 32
... the best picture quality. Contrast - Adjusts the hue of the picture. This setting is the recommended setting. • Game - Backlight - Reduces oversaturation of the picture colors. 6 Adjusting the Picture Settings Using the Picture menu, you to manually change the picture mode: 1. Press the MENU/OK button on -screen menu is too high, the picture may be adjusted to suit your preferences and viewing conditions. The on the remote. Use the Arrow buttons to highlight Picture Mode and press MENU/OK. 4. Use the Arrow buttons...
... the best picture quality. Contrast - Adjusts the hue of the picture. This setting is the recommended setting. • Game - Backlight - Reduces oversaturation of the picture colors. 6 Adjusting the Picture Settings Using the Picture menu, you to manually change the picture mode: 1. Press the MENU/OK button on -screen menu is too high, the picture may be adjusted to suit your preferences and viewing conditions. The on the remote. Use the Arrow buttons to highlight Picture Mode and press MENU/OK. 4. Use the Arrow buttons...
E261VA User Manual
Page 38
... the INPUT button on the remote aren't working electrical outlet. • Ensure the power cable is not good. • For the best image quality, view high-definition programs using this troubleshooting guide. see your TV, contact VIZIO's Support Department. Ensure the speakers are using an antenna, the signal strength of the channel may be low. The image quality is securely attached to the TV. • Press the Power/Standby button on the remote control...
... the INPUT button on the remote aren't working electrical outlet. • Ensure the power cable is not good. • For the best image quality, view high-definition programs using this troubleshooting guide. see your TV, contact VIZIO's Support Department. Ensure the speakers are using an antenna, the signal strength of the channel may be low. The image quality is securely attached to the TV. • Press the Power/Standby button on the remote control...
E261VA User Manual
Page 39
... the viewing mode on the new input source differs from , the difference may be low. The TV has pixels (dots) that H-Size and V-Position in the on-screen menu are set correctly. • If you switch from the one on the input source you are using an antenna, the signal strength of product and do not constitute a defective product. E190VA / E220VA / E260VA / E261VA A The display image...
... the viewing mode on the new input source differs from , the difference may be low. The TV has pixels (dots) that H-Size and V-Position in the on-screen menu are set correctly. • If you switch from the one on the input source you are using an antenna, the signal strength of product and do not constitute a defective product. E190VA / E220VA / E260VA / E261VA A The display image...
E261VA User Manual
Page 42
... sent to a VIZIO service center to obtain warranty service. Replacement parts and Products are not covered. This one year limited warranty does not cover Products sold "AS IS", "FACTORY RECERTIFIED", or by this occurs, your personal information, VIZIO recommends that affords an equal degree of customer misuse, modifications or adjustments, as well as installation and set-up issues or any repairs attempted by anyone...
... sent to a VIZIO service center to obtain warranty service. Replacement parts and Products are not covered. This one year limited warranty does not cover Products sold "AS IS", "FACTORY RECERTIFIED", or by this occurs, your personal information, VIZIO recommends that affords an equal degree of customer misuse, modifications or adjustments, as well as installation and set-up issues or any repairs attempted by anyone...
E261VA Quick Start Guide
Page 2
... device shall remain readily operable. • CAUTION - The performance of your TV. Keep these instructions in electric shock or fire. Do not place your dealer. The manufacturer's warranty does not cover user abuse or improper installations. • The power cord must be maintained between your TV and any heat source, such as when the power-supply cord or plug is provided. •...
... device shall remain readily operable. • CAUTION - The performance of your TV. Keep these instructions in electric shock or fire. Do not place your dealer. The manufacturer's warranty does not cover user abuse or improper installations. • The power cord must be maintained between your TV and any heat source, such as when the power-supply cord or plug is provided. •...

E261VA Quick Start Guide
Page 4
PACKAGE CONTENTS RAZOR LED LCD HDTV with Stand Remote Control with Batteries HELP VIZIO REDUCE PAPER WASTE. DOWNLOAD THE FULL USER MANUAL AT VIZIO.COM/SUPPORT This Quick Start Guide
PACKAGE CONTENTS RAZOR LED LCD HDTV with Stand Remote Control with Batteries HELP VIZIO REDUCE PAPER WASTE. DOWNLOAD THE FULL USER MANUAL AT VIZIO.COM/SUPPORT This Quick Start Guide
E261VA Quick Start Guide
Page 12
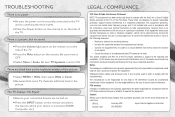
... emission limits. Use the AC cords listed below for a Class B digital device, pursuant to operate the equipment. There are black bars on the top/bottom/sides of the picture. • Select MENU > Wide, then select Wide or Zoom. • Be aware that interference will not occur in a residential installation. The TV displays "No Signal." • Ensure your device is connected (HDMI, Composite, etc...
... emission limits. Use the AC cords listed below for a Class B digital device, pursuant to operate the equipment. There are black bars on the top/bottom/sides of the picture. • Select MENU > Wide, then select Wide or Zoom. • Be aware that interference will not occur in a residential installation. The TV displays "No Signal." • Ensure your device is connected (HDMI, Composite, etc...
E261VA Quick Start Guide
Page 13
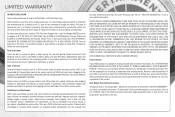
... operation, improper voltage supply or power surges, signal issues, damages from warranty service or replacement, whichever is capable of customer misuse, modifications or adjustments, as well as originally purchased. This one -year limited warranty only covers defects in United States and Puerto Rico Only. Recovery and reinstallation of the limited "ONE YEAR WARRANTY" on the box. VIZIO Technical Support will either the original carton box...
... operation, improper voltage supply or power surges, signal issues, damages from warranty service or replacement, whichever is capable of customer misuse, modifications or adjustments, as well as originally purchased. This one -year limited warranty only covers defects in United States and Puerto Rico Only. Recovery and reinstallation of the limited "ONE YEAR WARRANTY" on the box. VIZIO Technical Support will either the original carton box...


