
E261VA User Manual
Page 2
This product qualifies for ENERGY STAR in the "factory default" setting and this is the setting in which power savings will increase power consumption that could exceed the limits necessary to qualify for ENERGY STAR rating. ® HDMI, the HDMI logo and High-Definition Multimedia Interface are trademarks or registered trademarks of SRS Labs, Inc. TruSurround HD and TruVolume technologies are trademarks of HDMI Licensing LLC. Changing the factory default picture settings or enabling other features will be achieved. SRS TruSurround HD and SRS TruVolume are incorporated under license...
This product qualifies for ENERGY STAR in the "factory default" setting and this is the setting in which power savings will increase power consumption that could exceed the limits necessary to qualify for ENERGY STAR rating. ® HDMI, the HDMI logo and High-Definition Multimedia Interface are trademarks or registered trademarks of SRS Labs, Inc. TruSurround HD and TruVolume technologies are trademarks of HDMI Licensing LLC. Changing the factory default picture settings or enabling other features will be achieved. SRS TruSurround HD and SRS TruVolume are incorporated under license...
E261VA User Manual
Page 3
...extended warranty service plans. When you see this symbol, please read the accompanying helpful tip. To get the most out of Purchase VIZIO recommends you to ensure there are no missing or damaged parts. These plans provide additional coverage during the standard warranty period. It... is intended to alert you attach your sales receipt to protect your investment beyond the standard warranty, VIZIO offers on your new VIZIO product, read the accompanying important warning or notice. Attach Sales Receipt Here 3 Be sure to inspect the package contents...
...extended warranty service plans. When you see this symbol, please read the accompanying helpful tip. To get the most out of Purchase VIZIO recommends you to ensure there are no missing or damaged parts. These plans provide additional coverage during the standard warranty period. It... is intended to alert you attach your sales receipt to protect your investment beyond the standard warranty, VIZIO offers on your new VIZIO product, read the accompanying important warning or notice. Attach Sales Receipt Here 3 Be sure to inspect the package contents...

E261VA User Manual
Page 4
... when moving your TV from tip-over. • Unplug this apparatus near any object into the apparatus, the apparatus has been exposed 4 E190VA / E220VA / E260VA / E261VA to rain or moisture, does not operate normally or has been dropped. • Unplug the power cord before turning on or pinched, particularly at your...
... when moving your TV from tip-over. • Unplug this apparatus near any object into the apparatus, the apparatus has been exposed 4 E190VA / E220VA / E260VA / E261VA to rain or moisture, does not operate normally or has been dropped. • Unplug the power cord before turning on or pinched, particularly at your...
E261VA User Manual
Page 5
... dealer and refer all servicing to excessive heat such as the disconnect device, the disconnect device shall remain readily operable. • CAUTION - E190VA / E220VA / E260VA / E261VA • Do not overload power strips and extension cords. This will not be exposed to high voltages, electric shock, and other voltage than that may...
... dealer and refer all servicing to excessive heat such as the disconnect device, the disconnect device shall remain readily operable. • CAUTION - E190VA / E220VA / E260VA / E261VA • Do not overload power strips and extension cords. This will not be exposed to high voltages, electric shock, and other voltage than that may...
E261VA User Manual
Page 6
... out when they will turn off their analog signal and switch to provide some protection against voltage surges and static charges. E190VA / E220VA / E260VA / E261VA Television Antenna Connection Protection If an outside antenna/satellite dish or cable system is to be connected to receive over-the-air TV. Article 810...
... out when they will turn off their analog signal and switch to provide some protection against voltage surges and static charges. E190VA / E220VA / E260VA / E261VA Television Antenna Connection Protection If an outside antenna/satellite dish or cable system is to be connected to receive over-the-air TV. Article 810...
E261VA User Manual
Page 7
Table of Contents Installing the TV 1 Inspecting the Package Contents 1 Installing the TV 1 Installing the TV Stand 1 Installing the TV on a Wall 2 Controls and Connections 3 Front Panel 3 Left Side Panel 3 Right Side Panel 3 Rear Panel 4 Remote Control 4 Replacing the Batteries 5 Completing the First-Time Setup 6 Connecting Your Devices to the TV 7 Before You Begin 7 Connecting Your Devices 7 Adjusting the TV Settings 9 Changing the Input Source 9 Customizing and Removing Input Names 9 Customizing Input Names 9 Removing Unused Inputs from the Input List 10 Setting Up ...
Table of Contents Installing the TV 1 Inspecting the Package Contents 1 Installing the TV 1 Installing the TV Stand 1 Installing the TV on a Wall 2 Controls and Connections 3 Front Panel 3 Left Side Panel 3 Right Side Panel 3 Rear Panel 4 Remote Control 4 Replacing the Batteries 5 Completing the First-Time Setup 6 Connecting Your Devices to the TV 7 Before You Begin 7 Connecting Your Devices 7 Adjusting the TV Settings 9 Changing the Input Source 9 Customizing and Removing Input Names 9 Customizing Input Names 9 Removing Unused Inputs from the Input List 10 Setting Up ...
E261VA User Manual
Page 8
... 34 Parts and Labor 34 Type of Service 34 Limitations and Exclusions 34 Personal Data 34 Zero Bright Pixel Defect Guarantee 34 8 E190VA / E220VA / E260VA / E261VA Legal & Compliance 35 FCC Class B Radio Interference Statement 35 Notice...35 FCC warning 35 Caution 35 Open Source Software Notice 35
... 34 Parts and Labor 34 Type of Service 34 Limitations and Exclusions 34 Personal Data 34 Zero Bright Pixel Defect Guarantee 34 8 E190VA / E220VA / E260VA / E261VA Legal & Compliance 35 FCC Class B Radio Interference Statement 35 Notice...35 FCC warning 35 Caution 35 Open Source Software Notice 35
E261VA User Manual
Page 9
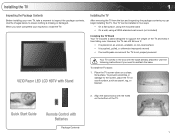
... keep it from the box and inspecting the package contents you can still fall over . When you need to ensure nothing is not properly secured VIZIO Razor LED LCD HDTV with Stand Your TV comes in two ways: • On a flat surface, using the included stand • On a wall, using a VESA...
... keep it from the box and inspecting the package contents you can still fall over . When you need to ensure nothing is not properly secured VIZIO Razor LED LCD HDTV with Stand Your TV comes in two ways: • On a flat surface, using the included stand • On a wall, using a VESA...
E261VA User Manual
Page 10
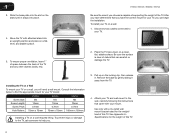
1 3. E190VA / E220VA / E260VA / E261VA Be sure the mount you choose is clear of debris that you have determined that can begin the installation. To ensure proper ventilation, leave 1" of ...
1 3. E190VA / E220VA / E260VA / E261VA Be sure the mount you choose is clear of debris that you have determined that can begin the installation. To ensure proper ventilation, leave 1" of ...
E261VA User Manual
Page 11
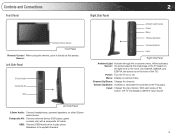
... this sensor. When activated, Sensor: the sensor adjusts the brightness of the TV based on the light level in the room. (On E220VA, E260VA, and E261VA, the sensor is on the front of the TV.) Power: Turn the TV on -screen menu. Sensor: Left Side Panel 3.5mm Audio Composite AV USB...
... this sensor. When activated, Sensor: the sensor adjusts the brightness of the TV based on the light level in the room. (On E220VA, E260VA, and E261VA, the sensor is on the front of the TV.) Power: Turn the TV on -screen menu. Sensor: Left Side Panel 3.5mm Audio Composite AV USB...
E261VA User Manual
Page 12
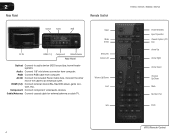
... TV. Component: Connect component video/audio devices. Input Wide Sleep Menu/OK Arrow Left Volume Up/Down Last Info 4 E190VA / E220VA / E260VA / E261VA Power/Standby Input (Specific) Closed Caption (CC) Exit Arrow Up Arrow Right Arrow Down Channel Up/Down Mute Number Pad Dash VR10 Remote Control HDMI... HDMI (1,2) Component Cable/Antenna Rear Panel Optical: Connect to an electrical outlet. Connect the other end of the cable to audio device (VIZIO sound bar, home theater system). Audio: Connect 1/8" mini stereo connector from computer. RGB: Connect RGB cable from computer.
... TV. Component: Connect component video/audio devices. Input Wide Sleep Menu/OK Arrow Left Volume Up/Down Last Info 4 E190VA / E220VA / E260VA / E261VA Power/Standby Input (Specific) Closed Caption (CC) Exit Arrow Up Arrow Right Arrow Down Channel Up/Down Mute Number Pad Dash VR10 Remote Control HDMI... HDMI (1,2) Component Cable/Antenna Rear Panel Optical: Connect to an electrical outlet. Connect the other end of the cable to audio device (VIZIO sound bar, home theater system). Audio: Connect 1/8" mini stereo connector from computer. RGB: Connect RGB cable from computer.
E261VA User Manual
Page 13
..., CC2, etc). Mute: Turn the sound off . Replacing the Batteries 1. Input (Specific): Change the input device. Up/Down: Channel Change the channel. E190VA / E220VA / E260VA / E261VA 2 Input: Change the input device. Remove the battery cover. 2. Last: Return to view. Exit: Close the on the batteries match the (+) and (-) symbols inside the...
..., CC2, etc). Mute: Turn the sound off . Replacing the Batteries 1. Input (Specific): Change the input device. Up/Down: Channel Change the channel. E190VA / E220VA / E260VA / E261VA 2 Input: Change the input device. Remove the battery cover. 2. Last: Return to view. Exit: Close the on the batteries match the (+) and (-) symbols inside the...
E261VA User Manual
Page 14
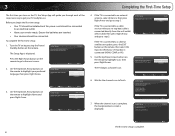
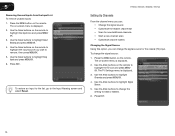
Initial Setup Allow the VIZIO setup Wizard to help you tune your input location: Mode Setting Home Retail Back Select Next EXIT Exit 4. Use the Up/Down Arrow buttons on ...
Initial Setup Allow the VIZIO setup Wizard to help you tune your input location: Mode Setting Home Retail Back Select Next EXIT Exit 4. Use the Up/Down Arrow buttons on ...
E261VA User Manual
Page 15
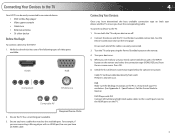
Use the best available connection. Turn the TV on by pressing the Power/Standby button on the TV. 7 When you are ready to use your device are connecting a Blu-ray player with DVI Connect left (white) and right (red) audio cables to the L and R ports next to the HDMI ports on the remote. 4. For example, if you are off. 2. Ensure both your device and the TV, ensure you have a cable that the device has one of the following types of video ports available: HDMI RGB Component RF/Antenna Composite AV Required Device Ports 2. Ensure each end of devices/connection types below for ...
Use the best available connection. Turn the TV on by pressing the Power/Standby button on the TV. 7 When you are ready to use your device are connecting a Blu-ray player with DVI Connect left (white) and right (red) audio cables to the L and R ports next to the HDMI ports on the remote. 4. For example, if you are off. 2. Ensure both your device and the TV, ensure you have a cable that the device has one of the following types of video ports available: HDMI RGB Component RF/Antenna Composite AV Required Device Ports 2. Ensure each end of devices/connection types below for ...

E261VA User Manual
Page 16
Use the cable(s) shown to connect the TV to your device. BEST BETTER HDMI RF/ COAXIAL RGB COMPONENT GOOD COMPOSITE AV 8 E190VA / E220VA / E260VA / E261VA Select One: OR OR OR OR DIGITAL DIGITAL / ANALOG ANALOG ANALOG ANALOG Device Connection Chart 4 Select one of the connection types.
Use the cable(s) shown to connect the TV to your device. BEST BETTER HDMI RF/ COAXIAL RGB COMPONENT GOOD COMPOSITE AV 8 E190VA / E220VA / E260VA / E261VA Select One: OR OR OR OR DIGITAL DIGITAL / ANALOG ANALOG ANALOG ANALOG Device Connection Chart 4 Select one of the connection types.
E261VA User Manual
Page 17
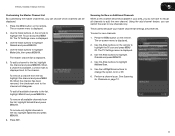
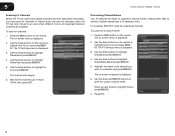
Use the Arrow buttons on the remote to highlight the TV icon and press MENU/ OK. 3. Use the Arrow buttons on the remote to highlight the input source you have a 10-character limit.) For example, HDMI 1 could be renamed as DVD players, Blu-Ray Players, and video game consoles can be connected to your TV. You can also remove unused inputs from the on-screen menu. You can also change the input device by pressing the INPUT button on the remote or by selecting the INPUT icon from the input list, making selection of the correct input faster. Use the Arrow buttons on the remote to ...
Use the Arrow buttons on the remote to highlight the TV icon and press MENU/ OK. 3. Use the Arrow buttons on the remote to highlight the input source you have a 10-character limit.) For example, HDMI 1 could be renamed as DVD players, Blu-Ray Players, and video game consoles can be connected to your TV. You can also remove unused inputs from the on-screen menu. You can also change the input device by pressing the INPUT button on the remote or by selecting the INPUT icon from the input list, making selection of the correct input faster. Use the Arrow buttons on the remote to ...
E261VA User Manual
Page 18
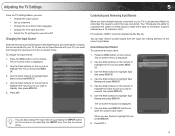
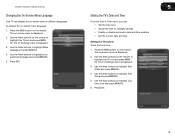
Use the Arrow buttons on the remote. The TV Settings menu is displayed. 2. E190VA / E220VA / E260VA / E261VA Setting Up Channels From the channel menu you can: • Change the signal source • Customize the master channel list • Scan for the coaxial (...
Use the Arrow buttons on the remote. The TV Settings menu is displayed. 2. E190VA / E220VA / E260VA / E261VA Setting Up Channels From the channel menu you can: • Change the signal source • Customize the master channel list • Scan for the coaxial (...
E261VA User Manual
Page 19
... displayed. 3. Scanning for New or Additional Channels When a new channel becomes available in the list, highlight Digital Only and press MENU/OK. 6. E190VA / E220VA / E260VA / E261VA 5 Customizing the Master Channel List By customizing the master channel list, you can choose which channels can restrict the scan to new channels only. The...
... displayed. 3. Scanning for New or Additional Channels When a new channel becomes available in the list, highlight Digital Only and press MENU/OK. 6. E190VA / E220VA / E260VA / E261VA 5 Customizing the Master Channel List By customizing the master channel list, you can choose which channels can restrict the scan to new channels only. The...
E261VA User Manual
Page 20
... Arrow buttons on the remote. Use the Arrow buttons to highlight Channel Name Edit and press MENU/OK. 5. To customize a channel name: 1. 5 E190VA / E220VA / E260VA / E261VA Scanning for Channels Before the TV can detect and display channels and their associated information, you must scan for channels: 1. The on-screen menu is...
... Arrow buttons on the remote. Use the Arrow buttons to highlight Channel Name Edit and press MENU/OK. 5. To customize a channel name: 1. 5 E190VA / E220VA / E260VA / E261VA Scanning for Channels Before the TV can detect and display channels and their associated information, you must scan for channels: 1. The on-screen menu is...
E261VA User Manual
Page 21
... -screen menu is displayed. 3. The TV Settings menu is displayed. 2. Use the Arrow buttons to highlight Date & Time and press MENU/OK. 4. E190VA / E220VA / E260VA / E261VA Changing the On-Screen Menu Language Your TV can : • Set the time zone • Adjust the time for daylight savings • Enable or disable...
... -screen menu is displayed. 3. The TV Settings menu is displayed. 2. Use the Arrow buttons to highlight Date & Time and press MENU/OK. 4. E190VA / E220VA / E260VA / E261VA Changing the On-Screen Menu Language Your TV can : • Set the time zone • Adjust the time for daylight savings • Enable or disable...
