Manuel de l Utilisateur
Page 16
...this device. NOTE: Accepting the terms and policiesis a condition of using the Cast functionality of By pressing "Accep VIZIO Term Conditio 16 You can turn your VIZIO TV. By pressing "Accept All", you agree to your phone into one simple experience. Home Network Home Use ...NOTE: Accepting the terms and policiesis a condition of using the Cast functionality of Service and Privacy Policy. You can turn your VIZIO TV. Acceptez les conditions et restrictions et enregistreUSAz votre apMepxicoareil. shows now! ASdtdarCtuWstaotmchiLnogcation Game Room By the way... Let's...
...this device. NOTE: Accepting the terms and policiesis a condition of using the Cast functionality of By pressing "Accep VIZIO Term Conditio 16 You can turn your VIZIO TV. By pressing "Accept All", you agree to your phone into one simple experience. Home Network Home Use ...NOTE: Accepting the terms and policiesis a condition of using the Cast functionality of Service and Privacy Policy. You can turn your VIZIO TV. Acceptez les conditions et restrictions et enregistreUSAz votre apMepxicoareil. shows now! ASdtdarCtuWstaotmchiLnogcation Game Room By the way... Let's...
User Manual
Page 2
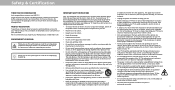
... installation services for replacement of the obsolete outlet. • Never push any objects on your new VIZIO TV. Your TV is provided. Keep these instructions before turning on your TV to qualified service personnel. WHEN READING THIS MANUAL • Heed all warnings. •...use , and maintenance of your TV. TV. We recommend that apparatus combination to operate within defined design limits. When you register your VIZIO product at (877) 698-4946. the apparatus. • When connected to the presence of important operating instructions. To totally disconnect ...
... installation services for replacement of the obsolete outlet. • Never push any objects on your new VIZIO TV. Your TV is provided. Keep these instructions before turning on your TV to qualified service personnel. WHEN READING THIS MANUAL • Heed all warnings. •...use , and maintenance of your TV. TV. We recommend that apparatus combination to operate within defined design limits. When you register your VIZIO product at (877) 698-4946. the apparatus. • When connected to the presence of important operating instructions. To totally disconnect ...

User Manual
Page 6
... 35 Adjusting the CEC Settings 35 Changing the TV Name 36 Using the Reset & Admin Menu 37 Restoring the TV to Factory Default Settings 37 Turning the Power Indicator On or Off 37 Using the Info Window 39 SmartCast HomeSM 40 What is SmartCast Home 40 What You Can Do with...
... 35 Adjusting the CEC Settings 35 Changing the TV Name 36 Using the Reset & Admin Menu 37 Restoring the TV to Factory Default Settings 37 Turning the Power Indicator On or Off 37 Using the Info Window 39 SmartCast HomeSM 40 What is SmartCast Home 40 What You Can Do with...

User Manual
Page 7
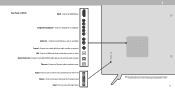
Getting to Know Your TV 1 FRONT PANEL Remote Sensor and Power Indicator When using the remote, aim it directly at this sensor. To keep the power indicator on as long as the TV is on , then goes out after several seconds. The power indicator flashes on when the TV turns on , see Turning the Power Indicator On or Off. 7
Getting to Know Your TV 1 FRONT PANEL Remote Sensor and Power Indicator When using the remote, aim it directly at this sensor. To keep the power indicator on as long as the TV is on , then goes out after several seconds. The power indicator flashes on when the TV turns on , see Turning the Power Indicator On or Off. 7
User Manual
Page 8
... - Connect a composite. Connect 3.5 mm audio device, such as home audio receiver. Volume - Press and hold to turn the TV off. VOL Input - USB - Press to turn on the model. 8 Press to play photo, music, or video. Optical Audio Out - Connect to increase or decrease... the TV volume level. D24h-G9 HDMI - Connect an HDMI device. Composite - Video/ L/R Coaxial - Power - Press to a coaxial cable from ...
... - Connect a composite. Connect 3.5 mm audio device, such as home audio receiver. Volume - Press and hold to turn the TV off. VOL Input - USB - Press to turn on the model. 8 Press to play photo, music, or video. Optical Audio Out - Connect to increase or decrease... the TV volume level. D24h-G9 HDMI - Connect an HDMI device. Composite - Video/ L/R Coaxial - Power - Press to a coaxial cable from ...
User Manual
Page 9
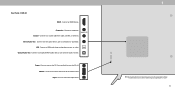
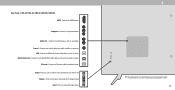
Press to turn the TV off. The actual number of ports and their locations may be subject to modem/ router. Connect an HDMI device. Coaxial - Optical Audio Out - .... Connect to play photo, music, or video. Ethernet - Press and hold to an optical/SPDIF audio device, such as sound bar. Rear Panel - Connect to turn on the model. 9 D40f-G9 HDMI - Component/Composite - Connect to increase or decrease the TV volume level. USB - Press to a coaxial cable from cable, satellite, or antenna.
Press to turn the TV off. The actual number of ports and their locations may be subject to modem/ router. Connect an HDMI device. Coaxial - Optical Audio Out - .... Connect to play photo, music, or video. Ethernet - Press and hold to an optical/SPDIF audio device, such as sound bar. Rear Panel - Connect to turn on the model. 9 D40f-G9 HDMI - Component/Composite - Connect to increase or decrease the TV volume level. USB - Press to a coaxial cable from cable, satellite, or antenna.
User Manual
Page 10
D32h-G9, D50x-G9, V405-G9, V505-G9 & V655-G9 HDMI - Coaxial - Connect a USB thumb drive to access the input menu. Optical Audio Out - Connect to an RCA device, such as home audio receiver. INPUT 1 ... device, such as sound bar. Ethernet - Press and hold to change. VOL Input - The actual number of ports and their locations may be subject to turn on the model. 10 Power - Press to play photo, music, or video. Connect an Ethernet cable to increase or decrease the TV volume level. Press...
D32h-G9, D50x-G9, V405-G9, V505-G9 & V655-G9 HDMI - Coaxial - Connect a USB thumb drive to access the input menu. Optical Audio Out - Connect to an RCA device, such as home audio receiver. INPUT 1 ... device, such as sound bar. Ethernet - Press and hold to change. VOL Input - The actual number of ports and their locations may be subject to turn on the model. 10 Power - Press to play photo, music, or video. Connect an Ethernet cable to increase or decrease the TV volume level. Press...
User Manual
Page 11
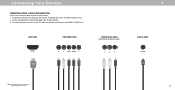
AUDIO & VIDEO CABLE TYPES Your TV can be used (HDMI-1, HDMI-2, etc.). Verify that your device on the TV (HDMI, Component, etc.). 2. Turn the TV and your device has a video port that matches an available port on . Connecting Your Devices CONNECTING A DEVICE - Connect the appropriate cable (not included) ...
AUDIO & VIDEO CABLE TYPES Your TV can be used (HDMI-1, HDMI-2, etc.). Verify that your device on the TV (HDMI, Component, etc.). 2. Turn the TV and your device has a video port that matches an available port on . Connecting Your Devices CONNECTING A DEVICE - Connect the appropriate cable (not included) ...
User Manual
Page 12
Connect the appropriate cable (not included) to match the connection you used (Composite). Composite input on back of TV* Video/ L/R Connecting to a composite device Video / Audio L/R Adapter (Not Included) *The actual ports and their locations may vary, depending on the TV model. 1 Composite Connection on . CONNECTING A DEVICE - Turn the TV and your device on Your Device 12 D24h-G9 ONLY D24h-G9 includes a Composite In / AV In port that requires additional adapters (not included). 1. Set the TV's input to the TV and the device using an adapter (not included). 2.
Connect the appropriate cable (not included) to match the connection you used (Composite). Composite input on back of TV* Video/ L/R Connecting to a composite device Video / Audio L/R Adapter (Not Included) *The actual ports and their locations may vary, depending on the TV model. 1 Composite Connection on . CONNECTING A DEVICE - Turn the TV and your device on Your Device 12 D24h-G9 ONLY D24h-G9 includes a Composite In / AV In port that requires additional adapters (not included). 1. Set the TV's input to the TV and the device using an adapter (not included). 2.
User Manual
Page 13
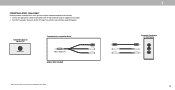
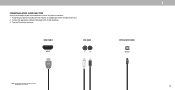
Verify that matches an available port on . Turn the TV and your device has audio port that your device on the TV (Optical, RCA, etc). 2. AUDIO CABLE TYPES Your TV can be output sound to the TV and the device. 3. HDMI CABLE HDMI RCA CABLE L R 1 OPTICAL/SPDIF CABLE Optical Note: The actual ports and their locations may vary, depending on the TV model. 13 Connect the appropriate cable (not included) to an audio device, such as a receiver or sound bar. 1. CONNECTING A DEVICE -
Verify that matches an available port on . Turn the TV and your device has audio port that your device on the TV (Optical, RCA, etc). 2. AUDIO CABLE TYPES Your TV can be output sound to the TV and the device. 3. HDMI CABLE HDMI RCA CABLE L R 1 OPTICAL/SPDIF CABLE Optical Note: The actual ports and their locations may vary, depending on the TV model. 13 Connect the appropriate cable (not included) to an audio device, such as a receiver or sound bar. 1. CONNECTING A DEVICE -
User Manual
Page 15
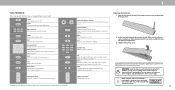
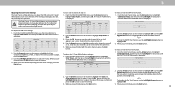
...the battery cover. Please ensure you live. For more information please visit: www.vizio.com/environment WARNING: keep the remote control batteries away from children. Insert a coin and pry open the back cover. 2. Mute Turn the audio on or off Input Change the currently displayed input App Launcher Quickly... menu by holding down each of the remote. Do not dispose of your model. Channel Up/Down Change the channel When needed, VIZIO recommends replacing the batteries that came with this button for example, 18-4 or 18-5) Wide Change the picture display size/aspect ratio ...
...the battery cover. Please ensure you live. For more information please visit: www.vizio.com/environment WARNING: keep the remote control batteries away from children. Insert a coin and pry open the back cover. 2. Mute Turn the audio on or off Input Change the currently displayed input App Launcher Quickly... menu by holding down each of the remote. Do not dispose of your model. Channel Up/Down Change the channel When needed, VIZIO recommends replacing the batteries that came with this button for example, 18-4 or 18-5) Wide Change the picture display size/aspect ratio ...
User Manual
Page 16
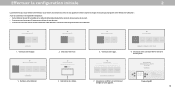
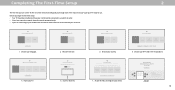
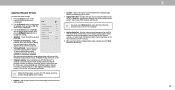
... your TV. ChooHsoewaaWrei-yFoi uNuestwinogrky.our TV? Choose home use of this device. Let's seCt uhpoolosceaal cWhia-FninNelest.work. VIZIO Terms & Conditions VIZIO Privacy Policy Google Privacy Policy Google Terms & Conditons Skip For Now Accept All 7. Congratulations! Before you begin the first-...the password. Home Use Store Demo 2. All set up local channels. Completing The First-Time Setup 2 The first time you turn your phone into one simple experience. USA Mexico Canada Choose a Wi-Fi Network. 3. Next Skip Public Wi-Fi John's Network...
... your TV. ChooHsoewaaWrei-yFoi uNuestwinogrky.our TV? Choose home use of this device. Let's seCt uhpoolosceaal cWhia-FninNelest.work. VIZIO Terms & Conditions VIZIO Privacy Policy Google Privacy Policy Google Terms & Conditons Skip For Now Accept All 7. Congratulations! Before you begin the first-...the password. Home Use Store Demo 2. All set up local channels. Completing The First-Time Setup 2 The first time you turn your phone into one simple experience. USA Mexico Canada Choose a Wi-Fi Network. 3. Next Skip Public Wi-Fi John's Network...
User Manual
Page 21
... their settings. If no longer needed can be restored to enter a unique 4-digit PIN. Press the Exit button to highlight Reset and press OK. 3. Then turn ON Lock Picture Mode. 6. Use the Left/Right Arrow buttons to exit the menu screens. Use the Number Pad on your remote to enter your...
... their settings. If no longer needed can be restored to enter a unique 4-digit PIN. Press the Exit button to highlight Reset and press OK. 3. Then turn ON Lock Picture Mode. 6. Use the Left/Right Arrow buttons to exit the menu screens. Use the Number Pad on your remote to enter your...
User Manual
Page 22
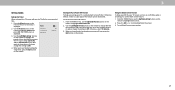
... Red Hue 0 Saturation -1 Brightness -24 Offset 0 Gain 0 Green 0 5 0 0 0 Color Tuner Blue 0 -4 -22 0 0 Cyan 0 0 0 Magenta 25 -2 0 Yellow -14 0 0 2. To turn the color channel off for the flat test pattern. From the COLOR CALIBRATION menu, use the Arrow buttons to highlight Color Tuner, and then press...To show or hide the SMPTE Test Pattern: 1. The COLOR TUNER menu is displayed. An X appears over a color channel that has been turned off at that brightness. -or- When you wish to highlight Off. Use the Arrow buttons on the remote to highlight the Hue, Saturation,...
... Red Hue 0 Saturation -1 Brightness -24 Offset 0 Gain 0 Green 0 5 0 0 0 Color Tuner Blue 0 -4 -22 0 0 Cyan 0 0 0 Magenta 25 -2 0 Yellow -14 0 0 2. To turn the color channel off for the flat test pattern. From the COLOR CALIBRATION menu, use the Arrow buttons to highlight Color Tuner, and then press...To show or hide the SMPTE Test Pattern: 1. The COLOR TUNER menu is displayed. An X appears over a color channel that has been turned off at that brightness. -or- When you wish to highlight Off. Use the Arrow buttons on the remote to highlight the Hue, Saturation,...
User Manual
Page 24
...On the setting you have finished adjusting the audio settings, press the Exit button on the remote. • Balance - If this occurs, turn volume leveling off. Adjusts the synchronization between On or Off to hide or display the on the remote Speakers Auto to deliver an immersive surround...with the TV's volume controls, or select Fixed if an external audio device (sound bar or AV receiver) will control the volume. 4. Turns the built-in speakers Digital Audio Out Auto On or Off. TruSurround completes the entertainment experience by providing deep, rich bass and by delivering ...
...On the setting you have finished adjusting the audio settings, press the Exit button on the remote. • Balance - If this occurs, turn volume leveling off. Adjusts the synchronization between On or Off to hide or display the on the remote Speakers Auto to deliver an immersive surround...with the TV's volume controls, or select Fixed if an external audio device (sound bar or AV receiver) will control the volume. 4. Turns the built-in speakers Digital Audio Out Auto On or Off. TruSurround completes the entertainment experience by providing deep, rich bass and by delivering ...
User Manual
Page 27
... use the Up/Down Arrow buttons on the remote to highlight Timers and press OK. Press the OK button to change whether the TV will turn the TV off after a set period of time after 10 minutes without a video or audio signal. The TIMERS menu is no signal, change the setting... Screen Feature To help save LED life, your TV is streaming. From the TIMERS menu, use the Up/Down Arrow buttons on the remote to turn off after which you don't want the sleep timer to activate, change the setting to Off. The on or off while audio is set the...
... use the Up/Down Arrow buttons on the remote to highlight Timers and press OK. Press the OK button to change whether the TV will turn the TV off after a set period of time after 10 minutes without a video or audio signal. The TIMERS menu is no signal, change the setting... Screen Feature To help save LED life, your TV is streaming. From the TIMERS menu, use the Up/Down Arrow buttons on the remote to turn off after which you don't want the sleep timer to activate, change the setting to Off. The on or off while audio is set the...
User Manual
Page 36
...name: 1. Press the Menu button on -screen Menu is displayed. The SYSTEM Menu is displayed. 3. Turn Text-to navigate and select Closed Captions. The on the remote. Your new VIZIO TV offers several accessibility features that can help you can be paired with a mobile device so you get.... Press the Menu button on the remote. Ok Cancel Manging Mobile Devices Your TV can easily control your TV across multiple devices . Accessibility settings VIZIO is displayed. 2. Talk Back - 3 Changing the TV Name Naming your TV helps differentiate it and press OK. 5. The on the remote ...
...name: 1. Press the Menu button on -screen Menu is displayed. The SYSTEM Menu is displayed. 3. Turn Text-to navigate and select Closed Captions. The on the remote. Your new VIZIO TV offers several accessibility features that can help you can be paired with a mobile device so you get.... Press the Menu button on the remote. Ok Cancel Manging Mobile Devices Your TV can easily control your TV across multiple devices . Accessibility settings VIZIO is displayed. 2. Talk Back - 3 Changing the TV Name Naming your TV helps differentiate it and press OK. 5. The on the remote ...
User Manual
Page 37
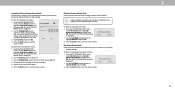
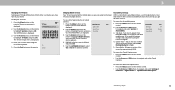
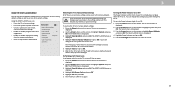
...enter it now. The RESET & ADMIN menu is displayed. 3. The SYSTEM menu is displayed. 4. The RESET & ADMIN menu is displayed. 2. The TV will turn off then on the remote to highlight Reset & Admin and press OK. Press the Menu button on the remote. 3 USING THE RESET & ADMIN MENU You... Mode Reset & Admin Back Reset to Factory Defaults Soft Power Cycle Power Indicator On System PIN Code USB Power Always On Viewing Data VIZIO Privacy Policy Store Demo Restoring the TV to the factory defaults. If you can be reset to Factory Default Settings All of your TV...
...enter it now. The RESET & ADMIN menu is displayed. 3. The SYSTEM menu is displayed. 4. The RESET & ADMIN menu is displayed. 2. The TV will turn off then on the remote to highlight Reset & Admin and press OK. Press the Menu button on the remote. 3 USING THE RESET & ADMIN MENU You... Mode Reset & Admin Back Reset to Factory Defaults Soft Power Cycle Power Indicator On System PIN Code USB Power Always On Viewing Data VIZIO Privacy Policy Store Demo Restoring the TV to the factory defaults. If you can be reset to Factory Default Settings All of your TV...

User Manual
Page 38
...and commercials viewed (including time, date, channel, and whether you might find useful, both on -screen menu is displayed. 2. You can easily turn this feature USB Power Back are: Always On • Always On - System PIN Code Back Change the PIN used to help content publishers, ...System and press OK. If you will need to create a PIN. Off When TV Off • Off When TV Off - Cancel Save 6. VIZIO Viewing Data is collectively referred to as prevent accidental system resets. Highlight Reset & Admin and press OK. Press the Menu button on summary insights,...
...and commercials viewed (including time, date, channel, and whether you might find useful, both on -screen menu is displayed. 2. You can easily turn this feature USB Power Back are: Always On • Always On - System PIN Code Back Change the PIN used to help content publishers, ...System and press OK. If you will need to create a PIN. Off When TV Off • Off When TV Off - Cancel Save 6. VIZIO Viewing Data is collectively referred to as prevent accidental system resets. Highlight Reset & Admin and press OK. Press the Menu button on summary insights,...
User Manual
Page 40
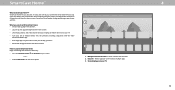
... apps, like Netflix, Hulu, and Amazon Prime Video by mirroring your laptop or mobile device onto your TV. • Turn your iOS or Android device into the ultimate streaming companion with the VIZIO SmartCast Mobile app. • Rearrange apps on your photos and videos by using the remote to watch easy and...
... apps, like Netflix, Hulu, and Amazon Prime Video by mirroring your laptop or mobile device onto your TV. • Turn your iOS or Android device into the ultimate streaming companion with the VIZIO SmartCast Mobile app. • Rearrange apps on your photos and videos by using the remote to watch easy and...


