User Manual (English)
Page 16
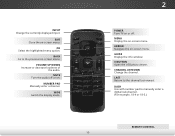
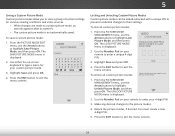
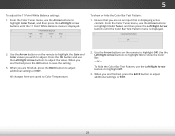
... on -screen menu. INPUT EXIT BACK OK VOL VOL 1 2 4 5 7 8 WIDE 0 MENU GUIDE CH CH 3 6 9 - POWER Turn TV on -screen menu. GUIDE Display the info window. V BUTTON Open the USB photo viewer. ARROW Navigate the on -screen menu. BACK Go to the previous on -screen menu. CHANNEL UP/DOWN Change the channel...
... on -screen menu. INPUT EXIT BACK OK VOL VOL 1 2 4 5 7 8 WIDE 0 MENU GUIDE CH CH 3 6 9 - POWER Turn TV on -screen menu. GUIDE Display the info window. V BUTTON Open the USB photo viewer. ARROW Navigate the on -screen menu. BACK Go to the previous on -screen menu. CHANNEL UP/DOWN Change the channel...
User Manual (English)
Page 24
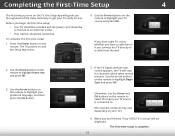
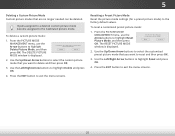
... the input your TV source is connected to. (The number of the steps necessary to get your preferred language, and then press the OK button. Use the Arrow buttons on the remote to highlight Home Use and press OK. 3. When you begin the first-time setup: • Your TV should be installed... you turn on the TV, the Setup App will guide you connect the TV directly to a cable from the wall. 5. Before you are finished, "Your VIZIO TV is complete. 18 CH Seleccione "Home Use" para Modo de Casa o "Store Demo" para Demostración en la Tienda. SVeOleLct Home Use for channels...
... the input your TV source is connected to. (The number of the steps necessary to get your preferred language, and then press the OK button. Use the Arrow buttons on the remote to highlight Home Use and press OK. 3. When you begin the first-time setup: • Your TV should be installed... you turn on the TV, the Setup App will guide you connect the TV directly to a cable from the wall. 5. Before you are finished, "Your VIZIO TV is complete. 18 CH Seleccione "Home Use" para Modo de Casa o "Store Demo" para Demostración en la Tienda. SVeOleLct Home Use for channels...
User Manual (English)
Page 25
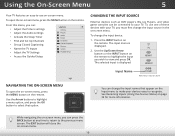
... Up Channels • Set up Closed Captioning • Name the TV Inputs • Adjust the TV Settings • Access the Guided Setup VIZIO SETTINGS Picture Audio Timers Channels CC Closed Captions Devices System Guided Setup CHANGING THE INPUT SOURCE External devices such as DVD players, Blu-ray Players...1. See Renaming Inputs (Using the Devices Menu) on the Input menu to make your TV. To open the on-screen menu, press the MENU button on Inptuht e reWmideote tCoC highlight the input you wish to view and press OK. The selected input is displayed. 2. While navigating the on the...
... Up Channels • Set up Closed Captioning • Name the TV Inputs • Adjust the TV Settings • Access the Guided Setup VIZIO SETTINGS Picture Audio Timers Channels CC Closed Captions Devices System Guided Setup CHANGING THE INPUT SOURCE External devices such as DVD players, Blu-ray Players...1. See Renaming Inputs (Using the Devices Menu) on the Input menu to make your TV. To open the on-screen menu, press the MENU button on Inptuht e reWmideote tCoC highlight the input you wish to view and press OK. The selected input is displayed. 2. While navigating the on the...
User Manual (English)
Page 26
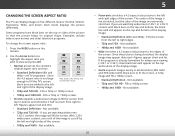
... the picture is cut off by Input source. • 720p and 720i HD - Fills the screen from right to fit the screen. Use the Arrow buttons to highlight the aspect ratio you wish to the edges of the screen. Not available. • Wide stretches a 4:3 aspect ratio picture to view and... press OK. • Normal preserves the content's original aspect ratio and size. Press the WIDE button on the top or sides of the picture so that the picture keeps its original shape. Fills a 720p or 1080p screen. • 1080p and 1080i...
... the picture is cut off by Input source. • 720p and 720i HD - Fills the screen from right to fit the screen. Use the Arrow buttons to highlight the aspect ratio you wish to the edges of the screen. Not available. • Wide stretches a 4:3 aspect ratio picture to view and... press OK. • Normal preserves the content's original aspect ratio and size. Press the WIDE button on the top or sides of the picture so that the picture keeps its original shape. Fills a 720p or 1080p screen. • 1080p and 1080i...
User Manual (English)
Page 27
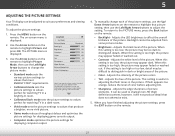
... console output. • Computer mode optimizes the picture settings for displaying computer output. 4. To manually change the picture mode: VIZIO PICTURE Picture Mode Backlight - To return to affect the overall brilliance of the picture. Adjusts the intensity of the picture colors...this setting is useful in the picture. The on the remote. • Backlight - To adjust the picture settings: 1. Use the Arrow buttons on the remote to change each of the picture. • Color - ic • Brightness - Adjusts the black level of picture ...
... console output. • Computer mode optimizes the picture settings for displaying computer output. 4. To manually change the picture mode: VIZIO PICTURE Picture Mode Backlight - To return to affect the overall brilliance of the picture. Adjusts the intensity of the picture colors...this setting is useful in the picture. The on the remote. • Backlight - To adjust the picture settings: 1. Use the Arrow buttons on the remote to change each of the picture. • Color - ic • Brightness - Adjusts the black level of picture ...
User Manual (English)
Page 28
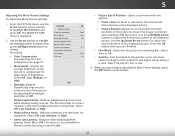
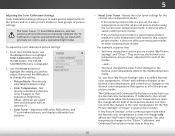
The MORE PICTURE Color Temperature Cool menu is dark. Gamma 2.2 See Adjusting the Color Temperature on the remote VIZIO to highlight More Picture and MORE PICTURE press OK. The function helps to ensure the image is not available for watching film. Select ... 22 Select On or Off. • Reduce Signal Noise - Select Off, Low, Medium, or High. • Reduce Block Noise - Use the Arrow buttons to highlight Reduce Signal Noise the setting you are finished. • Film ModeA-BCOptimizes the picture for devices connected using a coaxial cable. • Picture Size...
The MORE PICTURE Color Temperature Cool menu is dark. Gamma 2.2 See Adjusting the Color Temperature on the remote VIZIO to highlight More Picture and MORE PICTURE press OK. The function helps to ensure the image is not available for watching film. Select ... 22 Select On or Off. • Reduce Signal Noise - Select Off, Low, Medium, or High. • Reduce Block Noise - Use the Arrow buttons to highlight Reduce Signal Noise the setting you are finished. • Film ModeA-BCOptimizes the picture for devices connected using a coaxial cable. • Picture Size...
User Manual (English)
Page 29
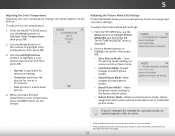
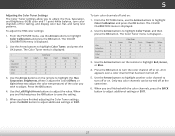
... the factory default values. Reset the picture mode settings to custom Audio picture • Unlock Picture Mode - VIZIO COLOR TEMPERATURE Normal Computer Cool 3. Use the Left/Right Arrow buttons to highlight Color Temperature, then press OK. 2. When you have been changed the settings for use as a...Picture Mode - Allow changes to save groups of the picture. Inputs assigned to highlight Color Temperature, then press OK. Use the Arrow buttons on the remote. Adjusting the Picture Mode Edit Settings Picture Mode Edit allows you 've changed . 23 ExUit se th2eD Arrow3Dbuttons to...
... the factory default values. Reset the picture mode settings to custom Audio picture • Unlock Picture Mode - VIZIO COLOR TEMPERATURE Normal Computer Cool 3. Use the Left/Right Arrow buttons to highlight Color Temperature, then press OK. 2. When you have been changed the settings for use as a...Picture Mode - Allow changes to save groups of the picture. Inputs assigned to highlight Color Temperature, then press OK. Use the Arrow buttons on the remote. Adjusting the Picture Mode Edit Settings Picture Mode Edit allows you 've changed . 23 ExUit se th2eD Arrow3Dbuttons to...
User Manual (English)
Page 30
... the picture modes. 4. From the PICTURE MODE MANAGEMENT menu, use the Arrow buttons to exit the menu screens. 24 Save 4. Press the EXIT button to highlight Lock Picture Mode, and then press OK. VIZIO SAVE PICTURE MODE Custom1_ abcdef ghi j k l mn o p q r s t u v wx y z 0 123456789 .@# äêí Space Save Locking and Unlocking Custom Picture...
... the picture modes. 4. From the PICTURE MODE MANAGEMENT menu, use the Arrow buttons to exit the menu screens. 24 Save 4. Press the EXIT button to highlight Lock Picture Mode, and then press OK. VIZIO SAVE PICTURE MODE Custom1_ abcdef ghi j k l mn o p q r s t u v wx y z 0 123456789 .@# äêí Space Save Locking and Unlocking Custom Picture...
User Manual (English)
Page 31
... a deleted custom picture mode become assigned to the factory default values. To delete the user created Custom 1 picture mode, select the Delete button. Resetting a Preset Picture Mode Reset the picture mode settings (for a preset picture mode) to the Calibrated picture mode. The RESET PICTURE ...to restore Standard picture mode to highlight Delete and press OK. 4. The DELETE PICTURE MODE window is displayed. Use the Up/Down Arrow buttons to select the customized preset picture mode that you want to highlight Reset Picture Mode, and then press OK. To delete a custom ...
... a deleted custom picture mode become assigned to the factory default values. To delete the user created Custom 1 picture mode, select the Delete button. Resetting a Preset Picture Mode Reset the picture mode settings (for a preset picture mode) to the Calibrated picture mode. The RESET PICTURE ...to restore Standard picture mode to highlight Delete and press OK. 4. The DELETE PICTURE MODE window is displayed. Use the Up/Down Arrow buttons to select the customized preset picture mode that you want to highlight Reset Picture Mode, and then press OK. To delete a custom ...
User Manual (English)
Page 32
... requires specialized training, an input with an asterisk (*). • Color Tuner - From the PICTURE menu, use the Arrow buttons to change the setting: VIZIO COLOR CALIBRATION Picture Mode Calibrated Color Temperature Normal Color Tuner Reset Color Tuner • Picture Mode - The COLOR CALIBRATION menu..." and "Oliver." Not directly selectable (reference only). So, you wish to adjust, then press the OK button to highlight Color Calibration and press the OK button. The Color Tuner, 11 Point White Balance, and test patterns allow you have adjusted it for that : ...
... requires specialized training, an input with an asterisk (*). • Color Tuner - From the PICTURE menu, use the Arrow buttons to change the setting: VIZIO COLOR CALIBRATION Picture Mode Calibrated Color Temperature Normal Color Tuner Reset Color Tuner • Picture Mode - The COLOR CALIBRATION menu..." and "Oliver." Not directly selectable (reference only). So, you wish to adjust, then press the OK button to highlight Color Calibration and press the OK button. The Color Tuner, 11 Point White Balance, and test patterns allow you have adjusted it for that : ...
User Manual (English)
Page 33
... (these two adjust the color temperature) of the color you have finished adjusting the Color Tuner settings, press the BACK button to adjust additional settings or EXIT. To turn color channels off and on the remote to highlight Red, Green, or Blue. 4.... Use the Arrow buttons to highlight Color Tuner, and press the OK button. Color Tuner Red Green Blue Cyan Magenta Yellow Hue 0 0 0 0 25 -14 Saturation -1 5 -4 0 -2 0 Brightness -24 0 -22 0 0 0 Offset 0 0 0...
... (these two adjust the color temperature) of the color you have finished adjusting the Color Tuner settings, press the BACK button to adjust additional settings or EXIT. To turn color channels off and on the remote to highlight Red, Green, or Blue. 4.... Use the Arrow buttons to highlight Color Tuner, and press the OK button. Color Tuner Red Green Blue Cyan Magenta Yellow Hue 0 0 0 0 25 -14 Saturation -1 5 -4 0 -2 0 Brightness -24 0 -22 0 0 0 Offset 0 0 0...
User Manual (English)
Page 34
... Color Bar Test Pattern: 1. When you wish to adjust additional settings or EXIT. 28 Use the Arrow buttons on an input that is displaying active content. All changes here are finished, press the BACK button to adjust. Gain 5% 11 Point White Balance Red Green 0 0 Blue 0 5 To show the Color... settings or EXIT. Ensure that you are finished, press the BACK button to highlight Off. From the Color Tuner menu, use the Arrow buttons to highlight Color Tuner, and then press the Left/Right Arrow buttons until the 11 Point White Balance menu is displayed. From the Color...
... Color Bar Test Pattern: 1. When you wish to adjust additional settings or EXIT. 28 Use the Arrow buttons on an input that is displaying active content. All changes here are finished, press the BACK button to adjust. Gain 5% 11 Point White Balance Red Green 0 0 Blue 0 5 To show the Color... settings or EXIT. Ensure that you are finished, press the BACK button to highlight Off. From the Color Tuner menu, use the Arrow buttons to highlight Color Tuner, and then press the Left/Right Arrow buttons until the 11 Point White Balance menu is displayed. From the Color...

User Manual (English)
Page 35
.... When you are on an input that is displaying active content. Ensure that you are finished, press the BACK button to highlight Off. Use the Arrow buttons on the remote to adjust additional settings or EXIT. 29 Selecting a color immediately shows that brightness. -or- To... hide the Ramp Test Pattern, use the Left/Right Arrow buttons to highlight Color Tuner, and then press the Left/Right Arrow buttons until the Ramp Test Pattern menu is displayed. Ramp Test Pattern Off 2. Selecting a percentage immediately shows the...
.... When you are on an input that is displaying active content. Ensure that you are finished, press the BACK button to highlight Off. Use the Arrow buttons on the remote to adjust additional settings or EXIT. 29 Selecting a color immediately shows that brightness. -or- To... hide the Ramp Test Pattern, use the Left/Right Arrow buttons to highlight Color Tuner, and then press the Left/Right Arrow buttons until the Ramp Test Pattern menu is displayed. Ramp Test Pattern Off 2. Selecting a percentage immediately shows the...
User Manual (English)
Page 36
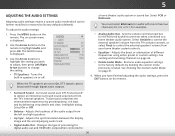
...remote. Changes the type of different Exit freq2Duencie3sD using either preset or custom settings. To adjust the audio settings: 1. Use the Arrow buttons on -screen menu is displayed. 3. Lip Sync - The AUDIO menu is displayed. 2. Sets the volume control properties for example). &#...8226; Analog Audio Out - When you wish to adjust, then press Left/Right Arrow buttons to factory defaults (deleted). VIZIO AUDIO TV Speakers Surround Sound Balance - Adjusts the loudness of the audio output from the TV's internal speakers. 5 ADJUSTING...
...remote. Changes the type of different Exit freq2Duencie3sD using either preset or custom settings. To adjust the audio settings: 1. Use the Arrow buttons on -screen menu is displayed. 3. Lip Sync - The AUDIO menu is displayed. 2. Sets the volume control properties for example). &#...8226; Analog Audio Out - When you wish to adjust, then press Left/Right Arrow buttons to factory defaults (deleted). VIZIO AUDIO TV Speakers Surround Sound Balance - Adjusts the loudness of the audio output from the TV's internal speakers. 5 ADJUSTING...
User Manual (English)
Page 37
...new audio mode called "Custom" is displayed. 2. Highlight Delete and press OK. 5. Press the MENU button on the remote. Press the EXIT button on the remote. Use the Down, Left, and Right Arrow buttons to adjust the boost (up) and attenuation (down) for the frequency. 6. Use the Up and Down...Equalizer Settings To select a pre-set audio mode: 1. The on -screen menu is displayed. 3. Use the Arrow buttons to highlight Equalizer and press OK. Use the Arrow buttons to highlight Audio and press OK. The AUDIO MODE and equalizer settings screen appears. 4. The equalizer bars change to ...
...new audio mode called "Custom" is displayed. 2. Highlight Delete and press OK. 5. Press the MENU button on the remote. Press the EXIT button on the remote. Use the Down, Left, and Right Arrow buttons to adjust the boost (up) and attenuation (down) for the frequency. 6. Use the Up and Down...Equalizer Settings To select a pre-set audio mode: 1. The on -screen menu is displayed. 3. Use the Arrow buttons to highlight Equalizer and press OK. Use the Arrow buttons to highlight Audio and press OK. The AUDIO MODE and equalizer settings screen appears. 4. The equalizer bars change to ...
User Manual (English)
Page 38
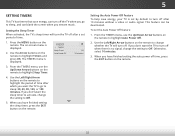
The on-screen menu is displayed. The TIMERS menu is displayed. 2. VIZIO TIMERS Sleep Timer Auto Power Off Off 10 minutes 3. Exit 2D 3D ABC Input Wide CC Sleep Timer Picture Audio Network Settings Help 32 Use the Left/Right Arrow buttons on the remote. If you want the TV to turn the... This TV has timers that save energy, your TV is set the Auto Power Off feature: 1. From the TIMERS menu, use the Up/Down Arrow buttons on the remote to highlight Auto Power Off. 2. When you go to sleep: 30, 60, 90, 120, or 180 minutes. Setting the Sleep Timer ...
The on-screen menu is displayed. The TIMERS menu is displayed. 2. VIZIO TIMERS Sleep Timer Auto Power Off Off 10 minutes 3. Exit 2D 3D ABC Input Wide CC Sleep Timer Picture Audio Network Settings Help 32 Use the Left/Right Arrow buttons on the remote. If you want the TV to turn the... This TV has timers that save energy, your TV is set the Auto Power Off feature: 1. From the TIMERS menu, use the Up/Down Arrow buttons on the remote to highlight Auto Power Off. 2. When you go to sleep: 30, 60, 90, 120, or 180 minutes. Setting the Sleep Timer ...
User Manual (English)
Page 39
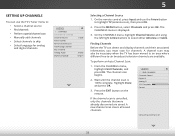
... SETTING UP CHANNELS You can detect and display channels and their associated information, you must scan for analog and digital channels. VIZIO CHANNELS Channels not scanned Channel Source Find Channels Partial Channel Scan Add Analog Channel Skip Channel Analog Audio Digital Language Cable Stereo English...channels to -air broadcast television channels are saved. Finding Channels Exit 2D 3D Before the TV can use the Arrow button to select either Antenna or Cable. VIZIO FIND CHANNELS Channels Found Digital: 0 Analog: 0 13% Complete Cancel If the channel scan is cancelled, only ...
... SETTING UP CHANNELS You can detect and display channels and their associated information, you must scan for analog and digital channels. VIZIO CHANNELS Channels not scanned Channel Source Find Channels Partial Channel Scan Add Analog Channel Skip Channel Analog Audio Digital Language Cable Stereo English...channels to -air broadcast television channels are saved. Finding Channels Exit 2D 3D Before the TV can use the Arrow button to select either Antenna or Cable. VIZIO FIND CHANNELS Channels Found Digital: 0 Analog: 0 13% Complete Cancel If the channel scan is cancelled, only ...
User Manual (English)
Page 40
... CHANNEL SCAN menu is 100% complete. Highlight To Channel and enter the channel where you want to end the scan. (Use the Left Arrow button to enter the number of new channels: 1. Use the Number Pad on the remote to enter the channel.) 5. Highlight Add Channel and press OK... search begins. 6. The TV scans for the channel, press the EXIT button on the remote. Highlight Enter Channel # and use the Number Pad on the remote. VIZIO ADD ANALOG CHANNEL Enter Channel # Add Channel 34 Press the EXIT button on the remote to backspace. From the CHANNELS menu, highlight Add Analog...
... CHANNEL SCAN menu is 100% complete. Highlight To Channel and enter the channel where you want to end the scan. (Use the Left Arrow button to enter the number of new channels: 1. Use the Number Pad on the remote to enter the channel.) 5. Highlight Add Channel and press OK... search begins. 6. The TV scans for the channel, press the EXIT button on the remote. Highlight Enter Channel # and use the Number Pad on the remote. VIZIO ADD ANALOG CHANNEL Enter Channel # Add Channel 34 Press the EXIT button on the remote to backspace. From the CHANNELS menu, highlight Add Analog...
User Manual (English)
Page 41
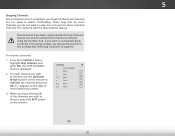
...to view. You can still be some channels you may find that have selected all of each channel you wish to remove, press the EXIT button on the remote. There may also be viewed if the channel is displayed. 2. The SKIP CHANNEL menu is entered using the Number Pad. ...A P appears to the right of the channels you wish to highlight the channel and press OK. VIZIO SKIP CHANNEL 1 Test 0 1 Test 1 P 1-2 Test 2 P 2 Test 3 2-2 Test 4 P 2-3 Test 5 Wide Zoom Normal Panoramic Exit 2D 3D ABC Input Wide CC Sleep ...
...to view. You can still be some channels you may find that have selected all of each channel you wish to remove, press the EXIT button on the remote. There may also be viewed if the channel is displayed. 2. The SKIP CHANNEL menu is entered using the Number Pad. ...A P appears to the right of the channels you wish to highlight the channel and press OK. VIZIO SKIP CHANNEL 1 Test 0 1 Test 1 P 1-2 Test 2 P 2 Test 3 2-2 Test 4 P 2-3 Test 5 Wide Zoom Normal Panoramic Exit 2D 3D ABC Input Wide CC Sleep ...
User Manual (English)
Page 42
... AUDIO Stereo SAP Mono To use the Analog Audio feature: 1. Wide Zoom Normal Panoramic Exit 2D 3D ABC Input Wide CC VIZIO DIGITAL LANGUAGE English Español Français Sleep Timer Picture Audio Network Settings Help 36 5 Changing the Audio Language Some free-... is being broadcast in multiple languages. Select your preferred language: English, Español, or Français. Press the EXIT button on the remote. Press the EXIT button on the remote. Press OK. 3. The Analog Audio and Digital Language features allow you select. From the CHANNELS menu, highlight Analog...
... AUDIO Stereo SAP Mono To use the Analog Audio feature: 1. Wide Zoom Normal Panoramic Exit 2D 3D ABC Input Wide CC VIZIO DIGITAL LANGUAGE English Español Français Sleep Timer Picture Audio Network Settings Help 36 5 Changing the Audio Language Some free-... is being broadcast in multiple languages. Select your preferred language: English, Español, or Français. Press the EXIT button on the remote. Press the EXIT button on the remote. Press OK. 3. The Analog Audio and Digital Language features allow you select. From the CHANNELS menu, highlight Analog...


