User Manual (English)
Page 5
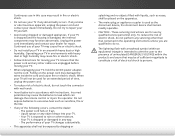
... power cord may cause fire or electric shock. • Do not install your TV changes substantially. • This apparatus shall not be placed on the apparatus. • The mains plug or appliance coupler is damaged, the internal components may function abnormally. If your TV. - When your TV. These servicing instructions are qualified to do not perform any way. - Operating...
... power cord may cause fire or electric shock. • Do not install your TV changes substantially. • This apparatus shall not be placed on the apparatus. • The mains plug or appliance coupler is damaged, the internal components may function abnormally. If your TV. - When your TV. These servicing instructions are qualified to do not perform any way. - Operating...
User Manual (English)
Page 6
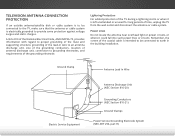
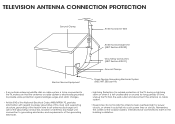
..., connection to grounding electrodes, and requirements of the grounding electrode. Article 810 of the National Electrical Code, ANSI/NFPSA 70, provides information with regard to proper grounding of the mast and supporting structure, grounding of time, unplug the TV from the wall outlet and disconnect the antenna or cable system. Power Lines Do not locate the antenna near overhead light or power...
..., connection to grounding electrodes, and requirements of the grounding electrode. Article 810 of the National Electrical Code, ANSI/NFPSA 70, provides information with regard to proper grounding of the mast and supporting structure, grounding of time, unplug the TV from the wall outlet and disconnect the antenna or cable system. Power Lines Do not locate the antenna near overhead light or power...
User Manual (English)
Page 7
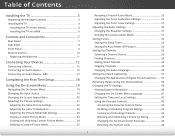
Table of Digital Closed Captions........ 37 Renaming Inputs (Using the Devices Menu 39 Changing the TV Settings 40 Viewing System Information 40 Changing the On-Screen Menu Language 41 Setting the Time and Local Settings 41 Using the Parental Controls 42 Accessing the Parental Controls Menu 42 Enabling or Disabling Program Ratings 42 Locking and Unlocking Channels 42 Blocking and Unblocking Content by Rating 43 Changing the Parental Control Passcode 43 Resetting the Content Locks 43 1 ARC 17 Completing the First-Time Setup 18 Using the On-Screen Menu 19...
Table of Digital Closed Captions........ 37 Renaming Inputs (Using the Devices Menu 39 Changing the TV Settings 40 Viewing System Information 40 Changing the On-Screen Menu Language 41 Setting the Time and Local Settings 41 Using the Parental Controls 42 Accessing the Parental Controls Menu 42 Enabling or Disabling Program Ratings 42 Locking and Unlocking Channels 42 Blocking and Unblocking Content by Rating 43 Changing the Parental Control Passcode 43 Resetting the Content Locks 43 1 ARC 17 Completing the First-Time Setup 18 Using the On-Screen Menu 19...
User Manual (English)
Page 8
Adjusting the Wide Mode (Aspect Ratio 44 Controlling Other Devices with CEC 45 Turning the Power Indicator On or Off 46 Restoring the TV to Factory Default Settings 46 Using the Guided Setup Menu 47 Using the Info Window 48 Using the USB Media Player 49 Preparing Your USB Drive to Display USB Media 49 Displaying USB Media 49 Removing the USB Drive from the TV 49 Troubleshooting & Technical Support 51 Specifications 54 Limited Warranty 56 Legal & Compliance 57 2
Adjusting the Wide Mode (Aspect Ratio 44 Controlling Other Devices with CEC 45 Turning the Power Indicator On or Off 46 Restoring the TV to Factory Default Settings 46 Using the Guided Setup Menu 47 Using the Info Window 48 Using the USB Media Player 49 Preparing Your USB Drive to Display USB Media 49 Displaying USB Media 49 Removing the USB Drive from the TV 49 Troubleshooting & Technical Support 51 Specifications 54 Limited Warranty 56 Legal & Compliance 57 2
User Manual (English)
Page 12
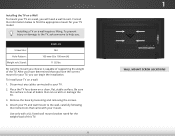
... removing the screws. 4. Disconnect any cables connected to find the appropriate mount for the weight/load of this TV. 6 1 WALL MOUNT SCREW LOCATIONS Attach your TV and wall mount to help you have the correct mount for your mount. To install your TV model: Installing a TV on a wall requires lifting. To prevent injury or damage to the TV, ask someone to the wall, carefully following the instructions that came with a UL-listed wall mount bracket...
... removing the screws. 4. Disconnect any cables connected to find the appropriate mount for the weight/load of this TV. 6 1 WALL MOUNT SCREW LOCATIONS Attach your TV and wall mount to help you have the correct mount for your mount. To install your TV model: Installing a TV on a wall requires lifting. To prevent injury or damage to the TV, ask someone to the wall, carefully following the instructions that came with a UL-listed wall mount bracket...
User Manual (English)
Page 21
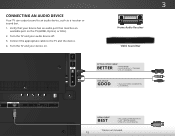
... TV (HDMI, Optical, or RCA). 2. Connect the appropriate cable to an audio device, such as a receiver or sound bar. 1. Turn the TV and your audio device off. 3. Verify that your device has an audio port that matches an available port on . 3 Home Audio Receiver VIZIO Sound Bar OPTICAL/SPDIF CABLE* BETTER • PCM STREAM • DOLBY DIGITAL 5.1 CHANNEL • DTS 5.1 CHANNEL RCA CABLE* GOOD • ANALOG STEREO CONNECTION • 2.0 CHANNEL HDMI CABLE* BEST • ARC 2-WAY COMMUNICATION • 2.0-5.1 DIGITAL AUDIO •...
... TV (HDMI, Optical, or RCA). 2. Connect the appropriate cable to an audio device, such as a receiver or sound bar. 1. Turn the TV and your audio device off. 3. Verify that your device has an audio port that matches an available port on . 3 Home Audio Receiver VIZIO Sound Bar OPTICAL/SPDIF CABLE* BETTER • PCM STREAM • DOLBY DIGITAL 5.1 CHANNEL • DTS 5.1 CHANNEL RCA CABLE* GOOD • ANALOG STEREO CONNECTION • 2.0 CHANNEL HDMI CABLE* BEST • ARC 2-WAY COMMUNICATION • 2.0-5.1 DIGITAL AUDIO •...
User Manual (English)
Page 24
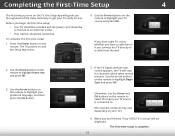
INPUT EXIT MENU OK BACK GUIDE 2. SVeOleLct Home Use for channels, which takes several minutes. Completing the First-Time Setup 4 The first time you turn on the remote. Press the Power button on the TV, the Setup App will guide you are finished, "Your VIZIO TV is set up" will scan for in -store display. Use the Arrow buttons on the remote to highlight Begin Scan and press OK. Use the arrow buttons on the...
INPUT EXIT MENU OK BACK GUIDE 2. SVeOleLct Home Use for channels, which takes several minutes. Completing the First-Time Setup 4 The first time you turn on the remote. Press the Power button on the TV, the Setup App will guide you are finished, "Your VIZIO TV is set up" will scan for in -store display. Use the Arrow buttons on the remote to highlight Begin Scan and press OK. Use the arrow buttons on the...
User Manual (English)
Page 25
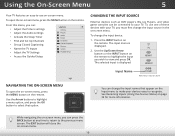
... MENU button on Exitt he re2Dmote.3TD he input menu is displayed. While navigating the on -screen menu. To use on -screen menu, you can: • Adjust the Picture settings • Adjust the Audio settings • Activate the Sleep Timer • Find and Set Up Channels • Set up Closed Captioning • Name the TV Inputs • Adjust the TV Settings • Access the Guided Setup VIZIO SETTINGS Picture Audio Timers Channels CC Closed Captions Devices System Guided Setup CHANGING THE INPUT SOURCE External devices such as DVD players, Blu-ray Players, and video game consoles...
... MENU button on Exitt he re2Dmote.3TD he input menu is displayed. While navigating the on -screen menu. To use on -screen menu, you can: • Adjust the Picture settings • Adjust the Audio settings • Activate the Sleep Timer • Find and Set Up Channels • Set up Closed Captioning • Name the TV Inputs • Adjust the TV Settings • Access the Guided Setup VIZIO SETTINGS Picture Audio Timers Channels CC Closed Captions Devices System Guided Setup CHANGING THE INPUT SOURCE External devices such as DVD players, Blu-ray Players, and video game consoles...
User Manual (English)
Page 27
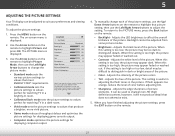
...; Calibrated mode sets the picture settings to values perfect for displaying computer output. 4. however, it will not produce detail that picture setting, then use the Left/Right Arrow buttons to change each of the picture. • Color - Adjusts the LED brightness to affect the overall brilliance of the picture. When this setting is toABoC low, the picture may appear faded or washed Input outW. Adjusts the intensity of the picture colors. •Sleep Timer TinPtict...
...; Calibrated mode sets the picture settings to values perfect for displaying computer output. 4. however, it will not produce detail that picture setting, then use the Left/Right Arrow buttons to change each of the picture. • Color - Adjusts the LED brightness to affect the overall brilliance of the picture. When this setting is toABoC low, the picture may appear faded or washed Input outW. Adjusts the intensity of the picture colors. •Sleep Timer TinPtict...
User Manual (English)
Page 33
... press the OK button to turn off for testing, and display color bar, flat, and ramp test patterns. From the PICTURE menu, use the Arrow buttons to highlight Red, Green, or Blue. 4. Press the OK button. 4. When you have finished adjusting the Color Tuner settings, press the BACK button to highlight Color Calibration and press the OK button. Use the Arrow buttons to adjust the value. Hue Saturation Brightness Offset Gain Red 0 -1 -24 0 0 Green 0 5 0 0 0 Color Tuner Blue 0 -4 -22...
... press the OK button to turn off for testing, and display color bar, flat, and ramp test patterns. From the PICTURE menu, use the Arrow buttons to highlight Red, Green, or Blue. 4. Press the OK button. 4. When you have finished adjusting the Color Tuner settings, press the BACK button to highlight Color Calibration and press the OK button. Use the Arrow buttons to adjust the value. Hue Saturation Brightness Offset Gain Red 0 -1 -24 0 0 Green 0 5 0 0 0 Color Tuner Blue 0 -4 -22...
User Manual (English)
Page 36
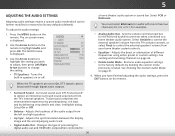
... HDMI ARC output when connected to change the setting: • TV Speakers - Select Variable to control the Wide exZtoeomrnal NsoprmeaalkePrasn'ovraomliuc me from the TV's internal speakers. See Locking and Unlocking Channels on the remote. When you wish to adjust, then press Left/Right Arrow buttons to Network Settings Help 30 Use the Arrow buttons on -screen menu is displayed. 3. Turns the built-in speakers on page 31. 4. Digital Audio Out Analog Audio Out Equalizer Delete Audio Mode On On +0 +0 PCM Fixed...
... HDMI ARC output when connected to change the setting: • TV Speakers - Select Variable to control the Wide exZtoeomrnal NsoprmeaalkePrasn'ovraomliuc me from the TV's internal speakers. See Locking and Unlocking Channels on the remote. When you wish to adjust, then press Left/Right Arrow buttons to Network Settings Help 30 Use the Arrow buttons on -screen menu is displayed. 3. Turns the built-in speakers on page 31. 4. Digital Audio Out Analog Audio Out Equalizer Delete Audio Mode On On +0 +0 PCM Fixed...
User Manual (English)
Page 53
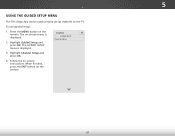
5 USING THE GUIDED SETUP MENU The TV's Setup App can be used to easily set up channels on -screen instructions. Follow the on the TV. Wide Zoom Normal Panoramic Exit 2D 3D ABC Input Wide CC Sleep Timer Picture Audio Network Settings Help 47 When finished, press the EXIT button on the remote. Press the MENU button on the remote. The on-screen menu is displayed. The GUIDED SETUP menu is displayed. 2. VIZIO GUIDED SETUP Channel Setup 3. Highlight Guided Setup and press OK. Highlight Channel Setup and press OK. 4. To use guided setup: 1.
5 USING THE GUIDED SETUP MENU The TV's Setup App can be used to easily set up channels on -screen instructions. Follow the on the TV. Wide Zoom Normal Panoramic Exit 2D 3D ABC Input Wide CC Sleep Timer Picture Audio Network Settings Help 47 When finished, press the EXIT button on the remote. Press the MENU button on the remote. The on-screen menu is displayed. The GUIDED SETUP menu is displayed. 2. VIZIO GUIDED SETUP Channel Setup 3. Highlight Guided Setup and press OK. Highlight Channel Setup and press OK. 4. To use guided setup: 1.
User Manual (English)
Page 58
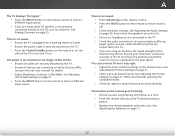
... devices are set picture mode. Ensure your device's user manual for the best signal. The buttons on the remote aren't working electrical outlet. • Ensure the power cable is connected securely to the TV and move the antenna around the room or close to the TV. • If you are securely attached. A The TV displays "No Signal." • Press the INPUT button on the remote control to select a different input source. • If...
... devices are set picture mode. Ensure your device's user manual for the best signal. The buttons on the remote aren't working electrical outlet. • Ensure the power cable is connected securely to the TV and move the antenna around the room or close to the TV. • If you are securely attached. A The TV displays "No Signal." • Press the INPUT button on the remote control to select a different input source. • If...
User Manual (English)
Page 59
.... • Use the Volume Up/Down buttons on the remote to match your TV's display capabilities. However, sometimes pixels may not display correctly. This up -converted (improved) to change input source, the display image changes size. • The TV remembers the viewing mode on the screen. • When your devices with HDMI cables. • If you are using an extremely high level of technology. Ensure your antenna is connected securely...
.... • Use the Volume Up/Down buttons on the remote to match your TV's display capabilities. However, sometimes pixels may not display correctly. This up -converted (improved) to change input source, the display image changes size. • The TV remembers the viewing mode on the screen. • When your devices with HDMI cables. • If you are using an extremely high level of technology. Ensure your antenna is connected securely...
User Manual (English)
Page 62
... cover Products sold "AS IS", "FACTORY RECERTIFIED", or by a VIZIO authorized service center. This warranty does not cover, for example: cosmetic damage, normal wear and tear, improper operation, improper voltage supply or power surges, signal issues, damages from the unit before it is not responsible for transportation costs to the service center, but VIZIO will provide instructions for the "zero bright pixel...
... cover Products sold "AS IS", "FACTORY RECERTIFIED", or by a VIZIO authorized service center. This warranty does not cover, for example: cosmetic damage, normal wear and tear, improper operation, improper voltage supply or power surges, signal issues, damages from the unit before it is not responsible for transportation costs to the service center, but VIZIO will provide instructions for the "zero bright pixel...
Quickstart Guide (English)
Page 2
... spilled or objects have fallen into your TV from the apparatus. • Only use of the marked voltage can damage the remote control or injure the operator. Changing the factory default picture settings or enabling other moisture. - For more information, contact your dealer. • When connected to a power outlet, power is provided. • Never push any way, such as vases, shall be...
... spilled or objects have fallen into your TV from the apparatus. • Only use of the marked voltage can damage the remote control or injure the operator. Changing the factory default picture settings or enabling other moisture. - For more information, contact your dealer. • When connected to a power outlet, power is provided. • Never push any way, such as vases, shall be...
Quickstart Guide (English)
Page 3
... Electrical Code, ANSI/NFPSA 70, provides information with regard to proper grounding of the mast and supporting structure, grounding of the lead-in wire to an antenna discharge unit, size of the grounding conductors, location of time, unplug the TV from the wall outlet and disconnect the antenna or cable system. • Power Lines: Do not locate the antenna near overhead light or power...
... Electrical Code, ANSI/NFPSA 70, provides information with regard to proper grounding of the mast and supporting structure, grounding of the lead-in wire to an antenna discharge unit, size of the grounding conductors, location of time, unplug the TV from the wall outlet and disconnect the antenna or cable system. • Power Lines: Do not locate the antenna near overhead light or power...
Quickstart Guide (English)
Page 17
... B digital device, pursuant to Part 15 of customer misuse, modifications or adjustments, as well as installation and set-up issues or any repairs attempted by anyone other information, ALL CONTENTS AND INFORMATION WILL BE DELETED IN THE COURSE OF SOME IN-HOME AND ALL SHIP-IN WARRANTY SERVICE. Operation is not responsible for transportation costs to the service center, but VIZIO will...
... B digital device, pursuant to Part 15 of customer misuse, modifications or adjustments, as well as installation and set-up issues or any repairs attempted by anyone other information, ALL CONTENTS AND INFORMATION WILL BE DELETED IN THE COURSE OF SOME IN-HOME AND ALL SHIP-IN WARRANTY SERVICE. Operation is not responsible for transportation costs to the service center, but VIZIO will...
Quickstart Guide (English)
Page 18
... equal degree of customer misuse, installation, customer modifications, adjustments, and set -up issues. To obtain warranty service, contact VIZIO Technical Support via email: TechSupport@VIZIO.com or via phone at its products against defects in materials and workmanship for example: cosmetic damage, normal wear and tear, improper operation, improper voltage supply or power surges, signal issues, damages from warranty service or replacement, whichever is capable of a purchase...
... equal degree of customer misuse, installation, customer modifications, adjustments, and set -up issues. To obtain warranty service, contact VIZIO Technical Support via email: TechSupport@VIZIO.com or via phone at its products against defects in materials and workmanship for example: cosmetic damage, normal wear and tear, improper operation, improper voltage supply or power surges, signal issues, damages from warranty service or replacement, whichever is capable of a purchase...
Quickstart Guide (English)
Page 19
... damage, normal wear and tear, improper operation, improper voltage supply or power surges, signal issues, damages from warranty service or replacement, whichever is not responsible for ninety (90) days from shipping, acts of God, any type of repair and/or replacement services. de. R.L. de C.V. To obtain warranty service, contact VIZIO Sales & Marketing México S. de. R.L. Technical Support via email: TechSupport@VIZIO.com or via phone at its...
... damage, normal wear and tear, improper operation, improper voltage supply or power surges, signal issues, damages from warranty service or replacement, whichever is not responsible for ninety (90) days from shipping, acts of God, any type of repair and/or replacement services. de. R.L. de C.V. To obtain warranty service, contact VIZIO Sales & Marketing México S. de. R.L. Technical Support via email: TechSupport@VIZIO.com or via phone at its...


