User Manual
Page 2
... for your TV. If the provided plug does not fit into your VIZIO product at least three feet should be observed for replacement of power supplied to rain or moisture, does not operate normally, or has been dropped. The manufacturer's warranty does not cover user abuse or improper installations. • The power cord must be replaced when using your TV. into your outlet...
... for your TV. If the provided plug does not fit into your VIZIO product at least three feet should be observed for replacement of power supplied to rain or moisture, does not operate normally, or has been dropped. The manufacturer's warranty does not cover user abuse or improper installations. • The power cord must be replaced when using your TV. into your outlet...
User Manual
Page 3
...; WARNING: Exposure to loud sounds can safely support the television set • Ensuring the television set is not overhanging the edge of the supporting furniture. • Not placing the television set on the apparatus. • The mains plug or appliance coupler is used for long period of the television set. • Only using dropped or damaged appliances. Ensure that the power cord and any object drops...
...; WARNING: Exposure to loud sounds can safely support the television set • Ensuring the television set is not overhanging the edge of the supporting furniture. • Not placing the television set on the apparatus. • The mains plug or appliance coupler is used for long period of the television set. • Only using dropped or damaged appliances. Ensure that the power cord and any object drops...
User Manual
Page 4
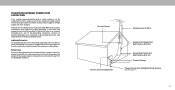
... mast and supporting structure, grounding of the lead-in the building installation. TELEVISION ANTENNA CONNECTION PROTECTION If an outside antenna/satellite dish or cable system is to be connected to earth in wire to an antenna discharge unit, size of the grounding conductors, location of antenna discharge unit, connection to provide some protection against voltage surges and static charges. Remember, the screen of the...
... mast and supporting structure, grounding of the lead-in the building installation. TELEVISION ANTENNA CONNECTION PROTECTION If an outside antenna/satellite dish or cable system is to be connected to earth in wire to an antenna discharge unit, size of the grounding conductors, location of antenna discharge unit, connection to provide some protection against voltage surges and static charges. Remember, the screen of the...
User Manual
Page 6
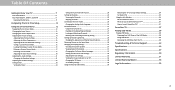
... Rear Panel D24f-F1 8 Rear Panel D32f-F1, D43f-F1, & D50f-F1 9 Replacing the Batteries 11 Completing The First-Time Setup 12 Using the On-Screen Menu 12 Navigating the On-Screen Menu 12 Changing the Input Source 12 Changing the Screen Aspect Ratio 13 Adjusting the Picture Settings 14 Adjusting More Picture Settings 15 Adjusting the Color Temperature 15 Adjusting the Picture Mode Edit Settings 16 Saving a Custom Picture Mode 16 Locking/Unlocking a Custom Picture Mode 16 Deleting a Custom Picture Mode 17 Resetting a Picture Mode 17 Adjusting the Color Tuner Settings 18 Adjusting...
... Rear Panel D24f-F1 8 Rear Panel D32f-F1, D43f-F1, & D50f-F1 9 Replacing the Batteries 11 Completing The First-Time Setup 12 Using the On-Screen Menu 12 Navigating the On-Screen Menu 12 Changing the Input Source 12 Changing the Screen Aspect Ratio 13 Adjusting the Picture Settings 14 Adjusting More Picture Settings 15 Adjusting the Color Temperature 15 Adjusting the Picture Mode Edit Settings 16 Saving a Custom Picture Mode 16 Locking/Unlocking a Custom Picture Mode 16 Deleting a Custom Picture Mode 17 Resetting a Picture Mode 17 Adjusting the Color Tuner Settings 18 Adjusting...
User Manual
Page 10
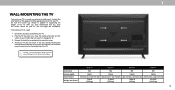
... removing the screws. 4. 1 WALL-MOUNTING THE TV To mount your TV on a wall: 1. To prevent injury or damage to the TV, ask someone to your TV. Installing a TV on a clean, flat, stable surface. Be sure the mount you choose is clear of this page to the wall, carefully following the instructions that came with a UL-listed wall mount bracket rated for your mount. Disconnect any cables connected to help...
... removing the screws. 4. 1 WALL-MOUNTING THE TV To mount your TV on a wall: 1. To prevent injury or damage to the TV, ask someone to your TV. Installing a TV on a clean, flat, stable surface. Be sure the mount you choose is clear of this page to the wall, carefully following the instructions that came with a UL-listed wall mount bracket rated for your mount. Disconnect any cables connected to help...
User Manual
Page 11
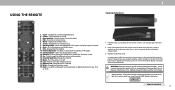
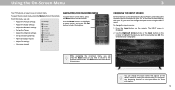
Close the on -screen menu 9. Display the settings menu 6. Display the info window 10. Turn the audio on or off 3. Last - Wide - Replace the battery cover. vizio.com/environment. Replace only with batteries of your batteries consistent with household waste. Change the currently displayed input 2. Exit - Arrow - Launch SmartCast TV/Return to the last viewed channel.. 17. Cycle through the different picture setting modes 14. Channel Up/Down- Manually enter a channel 18. Dash - For...
Close the on -screen menu 9. Display the settings menu 6. Display the info window 10. Turn the audio on or off 3. Last - Wide - Replace the battery cover. vizio.com/environment. Replace only with batteries of your batteries consistent with household waste. Change the currently displayed input 2. Exit - Arrow - Launch SmartCast TV/Return to the last viewed channel.. 17. Cycle through the different picture setting modes 14. Channel Up/Down- Manually enter a channel 18. Dash - For...
User Manual
Page 12
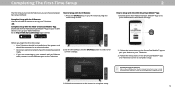
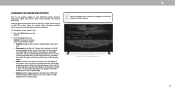
... port on the SmartCast Mobile™ app to pair your device to complete setup. 12 Before you begin the first-time setup: • Your Television should be installed and the power cord should be connected to an electrical outlet. • If you have a wireless network, have the network password ready. • If you can also find a digital copy on support.vizio.com 3.Follow the instruction on the screen...
... port on the SmartCast Mobile™ app to pair your device to complete setup. 12 Before you begin the first-time setup: • Your Television should be installed and the power cord should be connected to an electrical outlet. • If you have a wireless network, have the network password ready. • If you can also find a digital copy on support.vizio.com 3.Follow the instruction on the screen...
User Manual
Page 13
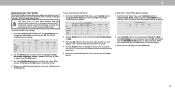
... settings • Adjust the Network settings • Set up the Timers • Adjust the Channel settings • Set up Closed Captioning • Name and adjust Inputs • Adjust TV settings TV Settings Picture Audio Network Timers Channels CC Closed Captions Inputs System User Manual • View user manual NAVIGATING THE ON-SCREEN MENU To open the on-screen menu, press the Menu button on the remote. To open the on-screen menu, press the Menu button on the remote. The INPUT menu is displayed. The selected input is displayed. 2. From this menu, you can be connected...
... settings • Adjust the Network settings • Set up the Timers • Adjust the Channel settings • Set up Closed Captioning • Name and adjust Inputs • Adjust TV settings TV Settings Picture Audio Network Timers Channels CC Closed Captions Inputs System User Manual • View user manual NAVIGATING THE ON-SCREEN MENU To open the on-screen menu, press the Menu button on the remote. To open the on-screen menu, press the Menu button on the remote. The INPUT menu is displayed. The selected input is displayed. 2. From this menu, you can be connected...
User Manual
Page 14
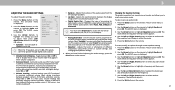
... on the top and bottom, the black bars will fill a 1080p screen. Each mode displays the picture differently. Some programs have black bars on the remote. 2. Examples include wide-screen movies and older television programs. To change the screen aspect ratio: 1. If the program is being stretched, the display image may vary by Input source. 3 13 Since the picture is already formatted for Ultra HD content or HDR content...
... on the top and bottom, the black bars will fill a 1080p screen. Each mode displays the picture differently. Some programs have black bars on the remote. 2. Examples include wide-screen movies and older television programs. To change the screen aspect ratio: 1. If the program is being stretched, the display image may vary by Input source. 3 13 Since the picture is already formatted for Ultra HD content or HDR content...

User Manual
Page 15
... remote to adjust the setting: • Auto Brightness Control - For the best picture, switch to suit your preferences and viewing conditions. Note that produce a brighter, more vivid picture. Customizing picture settings will not produce detail that does not otherwise exist. 5. 3 ADJUSTING THE PICTURE SETTINGS Your TV display can be used to operate the TV. 3. Use the Arrow buttons on -screen menu is too high, the picture may appear faded or washed out. To manually change...
... remote to adjust the setting: • Auto Brightness Control - For the best picture, switch to suit your preferences and viewing conditions. Note that produce a brighter, more vivid picture. Customizing picture settings will not produce detail that does not otherwise exist. 5. 3 ADJUSTING THE PICTURE SETTINGS Your TV display can be used to operate the TV. 3. Use the Arrow buttons on -screen menu is too high, the picture may appear faded or washed out. To manually change...

User Manual
Page 17
... picture settings. Locking/Unlocking a Custom Picture Mode Custom picture modes can be prompted to factory default values. From the PICTURE menu, use the Arrow buttons to enter a unique 4-digit PIN. MyMode Saving a Custom Picture Mode Custom picture modes allow you to make precise adjustments to the picture and to create picture modes to save a custom picture mode: 1. Highlight Save and press OK. Back System PIN code Change the PIN used for various viewing conditions and video sources. • Changes made while on -screen...
... picture settings. Locking/Unlocking a Custom Picture Mode Custom picture modes can be prompted to factory default values. From the PICTURE menu, use the Arrow buttons to enter a unique 4-digit PIN. MyMode Saving a Custom Picture Mode Custom picture modes allow you to make precise adjustments to the picture and to create picture modes to save a custom picture mode: 1. Highlight Save and press OK. Back System PIN code Change the PIN used for various viewing conditions and video sources. • Changes made while on -screen...
User Manual
Page 19
... two color channels can be turned off . 4. Gain 5% 11 Point White Balance Red Green 0 0 Blue 0 2. Use the Arrow buttons on the remote to highlight Red, Green, or Blue. 3. Calibration requires specialized training, an input with the color channels, press the Exit button. When you are finished with precisely set colors, and a specialized light meter. To turn color channels off and on the remote to highlight the Gain and Color values you are finished adjusting the color tuner settings...
... two color channels can be turned off . 4. Gain 5% 11 Point White Balance Red Green 0 0 Blue 0 2. Use the Arrow buttons on the remote to highlight Red, Green, or Blue. 3. Calibration requires specialized training, an input with the color channels, press the Exit button. When you are finished with precisely set colors, and a specialized light meter. To turn color channels off and on the remote to highlight the Gain and Color values you are finished adjusting the color tuner settings...
User Manual
Page 22
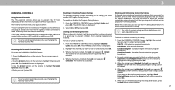
... sound experience from the left and right speakers. • Lip Sync - The AUDIO menu is displayed. 3. In a few cases, volume leveling may artificially suppress volume increases, making it . 8. 3 ADJUSTING THE AUDIO SETTINGS To adjust the audio settings: 1. The AUDIO menu is displayed. 3. Changes the type of processing for the RCA connector when connected to a home theater audio system. to select an audio mode. Press the Menu button on the remote. Sets the volume control properties for digital audio out and HDMI ARC output...
... sound experience from the left and right speakers. • Lip Sync - The AUDIO menu is displayed. 3. In a few cases, volume leveling may artificially suppress volume increases, making it . 8. 3 ADJUSTING THE AUDIO SETTINGS To adjust the audio settings: 1. The AUDIO menu is displayed. 3. Changes the type of processing for the RCA connector when connected to a home theater audio system. to select an audio mode. Press the Menu button on the remote. Sets the volume control properties for digital audio out and HDMI ARC output...
User Manual
Page 23
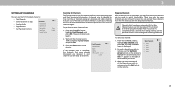
... MANUAL SETUP menu is Internet-ready, featuring both an Ethernet port and built-in the router's settings. 3 ADJUSTING THE NETWORK SETTINGS Your TV is displayed. 2. If your router may be needed to set a wireless network connection. DNS Server RJ45 MAC 0:0:0:0:0:0 3. DNS Server - Press the Exit button on the remote. The MAC addresses for Network Setup The security settings on your TV is displayed. 4. You must unplug the Ethernet cable to a wireless network whose network name...
... MANUAL SETUP menu is Internet-ready, featuring both an Ethernet port and built-in the router's settings. 3 ADJUSTING THE NETWORK SETTINGS Your TV is displayed. 2. If your router may be needed to set a wireless network connection. DNS Server RJ45 MAC 0:0:0:0:0:0 3. DNS Server - Press the Exit button on the remote. The MAC addresses for Network Setup The security settings on your TV is displayed. 4. You must unplug the Ethernet cable to a wireless network whose network name...
User Manual
Page 26
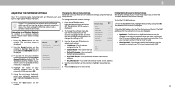
... Auto Channel Scan: 1. From the CHANNELS menu, highlight Find Channels, and press OK. A new channel scan will clear all of -the-wall connection (without a cable box). Analog 45% Complete Cancel Skipping Channels After a channel scan is displayed. 0 Test 0 1 Test 1 2 Test 2 2. When you select. 3. Highlight Done and press OK. See Locking and Unlocking Channels. The SKIP CHANNEL menu is completed, you do not want to view. 3 SETTING UP CHANNELS You can use the TV's Channels menu to: • Find Channels...
... Auto Channel Scan: 1. From the CHANNELS menu, highlight Find Channels, and press OK. A new channel scan will clear all of -the-wall connection (without a cable box). Analog 45% Complete Cancel Skipping Channels After a channel scan is displayed. 0 Test 0 1 Test 1 2 Test 2 2. When you select. 3. Highlight Done and press OK. See Locking and Unlocking Channels. The SKIP CHANNEL menu is completed, you do not want to view. 3 SETTING UP CHANNELS You can use the TV's Channels menu to: • Find Channels...
User Manual
Page 28
... Changing the Parental Control PIN. Locking a channel is locked, it will be inaccessible. For a list of content ratings and their definitions, visit www.tvguidelines.org. Locking and Unlocking Channels When a channel is a good way to block content based on the remote to highlight the rating type and press OK. 3. Accessing the Parental Controls Menu To access the PARENTAL CONTROLS menu: 1. Use the Arrow buttons on its rating. When the rating type is displayed. 2. To lock or unlock a channel: 1. USA television program...
... Changing the Parental Control PIN. Locking a channel is locked, it will be inaccessible. For a list of content ratings and their definitions, visit www.tvguidelines.org. Locking and Unlocking Channels When a channel is a good way to block content based on the remote to highlight the rating type and press OK. 3. Accessing the Parental Controls Menu To access the PARENTAL CONTROLS menu: 1. Use the Arrow buttons on its rating. When the rating type is displayed. 2. To lock or unlock a channel: 1. USA television program...
User Manual
Page 36
.... Picture mode lock 2. digital purchases and other consumer behavior taken by emailing techsupport@ vizio.com or calling (855) 472-8817. You can easily turn this TV, including the IP address. Reset to TV to factory default setting The first time you select System PIN code, you can reset your broadcast, cable, or satellite television provider, and the television programs and commercials viewed (including time, date, channel, and whether you have trouble...
.... Picture mode lock 2. digital purchases and other consumer behavior taken by emailing techsupport@ vizio.com or calling (855) 472-8817. You can easily turn this TV, including the IP address. Reset to TV to factory default setting The first time you select System PIN code, you can reset your broadcast, cable, or satellite television provider, and the television programs and commercials viewed (including time, date, channel, and whether you have trouble...
User Manual
Page 45
... close to change the screen mode. Connect your device's user manual for channels. The display image does not cover the entire screen. • If you are using TV, AV, or Component with new ones. See Adjusting the Audio Settings. The buttons on the TV don't look right. • Adjust the Color and Tint settings in the Picture menu. Devices differ; See Adjusting the Audio Settings. • Check the audio connections of external devices (Blu-ray player, game console, cable/satellite box...
... close to change the screen mode. Connect your device's user manual for channels. The display image does not cover the entire screen. • If you are using TV, AV, or Component with new ones. See Adjusting the Audio Settings. The buttons on the TV don't look right. • Adjust the Color and Tint settings in the Picture menu. Devices differ; See Adjusting the Audio Settings. • Check the audio connections of external devices (Blu-ray player, game console, cable/satellite box...
User Manual
Page 52
... a VIZIO authorized service center; To Types of protection. You may be required to the VIZIO service center. VIZIO is not covered under this guarantee applies to your claim heard by a non-authorized reseller. To obtain warranty service, contact service center, but in accordance with VIZIO's user guides UNLESS YOU HAVE BROUGHT AN ELIGIBLE CLAIM IN SMALL CLAIMS and manuals. The VIZIO Technical Support This warranty does...
... a VIZIO authorized service center; To Types of protection. You may be required to the VIZIO service center. VIZIO is not covered under this guarantee applies to your claim heard by a non-authorized reseller. To obtain warranty service, contact service center, but in accordance with VIZIO's user guides UNLESS YOU HAVE BROUGHT AN ELIGIBLE CLAIM IN SMALL CLAIMS and manuals. The VIZIO Technical Support This warranty does...
User Manual
Page 54
... power surges; (e) signal issues; (f) damage from the date of original purchase. Replacement parts and VIZIO's labor are 32 inches or larger will usually be restored to its option) repair or replace it is covered by this occurs, your product, will "FACTORY RECERTIFIED", or by a VIZIO authorized service center; (j) products with ALL USER DATA AND DOWNLOADED APPLICATIONS STORED ON unreadable or removed serial numbers; (k) products requiring What This Warranty...
... power surges; (e) signal issues; (f) damage from the date of original purchase. Replacement parts and VIZIO's labor are 32 inches or larger will usually be restored to its option) repair or replace it is covered by this occurs, your product, will "FACTORY RECERTIFIED", or by a VIZIO authorized service center; (j) products with ALL USER DATA AND DOWNLOADED APPLICATIONS STORED ON unreadable or removed serial numbers; (k) products requiring What This Warranty...


