
Camera Manual
Page 1
Windows and the Windows logo are the property of Microsoft Corporation. All other trademarks are registered trademarks of their respective companies. All rights reserved. DVR 480 Digital Helmet Camcorder User Manual © 2009-2011 Sakar International, Inc.
Windows and the Windows logo are the property of Microsoft Corporation. All other trademarks are registered trademarks of their respective companies. All rights reserved. DVR 480 Digital Helmet Camcorder User Manual © 2009-2011 Sakar International, Inc.
Camera Manual
Page 2
Contents Introduction ...2 What's Included...2 Parts of the Camera ...3 Initial Camera Setup...4 Camcorder Mounts and Accessories 7 Main Camera Mode...10 Using your Helmet Camcorder ...11 Technical Specifications ...13 Computer System Requirements 14 Installing the Software ...15 Connecting the Camcorder to the Computer 16 Getting Videos from your Camcorder to Your Computer 17 Get started!...18 Transferring Videos from my Camcorder to my Computer Manually 18 Camcorder Maintenance ...19 Sakar Warranty Card...20 Technical Support...21 Troubleshooting...21 1
Contents Introduction ...2 What's Included...2 Parts of the Camera ...3 Initial Camera Setup...4 Camcorder Mounts and Accessories 7 Main Camera Mode...10 Using your Helmet Camcorder ...11 Technical Specifications ...13 Computer System Requirements 14 Installing the Software ...15 Connecting the Camcorder to the Computer 16 Getting Videos from your Camcorder to Your Computer 17 Get started!...18 Transferring Videos from my Camcorder to my Computer Manually 18 Camcorder Maintenance ...19 Sakar Warranty Card...20 Technical Support...21 Troubleshooting...21 1
Camera Manual
Page 3
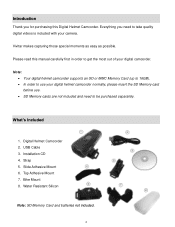
... purchasing this manual carefully first in order to get the most out of your digital camcorder. Strap 5. Vivitar makes capturing those special moments as easy as possible. Please read this Digital Helmet Camcorder. Note: Your digital helmet camcorder supports an SD or MMC Memory Card (up to 16GB). In order to use...
... purchasing this manual carefully first in order to get the most out of your digital camcorder. Strap 5. Vivitar makes capturing those special moments as easy as possible. Please read this Digital Helmet Camcorder. Note: Your digital helmet camcorder supports an SD or MMC Memory Card (up to 16GB). In order to use...
Camera Manual
Page 6
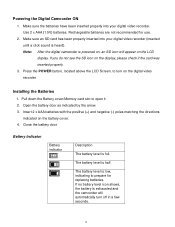
Powering the Digital Camcorder ON 1. Make sure an SD card has been properly inserted into your digital video recorder (inserted until a click sound is low, indicating to open it. 2. ... will automatically turn on the LCD display. If you do not see the SD icon on the battery cover. 4. Note: After the digital camcorder is exhausted and the camcorder will appear on the digital video recorder. Make sure the batteries have been inserted properly into your digital video recorder. The battery level...
Powering the Digital Camcorder ON 1. Make sure an SD card has been properly inserted into your digital video recorder (inserted until a click sound is low, indicating to open it. 2. ... will automatically turn on the LCD display. If you do not see the SD icon on the battery cover. 4. Note: After the digital camcorder is exhausted and the camcorder will appear on the digital video recorder. Make sure the batteries have been inserted properly into your digital video recorder. The battery level...
Camera Manual
Page 7
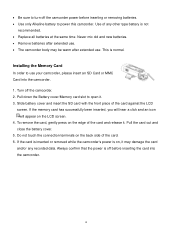
... . Slide battery cover and insert the SD card with the front piece of any recorded data. If the card is inserted or removed while the camcorder's power is not recommended. Replace all batteries at the same time. Pull down the Battery cover/Memory card slot to open it . This is... a click and an icon will appear on the edge of the card. 6. To remove the card, gently press on the LCD screen. 4. Turn off the camcorder. 2. Always confirm that the power is normal. Use of the card against the LCD screen. Pull the card out and close the battery cover. 5. ...
... . Slide battery cover and insert the SD card with the front piece of any recorded data. If the card is inserted or removed while the camcorder's power is not recommended. Replace all batteries at the same time. Pull down the Battery cover/Memory card slot to open it . This is... a click and an icon will appear on the edge of the card. 6. To remove the card, gently press on the LCD screen. 4. Turn off the camcorder. 2. Always confirm that the power is normal. Use of the card against the LCD screen. Pull the card out and close the battery cover. 5. ...
Camera Manual
Page 8
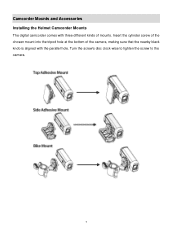
Insert the cylinder screw of the chosen mount into the tripod hole at the bottom of mounts. Turn the screw's disc clock-wise to tighten the screw to the camera. 7 Camcorder Mounts and Accessories Installing the Helmet Camcorder Mounts The digital camcorder comes with three different kinds of the camera, making sure that the nearby black knob is aligned with the parallel hole.
Insert the cylinder screw of the chosen mount into the tripod hole at the bottom of mounts. Turn the screw's disc clock-wise to tighten the screw to the camera. 7 Camcorder Mounts and Accessories Installing the Helmet Camcorder Mounts The digital camcorder comes with three different kinds of the camera, making sure that the nearby black knob is aligned with the parallel hole.
Camera Manual
Page 9
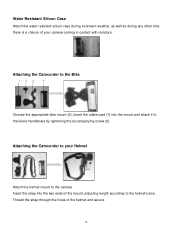
... Bike 1 2 3 4 Choose the appropriate bike mount (3), insert the rubber pad (1) into the two ends of the mount, adjusting length according to the camera. Attaching the Camcorder to your camera coming in contact with moisture. Thread the strap through the holes of your Helmet Attach the helmet mount to the helmet's size...
... Bike 1 2 3 4 Choose the appropriate bike mount (3), insert the rubber pad (1) into the two ends of the mount, adjusting length according to the camera. Attaching the Camcorder to your camera coming in contact with moisture. Thread the strap through the holes of your Helmet Attach the helmet mount to the helmet's size...
Camera Manual
Page 10
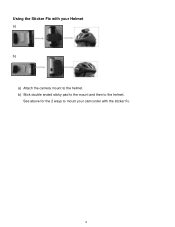
Using the Sticker Fix with your camcorder with the sticker fix. 9 See above for the 2 ways to mount your Helmet a) b) a) Attach the camera mount to the helmet. b) Stick double ended sticky pad to the mount and then to the helmet.
Using the Sticker Fix with your camcorder with the sticker fix. 9 See above for the 2 ways to mount your Helmet a) b) a) Attach the camera mount to the helmet. b) Stick double ended sticky pad to the mount and then to the helmet.
Camera Manual
Page 11
The captured video is in progress. To take a video, aim your selected resolution. 10 To stop the recording, press the "Record" (REC) button again. To change the video resolution, press the "MODE" button. The LCD monitor displays the recorded time while the recording is automatically saved to the SD memory card. The LCD monitor displays your camcorder as desired and press the "Record" (REC) button to capture videos with your digital camcorder. Main Camera Mode Video Capture Mode Use this mode to start the recording.
The captured video is in progress. To take a video, aim your selected resolution. 10 To stop the recording, press the "Record" (REC) button again. To change the video resolution, press the "MODE" button. The LCD monitor displays the recorded time while the recording is automatically saved to the SD memory card. The LCD monitor displays your camcorder as desired and press the "Record" (REC) button to capture videos with your digital camcorder. Main Camera Mode Video Capture Mode Use this mode to start the recording.
Camera Manual
Page 12
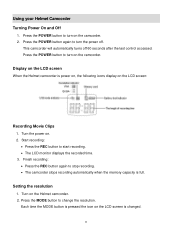
...the resolution. Press the POWER button to turn on the LCD screen When the Helmet camcorder is changed. 11 Turn the power on the Helmet camcorder. 2. Setting the resolution 1. Display on the camcorder. Turn on . 2. Press the POWER button to turn on the LCD screen: Recording...Start recording: Press the REC button to stop recording. The camcorder stops recording automatically when the memory capacity is full. This camcorder will automatically turns off . Using your Helmet Camcorder Turning Power On and Off 1. Each time the MODE button is pressed the icon ...
...the resolution. Press the POWER button to turn on the LCD screen When the Helmet camcorder is changed. 11 Turn the power on the Helmet camcorder. 2. Setting the resolution 1. Display on the camcorder. Turn on . 2. Press the POWER button to turn on the LCD screen: Recording...Start recording: Press the REC button to stop recording. The camcorder stops recording automatically when the memory capacity is full. This camcorder will automatically turns off . Using your Helmet Camcorder Turning Power On and Off 1. Each time the MODE button is pressed the icon ...
Camera Manual
Page 16
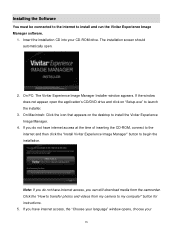
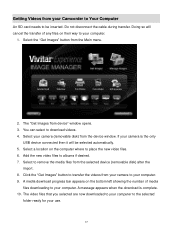
...connect to the internet and then click the "Install Vivitar Experience Image Manager" button to install and run the Vivitar Experience Image Manager software. 1. Click the "How to transfer photos and videos from the camcorder. The installation screen should automatically open the application's CD.../DVD drive and click on the desktop to install the Vivitar Experience Image Manager. 4. If the window does not appear, open . ...
...connect to the internet and then click the "Install Vivitar Experience Image Manager" button to install and run the Vivitar Experience Image Manager software. 1. Click the "How to transfer photos and videos from the camcorder. The installation screen should automatically open the application's CD.../DVD drive and click on the desktop to install the Vivitar Experience Image Manager. 4. If the window does not appear, open . ...
Camera Manual
Page 17
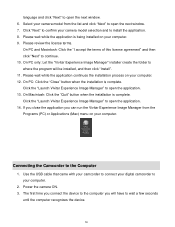
... the USB cable that came with your camcorder to connect your computer. If you close the application you will be installed, and then click "Install". 11. The first time you connect the device to the computer you can run the Vivitar Experience Image Manager from the list and...the computer recognizes the device. 16 On PC only: Let the "Vivitar Experience Image Manager" installer create the folder to the Computer 1. Click the "Launch Vivitar Experience Image Manager" to open the application. 14. Connecting the Camcorder to where the program will have to continue. 10. On PC:...
... the USB cable that came with your camcorder to connect your computer. If you close the application you will be installed, and then click "Install". 11. The first time you connect the device to the computer you can run the Vivitar Experience Image Manager from the list and...the computer recognizes the device. 16 On PC only: Let the "Vivitar Experience Image Manager" installer create the folder to the Computer 1. Click the "Launch Vivitar Experience Image Manager" to open the application. 14. Connecting the Camcorder to where the program will have to continue. 10. On PC:...
Camera Manual
Page 18
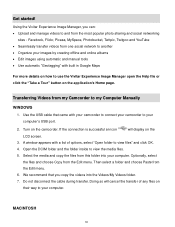
... selected automatically. 5. A message appears when the download is the only USB device connected then it will cancel the transfer of media files downloading to your Camcorder to Your Computer An SD card needs to transfer the videos from the Main menu. 2. The video files that you selected are now downloaded to...
... selected automatically. 5. A message appears when the download is the only USB device connected then it will cancel the transfer of media files downloading to your Camcorder to Your Computer An SD card needs to transfer the videos from the Main menu. 2. The video files that you selected are now downloaded to...
Camera Manual
Page 19
...computer. Open the DCIM folder and the folder inside to and from the Edit menu. 6. We recommend that came with your camcorder to connect your camcorder to use the Vivitar Experience Image Manager open the Help file or click the "Take a Tour" button on their way to your computer's USB ...port. 2. Get started! Do not disconnect the cable during transfer. Using the Vivitar Experience Image Manager, you copy the videos into...
...computer. Open the DCIM folder and the folder inside to and from the Edit menu. 6. We recommend that came with your camcorder to connect your camcorder to use the Vivitar Experience Image Manager open the Help file or click the "Take a Tour" button on their way to your computer's USB ...port. 2. Get started! Do not disconnect the cable during transfer. Using the Vivitar Experience Image Manager, you copy the videos into...
Camera Manual
Page 20
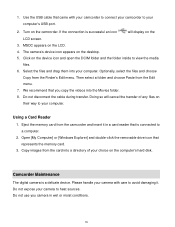
... to heat sources. Click on the desktop. 5. We recommend that is connected to view the media files. 6. Please handle your camera with your camcorder to connect your computer. Open [My Computer] or [Windows Explorer] and double-click the removable drive icon that came with care to your choice ...on the LCD screen. 3. Copy images from the camcorder and insert it . Using a Card Reader 1. Do not use you copy the videos into your camcorder to avoid damaging it in a card reader that you camera in wet or moist conditions. 19 ...
... to heat sources. Click on the desktop. 5. We recommend that is connected to view the media files. 6. Please handle your camera with your camcorder to connect your computer. Open [My Computer] or [Windows Explorer] and double-click the removable drive icon that came with care to your choice ...on the LCD screen. 3. Copy images from the camcorder and insert it . Using a Card Reader 1. Do not use you copy the videos into your camcorder to avoid damaging it in a card reader that you camera in wet or moist conditions. 19 ...


