
Warranty
Page 1
... or liquids, extremes of one year from accident, abuse, misuse, failure to operate the product in accordance with relevant instructions, neglect, immersion in this product which result from the date of such damages. WHAT IS NOT COVERED BY THIS WARRANTY No express or implied...unauthorised disassembly, repair or modification. This warranty shall not extend to any defects in or exposure to you. -1- During the period, Vivitar will repair or replace the product at no charge for parts or labor. TIME PERIOD OF THIS WARRANTY The time period of this product even if Vivitar has been advised...
... or liquids, extremes of one year from accident, abuse, misuse, failure to operate the product in accordance with relevant instructions, neglect, immersion in this product which result from the date of such damages. WHAT IS NOT COVERED BY THIS WARRANTY No express or implied...unauthorised disassembly, repair or modification. This warranty shall not extend to any defects in or exposure to you. -1- During the period, Vivitar will repair or replace the product at no charge for parts or labor. TIME PERIOD OF THIS WARRANTY The time period of this product even if Vivitar has been advised...
Warranty
Page 2
... CV3 4PE, UK When service is a result in the UK call from country and State to State thereof. For phone support in the US please call 1-800-592-9541, in wear and tear, Vivitar may levy a handling charge for the from anywhere else, please visit www.vivitar.com for example, a copy of your problem. b) Detailed description of...
... CV3 4PE, UK When service is a result in the UK call from country and State to State thereof. For phone support in the US please call 1-800-592-9541, in wear and tear, Vivitar may levy a handling charge for the from anywhere else, please visit www.vivitar.com for example, a copy of your problem. b) Detailed description of...
Camera Manual
Page 1
Windows and the Windows logo are the property of Microsoft Corporation. All other trademarks are registered trademarks of their respective companies. DVR 480 Digital Helmet Camcorder User Manual © 2009-2011 Sakar International, Inc. All rights reserved.
Windows and the Windows logo are the property of Microsoft Corporation. All other trademarks are registered trademarks of their respective companies. DVR 480 Digital Helmet Camcorder User Manual © 2009-2011 Sakar International, Inc. All rights reserved.
Camera Manual
Page 2
Contents Introduction ...2 What's Included...2 Parts of the Camera ...3 Initial Camera Setup...4 Camcorder Mounts and Accessories 7 Main Camera Mode...10 Using your Helmet Camcorder ...11 Technical Specifications ...13 Computer System Requirements 14 Installing the Software ...15 Connecting the Camcorder to the Computer 16 Getting Videos from your Camcorder to Your Computer 17 Get started!...18 Transferring Videos from my Camcorder to my Computer Manually 18 Camcorder Maintenance ...19 Sakar Warranty Card...20 Technical Support...21 Troubleshooting...21 1
Contents Introduction ...2 What's Included...2 Parts of the Camera ...3 Initial Camera Setup...4 Camcorder Mounts and Accessories 7 Main Camera Mode...10 Using your Helmet Camcorder ...11 Technical Specifications ...13 Computer System Requirements 14 Installing the Software ...15 Connecting the Camcorder to the Computer 16 Getting Videos from your Camcorder to Your Computer 17 Get started!...18 Transferring Videos from my Camcorder to my Computer Manually 18 Camcorder Maintenance ...19 Sakar Warranty Card...20 Technical Support...21 Troubleshooting...21 1
Camera Manual
Page 3
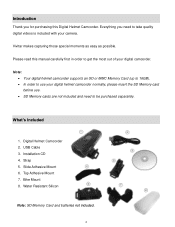
... your camera. Vivitar makes capturing those special moments as easy as possible. Please read this Digital Helmet Camcorder. Note: Your digital helmet camcorder supports an SD or MMC Memory Card (up to 16GB). In order to use your digital helmet camcorder normally, please insert the SD Memory card before use. SD Memory cards are not included and need to take quality digital videos is included with your digital camcorder. USB Cable 3. Slide...
... your camera. Vivitar makes capturing those special moments as easy as possible. Please read this Digital Helmet Camcorder. Note: Your digital helmet camcorder supports an SD or MMC Memory Card (up to 16GB). In order to use your digital helmet camcorder normally, please insert the SD Memory card before use. SD Memory cards are not included and need to take quality digital videos is included with your digital camcorder. USB Cable 3. Slide...
Camera Manual
Page 4
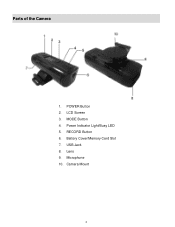
LCD Screen 3. RECORD Button 6. Camera Mount 3 MODE Button 4. Microphone 10. Power Indicator Light/Busy LED 5. Parts of the Camera 1. POWER Button 2. USB Jack 8. Battery Cover/Memory Card Slot 7. Lens 9.
LCD Screen 3. RECORD Button 6. Camera Mount 3 MODE Button 4. Microphone 10. Power Indicator Light/Busy LED 5. Parts of the Camera 1. POWER Button 2. USB Jack 8. Battery Cover/Memory Card Slot 7. Lens 9.
Camera Manual
Page 5
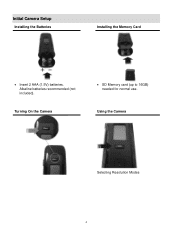
Alkaline batteries recommended (not included). Using the Camera Selecting Resolution Modes 4 Turning On the Camera SD Memory card (up to 16GB) needed for normal use. Initial Camera Setup Installing the Batteries Installing the Memory Card Insert 2 AAA (1.5V) batteries.
Alkaline batteries recommended (not included). Using the Camera Selecting Resolution Modes 4 Turning On the Camera SD Memory card (up to 16GB) needed for normal use. Initial Camera Setup Installing the Batteries Installing the Memory Card Insert 2 AAA (1.5V) batteries.
Camera Manual
Page 6
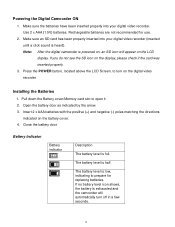
... your digital video recorder (inserted until a click sound is full. Press the POWER button, located above the LCD Screen, to open it. 2. Installing the Batteries 1. Insert 2 x AAA batteries with the positive (+) and negative (-) poles matching the directions indicated on the display, please check if the card was inserted properly. 3. Battery Indicator Battery indicator Description The battery level is heard). If no battery level icon shows, the battery is low, indicating to prepare for use...
... your digital video recorder (inserted until a click sound is full. Press the POWER button, located above the LCD Screen, to open it. 2. Installing the Batteries 1. Insert 2 x AAA batteries with the positive (+) and negative (-) poles matching the directions indicated on the display, please check if the card was inserted properly. 3. Battery Indicator Battery indicator Description The battery level is heard). If no battery level icon shows, the battery is low, indicating to prepare for use...
Camera Manual
Page 7
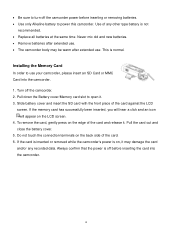
.... Replace all batteries at the same time. Pull down the Battery cover/Memory card slot to open it . Installing the Memory Card In order to use . Slide battery cover and insert the SD card with the front piece of the card. 6. Always confirm that the power is on the LCD screen. 4. To remove the card, gently press on the back side of the card against the LCD screen. If the memory card has...
.... Replace all batteries at the same time. Pull down the Battery cover/Memory card slot to open it . Installing the Memory Card In order to use . Slide battery cover and insert the SD card with the front piece of the card. 6. Always confirm that the power is on the LCD screen. 4. To remove the card, gently press on the back side of the card against the LCD screen. If the memory card has...
Camera Manual
Page 11
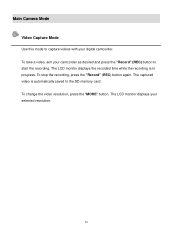
To take a video, aim your selected resolution. 10 The LCD monitor displays your camcorder as desired and press the "Record" (REC) button to start the recording. To stop the recording, press the "Record" (REC) button again. To change the video resolution, press the "MODE" button. Main Camera Mode Video Capture Mode Use this mode to the SD memory card. The captured video is in progress. The LCD monitor displays the recorded time while the recording is automatically saved to capture videos with your digital camcorder.
To take a video, aim your selected resolution. 10 The LCD monitor displays your camcorder as desired and press the "Record" (REC) button to start the recording. To stop the recording, press the "Record" (REC) button again. To change the video resolution, press the "MODE" button. Main Camera Mode Video Capture Mode Use this mode to the SD memory card. The captured video is in progress. The LCD monitor displays the recorded time while the recording is automatically saved to capture videos with your digital camcorder.
Camera Manual
Page 12
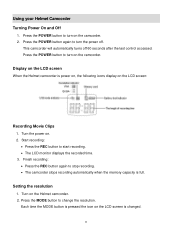
... the POWER button to turn on the LCD screen: Recording Movie Clips 1. Start recording: Press the REC button to change the resolution. Setting the resolution 1. Finish recording: Press the REC button again to turn the power off 60 seconds after the last control accessed. Using your Helmet Camcorder Turning Power On and Off 1. Press the MODE button to start recording. The LCD monitor displays the recorded time. 3. Turn on . 2. Press the POWER button again to stop recording. The camcorder stops recording automatically when the memory...
... the POWER button to turn on the LCD screen: Recording Movie Clips 1. Start recording: Press the REC button to change the resolution. Setting the resolution 1. Finish recording: Press the REC button again to turn the power off 60 seconds after the last control accessed. Using your Helmet Camcorder Turning Power On and Off 1. Press the MODE button to start recording. The LCD monitor displays the recorded time. 3. Turn on . 2. Press the POWER button again to stop recording. The camcorder stops recording automatically when the memory...
Camera Manual
Page 14
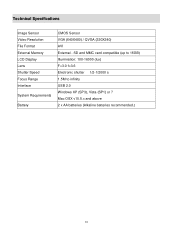
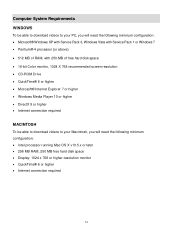
Technical Specifications Image Sensor Video Resolution File Format External Memory LCD Display Lens Shutter Speed Focus Range Interface System Requirements Battery CMOS Sensor VGA (640X480) / QVGA (320X240) AVI External - SD and MMC card compatible (up to 16GB) Illumination: 100-16000 (lux) F=3.0 f=3.6 Electronic shutter 1/2-1/2000 s 1.5M to infinity USB 2.0 Windows XP (SP3), Vista (SP1) or 7 Mac OSX v10.5.x and above 2 x AA batteries (Alkaline batteries recommended.) 13
Technical Specifications Image Sensor Video Resolution File Format External Memory LCD Display Lens Shutter Speed Focus Range Interface System Requirements Battery CMOS Sensor VGA (640X480) / QVGA (320X240) AVI External - SD and MMC card compatible (up to 16GB) Illumination: 100-16000 (lux) F=3.0 f=3.6 Electronic shutter 1/2-1/2000 s 1.5M to infinity USB 2.0 Windows XP (SP3), Vista (SP1) or 7 Mac OSX v10.5.x and above 2 x AA batteries (Alkaline batteries recommended.) 13
Camera Manual
Page 15
... of free hard disk space 16-bit Color monitor, 1024 X 768 recommended screen resolution CD-ROM Drive QuickTime® 6 or higher Microsoft® Internet Explorer 7 or higher Windows Media Player 10 or higher DirectX 9 or higher Internet connection required MACINTOSH To be able to download videos to your Macintosh, you will need...
... of free hard disk space 16-bit Color monitor, 1024 X 768 recommended screen resolution CD-ROM Drive QuickTime® 6 or higher Microsoft® Internet Explorer 7 or higher Windows Media Player 10 or higher DirectX 9 or higher Internet connection required MACINTOSH To be able to download videos to your Macintosh, you will need...
Camera Manual
Page 16
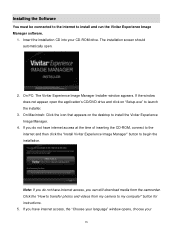
... have internet access, the "Choose your language" window opens, choose your CD-ROM drive. If you can still download media from my camera to begin the installation. On PC: The Vivitar Experience Image Manager Installer window appears. Click the "How to install the Vivitar Experience Image Manager. 4. The installation screen should automatically open the application's CD/DVD drive and click on the desktop to transfer photos and videos from the camcorder. Installing the Software You must be connected to...
... have internet access, the "Choose your language" window opens, choose your CD-ROM drive. If you can still download media from my camera to begin the installation. On PC: The Vivitar Experience Image Manager Installer window appears. Click the "How to install the Vivitar Experience Image Manager. 4. The installation screen should automatically open the application's CD/DVD drive and click on the desktop to transfer photos and videos from the camcorder. Installing the Software You must be connected to...
Camera Manual
Page 17
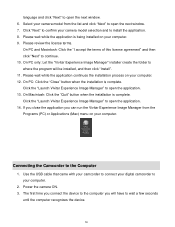
On PC: Click the "Close" button when the installation is complete. Use the USB cable that came with your camcorder to connect your digital camcorder to your camera model selection and to install the application. 8. Please review the license terms. On PC and Macintosh: ...device. 16 Click "Next" to confirm your computer. 2. Click the "Launch Vivitar Experience Image Manager" to open the application. 14. language and click "Next" to open the next window. 7. Power the camera ON. 3. The first time you connect the device to the computer you can run the Vivitar Experience Image...
On PC: Click the "Close" button when the installation is complete. Use the USB cable that came with your camcorder to connect your digital camcorder to your camera model selection and to install the application. 8. Please review the license terms. On PC and Macintosh: ...device. 16 Click "Next" to confirm your computer. 2. Click the "Launch Vivitar Experience Image Manager" to open the application. 14. language and click "Next" to open the next window. 7. Power the camera ON. 3. The first time you connect the device to the computer you can run the Vivitar Experience Image...
Camera Manual
Page 18
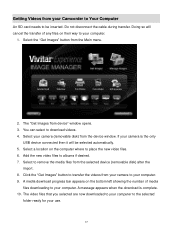
... card needs to your computer. 1. Select the "Get Images" button from device" window opens. 3. If your camera is complete. 10. Select to remove the media files from your camera to be selected automatically. 5. Doing so will be inserted. Click the "Get Images" button to your camera (removable disk) from the device window. A message appears when the download is the only USB device connected then it will cancel the transfer of media files downloading to transfer the videos from the selected device (removable disk...
... card needs to your computer. 1. Select the "Get Images" button from device" window opens. 3. If your camera is complete. 10. Select to remove the media files from your camera to be selected automatically. 5. Doing so will be inserted. Click the "Get Images" button to your camera (removable disk) from the device window. A message appears when the download is the only USB device connected then it will cancel the transfer of media files downloading to transfer the videos from the selected device (removable disk...
Camera Manual
Page 19
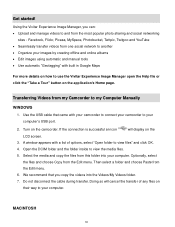
... on how to use the Vivitar Experience Image Manager open the Help file or click the "Take a Tour" button on the camcorder. Turn on the application's Home page. Do not disconnect the cable during transfer. Use the USB cable that you can: Upload and manage videos to my Computer Manually WINDOWS 1. Open the DCIM folder and the folder inside to your camcorder to view the media files. 5. If the connection is successful an...
... on how to use the Vivitar Experience Image Manager open the Help file or click the "Take a Tour" button on the camcorder. Turn on the application's Home page. Do not disconnect the cable during transfer. Use the USB cable that you can: Upload and manage videos to my Computer Manually WINDOWS 1. Open the DCIM folder and the folder inside to your camcorder to view the media files. 5. If the connection is successful an...
Camera Manual
Page 20
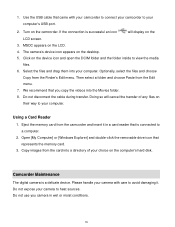
... expose your camera to your choice on the camcorder. The camera's device icon appears on the LCD. 4. Turn on the computer's hard disk. Optionally, select the files and choose Copy from the camcorder and insert it . Open [My Computer] or [Windows Explorer] and double-click the removable drive icon that is successful an icon will cancel the transfer of your computer's USB port. 2. Camcorder Maintenance The digital camera is a delicate...
... expose your camera to your choice on the camcorder. The camera's device icon appears on the LCD. 4. Turn on the computer's hard disk. Optionally, select the files and choose Copy from the camcorder and insert it . Open [My Computer] or [Windows Explorer] and double-click the removable drive icon that is successful an icon will cancel the transfer of your computer's USB port. 2. Camcorder Maintenance The digital camera is a delicate...
Camera Manual
Page 21
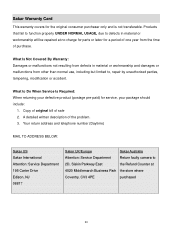
... service, your package should include: 1. Copy of original bill of purchase. A detailed written description of the problem. 3. What to 2D, Siskin Parkway East the Refund Counter at no charge for parts or labor for the original consumer purchaser only and is not transferable. Sakar Warranty Card This warranty covers for a period of one year from the time of...
... service, your package should include: 1. Copy of original bill of purchase. A detailed written description of the problem. 3. What to 2D, Siskin Parkway East the Refund Counter at no charge for parts or labor for the original consumer purchaser only and is not transferable. Sakar Warranty Card This warranty covers for a period of one year from the time of...
Camera Manual
Page 22
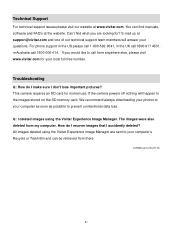
... free number. We recommend always downloading your photos to prevent unintentional data loss. All images deleted using the Vivitar Experience Image Manager. If you are sent to your computer as soon as possible to your computer's Recycle or Trash Bin and can find what you would like to the images stored on the SD memory card. How do I make sure I don't lose important pictures? The images...
... free number. We recommend always downloading your photos to prevent unintentional data loss. All images deleted using the Vivitar Experience Image Manager. If you are sent to your computer as soon as possible to your computer's Recycle or Trash Bin and can find what you would like to the images stored on the SD memory card. How do I make sure I don't lose important pictures? The images...


