
Vivitar DVR 480 Support Question
Vivitar DVR 480 Support Question
Find answers below for this question about Vivitar DVR 480.Need a Vivitar DVR 480 manual? We have 2 online manuals for this item!
Question posted by mminton369 on December 28th, 2016
My New Vivitar Dvr787hd Will Not Power Up Unless It Is Connectedto Power Supply
battery is showing to be fully cha
Current Answers

Answer #2: Posted by BusterDoogen on December 28th, 2016 1:55 PM
BusterDoogen

Member since:
October 30th, 2011 Points: 28,565,447

Member since:
October 30th, 2011 Points: 28,565,447
The battery cells are like those in hobby RC, you do not want to charge them immediately after using the camera for a long time. Heat kills these cells pretty quickly.
I hope this is helpful to you!
Please respond to my effort to provide you with the best possible solution by using the "Acceptable Solution" and/or the "Helpful" buttons when the answer has proven to be helpful. Please feel free to submit further info for your question, if a solution was not provided. I appreciate the opportunity to serve you!
Related Vivitar DVR 480 Manual Pages
Warranty - Page 1
...arising from other extraneous causes such as unauthorised disassembly, repair or modification. During the period, Vivitar will repair or replace the product at no charge for a period of one year from...damages, so the above limitation or exclusion may apply to you.
-1- Limited One Year Warranty
Vivitar warrants this quality product to be free of defects in or exposure to chemicals or liquids,...
Warranty - Page 2
...the event the product is a result in wear and tear, Vivitar may levy a handling charge for the
from anywhere else, please visit www.vivitar.com for example, a copy of your problem. WHAT TO DO...4831. c) When possible, a sample evidencing the problem. For more information visit our website www.vivitar.com TECHNICAL SUPPORT
support team members will be not faulty or the defect is
deemed to be...
Camera Manual - Page 1
DVR 480 Digital Helmet Camcorder
User Manual
© 2009-2011 Sakar International, Inc. Windows and the Windows logo are the property of Microsoft Corporation. All other trademarks are registered trademarks of their respective companies. All rights reserved.
Camera Manual - Page 2
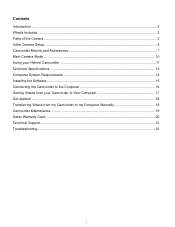
Contents
Introduction ...2 What's Included...2 Parts of the Camera ...3 Initial Camera Setup...4 Camcorder Mounts and Accessories 7 Main Camera Mode...10 Using your Helmet Camcorder ...11 Technical Specifications ...13 Computer System Requirements 14 Installing the Software ...15 Connecting the Camcorder to the Computer 16 Getting Videos from your Camcorder to Your Computer 17 Get started!......
Camera Manual - Page 3
....
Strap 5. Water Resistant Silicon
Note: SD Memory Card and batteries not included.
2
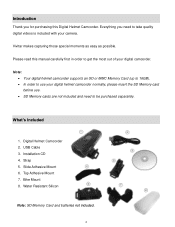
What's Included
1. Vivitar makes capturing those special moments as easy as possible. Digital Helmet...61623; SD Memory cards are not included and need to take quality digital videos is included with your camera. USB Cable 3. Introduction
Thank you need to be purchased separately. Everything...
Camera Manual - Page 4
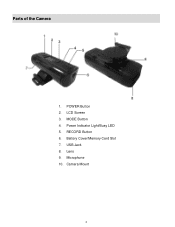
Parts of the Camera
1. MODE Button 4. USB Jack 8. Lens 9. RECORD Button 6. Power Indicator Light/Busy LED 5. Battery Cover/Memory Card Slot 7. Microphone 10. Camera Mount
3 POWER Button 2. LCD Screen 3.
Camera Manual - Page 5
Turning On the Camera
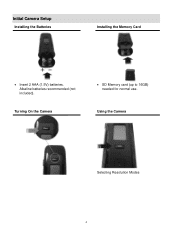
SD Memory card (up to 16GB) needed for normal use. Using the Camera
Selecting Resolution Modes
4 Initial Camera Setup
Installing the Batteries
Installing the Memory Card
Insert 2 AAA (1.5V) batteries. Alkaline batteries recommended (not included).
Camera Manual - Page 6
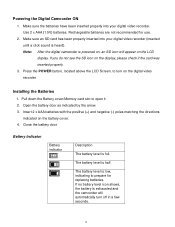
... Battery Indicator
Battery indicator
Description
The battery level is heard). Close the battery door. Rechargeable batteries are not recommended for replacing batteries. Make sure an SD card has been properly inserted into your digital video recorder (inserted until a click sound is full. Powering the Digital Camcorder ON
1. If no battery level icon shows, the battery is powered...
Camera Manual - Page 7
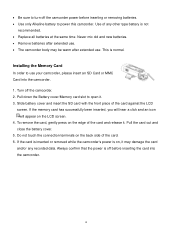
... old and new batteries. Remove batteries after extended use your camcorder, please insert an SD Card or MMC Card into the camcorder.
6 Pull down the Battery cover/Memory card...the camcorder. 2.
Installing the Memory Card
In order to power this camcorder. Always confirm that the power is not
recommended. Replace all batteries at the same time. Use of the card. 6. ...
Camera Manual - Page 8
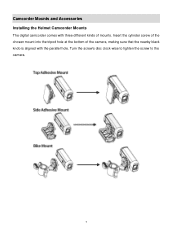
Camcorder Mounts and Accessories Installing the Helmet Camcorder Mounts
The digital camcorder comes with three different kinds of the camera, making sure that the nearby black knob is aligned with the parallel hole. Turn the screw's disc clock-wise to tighten the screw to the camera.
7 Insert the cylinder screw of the chosen mount into the tripod hole at the bottom of mounts.
Camera Manual - Page 9
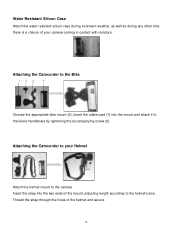
... (3), insert the rubber pad (1) into the two ends of the mount, adjusting length according to the camera. Thread the strap through the holes of your Helmet
Attach the helmet mount to the helmet's size.... Insert the strap into the mount and attach it to your camera coming in contact with moisture.
Water Resistant Silicon Case
Attach the water resistant silicon case...
Camera Manual - Page 10
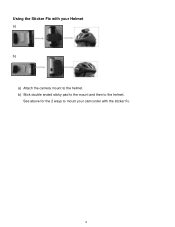
Using the Sticker Fix with the sticker fix.
9 b) Stick double ended sticky pad to the mount and then to the helmet. See above for the 2 ways to mount your camcorder with your Helmet
a) b)
a) Attach the camera mount to the helmet.
Camera Manual - Page 11
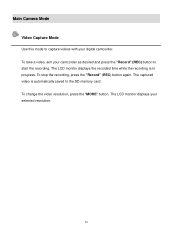
... the "Record" (REC) button again. To change the video resolution, press the "MODE" button. To take a video, aim your selected resolution.
10 The LCD monitor displays the recorded time while the recording is automatically saved to capture videos with your digital camcorder. Main Camera Mode Video Capture Mode
Use this mode to the SD memory...
Camera Manual - Page 12
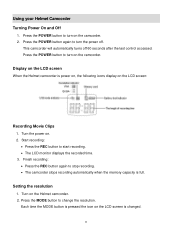
...; Press the REC button to change the resolution. Press the MODE button to start recording. The LCD monitor displays the recorded time. 3. Press the POWER button to turn on the Helmet camcorder. 2.
Each time the MODE button is full.
Finish recording: Press the REC button again to turn the...
Camera Manual - Page 13

VGA: The video clip size is higher and the quality is better when the resolution is VGA than when the resolution is QVGA. QVGA: The length of recording is longer when the resolution is QVGA than that is VGA.
12
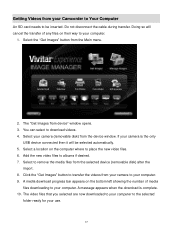
Camera Manual - Page 16
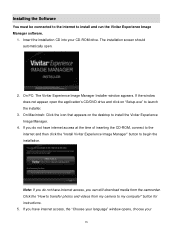
...media from my camera to launch the installer.
3. The installation screen should automatically open the application's CD/DVD drive and click on the desktop to install and run the Vivitar Experience Image Manager ... CD into your
15 On PC: The Vivitar Experience Image Manager Installer window appears. Click the "How to transfer photos and videos from the camcorder. If you have internet ...
Camera Manual - Page 17
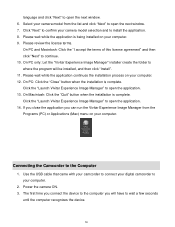
... to open the next window. 7. language and click "Next" to the Computer
1. Click the "Launch Vivitar Experience Image Manager" to open the application. 14.
Click the "Launch Vivitar Experience Image Manager" to open the application. 13. Power the camera ON. 3. On PC: Click the "Close" button when the installation is complete. If you close...
Camera Manual - Page 18
... are now downloaded to your use.
17 Add the new video files to the selected
folder ready for your computer to albums if desired. 7. A media download progress bar appears on the bottom left showing the number of any files on the computer where to download videos. 4. A message appears when the download is the only...
Camera Manual - Page 19
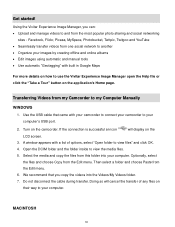
... most popular photo sharing and social networking
sites - Use the USB cable that you can: Upload and manage videos to view the media files.
5. Using the Vivitar Experience Image Manager, you copy the videos into your computer. We recommend that came with your camcorder to connect your computer's USB port.
2. Open the...
Camera Manual - Page 22
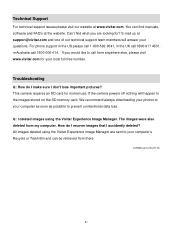
...UK call 0800 917 4831, in Australia call from anywhere else, please visit www.vivitar.com for your local toll free number. We recommend always downloading your photos to ... images using the Vivitar Experience Image Manager are looking for normal use.
If the camera powers off nothing will answer your questions. The images were also deleted from there.
This camera requires an SD ...
Similar Questions


How Do I Delete Everything On 503 Hd To Start Over...........
(Posted by ijd6213 8 years ago)

Vivitar Dvr787-pnk-kit-wm Action Digital Video Recorder, Pink Video Camera With
Vivitar's DVR 787 HD comes on when plugged in and says it has full power but cuts off when you unplu...
Vivitar's DVR 787 HD comes on when plugged in and says it has full power but cuts off when you unplu...
(Posted by jjknott82 8 years ago)

Camera Will Activate, But Nothing On The Screen
I used this Vivatar DVR787HD camera once for some in water shots. Camera worked fine. Charged the ba...
I used this Vivatar DVR787HD camera once for some in water shots. Camera worked fine. Charged the ba...
(Posted by scenic06 9 years ago)
Not Powering Up
I have the vivitar 810 HD and we changed batteries and when trying to power up it shows red light bu...
I have the vivitar 810 HD and we changed batteries and when trying to power up it shows red light bu...
(Posted by shericoons 9 years ago)