
Camera Manual
Page 2
Contents Introduction ...2 What's Included...2 Parts of the Camera ...3 Initial Camera Setup...4 Camcorder Mounts and Accessories 7 Main Camera Mode...10 Using your Helmet Camcorder ...11 Technical Specifications ...13 Computer System Requirements 14 Installing the Software ...15 Connecting the Camcorder to the Computer 16 Getting Videos from your Camcorder to Your Computer 17 Get started!...18 Transferring Videos from my Camcorder to my Computer Manually 18 Camcorder Maintenance ...19 Sakar Warranty Card...20 Technical Support...21 Troubleshooting...21 1
Contents Introduction ...2 What's Included...2 Parts of the Camera ...3 Initial Camera Setup...4 Camcorder Mounts and Accessories 7 Main Camera Mode...10 Using your Helmet Camcorder ...11 Technical Specifications ...13 Computer System Requirements 14 Installing the Software ...15 Connecting the Camcorder to the Computer 16 Getting Videos from your Camcorder to Your Computer 17 Get started!...18 Transferring Videos from my Camcorder to my Computer Manually 18 Camcorder Maintenance ...19 Sakar Warranty Card...20 Technical Support...21 Troubleshooting...21 1
Camera Manual
Page 3
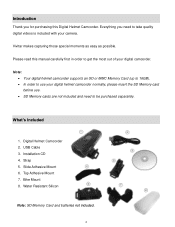
Vivitar makes capturing those special moments as easy as possible. Digital Helmet Camcorder 2. Slide Adhesive Mount 6. What's Included 1. Installation CD 4. Strap 5. Bike Mount 8. Note: Your ... be purchased separately. USB Cable 3. Top Adhesive Mount 7. Everything you for purchasing this manual carefully first in order to get the most out of your camera.
Vivitar makes capturing those special moments as easy as possible. Digital Helmet Camcorder 2. Slide Adhesive Mount 6. What's Included 1. Installation CD 4. Strap 5. Bike Mount 8. Note: Your ... be purchased separately. USB Cable 3. Top Adhesive Mount 7. Everything you for purchasing this manual carefully first in order to get the most out of your camera.
Camera Manual
Page 4
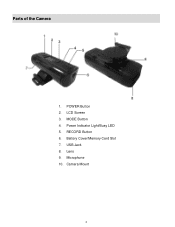
Power Indicator Light/Busy LED 5. USB Jack 8. Microphone 10. LCD Screen 3. Lens 9. Parts of the Camera 1. POWER Button 2. Camera Mount 3 Battery Cover/Memory Card Slot 7. RECORD Button 6. MODE Button 4.
Power Indicator Light/Busy LED 5. USB Jack 8. Microphone 10. LCD Screen 3. Lens 9. Parts of the Camera 1. POWER Button 2. Camera Mount 3 Battery Cover/Memory Card Slot 7. RECORD Button 6. MODE Button 4.
Camera Manual
Page 5
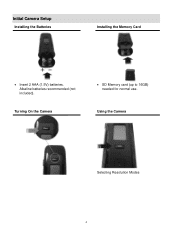
Using the Camera Selecting Resolution Modes 4 Turning On the Camera SD Memory card (up to 16GB) needed for normal use. Alkaline batteries recommended (not included). Initial Camera Setup Installing the Batteries Installing the Memory Card Insert 2 AAA (1.5V) batteries.
Using the Camera Selecting Resolution Modes 4 Turning On the Camera SD Memory card (up to 16GB) needed for normal use. Alkaline batteries recommended (not included). Initial Camera Setup Installing the Batteries Installing the Memory Card Insert 2 AAA (1.5V) batteries.
Camera Manual
Page 8
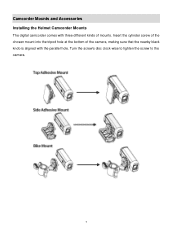
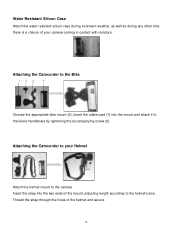
Turn the screw's disc clock-wise to tighten the screw to the camera. 7 Camcorder Mounts and Accessories Installing the Helmet Camcorder Mounts The digital camcorder comes with three different kinds of the camera, making sure that the nearby black knob is aligned with the parallel hole. Insert the cylinder screw of the chosen mount into the tripod hole at the bottom of mounts.
Turn the screw's disc clock-wise to tighten the screw to the camera. 7 Camcorder Mounts and Accessories Installing the Helmet Camcorder Mounts The digital camcorder comes with three different kinds of the camera, making sure that the nearby black knob is aligned with the parallel hole. Insert the cylinder screw of the chosen mount into the tripod hole at the bottom of mounts.
Camera Manual
Page 9
... and secure. 8 Attaching the Camcorder to the bike's handlebars by tightening the accompanying screw (2). Insert the strap into the mount and attach it to your camera coming in contact with moisture. Thread the strap through the holes of your Helmet Attach the helmet mount to the helmet's size. Attaching the Camcorder...
... and secure. 8 Attaching the Camcorder to the bike's handlebars by tightening the accompanying screw (2). Insert the strap into the mount and attach it to your camera coming in contact with moisture. Thread the strap through the holes of your Helmet Attach the helmet mount to the helmet's size. Attaching the Camcorder...
Camera Manual
Page 10
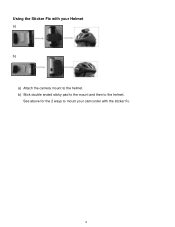
See above for the 2 ways to mount your Helmet a) b) a) Attach the camera mount to the helmet. Using the Sticker Fix with your camcorder with the sticker fix. 9 b) Stick double ended sticky pad to the mount and then to the helmet.
See above for the 2 ways to mount your Helmet a) b) a) Attach the camera mount to the helmet. Using the Sticker Fix with your camcorder with the sticker fix. 9 b) Stick double ended sticky pad to the mount and then to the helmet.
Camera Manual
Page 11
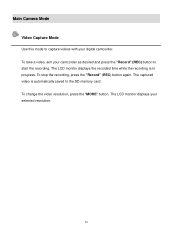
Main Camera Mode Video Capture Mode Use this mode to capture videos with your camcorder as desired and press the "Record" (REC) button to the SD memory card. To take a video, aim your digital camcorder. The captured video is in progress. To change the video resolution, press the "MODE" button. The LCD monitor displays the recorded time while the recording is automatically saved to start the recording. The LCD monitor displays your selected resolution. 10 To stop the recording, press the "Record" (REC) button again.
Main Camera Mode Video Capture Mode Use this mode to capture videos with your camcorder as desired and press the "Record" (REC) button to the SD memory card. To take a video, aim your digital camcorder. The captured video is in progress. To change the video resolution, press the "MODE" button. The LCD monitor displays the recorded time while the recording is automatically saved to start the recording. The LCD monitor displays your selected resolution. 10 To stop the recording, press the "Record" (REC) button again.
Camera Manual
Page 16
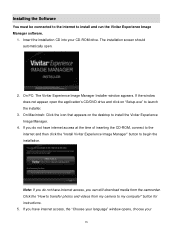
...choose your CD-ROM drive. If the window does not appear, open . 2. If you have internet access, you can still download media from my camera to begin the installation. Note: If you do not have internet access at the time of inserting the CD-ROM, connect to the internet and...automatically open the application's CD/DVD drive and click on the desktop to launch the installer. 3. Click the "How to install and run the Vivitar Experience Image Manager software. 1. Installing the Software You must be connected to the internet to transfer photos and videos from the camcorder. Insert the ...
...choose your CD-ROM drive. If the window does not appear, open . 2. If you have internet access, you can still download media from my camera to begin the installation. Note: If you do not have internet access at the time of inserting the CD-ROM, connect to the internet and...automatically open the application's CD/DVD drive and click on the desktop to launch the installer. 3. Click the "How to install and run the Vivitar Experience Image Manager software. 1. Installing the Software You must be connected to the internet to transfer photos and videos from the camcorder. Insert the ...
Camera Manual
Page 17
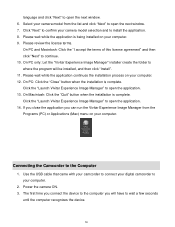
...to open the application. 14. Connecting the Camcorder to continue. 10. Power the camera ON. 3. Please wait while the application is being installed on your computer. 12. On PC only: Let the "Vivitar Experience Image Manager" installer create the folder to where the program will have to ... click "Next" to open the next window. 6. On Macintosh: Click the "Quit" button when the installation is complete. Click the "Launch Vivitar Experience Image Manager" to open the application. 13. On PC: Click the "Close" button when the installation is complete. Please review the license...
...to open the application. 14. Connecting the Camcorder to continue. 10. Power the camera ON. 3. Please wait while the application is being installed on your computer. 12. On PC only: Let the "Vivitar Experience Image Manager" installer create the folder to where the program will have to ... click "Next" to open the next window. 6. On Macintosh: Click the "Quit" button when the installation is complete. Click the "Launch Vivitar Experience Image Manager" to open the application. 13. On PC: Click the "Close" button when the installation is complete. Please review the license...
Camera Manual
Page 18
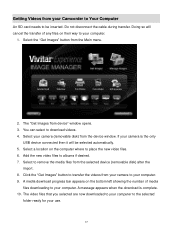
... to download videos. 4. Click the "Get Images" button to the selected folder ready for your camera (removable disk) from device" window opens. 3. Select the "Get Images" button from your camera to remove the media files from your computer. Select a location on the computer where to be ...selected automatically. 5. Getting Videos from the selected device (removable disk) after the import. 8. If your computer. 9. Select to your camera is complete. 10. A message appears when the download is the only USB device connected then it will cancel the transfer of any files on...
... to download videos. 4. Click the "Get Images" button to the selected folder ready for your camera (removable disk) from device" window opens. 3. Select the "Get Images" button from your camera to remove the media files from your computer. Select a location on the computer where to be ...selected automatically. 5. Getting Videos from the selected device (removable disk) after the import. 8. If your computer. 9. Select to your camera is complete. 10. A message appears when the download is the only USB device connected then it will cancel the transfer of any files on...
Camera Manual
Page 20
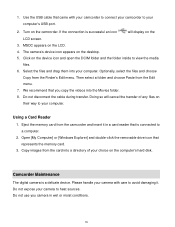
...and choose Copy from the Edit menu. 7. Do not use you copy the videos into the Movies folder. 8. 1. Turn on the LCD. 4. The camera's device icon appears on the LCD screen. 3. Click on the device icon and open the DCIM folder and the folder inside to a computer. 2. We...Then select a folder and choose Paste from the Finder's Edit menu. Using a Card Reader 1. Camcorder Maintenance The digital camera is successful an icon will cancel the transfer of your camera to your computer. Copy images from the camcorder and insert it . If the connection is a delicate device. Doing so ...
...and choose Copy from the Edit menu. 7. Do not use you copy the videos into the Movies folder. 8. 1. Turn on the LCD. 4. The camera's device icon appears on the LCD screen. 3. Click on the device icon and open the DCIM folder and the folder inside to a computer. 2. We...Then select a folder and choose Paste from the Finder's Edit menu. Using a Card Reader 1. Camcorder Maintenance The digital camera is successful an icon will cancel the transfer of your camera to your computer. Copy images from the camcorder and insert it . If the connection is a delicate device. Doing so ...
Camera Manual
Page 21
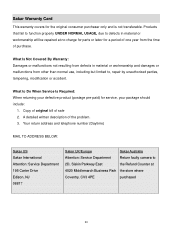
... ADDRESS BELOW: Sakar US Sakar International Attention: Service Department 195 Carter Drive Edison, NJ 08817 Sakar UK/Europe Sakar Australia Attention: Service Department Return faulty camera to defects in material or workmanship and damages or malfunctions from the time of one year from other than normal use, including but limited to...
... ADDRESS BELOW: Sakar US Sakar International Attention: Service Department 195 Carter Drive Edison, NJ 08817 Sakar UK/Europe Sakar Australia Attention: Service Department Return faulty camera to defects in material or workmanship and damages or malfunctions from the time of one year from other than normal use, including but limited to...
Camera Manual
Page 22
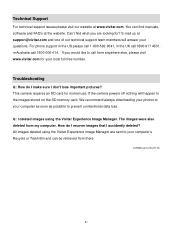
...call 0800 917 4831, in Australia call from anywhere else, please visit www.vivitar.com for your computer's Recycle or Trash Bin and can find what you would like to your questions. If the camera powers off nothing will answer your computer as soon as possible to prevent unintentional... data loss. This camera requires an SD card for ? The images were also deleted from there. All images deleted using the Vivitar Experience Image Manager. Can't find manuals, software and FAQ's at www.vivitar.com. If you are sent to the images stored...
...call 0800 917 4831, in Australia call from anywhere else, please visit www.vivitar.com for your computer's Recycle or Trash Bin and can find what you would like to your questions. If the camera powers off nothing will answer your computer as soon as possible to prevent unintentional... data loss. This camera requires an SD card for ? The images were also deleted from there. All images deleted using the Vivitar Experience Image Manager. Can't find manuals, software and FAQ's at www.vivitar.com. If you are sent to the images stored...


