
Camera Manual
Page 2
Contents Introduction ...2 What's Included...2 Parts of the Camera ...3 Initial Camera Setup...4 Camcorder Mounts and Accessories 7 Main Camera Mode...10 Using your Helmet Camcorder ...11 Technical Specifications ...13 Computer System Requirements 14 Installing the Software ...15 Connecting the Camcorder to the Computer 16 Getting Videos from your Camcorder to Your Computer 17 Get started!...18 Transferring Videos from my Camcorder to my Computer Manually 18 Camcorder Maintenance ...19 Sakar Warranty Card...20 Technical Support...21 Troubleshooting...21 1
Contents Introduction ...2 What's Included...2 Parts of the Camera ...3 Initial Camera Setup...4 Camcorder Mounts and Accessories 7 Main Camera Mode...10 Using your Helmet Camcorder ...11 Technical Specifications ...13 Computer System Requirements 14 Installing the Software ...15 Connecting the Camcorder to the Computer 16 Getting Videos from your Camcorder to Your Computer 17 Get started!...18 Transferring Videos from my Camcorder to my Computer Manually 18 Camcorder Maintenance ...19 Sakar Warranty Card...20 Technical Support...21 Troubleshooting...21 1
Camera Manual
Page 3
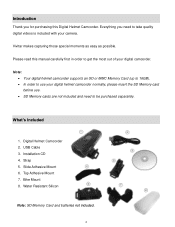
Introduction Thank you need to take quality digital videos is included with your digital camcorder. Please read this Digital Helmet Camcorder. Slide Adhesive Mount 6. Bike Mount 8. Strap 5. Digital Helmet Camcorder 2. What's Included 1. Water Resistant ... digital helmet camcorder normally, please insert the SD Memory card before use. SD Memory cards are not included and need to be purchased separately. Vivitar makes capturing those special moments as easy as possible.
Introduction Thank you need to take quality digital videos is included with your digital camcorder. Please read this Digital Helmet Camcorder. Slide Adhesive Mount 6. Bike Mount 8. Strap 5. Digital Helmet Camcorder 2. What's Included 1. Water Resistant ... digital helmet camcorder normally, please insert the SD Memory card before use. SD Memory cards are not included and need to be purchased separately. Vivitar makes capturing those special moments as easy as possible.
Camera Manual
Page 6
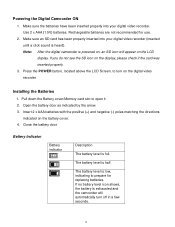
...indicated by the arrow. 3. Make sure the batteries have been inserted properly into your digital video recorder. Make sure an SD card has been properly inserted into your digital video recorder (inserted until a click sound is powered on the LCD display. If you do ... replacing batteries. The battery level is exhausted and the camcorder will appear on , an SD icon will automatically turn on the digital video recorder. Installing the Batteries 1. The battery level is full. Battery Indicator Battery indicator Description The battery level is low, indicating to ...
...indicated by the arrow. 3. Make sure the batteries have been inserted properly into your digital video recorder. Make sure an SD card has been properly inserted into your digital video recorder (inserted until a click sound is powered on the LCD display. If you do ... replacing batteries. The battery level is exhausted and the camcorder will appear on , an SD icon will automatically turn on the digital video recorder. Installing the Batteries 1. The battery level is full. Battery Indicator Battery indicator Description The battery level is low, indicating to ...
Camera Manual
Page 11
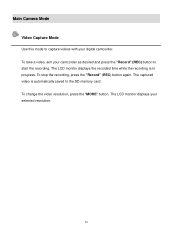
The captured video is in progress. The LCD monitor displays your digital camcorder. To stop the recording, press the "Record" (REC) button again. To change the video resolution, press the "MODE" button. Main Camera Mode Video Capture Mode Use this mode to capture videos with your selected resolution. 10 To take a video, aim your camcorder as desired and press the "Record" (REC) button to the SD memory card. The LCD monitor displays the recorded time while the recording is automatically saved to start the recording.
The captured video is in progress. The LCD monitor displays your digital camcorder. To stop the recording, press the "Record" (REC) button again. To change the video resolution, press the "MODE" button. Main Camera Mode Video Capture Mode Use this mode to capture videos with your selected resolution. 10 To take a video, aim your camcorder as desired and press the "Record" (REC) button to the SD memory card. The LCD monitor displays the recorded time while the recording is automatically saved to start the recording.

Camera Manual
Page 13
QVGA: The length of recording is longer when the resolution is QVGA than that is VGA. 12 VGA: The video clip size is higher and the quality is better when the resolution is VGA than when the resolution is QVGA.
QVGA: The length of recording is longer when the resolution is QVGA than that is VGA. 12 VGA: The video clip size is higher and the quality is better when the resolution is VGA than when the resolution is QVGA.
Camera Manual
Page 14
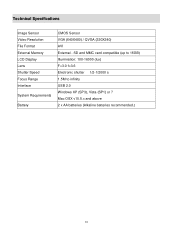
Technical Specifications Image Sensor Video Resolution File Format External Memory LCD Display Lens Shutter Speed Focus Range Interface System Requirements Battery CMOS Sensor VGA (640X480) / QVGA (320X240) AVI External - SD and MMC card compatible (up to 16GB) Illumination: 100-16000 (lux) F=3.0 f=3.6 Electronic shutter 1/2-1/2000 s 1.5M to infinity USB 2.0 Windows XP (SP3), Vista (SP1) or 7 Mac OSX v10.5.x and above 2 x AA batteries (Alkaline batteries recommended.) 13
Technical Specifications Image Sensor Video Resolution File Format External Memory LCD Display Lens Shutter Speed Focus Range Interface System Requirements Battery CMOS Sensor VGA (640X480) / QVGA (320X240) AVI External - SD and MMC card compatible (up to 16GB) Illumination: 100-16000 (lux) F=3.0 f=3.6 Electronic shutter 1/2-1/2000 s 1.5M to infinity USB 2.0 Windows XP (SP3), Vista (SP1) or 7 Mac OSX v10.5.x and above 2 x AA batteries (Alkaline batteries recommended.) 13
Camera Manual
Page 15
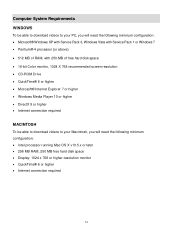
Computer System Requirements WINDOWS To be able to download videos to your PC, you will need the following minimum configuration: Microsoft® Windows XP with Service Pack 3, Windows Vista with Service Pack 1 or Windows 7 &#... Explorer 7 or higher Windows Media Player 10 or higher DirectX 9 or higher Internet connection required MACINTOSH To be able to download videos to your Macintosh, you will need the following minimum configuration: Intel processor running Mac OS X v10.5.x or later 256 MB RAM, 250 MB...
Computer System Requirements WINDOWS To be able to download videos to your PC, you will need the following minimum configuration: Microsoft® Windows XP with Service Pack 3, Windows Vista with Service Pack 1 or Windows 7 &#... Explorer 7 or higher Windows Media Player 10 or higher DirectX 9 or higher Internet connection required MACINTOSH To be able to download videos to your Macintosh, you will need the following minimum configuration: Intel processor running Mac OS X v10.5.x or later 256 MB RAM, 250 MB...
Camera Manual
Page 16
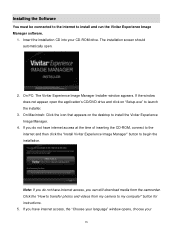
... not have internet access, you have internet access at the time of inserting the CD-ROM, connect to the internet and then click the "Install Vivitar Experience Image Manager" button to launch the installer. 3. If the window does not appear, open . 2. If you can still download media from... my camera to transfer photos and videos from the camcorder. On Macintosh: Click the icon that appears on "Setup.exe" to begin the installation. Insert the installation CD into your 15 ...
... not have internet access, you have internet access at the time of inserting the CD-ROM, connect to the internet and then click the "Install Vivitar Experience Image Manager" button to launch the installer. 3. If the window does not appear, open . 2. If you can still download media from... my camera to transfer photos and videos from the camcorder. On Macintosh: Click the icon that appears on "Setup.exe" to begin the installation. Insert the installation CD into your 15 ...
Camera Manual
Page 18
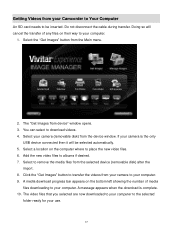
... progress bar appears on the bottom left showing the number of any files on the computer where to place the new video files. 6. Select your use. 17 Getting Videos from your Camcorder to Your Computer An SD card needs to be selected automatically. 5. Do not disconnect the cable during... transfer. Doing so will be inserted. Add the new video files to your computer. 1. A message appears when the download is the only USB device connected then it will cancel the transfer of media ...
... progress bar appears on the bottom left showing the number of any files on the computer where to place the new video files. 6. Select your use. 17 Getting Videos from your Camcorder to Your Computer An SD card needs to be selected automatically. 5. Do not disconnect the cable during... transfer. Doing so will be inserted. Add the new video files to your computer. 1. A message appears when the download is the only USB device connected then it will cancel the transfer of media ...
Camera Manual
Page 19
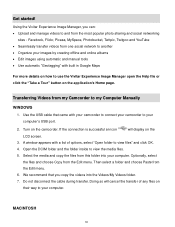
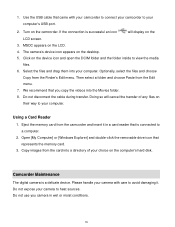
... Transferring Videos from one social network to another Organize your images by creating offline and online albums Edit images using automatic and manual tools Use automatic "Geotagging" with built in Google Maps For more details on how to your camcorder to use the Vivitar Experience ... Open the DCIM folder and the folder inside to your computer. Doing so will display on the camcorder. Get started! Using the Vivitar Experience Image Manager, you copy the videos into your computer. Optionally, select the files and choose Copy from this folder into the...
... Transferring Videos from one social network to another Organize your images by creating offline and online albums Edit images using automatic and manual tools Use automatic "Geotagging" with built in Google Maps For more details on how to your camcorder to use the Vivitar Experience ... Open the DCIM folder and the folder inside to your computer. Doing so will display on the camcorder. Get started! Using the Vivitar Experience Image Manager, you copy the videos into your computer. Optionally, select the files and choose Copy from this folder into the...
Camera Manual
Page 20
... The digital camera is successful an icon will cancel the transfer of your camera to view the media files. 6. Do not use you copy the videos into a directory of any files on their way to avoid damaging it in wet or moist conditions. 19 The camera's device icon appears on the...
... The digital camera is successful an icon will cancel the transfer of your camera to view the media files. 6. Do not use you copy the videos into a directory of any files on their way to avoid damaging it in wet or moist conditions. 19 The camera's device icon appears on the...


