
User Guide
Page 2
... User Guides ...4 Setting Up the Media Center Setup Instructions ...5 Input and Output Ports ...10 Setup Examples ...11 Basic Setup with TV and PC Monitor ...11 Setup with VCR, TV and PC Monitor ...12 Setup with Plasma Display and 5.1 Digital Audio ...13 Setup FAQs ...14 Connecting to the Internet ...16 Using the Media Center Media Center Power Modes ...17 Turning the Media Center On ...17 Using Standby Mode ...18 Turning the Media Center Off ...18 Using the Remote Control ...18 Remote Control Buttons ...19 Using the Wireless Keyboard ...20 Special Function Keys ...20 Adjusting the Speed...
... User Guides ...4 Setting Up the Media Center Setup Instructions ...5 Input and Output Ports ...10 Setup Examples ...11 Basic Setup with TV and PC Monitor ...11 Setup with VCR, TV and PC Monitor ...12 Setup with Plasma Display and 5.1 Digital Audio ...13 Setup FAQs ...14 Connecting to the Internet ...16 Using the Media Center Media Center Power Modes ...17 Turning the Media Center On ...17 Using Standby Mode ...18 Turning the Media Center Off ...18 Using the Remote Control ...18 Remote Control Buttons ...19 Using the Wireless Keyboard ...20 Special Function Keys ...20 Adjusting the Speed...

User Guide
Page 7
... you need for separate components while saving money. Video, audio and photos are great for digital home movie and photo buffs. Create your favorite movies with 5.1 surround sound capability. Wireless keyboard and remote Wireless remote control operation for viewing TV, DVDs, listening to 140 hours* ViewSonic NextVision video processor technology puts all accessible in Ethernet card allows you the freedom to share your broadband ISP connection.** *Based on the hard drive...
... you need for separate components while saving money. Video, audio and photos are great for digital home movie and photo buffs. Create your favorite movies with 5.1 surround sound capability. Wireless keyboard and remote Wireless remote control operation for viewing TV, DVDs, listening to 140 hours* ViewSonic NextVision video processor technology puts all accessible in Ethernet card allows you the freedom to share your broadband ISP connection.** *Based on the hard drive...
User Guide
Page 9
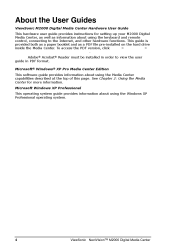
To access the PDF version, click Start > Programs > ViewSonic M2000 Hardware User Guide. See Chapter 2: Using the Media Center for setting up your M2000 Digital Media Center, as well as a PDF file pre-installed on the hard drive inside the Media Center. About the User Guides ViewSonic M2000 Digital Media Center Hardware User Guide This hardware user guide provides instructions for more information. NOTE: Adobe® Acrobat® Reader must be installed in PDF format. Microsoft Windows XP Professional This operating system guide provides information about using the Windows XP ...
To access the PDF version, click Start > Programs > ViewSonic M2000 Hardware User Guide. See Chapter 2: Using the Media Center for setting up your M2000 Digital Media Center, as well as a PDF file pre-installed on the hard drive inside the Media Center. About the User Guides ViewSonic M2000 Digital Media Center Hardware User Guide This hardware user guide provides instructions for more information. NOTE: Adobe® Acrobat® Reader must be installed in PDF format. Microsoft Windows XP Professional This operating system guide provides information about using the Windows XP ...

User Guide
Page 11
... the IR Emitter cable attached to your next best option. To activate the batteries, open the keyboard's battery compartment and remove the white plastic tab. or • Connecting the Composite Video cable with the L/R analog audio cable is your cable or satellite set-top-box, the Media Center's remote control replaces the set -top box (see illustration). 3 Connect the IR Emitter cable to the back of the Media Center. Remote Control: Open the battery compartment and install the batteries provided.
... the IR Emitter cable attached to your next best option. To activate the batteries, open the keyboard's battery compartment and remove the white plastic tab. or • Connecting the Composite Video cable with the L/R analog audio cable is your cable or satellite set-top-box, the Media Center's remote control replaces the set -top box (see illustration). 3 Connect the IR Emitter cable to the back of the Media Center. Remote Control: Open the battery compartment and install the batteries provided.

User Guide
Page 12
... quality listed first: • DVI • VGA (see the same image on the right) TV or Plasma Display Media Center (back) 6 Video Out (to TV) NOTE: The Media Center needs only one device is used simultaneously. Choose from the preferred connections listed below, starting with highest quality: • DVI • VGA • S-Video • Composite Video (using S-Videoto-Composite adapter as shown on both screens. If both a TV and a PC Monitor and...
... quality listed first: • DVI • VGA (see the same image on the right) TV or Plasma Display Media Center (back) 6 Video Out (to TV) NOTE: The Media Center needs only one device is used simultaneously. Choose from the preferred connections listed below, starting with highest quality: • DVI • VGA • S-Video • Composite Video (using S-Videoto-Composite adapter as shown on both screens. If both a TV and a PC Monitor and...
User Guide
Page 13
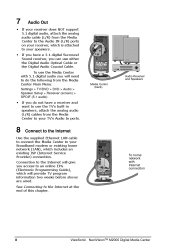
... Media Center Main Menu: Settings > TV/DVD > DVD > Audio > Speaker Setup > Receiver (screen) > SPDIF (5.1 audio) • If you do not have a 5.1 digital Surround Sound receiver, you will provide TV program information two weeks before shows are aired. See Connecting to an online EPG (Electronic Programming Guide), which includes an existing ISP (Internet Service Provider) connection. Audio Receiver and Speakers Media Center (back) 8 Connect to the Internet Use the supplied Ethernet LAN cable to connect the Media Center to your TV's Audio In ports. Connection...
... Media Center Main Menu: Settings > TV/DVD > DVD > Audio > Speaker Setup > Receiver (screen) > SPDIF (5.1 audio) • If you do not have a 5.1 digital Surround Sound receiver, you will provide TV program information two weeks before shows are aired. See Connecting to an online EPG (Electronic Programming Guide), which includes an existing ISP (Internet Service Provider) connection. Audio Receiver and Speakers Media Center (back) 8 Connect to the Internet Use the supplied Ethernet LAN cable to connect the Media Center to your TV's Audio In ports. Connection...
User Guide
Page 14
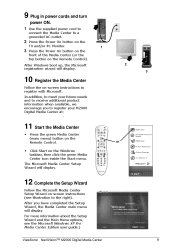
... Follow the Microsoft Media Center Setup Wizard on-screen instructions (see the Microsoft Windows XP Pro Media Center Edition user guide.) ViewSonic NextVisionTM M2000 Digital Media Center 9 9 Plug in power cords and turn power ON. 1 Use the supplied power cord to connect the Media Center to a grounded AC outlet. 2 Press the Power On button on the TV and/or PC Monitor. 3 Press the Power On button on the 1 front of the Media Center (or the top button on the Remote Control). 2 3 After Windows boot up, the...
... Follow the Microsoft Media Center Setup Wizard on-screen instructions (see the Microsoft Windows XP Pro Media Center Edition user guide.) ViewSonic NextVisionTM M2000 Digital Media Center 9 9 Plug in power cords and turn power ON. 1 Use the supplied power cord to connect the Media Center to a grounded AC outlet. 2 Press the Power On button on the TV and/or PC Monitor. 3 Press the Power On button on the 1 front of the Media Center (or the top button on the Remote Control). 2 3 After Windows boot up, the...
User Guide
Page 15
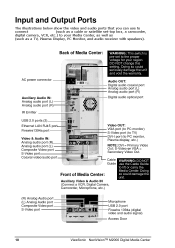
... devices (such as a TV, Plasma Display, PC Monitor, and audio receiver with speakers). Doing so could seriously damage the unit and void the warranty. Input and Output Ports The illustrations below show the video and audio ports that you can use the Cable Guide to lift or carry the Media Center. Audio OUT: Digital audio coaxial port Analog audio port (L) Analog audio port (R) Digital audio optical port AC power connector Auxiliary Audio IN: Analog audio port (L) Analog audio port (R) IR Emitter USB 2.0 ports (2) Ethernet LAN...
... devices (such as a TV, Plasma Display, PC Monitor, and audio receiver with speakers). Doing so could seriously damage the unit and void the warranty. Input and Output Ports The illustrations below show the video and audio ports that you can use the Cable Guide to lift or carry the Media Center. Audio OUT: Digital audio coaxial port Analog audio port (L) Analog audio port (R) Digital audio optical port AC power connector Auxiliary Audio IN: Analog audio port (L) Analog audio port (R) IR Emitter USB 2.0 ports (2) Ethernet LAN...
User Guide
Page 19
... Monitor only supports VGA, then you connect the M2000 to the Internet? How do I connect them? Once you must connect the DVI-to-VGA adapter to the Media Center's DVI port, then connect PC Monitor's VGA cable to the your existing home entertainment center. Yes. Can I connect the PC Monitor's VGA cable directly to the M2000 Digital Media Center's VGA port when a TV (or similar display) is to connect a Coaxial cable (combined video and audio signal) from your existing home network (connected to the Internet...
... Monitor only supports VGA, then you connect the M2000 to the Internet? How do I connect them? Once you must connect the DVI-to-VGA adapter to the Media Center's DVI port, then connect PC Monitor's VGA cable to the your existing home entertainment center. Yes. Can I connect the PC Monitor's VGA cable directly to the M2000 Digital Media Center's VGA port when a TV (or similar display) is to connect a Coaxial cable (combined video and audio signal) from your existing home network (connected to the Internet...
User Guide
Page 20
... port on the Media center. Connect your existing home network (connected to the Internet) to the Internet. You can use the pointer and buttons on the front of Windows XP Professional. The ViewSonic M2000 Digital Media Center currently supports only one integrated TV tuner. What are a convenient way to temporarily connect input devices such as a VCR (transferring VHS home movies to click the restore button (which will appear in "windowed mode" and use Windows...
... port on the Media center. Connect your existing home network (connected to the Internet) to the Internet. You can use the pointer and buttons on the front of Windows XP Professional. The ViewSonic M2000 Digital Media Center currently supports only one integrated TV tuner. What are a convenient way to temporarily connect input devices such as a VCR (transferring VHS home movies to click the restore button (which will appear in "windowed mode" and use Windows...

User Guide
Page 23
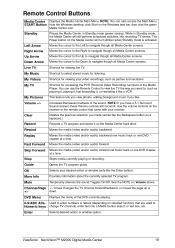
..., or press and hold the Standby button for a few seconds. • From the Wireless Keyboard: Press the Sleep button (Special Function key on the Windows taskbar, then click Turn Off. Then, Power Off the TV, PC Monitor, Receiver, etc. To go back to Normal mode, use the Remote Control or Keyboard (see above). Using the Remote Control Standby Record Rewind Replay Media Center START Back button Move Cursor Left Move Cursor Down...
..., or press and hold the Standby button for a few seconds. • From the Wireless Keyboard: Press the Sleep button (Special Function key on the Windows taskbar, then click Turn Off. Then, Power Off the TV, PC Monitor, Receiver, etc. To go back to Normal mode, use the Remote Control or Keyboard (see above). Using the Remote Control Standby Record Rewind Replay Media Center START Back button Move Cursor Left Move Cursor Down...
User Guide
Page 24
.... +/DVD Menu 0-9/ABC AlfaNumeric keys Enter Displays the menu of the sound. Shortcut for viewing live TV the way you made (works like the Enter button). You can also access the Main Menu START Button from the Windows desktop: click Start on the Media Center will not work. Opens the TV program guide. Moves the media (video and/or audio) backward. Provides information about the currently selected TV program. Used to change TV channels, enter text into a Media Center search...
.... +/DVD Menu 0-9/ABC AlfaNumeric keys Enter Displays the menu of the sound. Shortcut for viewing live TV the way you made (works like the Enter button). You can also access the Main Menu START Button from the Windows desktop: click Start on the Media Center will not work. Opens the TV program guide. Moves the media (video and/or audio) backward. Provides information about the currently selected TV program. Used to change TV channels, enter text into a Media Center search...

User Guide
Page 26
... down the left and right "mouse" buttons simultaneously for four (4) seconds. (The mouse buttons are on the far left side of the keyboard.) 2 When the LED light blinks twice, release the mouse buttons and enter the three digit code for the desired speed (refer to the default Speed Level 4 each time the batteries are changed. To de-activate this feature, press the NumLock button again. ViewSonic NextVisionTM M2000 Digital Media Center 21
... down the left and right "mouse" buttons simultaneously for four (4) seconds. (The mouse buttons are on the far left side of the keyboard.) 2 When the LED light blinks twice, release the mouse buttons and enter the three digit code for the desired speed (refer to the default Speed Level 4 each time the batteries are changed. To de-activate this feature, press the NumLock button again. ViewSonic NextVisionTM M2000 Digital Media Center 21

User Guide
Page 28
... digital video recordings. Using the 6-in-1 Media Slots The two media slots at the top of the Media Center accept six types media cards. As a secondary option, NVDVD media player comes pre-installed on the M2000 Digital Media Center (the NVDVD icon is recommended that are supported. To utilize the full Media Center features for the types media that you use the Play DVD option on the Windows desktop). Using the DVD-R/RW/CD-RW Drive The DVD-R/RW/CD-RW drive allows...
... digital video recordings. Using the 6-in-1 Media Slots The two media slots at the top of the Media Center accept six types media cards. As a secondary option, NVDVD media player comes pre-installed on the M2000 Digital Media Center (the NVDVD icon is recommended that are supported. To utilize the full Media Center features for the types media that you use the Play DVD option on the Windows desktop). Using the DVD-R/RW/CD-RW Drive The DVD-R/RW/CD-RW drive allows...
User Guide
Page 31
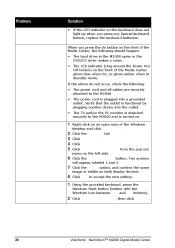
... the M2000 spins or the DVD/CD drive makes a noise. Verify that the outlet is functional by plugging another device into a grounded outlet. The LED indicator (ring around the Power On/ Off button) on the front of buttons) on the supplied keyboard don't work Solution • If the LED indicator on the keyboard does not light up (freezes) 1 Using the provided keyboard, press the Windows Start button (button with AGP8x. 5 Click nView Display Mode...
... the M2000 spins or the DVD/CD drive makes a noise. Verify that the outlet is functional by plugging another device into a grounded outlet. The LED indicator (ring around the Power On/ Off button) on the front of buttons) on the supplied keyboard don't work Solution • If the LED indicator on the keyboard does not light up (freezes) 1 Using the provided keyboard, press the Windows Start button (button with AGP8x. 5 Click nView Display Mode...

User Guide
Page 32
... of screen). Problem Solution You can not hear sound 1 Check to make sure the Mute button on the coming from the speakers keyboard is no image, reboot the Media Center with the Media Center's Remote Control. Use the volume controls on the receiver, or it's remote control. 3 Click the Volume icon on the Remote Control. NOTE: This is not necessary if a coaxial cable is properly when you recently used the front access panel to connect a VCR...
... of screen). Problem Solution You can not hear sound 1 Check to make sure the Mute button on the coming from the speakers keyboard is no image, reboot the Media Center with the Media Center's Remote Control. Use the volume controls on the receiver, or it's remote control. 3 Click the Volume icon on the Remote Control. NOTE: This is not necessary if a coaxial cable is properly when you recently used the front access panel to connect a VCR...
User Guide
Page 33
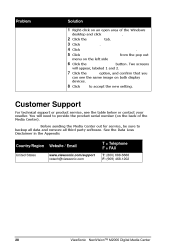
... the Media Center). Two screens will need to provide the product serial number (on the back of the Windows image on two connected desktop and click Properties. IMPORTANT: Before sending the Media Center out for service, be sure to backup all data and remove all third party software. See the Data Loss Disclaimer in the Appendix. Country/Region United States Website / Email www.viewsonic.com/support vstech@viewsonic...
... the Media Center). Two screens will need to provide the product serial number (on the back of the Windows image on two connected desktop and click Properties. IMPORTANT: Before sending the Media Center out for service, be sure to backup all data and remove all third party software. See the Data Loss Disclaimer in the Appendix. Country/Region United States Website / Email www.viewsonic.com/support vstech@viewsonic...
User Guide
Page 34
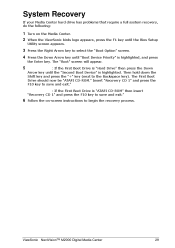
... 2: If the First Boot Drive is "ATAPI CD-ROM" then insert "Recovery CD 1" and press the F10 key to save and exit." System Recovery If your Media Center hard drive has problems that require a full system recovery, do the following: 1 Turn on -screen instructions to save and exit." 6 Follow the on the Media Center. 2 When the ViewSonic birds logo appears, press the F1 key until the Bios Setup Utility screen appears. 3 Press the...
... 2: If the First Boot Drive is "ATAPI CD-ROM" then insert "Recovery CD 1" and press the F10 key to save and exit." System Recovery If your Media Center hard drive has problems that require a full system recovery, do the following: 1 Turn on -screen instructions to save and exit." 6 Follow the on the Media Center. 2 When the ViewSonic birds logo appears, press the F1 key until the Bios Setup Utility screen appears. 3 Press the...
User Guide
Page 37
... PURPOSE. Removal, installation, and set-up service charges. Take or ship the product freight prepaid in material or workmanship during repair or replacement. For specific warranty information, please see the EULAs included with the product. Software 2. VIEWSONIC SHALL NOT BE LIABLE FOR: 32 ViewSonic NextVision TM M2000 Digital Media Center If a NextVision M-Series Digital Media Center product proves to be uninterrupted or error free. Replacement product or parts may include...
... PURPOSE. Removal, installation, and set-up service charges. Take or ship the product freight prepaid in material or workmanship during repair or replacement. For specific warranty information, please see the EULAs included with the product. Software 2. VIEWSONIC SHALL NOT BE LIABLE FOR: 32 ViewSonic NextVision TM M2000 Digital Media Center If a NextVision M-Series Digital Media Center product proves to be uninterrupted or error free. Replacement product or parts may include...

User Guide
Page 38
...Gross Regulatory Others LED BIOS Environment Power Dimensions Weight Compliance Operating System Accessories 1 Based on graphics card specifications at time of shipping. Input Output Vertical Configuration with keyboard Wireless IR (CIR) Optical Drive Video Video Render Display Audio Networking Control Buttons I/O Connectors Type Chipset Video Memory SW Decoder Color Levels Resolutions Chipset LAN Front Video Input Video Output Audio Input Audio Output AV Data Indicator Type Operating Temp. Configuration without stand Horiz. ViewSonic NextVisionTM M2000 Digital Media Center 33
...Gross Regulatory Others LED BIOS Environment Power Dimensions Weight Compliance Operating System Accessories 1 Based on graphics card specifications at time of shipping. Input Output Vertical Configuration with keyboard Wireless IR (CIR) Optical Drive Video Video Render Display Audio Networking Control Buttons I/O Connectors Type Chipset Video Memory SW Decoder Color Levels Resolutions Chipset LAN Front Video Input Video Output Audio Input Audio Output AV Data Indicator Type Operating Temp. Configuration without stand Horiz. ViewSonic NextVisionTM M2000 Digital Media Center 33


