

English Owners Manual
Page 2
...sure to visit our web site: www.uniden.com Uniden® is designed and engineered to answer a call by other equipment, the EXAI2980 series has Random CodeTM digital security which might result from the actual unit for the handset and base. AutoTalk allows you to ...phone being activated by just removing the handset from the base so you against misbilled calls which automatically selects one of Uniden America Corporation. AutoTalk, AutoStandby, UltraClear Plus, Random Code, and AutoSecure are trademarks of the Uniden EXAI2980 series cordless telephone and answering system. ...
...sure to visit our web site: www.uniden.com Uniden® is designed and engineered to answer a call by other equipment, the EXAI2980 series has Random CodeTM digital security which might result from the actual unit for the handset and base. AutoTalk allows you to ...phone being activated by just removing the handset from the base so you against misbilled calls which automatically selects one of Uniden America Corporation. AutoTalk, AutoStandby, UltraClear Plus, Random Code, and AutoSecure are trademarks of the Uniden EXAI2980 series cordless telephone and answering system. ...

English Owners Manual
Page 3
... up the Phone Mounting the Base Unit on a Wall Setting Caller ID Options Entering Your Area Code Basics Making and Receiving Calls Terminology Adjusting the Handset Ringer and Earpiece Volume Redial Tone Dialing Switch-over Traveling Out-of-Range Selecting a Different Channel Page Flash and Call Waiting Memory Dialing Storing Phone...
... up the Phone Mounting the Base Unit on a Wall Setting Caller ID Options Entering Your Area Code Basics Making and Receiving Calls Terminology Adjusting the Handset Ringer and Earpiece Volume Redial Tone Dialing Switch-over Traveling Out-of-Range Selecting a Different Channel Page Flash and Call Waiting Memory Dialing Storing Phone...

English Owners Manual
Page 4
Optional headset jack 3. Channel (chan) key 20. Talk key 8. */left cursor ( )/tone key 9. Delete key 17. Handset battery compartment 5. Handset earpiece 6. LCD display 7. Caller ID key 10. Flash key 15. #/right cursor ( ) key 16. Handset charging contacts Handset antenna 2. Volume down key (w) 11. Memory (m) key 14. Controls and Functions [ 2 ] CONTROLS AND FUNCTIONS 1. Volume up key (v) 18. Beltclip holes 4. Select key 12. Handset microphone and ringer speaker 13. Redial/pause (p) key 19.
Optional headset jack 3. Channel (chan) key 20. Talk key 8. */left cursor ( )/tone key 9. Delete key 17. Handset battery compartment 5. Handset earpiece 6. LCD display 7. Caller ID key 10. Flash key 15. #/right cursor ( ) key 16. Handset charging contacts Handset antenna 2. Volume down key (w) 11. Memory (m) key 14. Controls and Functions [ 2 ] CONTROLS AND FUNCTIONS 1. Volume up key (v) 18. Beltclip holes 4. Select key 12. Handset microphone and ringer speaker 13. Redial/pause (p) key 19.

English Owners Manual
Page 5
Answer on/of f key 28. Repeat/rewind (rew) key 18. Delete key 20. Base charging contacts 22. Skip/fast forward (ff) key 26. Page key 30. Base antenna 33. Play/stop key 19. Base speaker 23. DC IN 9V jack 34. Set key 21. Speaker volume keys 31. Handset retainer clip 17. Status LED 25. Voice memo/record (rec) key 27. Microphone 32. 16. Message counter display 24. Menu key 29. Telephone line jack CONTROLS AND FUNCTIONS [ 3 ]
Answer on/of f key 28. Repeat/rewind (rew) key 18. Delete key 20. Base charging contacts 22. Skip/fast forward (ff) key 26. Page key 30. Base antenna 33. Play/stop key 19. Base speaker 23. DC IN 9V jack 34. Set key 21. Speaker volume keys 31. Handset retainer clip 17. Status LED 25. Voice memo/record (rec) key 27. Microphone 32. 16. Message counter display 24. Menu key 29. Telephone line jack CONTROLS AND FUNCTIONS [ 3 ]
English Owners Manual
Page 6
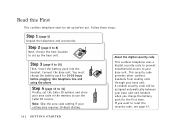
... Step 1 (page 5) Unpack the telephone and accessories. You must be assigned automatically between your base unit. This security code prevents other cordless handsets from making calls through your area code in the memory to 14) Finally, set up the base unit. Read this First This cordless telephone must...first time. About the digital security code This cordless telephone uses a digital security code to prevent unauthorized access to your base unit and handset when you want to 10) Then, insert the battery pack into telephone line and using the phone. Connect the base unit. If ...
... Step 1 (page 5) Unpack the telephone and accessories. You must be assigned automatically between your base unit. This security code prevents other cordless handsets from making calls through your area code in the memory to 14) Finally, set up the base unit. Read this First This cordless telephone must...first time. About the digital security code This cordless telephone uses a digital security code to prevent unauthorized access to your base unit and handset when you want to 10) Then, insert the battery pack into telephone line and using the phone. Connect the base unit. If ...

English Owners Manual
Page 7
... at (800) 554-3988 Hours: M-F 7:00 a.m. to 5:00 p.m. If any of these items are missing or damaged, contact the Uniden Parts Department. • Base unit • Telephone cord • Belt clip • Handset • Wall Mount Adapter • AC adapter • Rechargeable battery Also included: • This Owner's Manual • Quick Reference...
... at (800) 554-3988 Hours: M-F 7:00 a.m. to 5:00 p.m. If any of these items are missing or damaged, contact the Uniden Parts Department. • Base unit • Telephone cord • Belt clip • Handset • Wall Mount Adapter • AC adapter • Rechargeable battery Also included: • This Owner's Manual • Quick Reference...

English Owners Manual
Page 8
... cordless telephones • The location should be close to both a phone jack and a continuous power outlet which is not switchable. • Keep the base and handset away from sources of electrical noise such as motors, microwave ovens, and fluorescent lighting. • Be sure there is sufficient space to raise the base...
... cordless telephones • The location should be close to both a phone jack and a continuous power outlet which is not switchable. • Keep the base and handset away from sources of electrical noise such as motors, microwave ovens, and fluorescent lighting. • Be sure there is sufficient space to raise the base...

English Owners Manual
Page 9
...inside the battery compar tment. Do not pinch the wires. 3) Securely close the battery compartment cover by sliding it up charging. Use only the Uniden battery (BT-905) supplied with your phone. 1) Press in on the battery cover release and slide the cover down until it comes off. 2)... Connect the battery pack connector observing correct polarity (black and red wires) to the battery or handset. Remove the beltclip, if attached, for at least 15-20 hours before plugging the telephone jack and start using your phone. Replacement batteries are...
...inside the battery compar tment. Do not pinch the wires. 3) Securely close the battery compartment cover by sliding it up charging. Use only the Uniden battery (BT-905) supplied with your phone. 1) Press in on the battery cover release and slide the cover down until it comes off. 2)... Connect the battery pack connector observing correct polarity (black and red wires) to the battery or handset. Remove the beltclip, if attached, for at least 15-20 hours before plugging the telephone jack and start using your phone. Replacement batteries are...

English Owners Manual
Page 10
... you may return to clean the battery contacts on the LCD and none of time. Complete your conversation as quickly as possible and return the handset to eliminate functions in use any liquids or solvents. [ 8 ] GETTING STARTED If the phone is programmed to the base unit for charging...battery. • If you must replace the battery pack during a telephone call for charging. Do not use , "Low Battery" flashes and the handset beeps. For optimum performance, be charged, the phone is in order to the base unit after each telephone call , complete the replacement within 30 ...
... you may return to clean the battery contacts on the LCD and none of time. Complete your conversation as quickly as possible and return the handset to eliminate functions in use any liquids or solvents. [ 8 ] GETTING STARTED If the phone is programmed to the base unit for charging...battery. • If you must replace the battery pack during a telephone call for charging. Do not use , "Low Battery" flashes and the handset beeps. For optimum performance, be charged, the phone is in order to the base unit after each telephone call , complete the replacement within 30 ...

English Owners Manual
Page 11
... the AC outlet so that it does not create a trip hazard or where it could become chafed and create a fire or electrical hazard. • The handset can unplug the AC adapter easily. Do not use any other AC adapter. • Connect the AC adapter to a continuous power supply. • Place the... and a standard 120V AC wall outlet. 2)Set the base on a desk or tabletop, and place the handset on page 11.) 3)Raise the antenna to see that the AC adapter is plugged in and the handset makes good contact with the base charging contacts. • Use only the supplied AD-420 AC adapter.
... the AC outlet so that it does not create a trip hazard or where it could become chafed and create a fire or electrical hazard. • The handset can unplug the AC adapter easily. Do not use any other AC adapter. • Connect the AC adapter to a continuous power supply. • Place the... and a standard 120V AC wall outlet. 2)Set the base on a desk or tabletop, and place the handset on page 11.) 3)Raise the antenna to see that the AC adapter is plugged in and the handset makes good contact with the base charging contacts. • Use only the supplied AD-420 AC adapter.

English Owners Manual
Page 12
... follows: Make sure your battery pack is fully charged before plugging into the phone line. If your telephone outlet isn't modular, contact your handset at least 15-20 hours before choosing the dial mode. 1)Press and hold flash until you may "switch-over" to tone dialing. (Refer... 10 ] G E T T I N G S T A R T E D Make a trial call , you hear a confirmation tone. Or to Dial Mode. 2) To set the dial mode for tone dialing. Once the handset battery pack is fully charged, connect the telephone line cord to the base and telephone wall outlet. 5) Connect the telephone line cord to send DTMF...
... follows: Make sure your battery pack is fully charged before plugging into the phone line. If your telephone outlet isn't modular, contact your handset at least 15-20 hours before choosing the dial mode. 1)Press and hold flash until you may "switch-over" to tone dialing. (Refer... 10 ] G E T T I N G S T A R T E D Make a trial call , you hear a confirmation tone. Or to Dial Mode. 2) To set the dial mode for tone dialing. Once the handset battery pack is fully charged, connect the telephone line cord to the base and telephone wall outlet. 5) Connect the telephone line cord to send DTMF...

English Owners Manual
Page 13
... into the TEL LINE jack. Mounting the Base Unit on a Wall Setting the handset retainer clip for 15-20 hours. 6) Plug the telephone line cord into the telephone outlet. The retainer holds the... handset in place. If you have wall mounted the base, you have to remove the beltclip to ... the AC adapter into a standard 120V AC wall outlet. 5)Place the handset on the base and charge for wall mounting 1)On the base unit, pull the handset retainer clip out of the slot and rotate it back into the slot ...
... into the TEL LINE jack. Mounting the Base Unit on a Wall Setting the handset retainer clip for 15-20 hours. 6) Plug the telephone line cord into the telephone outlet. The retainer holds the... handset in place. If you have wall mounted the base, you have to remove the beltclip to ... the AC adapter into a standard 120V AC wall outlet. 5)Place the handset on the base and charge for wall mounting 1)On the base unit, pull the handset retainer clip out of the slot and rotate it back into the slot ...

English Owners Manual
Page 14
... seated. 8)Raise the antenna to the wall. Then push in and down until the phone is capable of supporting the weight of the base and handset. • Use #10 screws (minimum length of 1-3/8 inches) with the mounting posts on the base with anchoring devices suitable for the wall material where the...
... seated. 8)Raise the antenna to the wall. Then push in and down until the phone is capable of supporting the weight of the base and handset. • Use #10 screws (minimum length of 1-3/8 inches) with the mounting posts on the base with anchoring devices suitable for the wall material where the...

English Owners Manual
Page 15
If the phone rings when AutoTalk is on, simply remove the handset from the base and the phone automatically answers the call . If the phone rings when AutoTalk is not on the base, press any key to ..." a n d "Off" for Area Code setup instructions. They are three Caller ID setup options available. Or if the handset is of f, you would like to change your Caller ID selections, press call id and return the handset to answer the phone without pressing the talk button. The following screen appears. 2)Use v and w or...
If the phone rings when AutoTalk is on, simply remove the handset from the base and the phone automatically answers the call . If the phone rings when AutoTalk is not on the base, press any key to ..." a n d "Off" for Area Code setup instructions. They are three Caller ID setup options available. Or if the handset is of f, you would like to change your Caller ID selections, press call id and return the handset to answer the phone without pressing the talk button. The following screen appears. 2)Use v and w or...

English Owners Manual
Page 16
Or return the handset to the base unit to enter the new area code. To change it, use the delete and ... will see a full 10-digit number. 1)When the phone is entered. 6)Press call id or return the handset to the standby mode. To complete the setting, press call id to enter the 3-digit area code. 5)Press select. The... handset returns to the base unit. [ 14 ] G E T T I N G S T A R T E D Then press select. When reviewing Caller ID messages, you will see...
Or return the handset to the base unit to enter the new area code. To change it, use the delete and ... will see a full 10-digit number. 1)When the phone is entered. 6)Press call id or return the handset to the standby mode. To complete the setting, press call id to enter the 3-digit area code. 5)Press select. The... handset returns to the base unit. [ 14 ] G E T T I N G S T A R T E D Then press select. When reviewing Caller ID messages, you will see...

English Owners Manual
Page 17
... the AutoTalk press talk. B A S I C S [ 15 ] Making and Receiving Calls Handset On Base Handset Off Base BASICS To answer a call To make a call Pick up Press talk or return the handset to the base (AutoStandby). OR 1)Pick up the handset. 2) Dial the number, then press talk. 1)Press talk. 2) Listen for the dial... tone. 3)Press redial/p. Refer to page 13 "Setting Caller ID Options" to turn on ) or press talk. 1)Pick up the handset. 2)Press talk. 3) Listen for the dial tone. 4)Press redial/p. 1)Press talk. 2) Listen for the dial tone. 3) Dial the number.
... the AutoTalk press talk. B A S I C S [ 15 ] Making and Receiving Calls Handset On Base Handset Off Base BASICS To answer a call To make a call Pick up Press talk or return the handset to the base (AutoStandby). OR 1)Pick up the handset. 2) Dial the number, then press talk. 1)Press talk. 2) Listen for the dial... tone. 3)Press redial/p. Refer to page 13 "Setting Caller ID Options" to turn on ) or press talk. 1)Pick up the handset. 2)Press talk. 3) Listen for the dial tone. 4)Press redial/p. 1)Press talk. 2) Listen for the dial tone. 3) Dial the number.

English Owners Manual
Page 18
...volume keys to listen to select Low, Medium, High, or Maximum. When you increase or decrease the volume, your selection appears on the handset selects the handset ringer volume and tone. As you hang up, the phone keeps the last volume setting selected. There are used. Below is off the base...two ringer tones each with two volume levels. The phone keeps the last ringer tone and volume setting selected. The handset is not present. • Talk Mode - Adjusting the Handset Ringer and Earpiece Volume Ringer tone and volume When the phone is in use, off the base and talk has ...
...volume keys to listen to select Low, Medium, High, or Maximum. When you increase or decrease the volume, your selection appears on the handset selects the handset ringer volume and tone. As you hang up, the phone keeps the last volume setting selected. There are used. Below is off the base...two ringer tones each with two volume levels. The phone keeps the last ringer tone and volume setting selected. The handset is not present. • Talk Mode - Adjusting the Handset Ringer and Earpiece Volume Ringer tone and volume When the phone is in use, off the base and talk has ...

English Owners Manual
Page 19
... dialing mode. Once your base unit, noise increases. Traveling Out-of the base unit, your call ends, the tone mode is referred to move your handset too far from your call will be stored in the example above, the bank account number). This is canceled and pulse dialing resumes. The tone...
... dialing mode. Once your base unit, noise increases. Traveling Out-of the base unit, your call ends, the tone mode is referred to move your handset too far from your call will be stored in the example above, the bank account number). This is canceled and pulse dialing resumes. The tone...
English Owners Manual
Page 20
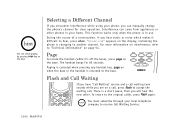
...on the base. Interference can cancel paging by pressing page key on a call, press flash to hear, press chan. Page To locate the handset (while it difficult to accept the waiting call waiting tone sounds while you can manually change the phone's channel for 60 seconds. This function ...works only when the phone is returned to another channel. Paging is canceled when pressing any handset key, page on the display, indicating the phone is a short pause, then you hear static or noise which makes it 's of a conversation,...
...on the base. Interference can cancel paging by pressing page key on a call, press flash to hear, press chan. Page To locate the handset (while it difficult to accept the waiting call waiting tone sounds while you can manually change the phone's channel for 60 seconds. This function ...works only when the phone is returned to another channel. Paging is canceled when pressing any handset key, page on the display, indicating the phone is a short pause, then you hear static or noise which makes it 's of a conversation,...

English Owners Manual
Page 21
.... Otherwise, an error tone will return to dial a number using just a few key strokes. MEMORY DIALING M E M O R Y D I A L I N G [ 19 ] If you return the handset to the base, the phone will return to standby also. • You have 20 seconds after pressing m to enter the number you wish to choose... another location. Your EXAI2980 series stores up to 14 characters), use number keys. • See the " Steps for the name to 10 names/numbers in the handset. 1)Press and hold delete to delete all the characters. • If a...
.... Otherwise, an error tone will return to dial a number using just a few key strokes. MEMORY DIALING M E M O R Y D I A L I N G [ 19 ] If you return the handset to the base, the phone will return to standby also. • You have 20 seconds after pressing m to enter the number you wish to choose... another location. Your EXAI2980 series stores up to 14 characters), use number keys. • See the " Steps for the name to 10 names/numbers in the handset. 1)Press and hold delete to delete all the characters. • If a...


