

Owners Manual
Page 4
... THE UNIT. Read owner's manual After unpacking this unit will fit into the outlet, try reversing the plug. This is provided or the manufacturer's instructions have been adhered to protect it from battery power, or other instructions. 2. If the plug should still fail to fit, contact your electrician to your home, consult your obsolete outlet. The openings should be operated...
... THE UNIT. Read owner's manual After unpacking this unit will fit into the outlet, try reversing the plug. This is provided or the manufacturer's instructions have been adhered to protect it from battery power, or other instructions. 2. If the plug should still fail to fit, contact your electrician to your home, consult your obsolete outlet. The openings should be operated...
Owners Manual
Page 5
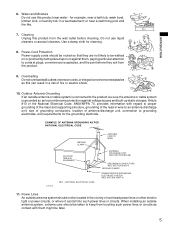
... discharge unit, size of grounding conductors, location of fire or electric shock. 10. Power-Cord Protection Power-supply cords should be routed so that they exit from the wall outlet before cleaning. Power Lines An outside antenna system should be taken to keep from touching such power lines or circuits as contact with regard to proper grounding of the mast and supporting structure...
... discharge unit, size of grounding conductors, location of fire or electric shock. 10. Power-Cord Protection Power-supply cords should be routed so that they exit from the wall outlet before cleaning. Power Lines An outside antenna system should be taken to keep from touching such power lines or circuits as contact with regard to proper grounding of the mast and supporting structure...

Owners Manual
Page 7
... you need to Use the Remote Control ...... 10 Connections 11 Auto Set Up 14 Initial Settings Using On-screen Display 15 • Setting the Language • Optional settings on the SET UP screen • Setting the Clock Storing Channels on the VCR .......... 17 Video Cassette Use 19 PLAYBACK Explains variable functions concerning playback. Recording a TV Program 25 • Watching a TV program while recording another • Recording off time setting Timer Program Recording 26 VCR Plus+ C3 ® system Set-up ......... 29 VCR Plus+ C3 ® system Recording .. 31 Cable Box Set...
... you need to Use the Remote Control ...... 10 Connections 11 Auto Set Up 14 Initial Settings Using On-screen Display 15 • Setting the Language • Optional settings on the SET UP screen • Setting the Clock Storing Channels on the VCR .......... 17 Video Cassette Use 19 PLAYBACK Explains variable functions concerning playback. Recording a TV Program 25 • Watching a TV program while recording another • Recording off time setting Timer Program Recording 26 VCR Plus+ C3 ® system Set-up ......... 29 VCR Plus+ C3 ® system Recording .. 31 Cable Box Set...

Owners Manual
Page 8
... POWER (CABLE BOX) 35 CH (CABLE BOX) 35 INDEX 24 * These buttons are used to control the cursor on the screen. VCR 14 To operate your TV. Front Panel CHANNEL 25 EJECT 19 POWER 15 Cassette compartment 19 POWER c EJECT CHANNEL LINE IN 2 VIDEO jack LINE IN 2 VIDEO L-MONO-AUDIO-R LINE IN 2 AUDIO (L/MONO, R) jacks REC Remote sensor 10 REC 25 PLAY STOP REV ( PAUSE/STILL PLAY 20 STOP 20 FWD ) SHUTTLE 22 PAUSE/STILL 21 VCR display 9 Remote Control To operate this VCR. INTRODUCTION Identification of buttons...
... POWER (CABLE BOX) 35 CH (CABLE BOX) 35 INDEX 24 * These buttons are used to control the cursor on the screen. VCR 14 To operate your TV. Front Panel CHANNEL 25 EJECT 19 POWER 15 Cassette compartment 19 POWER c EJECT CHANNEL LINE IN 2 VIDEO jack LINE IN 2 VIDEO L-MONO-AUDIO-R LINE IN 2 AUDIO (L/MONO, R) jacks REC Remote sensor 10 REC 25 PLAY STOP REV ( PAUSE/STILL PLAY 20 STOP 20 FWD ) SHUTTLE 22 PAUSE/STILL 21 VCR display 9 Remote Control To operate this VCR. INTRODUCTION Identification of buttons...
Owners Manual
Page 16
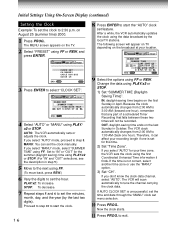
.... PLAY/x2: To increase. The VCR clock automatically changes from 2:00 AM to 3:00 AM (forward one hour), remember that any part of a scheduled Timer Recording that falls between these two times will scan automatically to set the hour. If you select "AUTO" mode, proceed to 1:00 AM (back one is set menu selection. 10 Press PROG.. Initial Settings Using On-Screen Display (continued) Setting the Clock Example: To set the clock manually. The MENU screen...
.... PLAY/x2: To increase. The VCR clock automatically changes from 2:00 AM to 3:00 AM (forward one hour), remember that any part of a scheduled Timer Recording that falls between these two times will scan automatically to set the hour. If you select "AUTO" mode, proceed to 1:00 AM (back one is set menu selection. 10 Press PROG.. Initial Settings Using On-Screen Display (continued) Setting the Clock Example: To set the clock manually. The MENU screen...

Owners Manual
Page 20
...; HEAD You can view high quality pictures while playing back a tape recorded in the stop playback, press STOP. POWER POWER S P VCR DT Adjusting the tracking When playback starts, the VCR automatically adjusts the tracking for clear pictures and sound (Digital Auto Tracking). Preparation • Select the video channel (3 or 4) or video input mode on the TV screen as follows: 19U-HEAD AUTO: Usually set the remote control operating the VCR. 1 2 3 4 5 6 789 0 100 PLAY/x2 REW FF STOP VCR CH/TRK 2 FF 3 19µ REW Basic Playback 1 Load a recorded cassette. PLAYBACK Playback...
...; HEAD You can view high quality pictures while playing back a tape recorded in the stop playback, press STOP. POWER POWER S P VCR DT Adjusting the tracking When playback starts, the VCR automatically adjusts the tracking for clear pictures and sound (Digital Auto Tracking). Preparation • Select the video channel (3 or 4) or video input mode on the TV screen as follows: 19U-HEAD AUTO: Usually set the remote control operating the VCR. 1 2 3 4 5 6 789 0 100 PLAY/x2 REW FF STOP VCR CH/TRK 2 FF 3 19µ REW Basic Playback 1 Load a recorded cassette. PLAYBACK Playback...

Owners Manual
Page 23
... resolution as the original S-VHS playback picture. • This VCR cannot record in sequence as the beginning of a new recording, just press COUNT RESET. They are switchable with REMAIN/COUNTER. PLAYBACK Useful Functions in the VCR display, select the tape length beforehand. 1 Turn on the VCR and load a cassette. 2 Press PROG. Tape Remaining Time To view the tape remaining time in Tape Operation These functions will also appear on the TV screen by pressing...
... resolution as the original S-VHS playback picture. • This VCR cannot record in sequence as the beginning of a new recording, just press COUNT RESET. They are switchable with REMAIN/COUNTER. PLAYBACK Useful Functions in the VCR display, select the tape length beforehand. 1 Turn on the VCR and load a cassette. 2 Press PROG. Tape Remaining Time To view the tape remaining time in Tape Operation These functions will also appear on the TV screen by pressing...

Owners Manual
Page 25
... video channel (3 or 4) or video input mode on the TV. • If you record cable channels via the LINE IN 2 jacks on the front panel. 1 Load a cassette with POWER CHANNEL on the VCR, or CH/TRK SLP VCR or number buttons on the remote control. SLP VCR CH 3 Select a channel to switch the display as follows: LI: To record via the cable box, finish the cable box set , this function will not activate. 25 Basic Recording RECORDING 123 4 5 6 789 0 100 PLAY...
... video channel (3 or 4) or video input mode on the TV. • If you record cable channels via the LINE IN 2 jacks on the front panel. 1 Load a cassette with POWER CHANNEL on the VCR, or CH/TRK SLP VCR or number buttons on the remote control. SLP VCR CH 3 Select a channel to switch the display as follows: LI: To record via the cable box, finish the cable box set , this function will not activate. 25 Basic Recording RECORDING 123 4 5 6 789 0 100 PLAY...

Owners Manual
Page 28
... timer standby mode, and then press POWER to cancel in step 4, and press CANCEL. PROGRAM SET UP PRESET CH DATE On OFF SPD 25 8 / 30 9 : 30PM 10 : 00PMSP EnD: PROG After about 30 seconds, the screen disappears. Overlapped portion (not recorded) Program 1 (Start time) Program 2 (Start time) Recording or playback in the VCR display if you want to turn the VCR on the VCR. the loaded cassette has no timer program is not loaded...
... timer standby mode, and then press POWER to cancel in step 4, and press CANCEL. PROGRAM SET UP PRESET CH DATE On OFF SPD 25 8 / 30 9 : 30PM 10 : 00PMSP EnD: PROG After about 30 seconds, the screen disappears. Overlapped portion (not recorded) Program 1 (Start time) Program 2 (Start time) Recording or playback in the VCR display if you want to turn the VCR on the VCR. the loaded cassette has no timer program is not loaded...

Owners Manual
Page 29
... program. This section explains the necessary set-up chart from Gemstar Development Corporation. The flow chart below will give you cannot find the numbers, call Gemstar's customer service department at 1-800-4321-VCR. The VCR Plus+ system is a timer recording system for guide channels (also called VCR Plus+® system channel numbers) assigned to make VCR Plus+ C3 ® system recordings. Sample of a Guide channel chart from a local TV listing VCR Plus+® SYSTEM CHANNEL NUMBERS Broadcast...
... program. This section explains the necessary set-up chart from Gemstar Development Corporation. The flow chart below will give you cannot find the numbers, call Gemstar's customer service department at 1-800-4321-VCR. The VCR Plus+ system is a timer recording system for guide channels (also called VCR Plus+® system channel numbers) assigned to make VCR Plus+ C3 ® system recordings. Sample of a Guide channel chart from a local TV listing VCR Plus+® SYSTEM CHANNEL NUMBERS Broadcast...

Owners Manual
Page 30
..." using PLAY/x2 or STOP, and press ENTER. 4 Set "TV/CATV" to exit. In some areas, one channel may be assigned more than one guide channel number. In this setup for the channel. • The VCR Plus+ C3 ® system feature does not work on programs from a connected DSS® satellite receiver. 30 7 Enter channel numbers on the channel line-up chart supplied by using number buttons. Example: To enter home channel number 7 (HBO...
..." using PLAY/x2 or STOP, and press ENTER. 4 Set "TV/CATV" to exit. In some areas, one channel may be assigned more than one guide channel number. In this setup for the channel. • The VCR Plus+ C3 ® system feature does not work on programs from a connected DSS® satellite receiver. 30 7 Enter channel numbers on the channel line-up chart supplied by using number buttons. Example: To enter home channel number 7 (HBO...

Owners Manual
Page 31
... the correct number. 3 Select "MODE" using PLAY/x2 or STOP, and set the recording tape speed. The numbers are published in the TV listings of TV program listing in a TV guide magazine 5PM FAM POPEYE Cartoon 725692 HBO MAKING OF A CHAMPION 237945 A look at the same time on the same day every week. The VCR Plus+ screen appears. 2 Enter a PlusCode® programming number. Press number button 3, 6, 2, 9 and 5. PROGRAM SET UP PRESET VCR PLUS + PLUSCODE 36295 MODE OnCE...
... the correct number. 3 Select "MODE" using PLAY/x2 or STOP, and set the recording tape speed. The numbers are published in the TV listings of TV program listing in a TV guide magazine 5PM FAM POPEYE Cartoon 725692 HBO MAKING OF A CHAMPION 237945 A look at the same time on the same day every week. The VCR Plus+ screen appears. 2 Enter a PlusCode® programming number. Press number button 3, 6, 2, 9 and 5. PROGRAM SET UP PRESET VCR PLUS + PLUSCODE 36295 MODE OnCE...

Owners Manual
Page 32
... number of the program to correct by using PLAY/x2 or STOP. The VCR enters the timer standby mode. After about 30 seconds, the screen disappears. Recording or playback in the timer standby mode First press both TIMER to add another program, repeat steps 1 to the timer standby mode after you that two programs with the same recording start time have finished. Press CANCEL to turn on the cable box beforehand. During the timer...
... number of the program to correct by using PLAY/x2 or STOP. The VCR enters the timer standby mode. After about 30 seconds, the screen disappears. Recording or playback in the timer standby mode First press both TIMER to add another program, repeat steps 1 to the timer standby mode after you that two programs with the same recording start time have finished. Press CANCEL to turn on the cable box beforehand. During the timer...

Owners Manual
Page 33
... by operating this VCR. RECORDING RECORDING Cable Box Set-up The VCR can select cable channels from the cable box by the cable box. Then they bounce off walls and other objects in the timer program recording or VCR Plus+ C3 ® system recording. Do not block the sensor window. Connection Type Type A Type B Type C A A/B switch AA BB B Cable box Type D Cable box (Continued) 33 It is also possible to a cable box equipped with an infrared wireless remote control. Cable Box Control This VCR needs...
... by operating this VCR. RECORDING RECORDING Cable Box Set-up The VCR can select cable channels from the cable box by the cable box. Then they bounce off walls and other objects in the timer program recording or VCR Plus+ C3 ® system recording. Do not block the sensor window. Connection Type Type A Type B Type C A A/B switch AA BB B Cable box Type D Cable box (Continued) 33 It is also possible to a cable box equipped with an infrared wireless remote control. Cable Box Control This VCR needs...

Owners Manual
Page 34
... "A") PROGRAM SET UP PRESET POWER (CABLE BOX) CH (CABLE BOX) • Cable channels will be selected using PLAY/x2 or STOP, and press I .SELECT. Cable Box Set-up 1 Press PROG. nO C . Number buttons 2 Select "PRESET" using FF or REW, and press ENTER. 100 3 Select "CABLE BOX/DSS" using USE CH/TRK on the remote control or CHANNEL on the VCR. → Go to your connection type. BOX DSS OUTPUT CH 3 CH COn TROL OFF On 5 Select "OUTPUT CH" using number buttons. (Usually...
... "A") PROGRAM SET UP PRESET POWER (CABLE BOX) CH (CABLE BOX) • Cable channels will be selected using PLAY/x2 or STOP, and press I .SELECT. Cable Box Set-up 1 Press PROG. nO C . Number buttons 2 Select "PRESET" using FF or REW, and press ENTER. 100 3 Select "CABLE BOX/DSS" using USE CH/TRK on the remote control or CHANNEL on the VCR. → Go to your connection type. BOX DSS OUTPUT CH 3 CH COn TROL OFF On 5 Select "OUTPUT CH" using number buttons. (Usually...

Owners Manual
Page 35
... set "CONTROL" to 91. 8 Press PROG. PROGRAM SET UP PRESET USE nO C. to 9. Press this button as the enter button. RECORDING 7 Select "BRAND TYPE" using number buttons. Example: For a TOSHIBA cable box, identified by the following buttons on the remote control of the VCR. • POWER (CABLE BOX) To turn the cable box on or off. • CH (CABLE BOX) To select cable channels in the upper or lower direction. (not applicable to some brands of digits from 1 to "OFF" in the timer recording...
... set "CONTROL" to 91. 8 Press PROG. PROGRAM SET UP PRESET USE nO C. to 9. Press this button as the enter button. RECORDING 7 Select "BRAND TYPE" using number buttons. Example: For a TOSHIBA cable box, identified by the following buttons on the remote control of the VCR. • POWER (CABLE BOX) To turn the cable box on or off. • CH (CABLE BOX) To select cable channels in the upper or lower direction. (not applicable to some brands of digits from 1 to "OFF" in the timer recording...

Owners Manual
Page 39
... is NON remote-controllable. • Satellite channels will be set "CONTROL" to step 7. On 1 EnD: PROG PROGRAM SET UP PRESET USE nO C. PROGRAM SET UP PRESET USE nO C. OFF: if your satellite channel does not change to the output channel of the DSS® satellite receiver. BOX DSS OUTPUT CH 3 CH COn TROL BRAnD TYPE OFFnO . Example: For a TOSHIBA DSS® satellite receiver, identified by CH (CABLE BOX) on the VCR so...
... is NON remote-controllable. • Satellite channels will be set "CONTROL" to step 7. On 1 EnD: PROG PROGRAM SET UP PRESET USE nO C. PROGRAM SET UP PRESET USE nO C. OFF: if your satellite channel does not change to the output channel of the DSS® satellite receiver. BOX DSS OUTPUT CH 3 CH COn TROL BRAnD TYPE OFFnO . Example: For a TOSHIBA DSS® satellite receiver, identified by CH (CABLE BOX) on the VCR so...

Owners Manual
Page 42
... Recording 1 On the SET UP screen (page 15), select "SIMULCAST" using PLAY/x2 or STOP, and set to "ON" using SP/SLP. 5 Press REC to start recording. 6 Press STOP to stop recording. 42 RECORDING Simulcast Recording When TV program such as below. • Turn on the connected FM tuner and tune to exit. 3 Select the desired channel using CHANNEL on the VCR or CH/TRK on the box. 4 Select the recording tape speed using...
... Recording 1 On the SET UP screen (page 15), select "SIMULCAST" using PLAY/x2 or STOP, and set to "ON" using SP/SLP. 5 Press REC to start recording. 6 Press STOP to stop recording. 42 RECORDING Simulcast Recording When TV program such as below. • Turn on the connected FM tuner and tune to exit. 3 Select the desired channel using CHANNEL on the VCR or CH/TRK on the box. 4 Select the recording tape speed using...
Owners Manual
Page 45
... not displayed. - Make the set-up has not been set the video input mode on the TV. (page 11) • The TV signal is not turned on the TV screen during recording and playback. • The video channel or VCR mode is an error in the VCR via the cable box. - The picture does not appear on when the channel comes in programming. - Load a cassette with a commercially available cleaning tape. Turn on the cable box. Adjust the tracking manually. (page 20) The timer recording...
... not displayed. - Make the set-up has not been set the video input mode on the TV. (page 11) • The TV signal is not turned on the TV screen during recording and playback. • The video channel or VCR mode is an error in the VCR via the cable box. - The picture does not appear on when the channel comes in programming. - Load a cassette with a commercially available cleaning tape. Turn on the cable box. Adjust the tracking manually. (page 20) The timer recording...
Owners Manual
Page 48
... set installation. Features may not be made by us; You should read the owner's manual thoroughly before operating this warranty. Reception problems caused by inadequate antenna systems are not covered by you with the first rental or thirty (30) days from the Authorized Service Station. Returns Center 1420C Toshiba Dr. Lebanon, TN 37087 (8) Upon receipt we will replace a defective part without charge...
... set installation. Features may not be made by us; You should read the owner's manual thoroughly before operating this warranty. Reception problems caused by inadequate antenna systems are not covered by you with the first rental or thirty (30) days from the Authorized Service Station. Returns Center 1420C Toshiba Dr. Lebanon, TN 37087 (8) Upon receipt we will replace a defective part without charge...
