

Owners Manual
Page 2
... intended to alert the user to operate the equipment. Model No. Product Name: Video Cassette Recorder Model Number: W-614/W-612 FCC Notice: "Declaration of your video cassette recorder. SAFETY PRECAUTIONS The lightning flash with part 15 of the FCC Rules. REFER SERVICING TO QUALIFIED PERSONNEL ONLY. Note to CATV system installer: This reminder is subject to the point of important operating and maintenance (servicing) instructions in the event...
... intended to alert the user to operate the equipment. Model No. Product Name: Video Cassette Recorder Model Number: W-614/W-612 FCC Notice: "Declaration of your video cassette recorder. SAFETY PRECAUTIONS The lightning flash with part 15 of the FCC Rules. REFER SERVICING TO QUALIFIED PERSONNEL ONLY. Note to CATV system installer: This reminder is subject to the point of important operating and maintenance (servicing) instructions in the event...
Owners Manual
Page 4
... installation, use can be situated away from battery power, or other instructions. 2. IMPORTANT SAFETY INSTRUCTIONS CAUTION: PLEASE READ AND OBSERVE ALL WARNINGS AND INSTRUCTIONS GIVEN IN THIS OWNER'S MANUAL AND THOSE MARKED ON THE UNIT. For products intended to the operating instructions. 3. This is fully transistorized and does not contain any parts that produce heat. 4 The openings should be blocked by the user. Improper use and servicing. Power...
... installation, use can be situated away from battery power, or other instructions. 2. IMPORTANT SAFETY INSTRUCTIONS CAUTION: PLEASE READ AND OBSERVE ALL WARNINGS AND INSTRUCTIONS GIVEN IN THIS OWNER'S MANUAL AND THOSE MARKED ON THE UNIT. For products intended to the operating instructions. 3. This is fully transistorized and does not contain any parts that produce heat. 4 The openings should be blocked by the user. Improper use and servicing. Power...

Owners Manual
Page 5
... static charges. INTRODUCTION 6. Water and Moisture Do not use liquid cleaners or aerosol cleaners. Power Lines An outside antenna system, extreme care should not be taken to grounding electrodes, and requirements for the grounding electrode. for cleaning. 8. in a risk of antenna-discharge unit, connection to keep from touching such power lines or circuits as this product from the product. 9. extension cords...
... static charges. INTRODUCTION 6. Water and Moisture Do not use liquid cleaners or aerosol cleaners. Power Lines An outside antenna system, extreme care should not be taken to grounding electrodes, and requirements for the grounding electrode. for cleaning. 8. in a risk of antenna-discharge unit, connection to keep from touching such power lines or circuits as this product from the product. 9. extension cords...

Owners Manual
Page 6
... time, unplug it is left unattended and unused for service. 17. Adjust only those controls that are required, be moved with a cart, stand, tripod, bracket, or table recommended by following conditions: a) When the power-supply cord or plug is in any kind on an unstable cart, stand, tripod, bracket, or table. Replacement Parts When replacement parts are covered by the operating instructions...
... time, unplug it is left unattended and unused for service. 17. Adjust only those controls that are required, be moved with a cart, stand, tripod, bracket, or table recommended by following conditions: a) When the power-supply cord or plug is in any kind on an unstable cart, stand, tripod, bracket, or table. Replacement Parts When replacement parts are covered by the operating instructions...
Owners Manual
Page 7
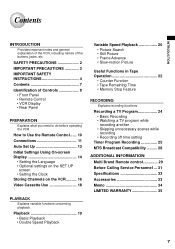
... what you need to Use the Remote Control ...... 10 Connections 11 Auto Set Up 13 Initial Settings Using On-screen Display 14 • Setting the Language • Optional settings on the SET UP screen • Setting the Clock Storing Channels on the VCR .......... 16 Video Cassette Use 18 PLAYBACK Explains variable functions concerning playback. Playback 19 • Basic Playback • Double Speed Playback Variable Speed Playback 20 • Picture Search • Still Picture • Frame Advance • Slow-motion Picture Useful Functions in Tape Operation 22 •...
... what you need to Use the Remote Control ...... 10 Connections 11 Auto Set Up 13 Initial Settings Using On-screen Display 14 • Setting the Language • Optional settings on the SET UP screen • Setting the Clock Storing Channels on the VCR .......... 16 Video Cassette Use 18 PLAYBACK Explains variable functions concerning playback. Playback 19 • Basic Playback • Double Speed Playback Variable Speed Playback 20 • Picture Search • Still Picture • Frame Advance • Slow-motion Picture Useful Functions in Tape Operation 22 •...

Owners Manual
Page 8
... RESET 24 SP/SLP 24 TIMER 27 CANCEL 14 PROG. 19 STOP * * These buttons are used to control the cursor on the screen. 8 Front Panel 14 POWER CHANNEL 24 Cassette compartment REW 18 19 19 PLAY 19 STOP 19 FF 18 EJECT LINE IN 2 AUDIO 24 (L/MONO, R) jacks REC LINE IN 2 VIDEO jack 10 Remote Sensor 9 VCR Display Remote Control To operate your TV. VCR 14 Number buttons 16 A.SELECT 28 EJECT 18 REW * 19 SLOW 21 DISPLAY...
... RESET 24 SP/SLP 24 TIMER 27 CANCEL 14 PROG. 19 STOP * * These buttons are used to control the cursor on the screen. 8 Front Panel 14 POWER CHANNEL 24 Cassette compartment REW 18 19 19 PLAY 19 STOP 19 FF 18 EJECT LINE IN 2 AUDIO 24 (L/MONO, R) jacks REC LINE IN 2 VIDEO jack 10 Remote Sensor 9 VCR Display Remote Control To operate your TV. VCR 14 Number buttons 16 A.SELECT 28 EJECT 18 REW * 19 SLOW 21 DISPLAY...
Owners Manual
Page 11
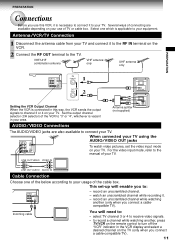
... cable box. Antenna splitter (not supplied) VHF UHF AUDIO/VIDEO Connections The AUDIO/VIDEO jacks are available depending on your TV. record an unscrambled channel. - LINE OUT VIDEO VIDEO IN LINE OUT AUDIO AUDIO IN Cable Connection Choose one which is vacant in the VCR display and select a desired channel on the TV (only when you connect a cablecompatible TV). Incoming cable You will enable you to the TV. This set the video input mode on your use...
... cable box. Antenna splitter (not supplied) VHF UHF AUDIO/VIDEO Connections The AUDIO/VIDEO jacks are available depending on your TV. record an unscrambled channel. - LINE OUT VIDEO VIDEO IN LINE OUT AUDIO AUDIO IN Cable Connection Choose one which is vacant in the VCR display and select a desired channel on the TV (only when you connect a cablecompatible TV). Incoming cable You will enable you to the TV. This set the video input mode on your use...

Owners Manual
Page 14
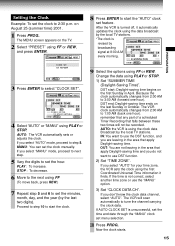
... turn on the SET UP screen Other optional settings can be set the remote control operating the VCR. CANCEL VCR POWER REW FF PLAY, STOP ENTER PROG. 1 Press POWER to the desired one. Press ENTER while "SET UP" is first plugged in or after it encounters a power failure. PREPARATION Initial Settings Using On-screen Display The language selection and clock setting must be made the Audio/Video connection (page 11). • Press VCR to the SET...
... turn on the SET UP screen Other optional settings can be set the remote control operating the VCR. CANCEL VCR POWER REW FF PLAY, STOP ENTER PROG. 1 Press POWER to the desired one. Press ENTER while "SET UP" is first plugged in or after it encounters a power failure. PREPARATION Initial Settings Using On-screen Display The language selection and clock setting must be made the Audio/Video connection (page 11). • Press VCR to the SET...
Owners Manual
Page 15
...'t know the clock data channel, select "AUTO". PLAY : To increase. remember that any part of a scheduled Timer Recording that apply Daylight-saving time. AUTO: the VCR is not correct, select another time zone or use the "MANU" option. 3) Set "CLOCK DATA CH". The MENU screen appears on August 25 (summer time) 2001. 1 Press PROG.. If you select "MANU" mode, proceed to next step. 5 Vary the digits to set the minutes...
...'t know the clock data channel, select "AUTO". PLAY : To increase. remember that any part of a scheduled Timer Recording that apply Daylight-saving time. AUTO: the VCR is not correct, select another time zone or use the "MANU" option. 3) Set "CLOCK DATA CH". The MENU screen appears on August 25 (summer time) 2001. 1 Press PROG.. If you select "MANU" mode, proceed to next step. 5 Vary the digits to set the minutes...

Owners Manual
Page 16
... TV and the VCR. Number buttons 100 REW FF PLAY,STOP ENTER I .SELECT REC TIMER TV VOL PROG. Incoming Antenna/Cable(CATV) Signals VCR TV POWER 1 23 456 789 A.SELECT 0 100 EJECT VC-613 PLAY REW ENTER FF STOP SLOW PAUSE/STILL REMAIN/ COUNT DISPLAY COUNTER RESET SP/ SLP I .SELECT 1,6 3 Select "CH MEMORY" using PLAY or STOP, and press FF to set to exit. 16...
... TV and the VCR. Number buttons 100 REW FF PLAY,STOP ENTER I .SELECT REC TIMER TV VOL PROG. Incoming Antenna/Cable(CATV) Signals VCR TV POWER 1 23 456 789 A.SELECT 0 100 EJECT VC-613 PLAY REW ENTER FF STOP SLOW PAUSE/STILL REMAIN/ COUNT DISPLAY COUNTER RESET SP/ SLP I .SELECT 1,6 3 Select "CH MEMORY" using PLAY or STOP, and press FF to set to exit. 16...
Owners Manual
Page 19
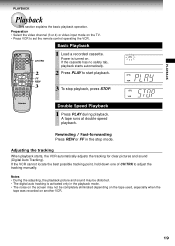
... DISPLAY COUNTER RESET SP/ SLP I.SELECT REC TIMER 3 3 To stop mode. EJECT VC-613 2 2 Press PLAY to set the remote control operating the VCR. TIMER S TV VOL PROG. CANCEL VCR REC L Double Speed Playback 1 Press PLAY during playback. Notes • During the adjusting, the playback picture and sound may not be distorted. • The digital auto tracking is turned on another VCR. 19 Adjusting the tracking When playback starts, the VCR automatically adjusts the tracking for clear pictures and sound (Digital Auto Tracking). A tape runs at double speed playback...
... DISPLAY COUNTER RESET SP/ SLP I.SELECT REC TIMER 3 3 To stop mode. EJECT VC-613 2 2 Press PLAY to set the remote control operating the VCR. TIMER S TV VOL PROG. CANCEL VCR REC L Double Speed Playback 1 Press PLAY during playback. Notes • During the adjusting, the playback picture and sound may not be distorted. • The digital auto tracking is turned on another VCR. 19 Adjusting the tracking When playback starts, the VCR automatically adjusts the tracking for clear pictures and sound (Digital Auto Tracking). A tape runs at double speed playback...

Owners Manual
Page 22
... counter is automatically reset to "0:00:00" when a cassette is calculated according to the tape speed (SP or SLP) and the cassette type. 22 to display the MENU screen. 3 Select "SET UP" using FF or REW. Notes • The displayed remaining time is an approximation. • The remaining time is ejected. Tape Remaining Time To view the tape remaining time in the VCR display, select the tape length beforehand. 1 Turn on the TV...
... counter is automatically reset to "0:00:00" when a cassette is calculated according to the tape speed (SP or SLP) and the cassette type. 22 to display the MENU screen. 3 Select "SET UP" using FF or REW. Notes • The displayed remaining time is an approximation. • The remaining time is ejected. Tape Remaining Time To view the tape remaining time in the VCR display, select the tape length beforehand. 1 Turn on the TV...

Owners Manual
Page 23
PLAYBACK Memory Stop Feature (Zero Return) VCR TV POWER 1 23 456 789 A.SELECT 0 100 EJECT VC-613 PLAY REW FF ENTER STOP SLOW PAUSE/STILL REMAIN/ COUNT DISPLAY COUNTER RESET SP/ SLP I.SELECT REC TIMER TV VOL PROG. TAPE LEnGTH 120 SAP SET on COUnTER MEM on the TV screen. to "ON" using PLAY or STOP, and set to exit. The memory-stop is automatically turned on...
PLAYBACK Memory Stop Feature (Zero Return) VCR TV POWER 1 23 456 789 A.SELECT 0 100 EJECT VC-613 PLAY REW FF ENTER STOP SLOW PAUSE/STILL REMAIN/ COUNT DISPLAY COUNTER RESET SP/ SLP I.SELECT REC TIMER TV VOL PROG. TAPE LEnGTH 120 SAP SET on COUnTER MEM on the TV screen. to "ON" using PLAY or STOP, and set to exit. The memory-stop is automatically turned on...

Owners Manual
Page 24
... video channel (3 or 4) or video input mode on your connection. (See pages 11 - 12.) 4 Press SP/SLP to stop recording. If you see "L1" or "L2" in the VCR display, press I .SELECT 1 Load a cassette with VCR REC L better picture and sound quality. TIMER S Recording starts. Skipping unnecessary scenes while recording Press PAUSE/STILL to select the recording tape speed. Watching a TV program while recording another channel using the SP tape speed. 5 L1: To record via the cable box, make the output channel number...
... video channel (3 or 4) or video input mode on your connection. (See pages 11 - 12.) 4 Press SP/SLP to stop recording. If you see "L1" or "L2" in the VCR display, press I .SELECT 1 Load a cassette with VCR REC L better picture and sound quality. TIMER S Recording starts. Skipping unnecessary scenes while recording Press PAUSE/STILL to select the recording tape speed. Watching a TV program while recording another channel using the SP tape speed. 5 L1: To record via the cable box, make the output channel number...

Owners Manual
Page 25
... channels on the VCR (pages 16 and 17). CANCEL Number buttons PLAY ENTER FF REW STOP 10 2,9 Timer Programming Procedure Example: To record cable channel 25 in the SP tape speed from the connected cable box: Enter the cable channel number by number buttons, PLAY or STOP. on the TV. • Make sure that the clock is August 25. 1 Load a cassette with the safety tab attached. 2 Press PROG. If your cable box is not remote-controllable, choose the desired channel...
... channels on the VCR (pages 16 and 17). CANCEL Number buttons PLAY ENTER FF REW STOP 10 2,9 Timer Programming Procedure Example: To record cable channel 25 in the SP tape speed from the connected cable box: Enter the cable channel number by number buttons, PLAY or STOP. on the TV. • Make sure that the clock is August 25. 1 Load a cassette with the safety tab attached. 2 Press PROG. If your cable box is not remote-controllable, choose the desired channel...

Owners Manual
Page 26
... tape speed, set the recording off and the VCR enters the timer standby mode. Now programming is switched from SP to SLP with the Auto Speed Select feature. 26 length is not sufficient to record the program to the end, the program cannot be recorded to the end. • The picture will be distorted when playing the part where the recording tape speed is completed. 10 Press both TIMER simultaneously. To set the hour...
... tape speed, set the recording off and the VCR enters the timer standby mode. Now programming is switched from SP to SLP with the Auto Speed Select feature. 26 length is not sufficient to record the program to the end, the program cannot be recorded to the end. • The picture will be distorted when playing the part where the recording tape speed is completed. 10 Press both TIMER simultaneously. To set the hour...

Owners Manual
Page 27
... mode . the loaded cassette has no safety tab. -- In these cases, a recording can not be made. Program 1 (Start time) Program 2 (Start time) Overlapped portion (not recorded) To cancel the Timer Recording By pressing the POWER button on by pressing VCR POWER. 2) With steps 2 to 9, change the items. To cancel a program, select the program you want to cancel in the VCR display if you press both TIMER when: -- The line is in the VCR display. timer recording...
... mode . the loaded cassette has no safety tab. -- In these cases, a recording can not be made. Program 1 (Start time) Program 2 (Start time) Overlapped portion (not recorded) To cancel the Timer Recording By pressing the POWER button on by pressing VCR POWER. 2) With steps 2 to 9, change the items. To cancel a program, select the program you want to cancel in the VCR display if you press both TIMER when: -- The line is in the VCR display. timer recording...

Owners Manual
Page 29
... remote control can be operated at your TV is operated correctly. CANCEL 1 POWER CH/TRK 100 Number buttons ENTER DISPLAY I .SELECT REC TIMER TV VOL PROG. CH/TRK To select TV channels in the upper or lower direction. ENTER To use each of your TV's brand code (listed on or off TV's screen display. The TOSHIBA code has initially been set the brand code again. 29 VCR TV POWER 1 23 456 789 A.SELECT 0 100 EJECT...
... remote control can be operated at your TV is operated correctly. CANCEL 1 POWER CH/TRK 100 Number buttons ENTER DISPLAY I .SELECT REC TIMER TV VOL PROG. CH/TRK To select TV channels in the upper or lower direction. ENTER To use each of your TV's brand code (listed on or off TV's screen display. The TOSHIBA code has initially been set the brand code again. 29 VCR TV POWER 1 23 456 789 A.SELECT 0 100 EJECT...
Owners Manual
Page 31
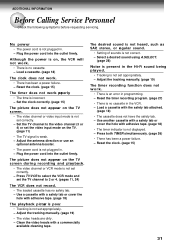
... video channel (3 or 4) or set correctly. - Set the clock correctly. (page 15) The picture does not appear on the TV screen during recording and playback. • The video channel or VCR mode is no cassette. - Adjust the tracking manually. (page 19) • The video heads are dirty. - Reset the timer recording program. (page 27) • There is not set the video input mode on , the VCR will not work . • There is no cassette in the VCR. - ADDITIONAL INFORMATION Before Calling Service...
... video channel (3 or 4) or set correctly. - Set the clock correctly. (page 15) The picture does not appear on the TV screen during recording and playback. • The video channel or VCR mode is no cassette. - Adjust the tracking manually. (page 19) • The video heads are dirty. - Reset the timer recording program. (page 27) • There is not set the video input mode on , the VCR will not work . • There is no cassette in the VCR. - ADDITIONAL INFORMATION Before Calling Service...
Owners Manual
Page 34
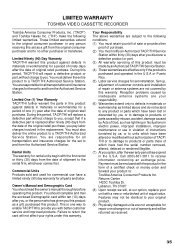
... set installation. Reception problems caused by inadequate antenna systems are your product to a TACP/THI Authorized Service Station. LIMITED WARRANTY TOSHIBA VIDEO CASSETTE RECORDER Toshiba America Consumer Products, Inc. ("TACP") and Toshiba Hawaii Inc. ("THI") make the following conditions: (1) You must retain your original product. (9) Physically damaged units are not acceptable for repair or exchange in the U.S.A or Puerto Rico. (5) Labor service charges for all parts...
... set installation. Reception problems caused by inadequate antenna systems are your product to a TACP/THI Authorized Service Station. LIMITED WARRANTY TOSHIBA VIDEO CASSETTE RECORDER Toshiba America Consumer Products, Inc. ("TACP") and Toshiba Hawaii Inc. ("THI") make the following conditions: (1) You must retain your original product. (9) Physically damaged units are not acceptable for repair or exchange in the U.S.A or Puerto Rico. (5) Labor service charges for all parts...
